Free 186 More Best Homemade Tools eBook:  
Get 2,000+ tool plans, full site access, and more.

User Tag List

Page 1 of 2 1 2 LastLast
Results 1 to 10 of 18

Thread: Harbor Freight sandblast cabinet stand and modifications

  1. #1
    Supporting Member sossol's Avatar
    Join Date
    Oct 2012
    Location
    Lafayette, Indiana
    Posts
    511
    Thanks
    846
    Thanked 407 Times in 209 Posts

    sossol's Tools

    Harbor Freight sandblast cabinet stand and modifications

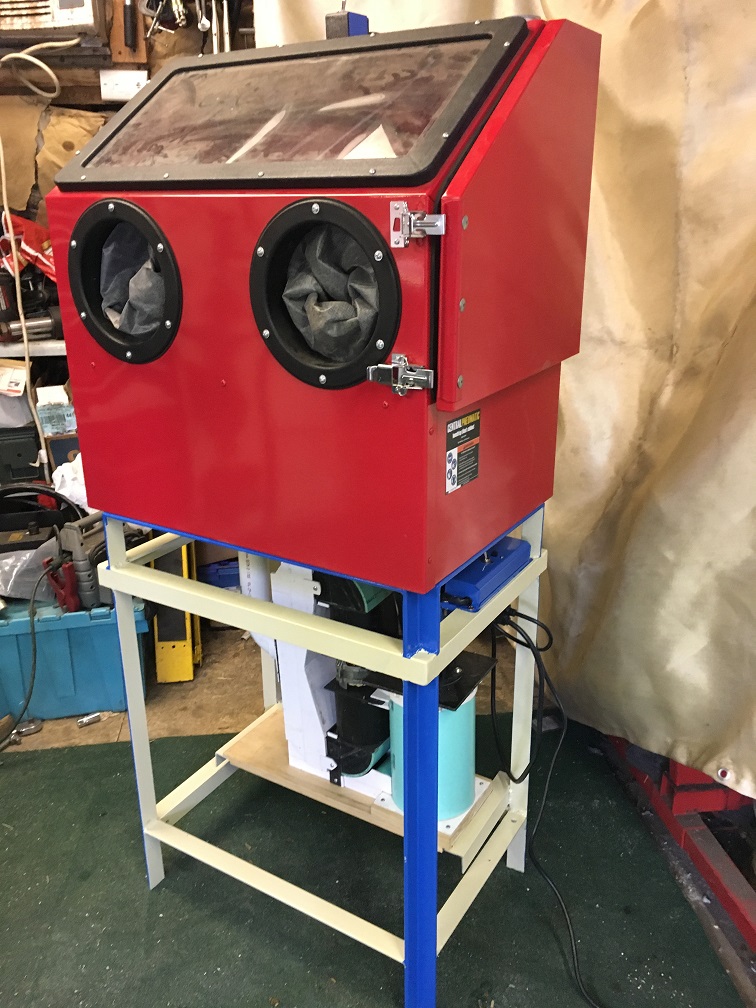
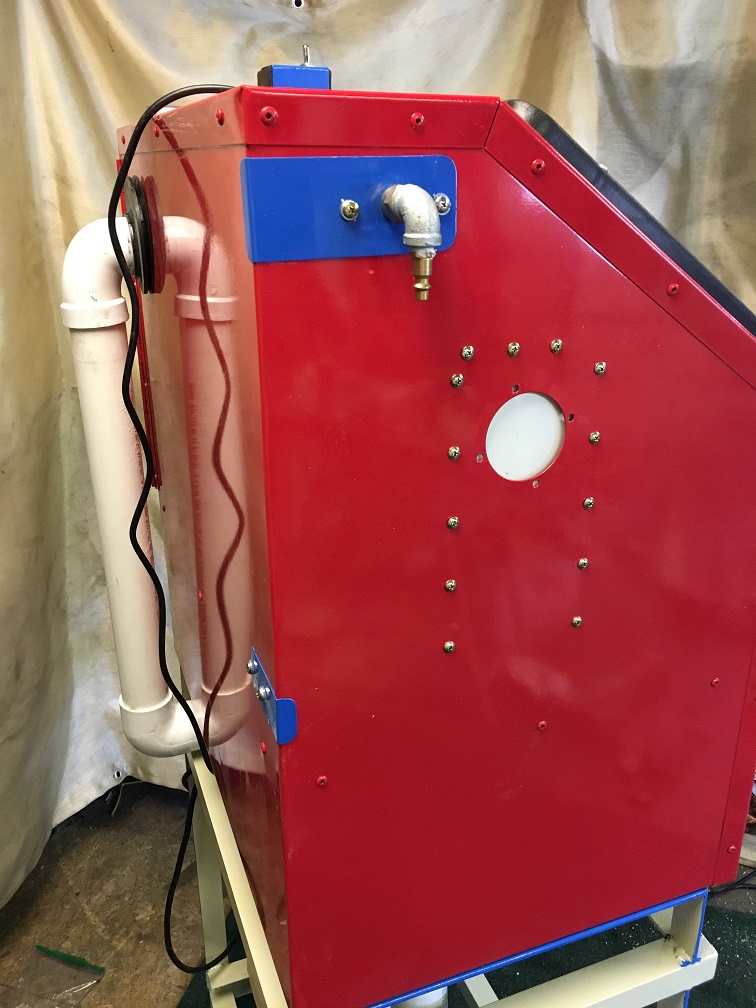
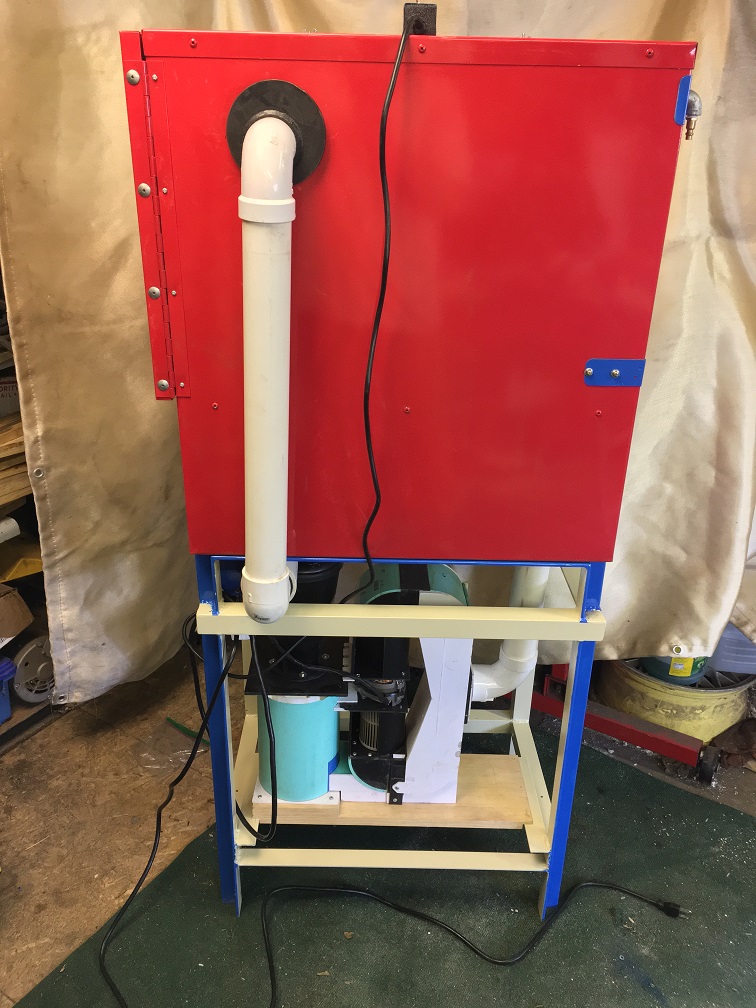
    Prologue: Glamour shots

    Harbor Freight sandblast cabinet stand and modifications-img_3407sm.jpg Harbor Freight sandblast cabinet stand and modifications-img_3410sm.jpg Harbor Freight sandblast cabinet stand and modifications-img_3420sm.jpg


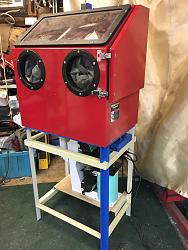
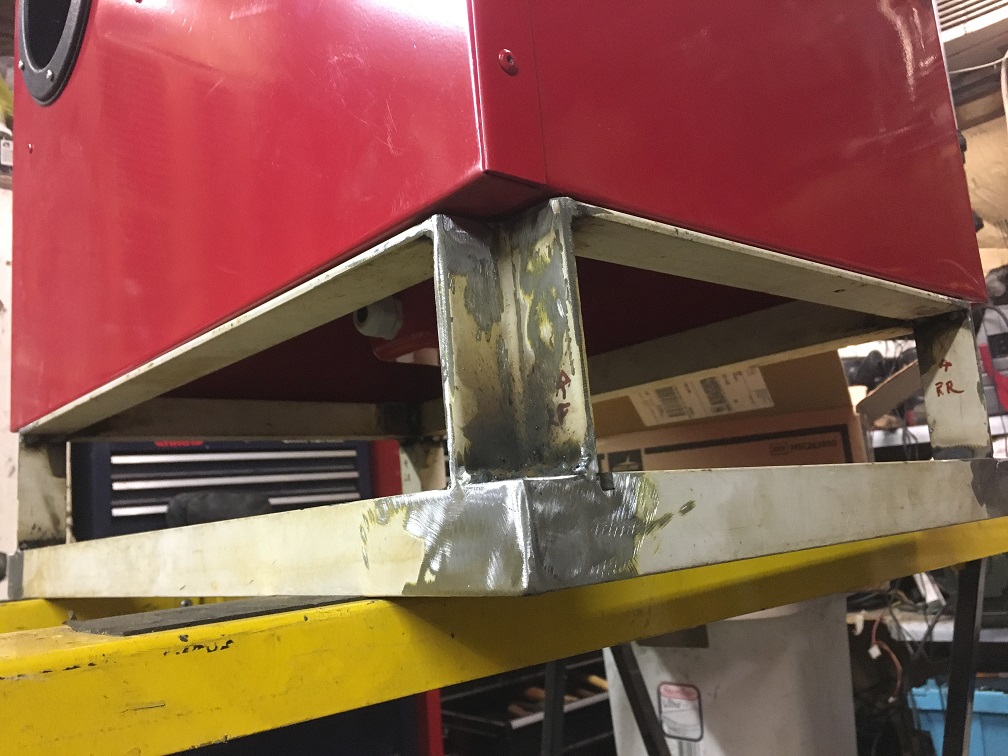
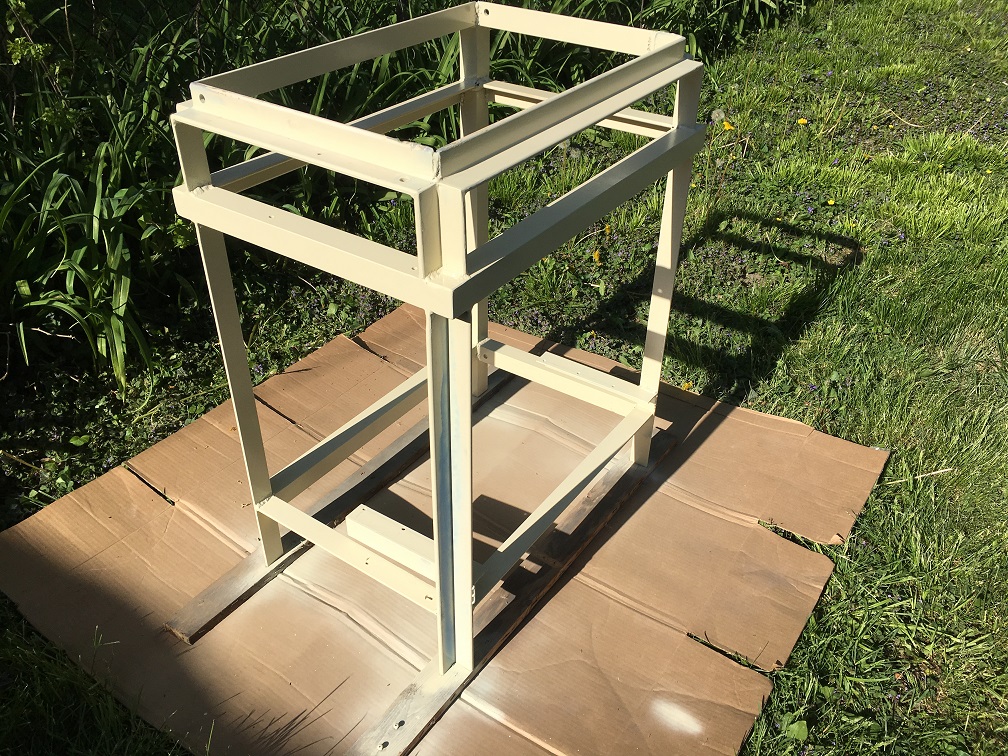
    Fit the first: the stand.

    Though it looks planned, the real reason I built it in this 2-box style is that I'd bought 70 L-shaped things (no idea what they are) at Purdue Surplus that were made from 1 1/2" x 1/4" L-channel with one 27" leg and one 15" leg. I wanted this stand to be 32" high, so I had to stack them. It would have been much easier to just weld two bits together to make one 32" tall leg, but that's not how I roll. It turned out to look better this way, and it provided more mass in a compact space (it weighs 65 lb). I decided to not add wheels or feet. I'll fabricobble some socketed bolt-on feet later.

    Harbor Freight sandblast cabinet stand and modifications-img_1930sm.jpg Harbor Freight sandblast cabinet stand and modifications-img_3371sm.jpg

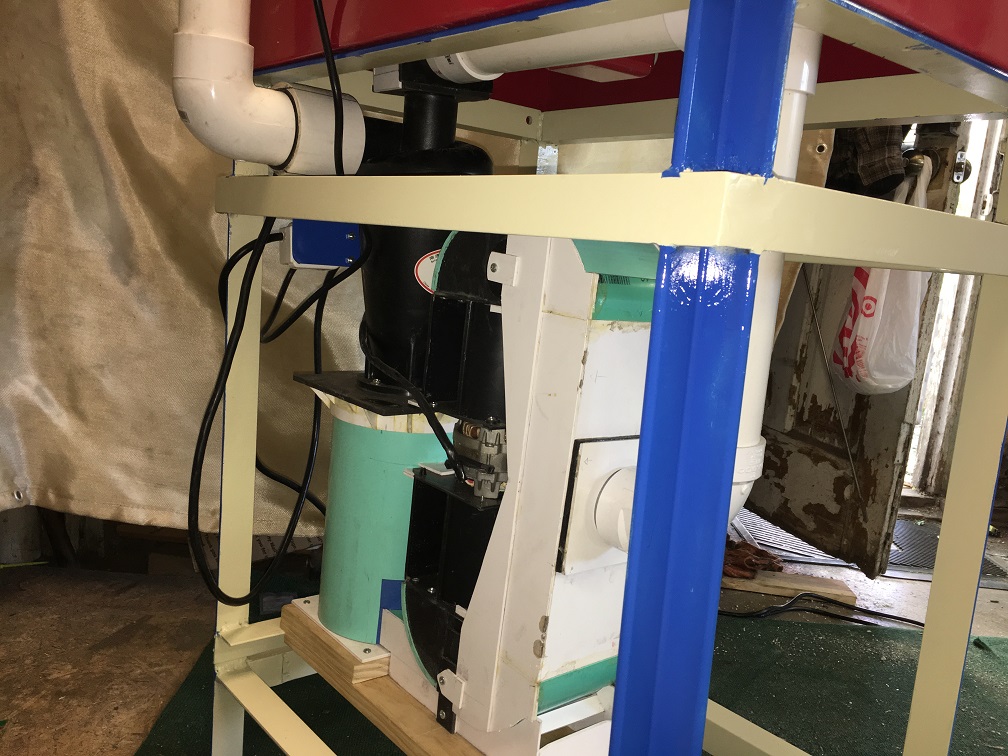
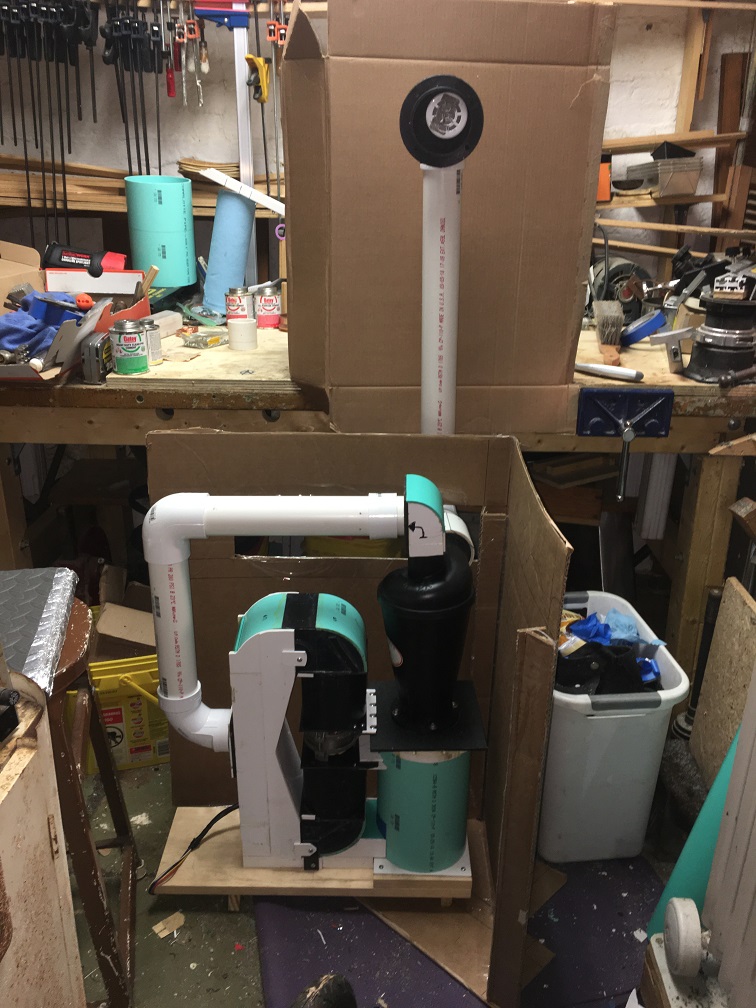
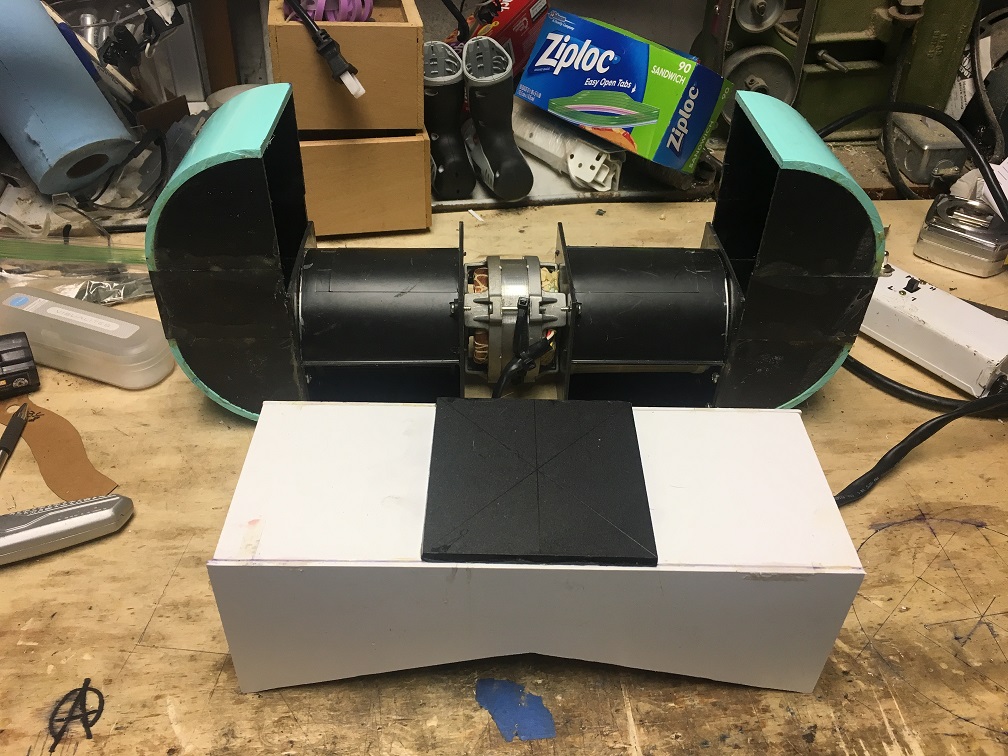
    Fit the second: the exhaust fan.

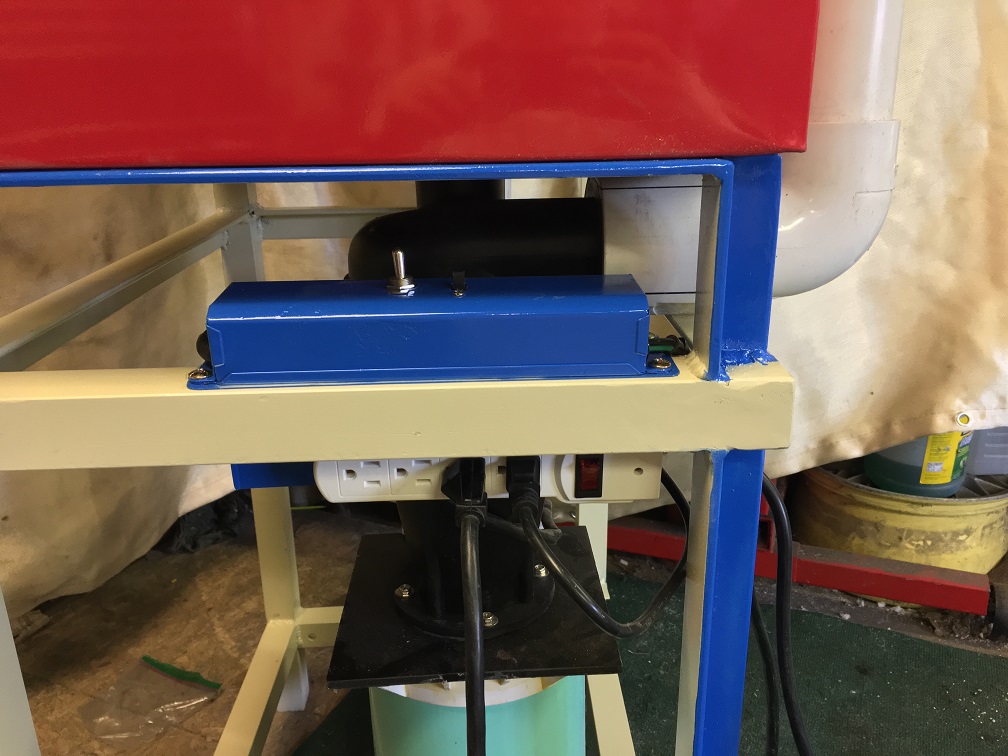
    I took advantage of the dead space under the cabinet for the air tube from the cyclone to the fan intake plenum.

    Harbor Freight sandblast cabinet stand and modifications-img_3417sm.jpg Harbor Freight sandblast cabinet stand and modifications-img_3423sm.jpg Harbor Freight sandblast cabinet stand and modifications-img_3430sm.jpg

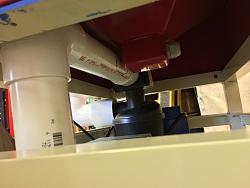
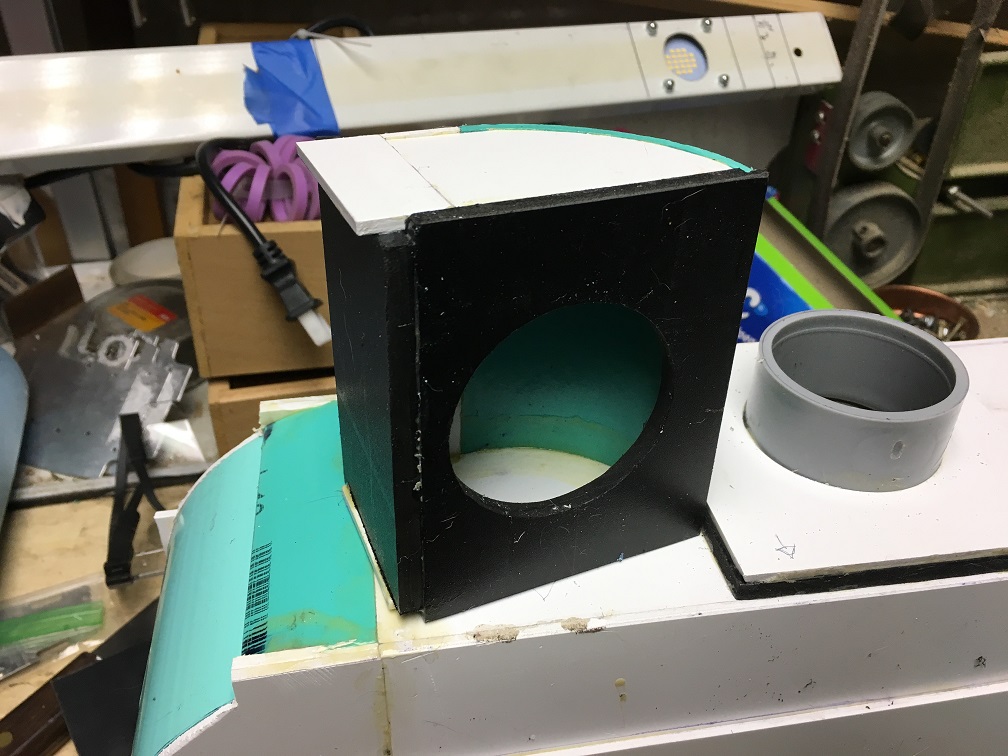
    This whole thing was built around the black stovetop hood fan. Other than the fan and the Chinesium cyclone, it's entirely made from PVC (arbitrary rule). It's 1/4" and 1/8" Celtec board and PVC piping. Looks were not a concern with this part of the project. I just cut, carved and bent stuff as I went along.

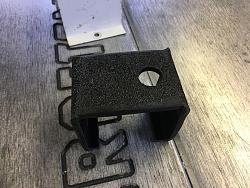
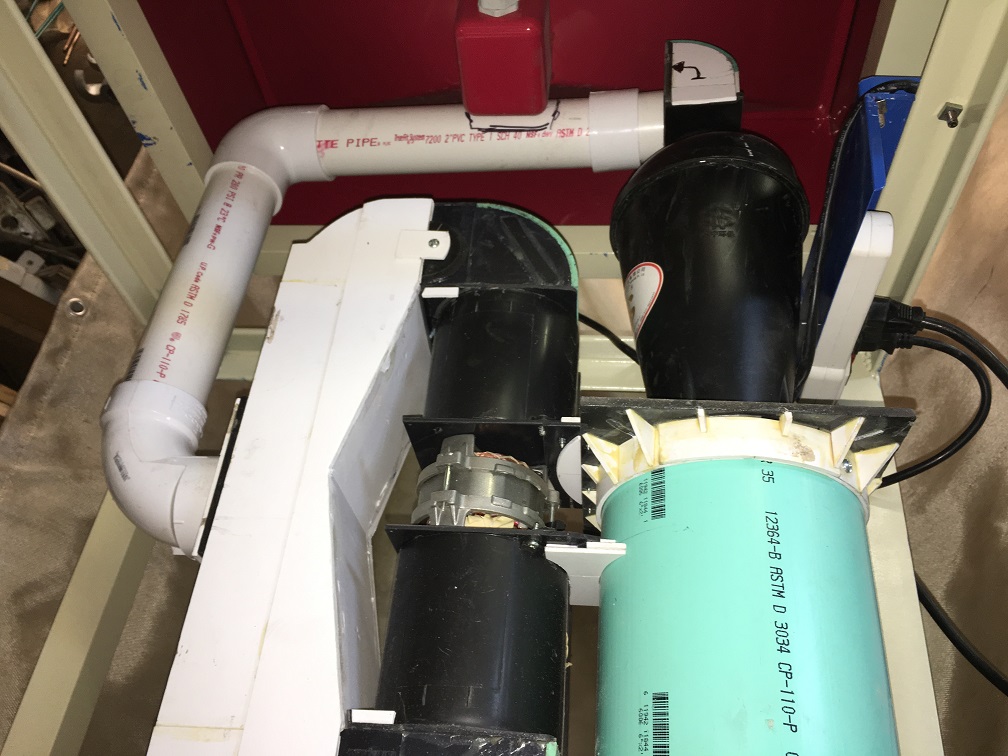
    This was a botched part that I repurposed as an elbow.
    Harbor Freight sandblast cabinet stand and modifications-img_2490sm.jpg
    This is the vortex mount / catch bin lid. It is removable and makes a nice seal.
    Harbor Freight sandblast cabinet stand and modifications-img_2528sm.jpg
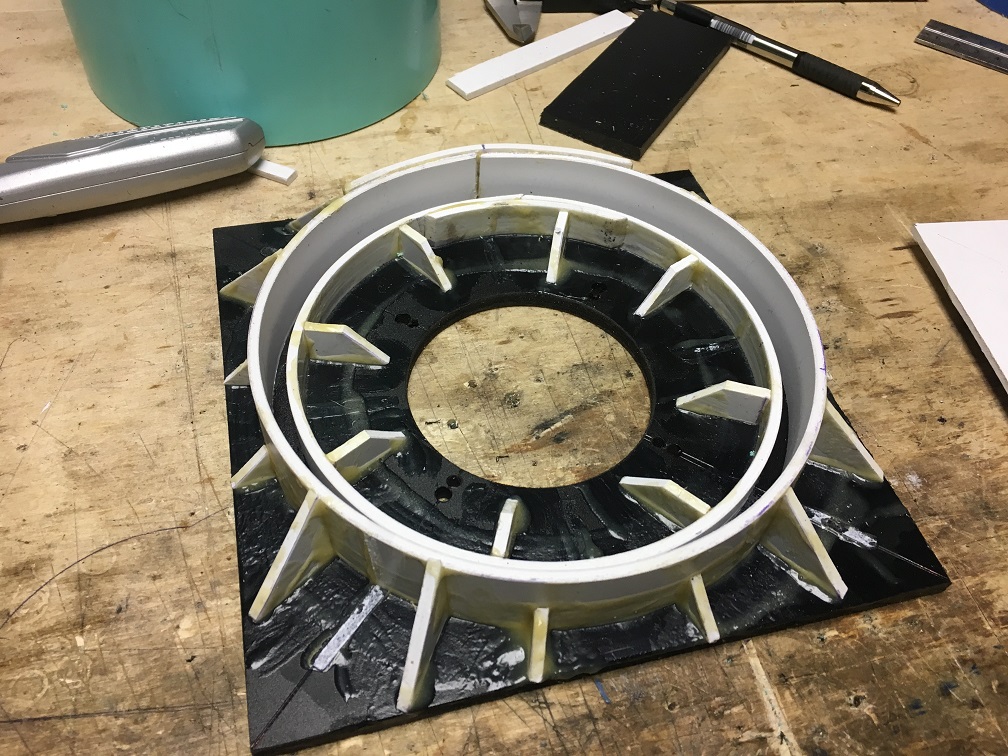
    I wasn't sure how long the pipe should be, so I made this is a rotating adaptor the original air intake port on the back of the cabinet. The part in the center rotates. The rest are glued together.
    Harbor Freight sandblast cabinet stand and modifications-img_2556sm.jpg
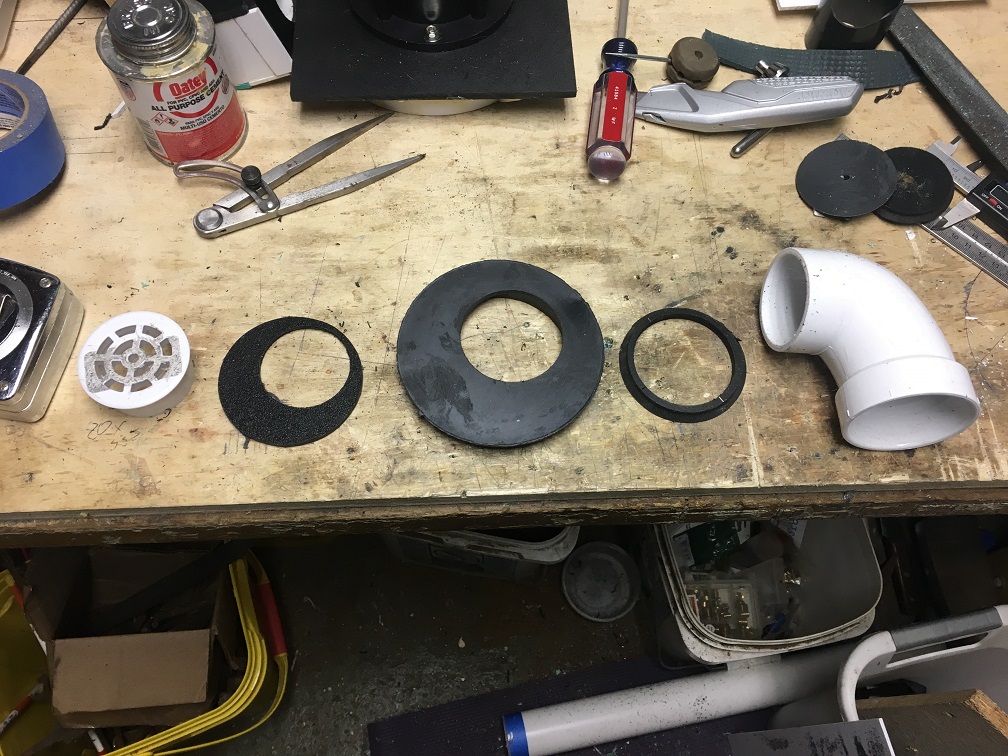
    This is a slip-on adapter to connect the metric vortex to the SAE piping.
    Attachment 23751
    This is the CAD file I used to mock up the fan unit. I mis-measured a bit, and the tall pipe is about 1/2" too short.
    Harbor Freight sandblast cabinet stand and modifications-img_2818sm.jpg

    Fit the third: the lights.
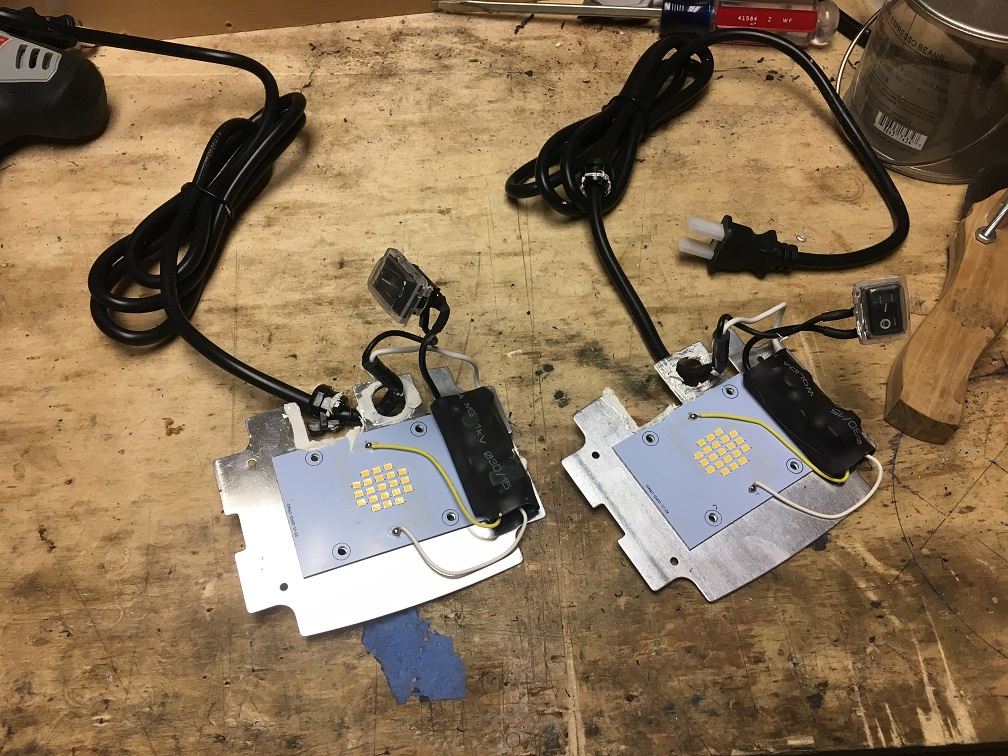
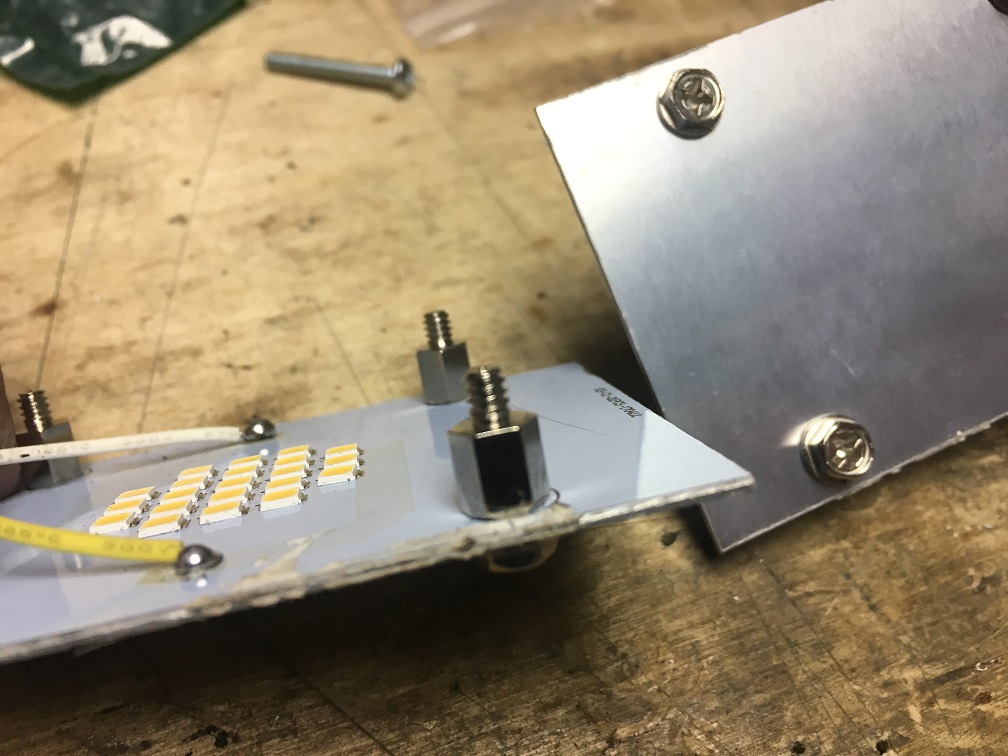
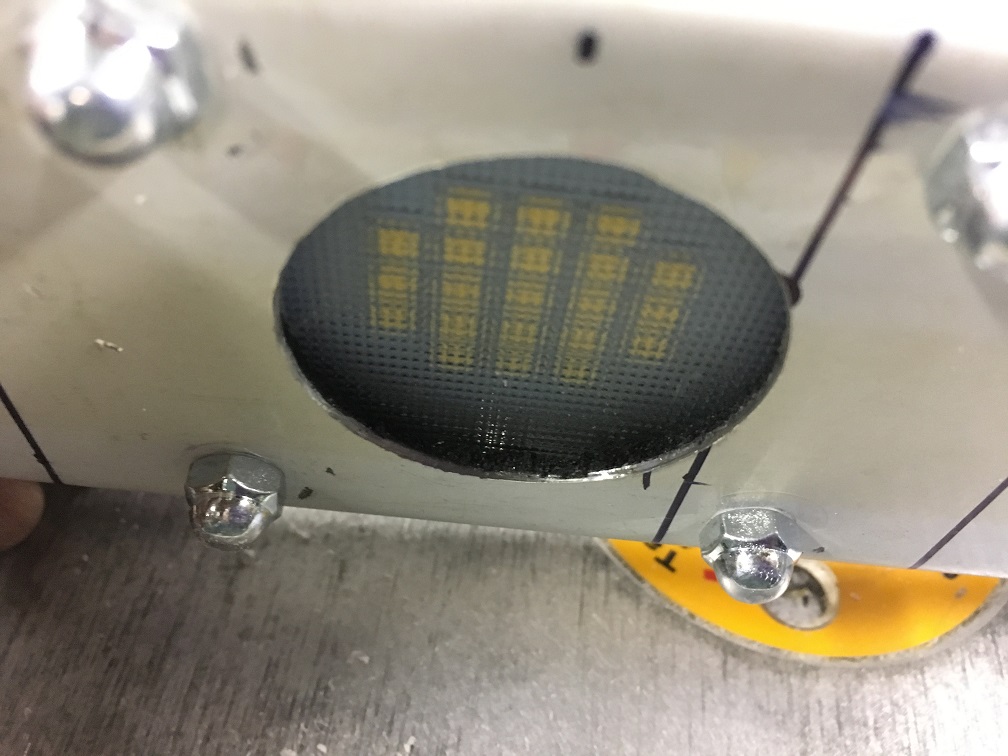
    I gutted two mini LED work lights from Rural King, and they happened to fit the filler panel that was between the freezer and fridge doors on our old fridge. The same one that donated its doors and shelves to my lathe table. They're printed onto aluminum sheet, so don't need a backer and computer standoffs were perfect. The glass is an oven light lens. It diffuses the light and will survive whatever heat the LEDs put off. They're cushioned on both sides by neoprene foam.
    Harbor Freight sandblast cabinet stand and modifications-img_2317sm.jpg Harbor Freight sandblast cabinet stand and modifications-img_2399sm.jpg Harbor Freight sandblast cabinet stand and modifications-img_3159sm.jpg

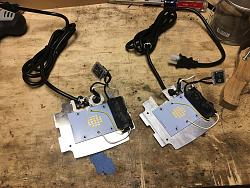
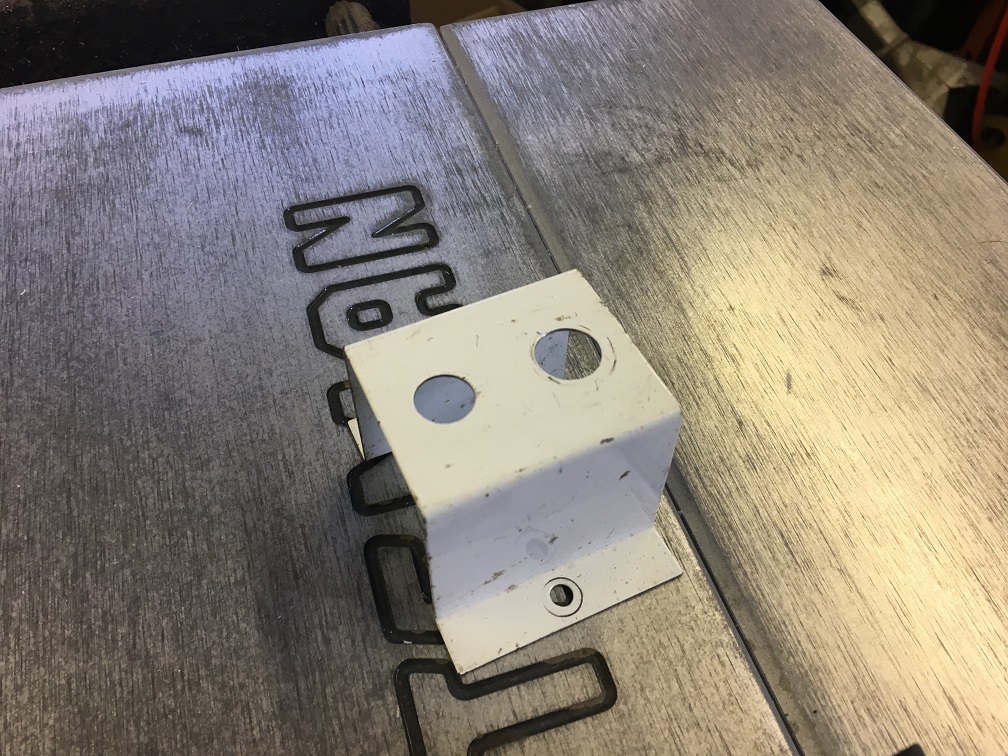
    The light switch box was salvaged from the same fluorescent light that donated the ballast box (now the wiring/switch box for the fan). The plastic is a scrap of ABS that I heat-bent to fit. This part tuned out quite nice.
    Harbor Freight sandblast cabinet stand and modifications-img_3150sm.jpg Harbor Freight sandblast cabinet stand and modifications-img_3151sm.jpg Harbor Freight sandblast cabinet stand and modifications-img_3418sm.jpg

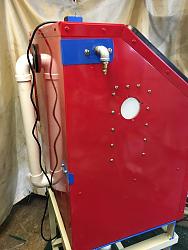
    Fit the fourth: the cabinet mods.
    Some of these can be seen in the glamour shots.
    I relocated the blast air inlet to the top of the left side panel, added a swivel joint to both ends of that air hose, which I made from a heavy-duty air hose.
    I made a cover/guide for the air inlet (formerly exhaust port) from the back panel of a drier cabinet. The number of bolts may be excessive, but it allowed for even clamping without distorting that panel (it's spaced away from the wall with neoprene foam).
    I replaced all of the craptastic sheet metal screws with bolts & nuts or steel rivets.

    I replaced the short power cord of a small power strip with an 8' power tool cord, and bolted the strip to a panel under the light switch. The lights and fan plug into this. It could double as a big, bulky extension cord.
    Harbor Freight sandblast cabinet stand and modifications-img_3424sm.jpg

    I painted this when I painted my bandsaw stand, and it's just as much a Monet. As usual, the colors are inspired by 80s BMX freestyle bikes. This time, SE racing (almond tan) and Haro (red & blue). I used cadmium plated bolts left over from my Shedipede because they looked right.
    Attached Thumbnails Attached Thumbnails Harbor Freight sandblast cabinet stand and modifications-img_2558sm.jpg  

    186 More Best Homemade Tools eBook
    Last edited by sossol; May 15, 2018 at 09:14 PM.

  2. The Following 16 Users Say Thank You to sossol For This Useful Post:

    brianp (Oct 12, 2020), clydeman (Oct 7, 2020), emu roo (Oct 7, 2020), Gregraper33712 (May 18, 2018), jlrice54 (May 17, 2018), Jon (May 18, 2018), nimedic (Sep 22, 2018), Paul Jones (May 16, 2018), PJs (May 17, 2018), rlm98253 (Sep 21, 2018), rossbotics (May 18, 2018), Seedtick (May 17, 2018), Texf1 (Jan 4, 2019), Tonyg (Jan 4, 2019), Toolmaker51 (Sep 21, 2018), WinDancerKnives (May 17, 2018)

  3. #2
    Supporting Member Paul Jones's Avatar
    Join Date
    May 2014
    Location
    Del Mar, California
    Posts
    1,231
    Thanks
    5,810
    Thanked 1,441 Times in 655 Posts

    Paul Jones's Tools
    sossol,

    Great pictures, details and modification explanations. I like this posting.

    Regards,

    Paul Jones

    2000 Tool Plans

  4. The Following User Says Thank You to Paul Jones For This Useful Post:

    PJs (May 17, 2018)

  5. #3
    Supporting Member sossol's Avatar
    Join Date
    Oct 2012
    Location
    Lafayette, Indiana
    Posts
    511
    Thanks
    846
    Thanked 407 Times in 209 Posts

    sossol's Tools
    Thanks! I have a lot more photos, but there's apparently a limit to the number per post, so I had to select the most descriptive ones.

  6. The Following 2 Users Say Thank You to sossol For This Useful Post:

    Paul Jones (May 17, 2018), PJs (May 17, 2018)

  7. #4
    Content Editor
    Supporting Member
    DIYer's Avatar
    Join Date
    Aug 2013
    Posts
    3,056
    Thanks
    772
    Thanked 1,852 Times in 1,653 Posts


    Thanks sossol! We've added your Sandblast Cabinet Stand to our Dollies and Stands category,
    as well as to your builder page: sossol's Homemade Tools. Your receipt:


  8. #5
    Content Editor
    Supporting Member
    DIYer's Avatar
    Join Date
    Aug 2013
    Posts
    3,056
    Thanks
    772
    Thanked 1,852 Times in 1,653 Posts


    Thanks sossol! We've added your Sandblaster Exhaust System to our Cleaning category,
    as well as to your builder page: sossol's Homemade Tools. Your receipt:


  9. #6
    Content Editor
    Supporting Member
    DIYer's Avatar
    Join Date
    Aug 2013
    Posts
    3,056
    Thanks
    772
    Thanked 1,852 Times in 1,653 Posts


    Thanks sossol! We've added your Sandblaster Lighting to our Lighting category,
    as well as to your builder page: sossol's Homemade Tools. Your receipt:


  10. #7
    WinDancerKnives's Avatar
    Join Date
    Jul 2016
    Posts
    16
    Thanks
    34
    Thanked 5 Times in 4 Posts
    Reused, Re-purposed, on hand, modified- my kind of build. And,oh yeah, it works! Great job!
    Dave

  11. The Following 2 Users Say Thank You to WinDancerKnives For This Useful Post:

    Paul Jones (May 21, 2018), PJs (May 17, 2018)

  12. #8
    PJs
    PJs is offline
    Supporting Member PJs's Avatar
    Join Date
    Sep 2014
    Location
    Northern CA
    Posts
    1,841
    Thanks
    8,337
    Thanked 1,118 Times in 718 Posts

    PJs's Tools
    Great pics and write up Sossol! Compact and proper height with lights and power onboard. Interesting frame design using the verticals reversed from normal, seems like it might be stronger that way. I am curious about the plumbing schematic and what that white vertical plenum thing is next to the motor assembly? It seems like it is re-circulatory and curious if you have and starving or stalling issue yet. Might want to use 2 45° elbows if it does for smoother air flow.

    Great build, cheap and cheerful to boot!

    PJ
    ‘‘Always do right. This will gratify some people and astonish the rest.’’
    Mark Twain

  13. #9
    Supporting Member sossol's Avatar
    Join Date
    Oct 2012
    Location
    Lafayette, Indiana
    Posts
    511
    Thanks
    846
    Thanked 407 Times in 209 Posts

    sossol's Tools
    Quote Originally Posted by PJs View Post
    Great pics and write up Sossol! Compact and proper height with lights and power onboard. Interesting frame design using the verticals reversed from normal, seems like it might be stronger that way. I am curious about the plumbing schematic and what that white vertical plenum thing is next to the motor assembly? It seems like it is re-circulatory and curious if you have and starving or stalling issue yet. Might want to use 2 45° elbows if it does for smoother air flow.

    Great build, cheap and cheerful to boot!

    PJ
    The reversed channels were mostly a visual thing. The material is thick enough that it would be plenty strong in any orientation. My original intent was to replicate Mid-Century Modern style, but in metal. Obviously I diverged from that, but the influence is there.
    er
    Do you mean the thing that resembles the USS Arizona memorial (also intentional)? That is the intake plenum for the fan unit. Here is is out of the fan unit.
    Harbor Freight sandblast cabinet stand and modifications-img_2413sm.jpg.
    The "V" shape is to allow air flow around the motor. In its original mount, it relies on air from the fans to cool it. I fully expect this motor to burn out because of the increased load and lack of forced-air cooling, but I have other fans, and I designed it so that I'd only have to change the piping.
    It looks like a recirc system, but it's not. Air is drawn from the cabinet near the top in the back to the top of the vortex separator; then out of the vortex to the intake plenum, where the airflow splits in two; around to the fan inlets, which are on the ends (the green tubing sections); then out to the room. The dust falls into the green tube under the vortex.
    I ran it yesterday, blasting off some nasty thick & flaky rust off of a C clamp. I figured that it would make as much dust as anything I'll be blasting. The fan worked well and was able to clear the cabinet, though it did cloud up on occasion. I'll space it away from the cabinet a bit.

    I had suspected that my inlet passage was too thin. Before filling the hopper, I tested the airflow with an incense stick. The intake air had a higher velocity than the exhaust air, and there was a vacuum at the edge of the metal. It looked cool, but isn't terribly efficient.
    Attached Thumbnails Attached Thumbnails Harbor Freight sandblast cabinet stand and modifications-img_2822sm.jpg   Harbor Freight sandblast cabinet stand and modifications-img_2823sm.jpg   Harbor Freight sandblast cabinet stand and modifications-img_2773sm.jpg   Harbor Freight sandblast cabinet stand and modifications-img_2820sm.jpg  

  14. The Following 2 Users Say Thank You to sossol For This Useful Post:

    Paul Jones (May 21, 2018), PJs (May 18, 2018)

  15. #10
    Jon
    Jon is online now Jon has agreed the Seller's Terms of Service
    Administrator
    Supporting Member
    Jon's Avatar
    Join Date
    Jan 2012
    Location
    Colorado, USA
    Posts
    25,554
    Thanks
    7,953
    Thanked 38,827 Times in 11,332 Posts
    Congratulations sossol - your Harbor Freight Sandblast Cabinet Modifications are the Homemade Tool of the Week!

    We love a good Harbor Freight mod (more here: Homemade Harbor Freight Tools), and this combination of mods certainly qualifies. I've also just increased the forum photo upload limit per your feedback; you can now upload 100 photos per post.

    Some good picks from this week:

    Benchtop Air Cleaner by jjr2001
    Pneumatic Pocket Hole Jig by Bellevue Woodshop
    Portable Bandsaw Stand by sossol
    Jacobs Taper Chuck Removal Tool by olderdan
    Amplifier Housing by rendoman


    sossol - we've added your tool entry to our All Homemade Tool of the Week winners post. And, you'll now notice the wrench-on-pedestal award in the awards showcase in your postbit, visible beneath your username:


    You'll be receiving a $25 online gift card, in your choice of Amazon, PayPal, or bitcoin. Please PM me your current email address and gift card choice and I'll get it sent over right away.


    Congratulations and well done!

  16. The Following User Says Thank You to Jon For This Useful Post:

    Paul Jones (May 21, 2018)

Thread Information

Users Browsing this Thread

There are currently 1 users browsing this thread. (0 members and 1 guests)

Bookmarks

Posting Permissions

  • You may not post new threads
  • You may not post replies
  • You may not post attachments
  • You may not edit your posts
  •