Free 186 More Best Homemade Tools eBook:  
Get 2,000+ tool plans, full site access, and more.

User Tag List

Page 1 of 2 1 2 LastLast
Results 1 to 10 of 16

Thread: Lathe Tailstock Quick Lock

  1. #1
    Supporting Member Crusty's Avatar
    Join Date
    May 2019
    Location
    Dry Gulch, Tx
    Posts
    749
    Thanks
    220
    Thanked 846 Times in 324 Posts

    Crusty's Tools

    Lathe Tailstock Quick Lock

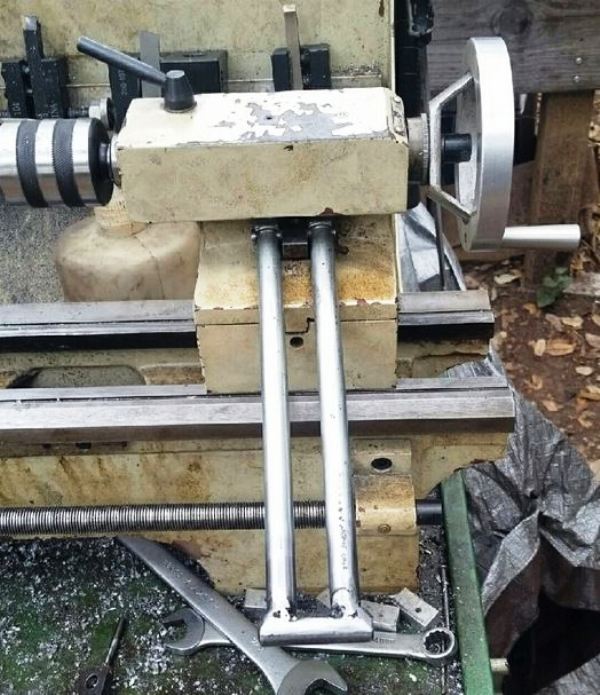
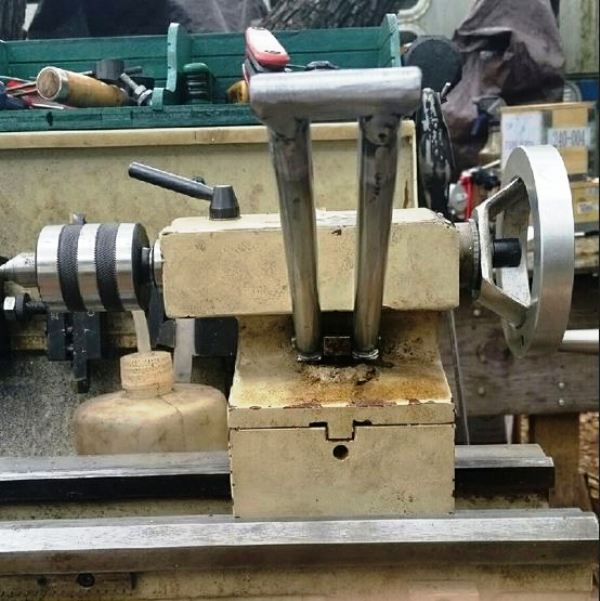
    Since I've been on a jag getting around to things I've been meaning to do I made a quick lock for my lathe's tailstock from 2 12" bolts and a piece of 3/8" scrap from my pile. The bolts had the sides of the heads sawn off flush with the shank so they looked like a T from the side, then cross holes were drilled in each one. Then I cut a small piece of 3/8" plate, turned trunnions on each side which go into the lever holes and finally threaded a hole in the center for the long clamp screw which used to clamp my tailstock down. A bit of rounding on the belt sander of one corner of the remnant bolt heads and a cross bar welded to the bolt ends and Bob's my uncle, and if any wear is experienced I can easily adjust the bolt to tighten the locking force again.

    In the down position the tailstock moves freely.
    Lathe Tailstock Quick Lock-unlocked.jpg

    And in the up position the bolt heads apply force to the tailstock base, tensioning the bolt and clamping the tailstock to the ways. The geometry is such that the bolt heads cam over in the locked position so that the lock stays put until I want to release it.

    Lathe Tailstock Quick Lock-locked.jpg

    I've been on a jag for a couple of days taking care of things I've put off for a while. I balanced and trued my grinder so it doesn't wobble and vibrate anymore, built a wooden box to keep my milling accessories in so they don't rust, worked on my parting tool holder so I can mount the blade upside down and run in reverse for trouble free parting (it works), put new tires and a Starrett blade on my bandsaw, built a lever locking mechanism for my lathe tailstock so I don't have to find the wrench to move it, cleaned the lathe (it was hideous), worked on my TIG foot pedal so that the welder shuts the welding current and HF completely off when I take my foot off of the pedal and finally got some time to practice my TIG welding and I see improvement.

    So far today I made a wooden box to store my rotary table in so that it doesn't rust and that went so well I've made two more general purpose wooden storage boxes for yet undetermined uses, and next I think I'll spend some quality time sharpening drill bits.

    186 More Best Homemade Tools eBook
    If you can't make it precise make it adjustable.

  2. The Following 9 Users Say Thank You to Crusty For This Useful Post:

    57_210 (Mar 5, 2024), baja (Dec 31, 2020), bruce.desertrat (Dec 30, 2020), Doc (Jan 29, 2023), Jon (Dec 30, 2020), olderdan (Jan 1, 2021), racardon (Mar 4, 2024), Ralphxyz (Dec 31, 2020), rebuilder1954 (Dec 31, 2020)

  3. #2
    greenie's Avatar
    Join Date
    Dec 2018
    Posts
    197
    Thanks
    136
    Thanked 113 Times in 64 Posts

    greenie's Tools
    So now you have a rigid arm sticking a couple of feet out from the lathe, wont be long and your hip or leg will love you for it, eh. :-)

    2000 Tool Plans

  4. The Following User Says Thank You to greenie For This Useful Post:

    bigtrev8xl (Dec 31, 2020)

  5. #3
    Supporting Member Crusty's Avatar
    Join Date
    May 2019
    Location
    Dry Gulch, Tx
    Posts
    749
    Thanks
    220
    Thanked 846 Times in 324 Posts

    Crusty's Tools
    I can readily see how that would be a problem for some, but since I always Pay Attention Around Power Tools I don't anticipate any issues. I made it for me and no one else.
    If you can't make it precise make it adjustable.

  6. The Following 3 Users Say Thank You to Crusty For This Useful Post:

    baja (Dec 31, 2020), Ralphxyz (Dec 31, 2020), sask man (Dec 29, 2020)

  7. #4
    Content Editor
    Supporting Member
    DIYer's Avatar
    Join Date
    Aug 2013
    Posts
    3,056
    Thanks
    772
    Thanked 1,852 Times in 1,653 Posts


    Thanks Crusty! We've added your Tailstock Lock to our Lathe Accessories category,
    as well as to your builder page: Crusty's Homemade Tools. Your receipt:


  8. #5
    Supporting Member Ralphxyz's Avatar
    Join Date
    Dec 2016
    Posts
    1,575
    Thanks
    2,487
    Thanked 280 Times in 229 Posts

    Ralphxyz's Tools
    Crusty, thanks for posting. I have started thinking of doing this on my lathe. If you ever take it off could take some pictures of the side view.

    Ralph

  9. #6
    Supporting Member Crusty's Avatar
    Join Date
    May 2019
    Location
    Dry Gulch, Tx
    Posts
    749
    Thanks
    220
    Thanked 846 Times in 324 Posts

    Crusty's Tools
    Imagine a cross shaped piece of 3/8" flat plate with the side arms turned into round trunnions (about.325" dia) and a clamping bolt hole drilled and threaded in the cross a bit aft of the trunnions' centerline.

    The trunnions go into holes cross drilled in the bolts.

    The bolts' hex head sides are trimmed off flush with the shanks, leaving the top and bottom portions of the hex heads.

    The bolt heads have been rounded at the aft bottom corner on a belt sander so that they bear on the tailstock base surface smoothly as the levers operate.

    The bolts' cross drilled holes are placed so that their centers locate the bolt heads forward of the tailstock clamping bolt center but aft of the trunnions' centers, creating a force triangle which wedges the rounded edges of the bolt heads against the tailstock base.

    The rounded portion was profile sanded so that maximum force is reached somewhere in the middle of the lever travel and the bolts heads cam over, locking the levers against the upper tailstock ledge.

    The cross bar welded to the other end of the bolts prevents the bolts from coming off the trunnions.

    I took it off and put it back on enough times that I won't be taking it off again except at gunpoint.
    If you can't make it precise make it adjustable.

  10. The Following 2 Users Say Thank You to Crusty For This Useful Post:

    Doc (Jan 25, 2023), Ralphxyz (Dec 31, 2020)

  11. #7
    Supporting Member Ralphxyz's Avatar
    Join Date
    Dec 2016
    Posts
    1,575
    Thanks
    2,487
    Thanked 280 Times in 229 Posts

    Ralphxyz's Tools
    Thanks, I am starting to see it.

    Ralph

  12. #8
    Supporting Member marksbug's Avatar
    Join Date
    Apr 2016
    Posts
    1,901
    Thanks
    734
    Thanked 372 Times in 298 Posts
    I put a rat**** rench on mine seems to work fine.I also added a spring under the tail stock to push the clamp away so it dont drag. perhaps someday if I ever get around to making rizor blocks for the head & tailstock Ill make a lever for it.in truth I need a bigger better lathe...

  13. #9
    Supporting Member Crusty's Avatar
    Join Date
    May 2019
    Location
    Dry Gulch, Tx
    Posts
    749
    Thanks
    220
    Thanked 846 Times in 324 Posts

    Crusty's Tools
    I've used a combo wrench for a couple of years now but I gotta tell you this is a big improvement. Since I routinely use a center in the tailstock to set my cutting tool height I move the TS in and out a lot and this is much faster for that.

    Sit down with a pencil and paper and make a conceptual sketch to see how it operates and the approximate dimensions. I think in my version the distance between the trunnions center and the clamping bolt center is of the order of around 3/8" and the bolt head cams exert maximum force within that span. The rounding which occurs last is used to fine tune the operation and since you're reducing the apex of the cam it fine tunes the clamping in conjunction with adjustment of the clamp bolt to set the clamping force (just enough to solidly hold the tailstock).

    Since recognition on this site is based on popularity and not content value, hitting that Thanks button is appreciated.
    If you can't make it precise make it adjustable.

  14. The Following 3 Users Say Thank You to Crusty For This Useful Post:

    marksbug (Dec 31, 2020), olderdan (Jan 1, 2021), Ralphxyz (Dec 31, 2020)

  15. #10
    greenie's Avatar
    Join Date
    Dec 2018
    Posts
    197
    Thanks
    136
    Thanked 113 Times in 64 Posts

    greenie's Tools
    Anybody who contemplates this idea will still have to factor in, what value they put on P-A-I-N.

    It is an accident just waiting to happen and your hip or leg, will love you for adding it to your lathe, just make sure your health insurance is fully paid up.

    You ask for the thanks button to be hit, but maybe the moderator should also add a DISLIKE button for silly ideas, think you would get more of the later.
    Last edited by greenie; Dec 31, 2020 at 03:09 PM.

  16. The Following User Says Thank You to greenie For This Useful Post:

    marksbug (Dec 31, 2020)

Thread Information

Users Browsing this Thread

There are currently 1 users browsing this thread. (0 members and 1 guests)

Bookmarks

Posting Permissions

  • You may not post new threads
  • You may not post replies
  • You may not post attachments
  • You may not edit your posts
  •