Free 186 More Best Homemade Tools eBook:  
Get 2,000+ tool plans, full site access, and more.

User Tag List

Results 1 to 9 of 9

Thread: Manually operated shaper

  1. #1
    Mr Mechanical's Avatar
    Join Date
    Aug 2019
    Posts
    18
    Thanks
    9
    Thanked 37 Times in 11 Posts

    Mr Mechanical's Tools

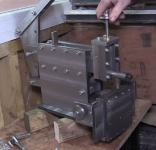
    Manually operated shaper

    Hi Guys

    So this week I started a new project - making a small manually operated shaper.

    The shaper is mostly made from 12mm thick plate so will be pretty robust.

    It will have a 3" stroke and approximately 140mm travel on the cross slide.

    I plan to use this for cutting splines and key ways in small parts.

    Part 1 of the build video can be found here:


    186 More Best Homemade Tools eBook

  2. The Following 6 Users Say Thank You to Mr Mechanical For This Useful Post:

    Jon (Feb 14, 2020), Karl_H (Feb 26, 2020), mwmkravchenko (Feb 17, 2020), rgsparber (Apr 8, 2020), rlm98253 (Feb 17, 2020), Scotsman Hosie (Feb 19, 2020)

  3. #2
    Mr Mechanical's Avatar
    Join Date
    Aug 2019
    Posts
    18
    Thanks
    9
    Thanked 37 Times in 11 Posts

    Mr Mechanical's Tools
    So over the past few weeks I been making more progress on my manual shaper. I've made the ram and the handle / level and there are now some moving parts to play with. Video will be online tonight!


    2000 Tool Plans

  4. The Following 5 Users Say Thank You to Mr Mechanical For This Useful Post:

    Canyonman44 (Mar 19, 2020), Jon (Apr 6, 2020), mwmkravchenko (Mar 2, 2020), Scotsman Hosie (Mar 2, 2020), Scotty12 (Apr 6, 2020)

  5. #3
    Mr Mechanical's Avatar
    Join Date
    Aug 2019
    Posts
    18
    Thanks
    9
    Thanked 37 Times in 11 Posts

    Mr Mechanical's Tools
    Hi Everyone!
    So last night I got my manual shaper finished. Its moving parts work really well. I tried a piece of scrap alloy in it to see how it cuts however I didn't have the shaper bolted down so a lot of the force from the lever was lost in the movement of the shaper (coming off the table) so it deffinately needs bolted down to make it work effectively. Also, I'm waiting for a new bench grinder coming, once I have it I'll be putting a better shape of the cutting tool.

    I have a full set of drawings for making this shaper so if you would like to have ago yourself please get in touch.

    There will not doubt be modifications I choose to make on the shaper..... I'm already thinking about locks for the horizontal and vertical axis.

    Thanks for checking out this thread! Video of the 3rd build video below. Enjoy!


  6. The Following 4 Users Say Thank You to Mr Mechanical For This Useful Post:

    Jon (Apr 6, 2020), mwmkravchenko (Apr 7, 2020), nova_robotics (Apr 6, 2020), rgsparber (Apr 8, 2020)

  7. #4
    Content Editor
    Supporting Member
    DIYer's Avatar
    Join Date
    Aug 2013
    Posts
    3,056
    Thanks
    772
    Thanked 1,852 Times in 1,653 Posts


    Thanks Mr Mechanical! We've added your Shaper to our Metalworking category,
    as well as to your builder page: Mr Mechanical's Homemade Tools. Your receipt:


  8. The Following User Says Thank You to DIYer For This Useful Post:

    Mr Mechanical (Apr 4, 2020)

  9. #5
    Supporting Member threesixesinarow's Avatar
    Join Date
    Mar 2018
    Location
    New England, USA
    Posts
    164
    Thanks
    217
    Thanked 382 Times in 100 Posts

    threesixesinarow's Tools
    Nice, neat job.

    It looks like yours is based on S. S. Miner’s, first published in Popular Mechanics. https://books.google.com/books?id=Zd...20shop&f=false

    Miner’s instructions are pretty loose, plus the way the drawings are presented is confusing and I’m not sure all of them are included in many of the pdfs you can download different places.

    It’s supposed to have a kind of clapper to allow the tool bit to lift clear of the work on the return stroke, but in the demonstration at the end of the third video yours didn’t seem to include it.

    In case it doesn’t, even if the shaper’s mostly going to be for internal stuff I think you’ll get a lot more use from it if you can fit a clapper, especially a more conventional design that allows both the clapper and tool to be positioned at different angles independent of each other and of the the tool slide.

    Here is one home made example: Kay Fisher's Metal Shaper Column 58 Those can be locked, and fitted with different toolposts, or can be removed and replaced with solid blocks, like the one shown toward the bottom on this page: https://gtwr.de/stoss-hobelmeissel/ - he also had pictures of a home made backwards-acting clapper for cutting in reverse, but I can’t find it now.

  10. The Following User Says Thank You to threesixesinarow For This Useful Post:

    Mr Mechanical (Apr 4, 2020)

  11. #6
    Mr Mechanical's Avatar
    Join Date
    Aug 2019
    Posts
    18
    Thanks
    9
    Thanked 37 Times in 11 Posts

    Mr Mechanical's Tools
    Yea, that's where I got the design from. But as you say the drawings weren't clear, hence I produced my own.

    I will have a think about how I could add a clapper.

  12. #7
    Supporting Member
    Join Date
    Sep 2018
    Posts
    2,152
    Thanks
    10,139
    Thanked 1,144 Times in 617 Posts

    nova_robotics's Tools
    Holy moly. A manual shaper. You must have better hand action than 13 year old me with a Sears catalog.

  13. The Following User Says Thank You to nova_robotics For This Useful Post:

    Mr Mechanical (Apr 7, 2020)

  14. #8
    Mr Mechanical's Avatar
    Join Date
    Aug 2019
    Posts
    18
    Thanks
    9
    Thanked 37 Times in 11 Posts

    Mr Mechanical's Tools
    It actually doesn't take as much effort to operate as you would imagine.

  15. #9
    Mr Mechanical's Avatar
    Join Date
    Aug 2019
    Posts
    18
    Thanks
    9
    Thanked 37 Times in 11 Posts

    Mr Mechanical's Tools
    So yesterday day I did a little more work to the manual shaper to reduce some of the play in the cross slide.

    I removed the guide spacers and measured them against the cross slide rail. The rail measure 10.9mm while the guide spacers measured 11.9mm. So my movement was coming from the 1mm of clearance between the two parts.

    I decided to machine 0.75mm off the guide spacers to create a 0.25mm clearance between the cross slide rail and the saddle / guides.

    This made a massive improvement without completely locking up the saddle. Let me know what clearance you would have made?


    186 More Best Homemade Tools eBook

  16. The Following User Says Thank You to Mr Mechanical For This Useful Post:

    Macca Boy (Apr 28, 2020)

Thread Information

Users Browsing this Thread

There are currently 1 users browsing this thread. (0 members and 1 guests)

Bookmarks

Posting Permissions

  • You may not post new threads
  • You may not post replies
  • You may not post attachments
  • You may not edit your posts
  •