Free 186 More Best Homemade Tools eBook:  
Get tool plans

User Tag List

Results 1 to 4 of 4

Thread: Modification of a tap wrench

  1. #1
    Supporting Member Karl_H's Avatar
    Join Date
    Sep 2013
    Posts
    891
    Thanks
    658
    Thanked 470 Times in 258 Posts

    Karl_H's Tools

    Modification of a tap wrench

    My usual method of using a tap on the lathe was to chuck the tap in the drill chuck, then turn the lathe by hand until the tap started to turn in the chuck. This would get the tap started straight and deep enough that I could then use a traditional tap wrench. However, I only have a couple inches of swing, so it was hard to use the traditional tap wrench.

    I already have a tailstock die holder that has worked really well, so I found a way to adapt that to tapping.

    One of the Big Box places had a tap wrench that had 1 inch across the flats for a hex wrench, a hole for a 1/2 inch socket, and a hole for a 1/4 inch tommy bar.

    I turned down the 1" hex to a 1" circle so I could mount the wrench in my tailstock die holder. If needed, I can still use the 1/2 in socket wrench or the tommy bar. The 1" wrench seems like an invitation to break a tap any way.

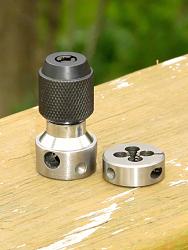
    Before I turned down the hex, I used the hex to index dimples at the proper level so my tailstock die holder could keep the wrench from turning.
    I used a 1/2 copper coupling, split length wise, as a perfect fit for soft jaws to grab the threads on the tap wrench so I didn't mar them while doing the interrupted cuts on the hex.

    The first photo shows the dimples made while the end was still a 1" hex - you can also see the original hole for a tommy bar.
    Modification of a tap wrench-divots-properly-placed.jpeg


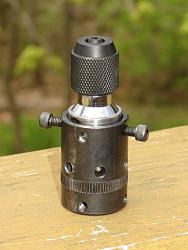
    The second photo shows the tap wrench mounted in the tailstock die holder, ready to go.
    Modification of a tap wrench-assembled.jpeg

    This wrench works for #4 through 1/4 taps. They offer another for 1/4 - 1/2 taps, but I don't know if it still has a 1" hex or something larger.

    186 More Best Homemade Tools eBook

  2. The Following 12 Users Say Thank You to Karl_H For This Useful Post:

    baja (Apr 29, 2020), bruce.desertrat (Apr 28, 2020), emu roo (Dec 23, 2022), FEM2008 (May 3, 2020), JoeH (Apr 29, 2020), Jon (Apr 30, 2020), nova_robotics (Dec 23, 2022), Paul Jones (Apr 29, 2020), rlm98253 (Apr 28, 2020), Sleykin (Jan 1, 2023), sossol (Apr 28, 2020), Toolmaker51 (Dec 23, 2022)

  3. #2
    JoeH's Avatar
    Join Date
    Mar 2018
    Posts
    57
    Thanks
    37
    Thanked 25 Times in 21 Posts
    Great idea! Many thanks.

    2,000+ Tool Plans

  4. The Following User Says Thank You to JoeH For This Useful Post:

    Karl_H (Apr 29, 2020)

  5. #3
    Supporting Member Paul Jones's Avatar
    Join Date
    May 2014
    Location
    Del Mar, California
    Posts
    1,231
    Thanks
    5,810
    Thanked 1,453 Times in 655 Posts

    Paul Jones's Tools
    A photo of tap wrench in accrual use would help with your final explanation. Thank you

  6. #4
    Supporting Member Karl_H's Avatar
    Join Date
    Sep 2013
    Posts
    891
    Thanks
    658
    Thanked 470 Times in 258 Posts

    Karl_H's Tools
    Quote Originally Posted by Paul Jones View Post
    A photo of tap wrench in actual use would help with your final explanation. Thank you
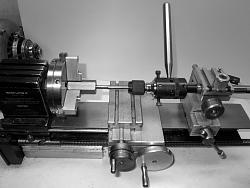
    Not really "actual use" since the threads were cut last week, but this is the set up.
    I use the tommy bar in the tailstock die holder and either my hand on the chuck or my spindle wrench to turn the part.
    Hope this helps.

    Modification of a tap wrench-use.jpeg


    2,000+ Tool Plans

Thread Information

Users Browsing this Thread

There are currently 1 users browsing this thread. (0 members and 1 guests)

Bookmarks

Posting Permissions

  • You may not post new threads
  • You may not post replies
  • You may not post attachments
  • You may not edit your posts
  •