Free 186 More Best Homemade Tools eBook:  
Get 2,000+ tool plans, full site access, and more.

User Tag List

Results 1 to 10 of 10

Thread: New Stand for the H/V saw

  1. #1
    Supporting Member astroracer's Avatar
    Join Date
    May 2012
    Location
    Byron, Michigan
    Posts
    310
    Thanks
    20
    Thanked 558 Times in 173 Posts

    astroracer's Tools

    New Stand for the H/V saw

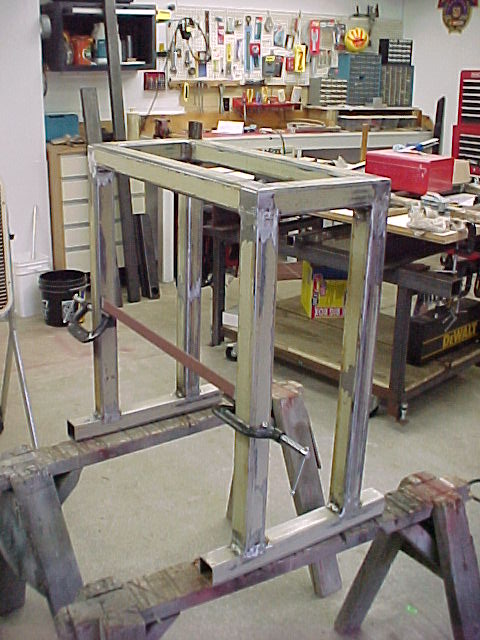
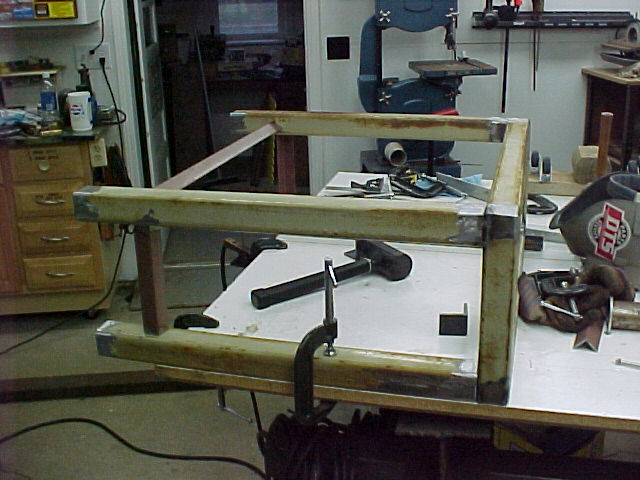
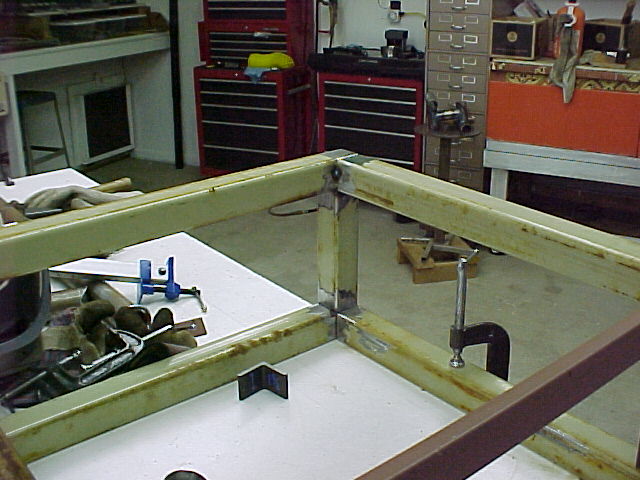
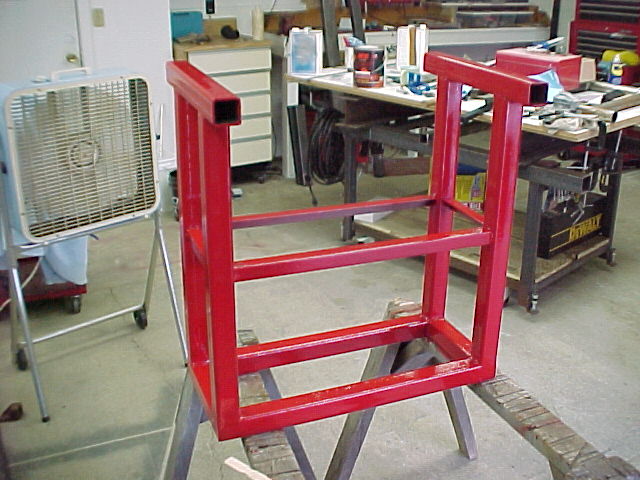
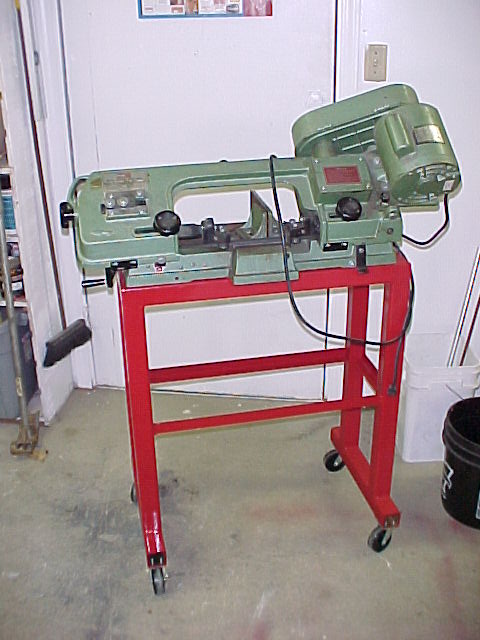
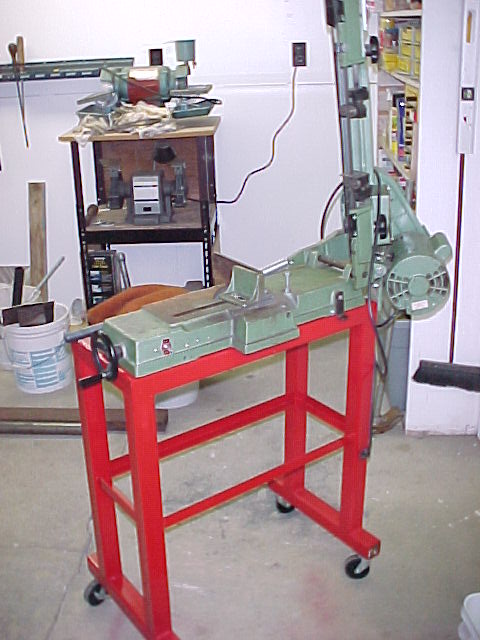
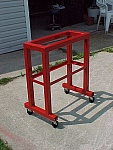
    I finally decided to improve the working height of my H/V Bandsaw. At 24" it was a pain in the back to work with it. It had always been a problem with long stock to keep it level with the cutting surface. After this mod I will be able to use one of my roller work stands. Much better...
    I had picked up 30 sticks of used 2 x 2 x 1/8th wall x 100"lg. sq. tubing so I made the new table out of a stick and a half of that. I know it's a little overkill for something like this but, at 7 bucks a stick, I can justify the 10 dollar material cost.


    Attached Thumbnails Attached Thumbnails New Stand for the H/V saw-27jl06const2-vi.jpg  

    186 More Best Homemade Tools eBook

  2. #2
    Supporting Member astroracer's Avatar
    Join Date
    May 2012
    Location
    Byron, Michigan
    Posts
    310
    Thanks
    20
    Thanked 558 Times in 173 Posts

    astroracer's Tools
    I used some brush on industrial red enamel I had left over from another project. It was very hot and humid when I painted this and it took a full day for it to tack-off and get solid enough to put on a second coat. Once it was dry though it is VERY tough paint...
    This was after the first coat.

    After the second coat

    Added the casters and let it sit in the sun for a day to bake. The paint got real hard after this.

    2000 Tool Plans

  3. #3
    Supporting Member astroracer's Avatar
    Join Date
    May 2012
    Location
    Byron, Michigan
    Posts
    310
    Thanks
    20
    Thanked 558 Times in 173 Posts

    astroracer's Tools
    I didn't get any pics of the mounting tabs before I bolted the saw down but I made some angle brackets and bolted those to the top to use as mounting lugs for the original sheet metal leg attachment holes on the saw. Worked well, as I set the saw in place and then marked and drilled the thru holes for three 1/4-20 bolts. The saw is nice and stable and rolls around much easier now.

    And let me tell you it is very nice not having to bend over to set up cuts!

    Thanks for looking
    Mark

  4. The Following User Says Thank You to astroracer For This Useful Post:

    Jon (May 22, 2012)

  5. #4
    Jon
    Jon is offline Jon has agreed the Seller's Terms of Service
    Administrator
    Supporting Member
    Jon's Avatar
    Join Date
    Jan 2012
    Location
    Colorado, USA
    Posts
    25,451
    Thanks
    7,928
    Thanked 38,621 Times in 11,284 Posts
    Thanks -- added to our Bandsaws category, and of course your homemade tools page as well. I know this is technically a tool stand, and not a tool per se, but we are indexing stands/carts/dollies as tools.


    As an ergonomic build, this one brought to mind jvander68's ergonomic weedeater cultivator build. Your receipt:


  6. #5

    Join Date
    Mar 2012
    Posts
    1
    Thanks
    0
    Thanked 1 Time in 1 Post
    Thanks for posting this build. At almost 70 i'm thinking i need to get my saw up higher also,, too hard on the ole back!! Lol

  7. The Following User Says Thank You to sasquatch For This Useful Post:

    astroracer (Jun 22, 2012)

  8. #6
    Supporting Member astroracer's Avatar
    Join Date
    May 2012
    Location
    Byron, Michigan
    Posts
    310
    Thanks
    20
    Thanked 558 Times in 173 Posts

    astroracer's Tools
    I hear you bud. I have not regretted that one at all!

  9. #7

    Join Date
    Jan 2014
    Posts
    4
    Thanks
    0
    Thanked 1 Time in 1 Post

    vader1701's Tools
    Now I like that stand, got no way to weld it, nice

  10. #8
    Supporting Member astroracer's Avatar
    Join Date
    May 2012
    Location
    Byron, Michigan
    Posts
    310
    Thanks
    20
    Thanked 558 Times in 173 Posts

    astroracer's Tools
    Quote Originally Posted by vader1701 View Post
    Now I like that stand, got no way to weld it, nice
    Thanks! It was exactly 10 yrs ago today I started building that stand! It has worked out very nicely.
    Mark

  11. #9
    Supporting Member mklotz's Avatar
    Join Date
    Aug 2015
    Location
    LA, CA, USA
    Posts
    3,434
    Thanks
    357
    Thanked 6,380 Times in 2,117 Posts

    mklotz's Tools
    Very nicely done, Mark. One addition I might suggest...

    Get a small, square plastic trash can. Drill some keyholes in it and hang it from two bolts just below the saw's vise. It will catch much of the swarf from sawing as well as short pieces when they fall free.

    I have such on my saw and it's a real time-saver plus I don't have to chase small cutoffs around the shop floor.
    ---
    Regards, Marv

    Home Shop Freeware
    https://www.myvirtualnetwork.com/mklotz

  12. The Following User Says Thank You to mklotz For This Useful Post:

    astroracer (Jul 26, 2016)

  13. #10
    Supporting Member astroracer's Avatar
    Join Date
    May 2012
    Location
    Byron, Michigan
    Posts
    310
    Thanks
    20
    Thanked 558 Times in 173 Posts

    astroracer's Tools
    Quote Originally Posted by mklotz View Post
    Very nicely done, Mark. One addition I might suggest...

    Get a small, square plastic trash can. Drill some keyholes in it and hang it from two bolts just below the saw's vise. It will catch much of the swarf from sawing as well as short pieces when they fall free.

    I have such on my saw and it's a real time-saver plus I don't have to chase small cutoffs around the shop floor.
    Great idea Marv! Thanks I will do that! Drill and tap a couple of holes right into the cart tube. Perfect!
    Mark
    Great Idea


    186 More Best Homemade Tools eBook

Thread Information

Users Browsing this Thread

There are currently 1 users browsing this thread. (0 members and 1 guests)

Bookmarks

Posting Permissions

  • You may not post new threads
  • You may not post replies
  • You may not post attachments
  • You may not edit your posts
  •