Free 186 More Best Homemade Tools eBook:  
Get 2,000+ tool plans, full site access, and more.

User Tag List

Results 1 to 9 of 9

Thread: Old Ceramics Kiln Digital Conversion

  1. #1
    House_Work's Avatar
    Join Date
    Sep 2019
    Location
    Naples, FL
    Posts
    34
    Thanks
    0
    Thanked 68 Times in 25 Posts

    House_Work's Tools

    Old Ceramics Kiln Digital Conversion

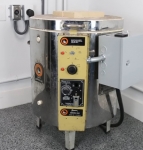
    I am in the process of building out a new workshop and I have always wanted to be able to fire ceramics and heat treat steel. I found an old Kiln on marketplace and bought it for $300. The downside to these old kilns is they basically have 3 settings. High, Medium and Low. Not a lot of adjustments there. Essentially this is just a really powerful oven, so I followed some simple wiring instructions to add a PID controller and a thermocouple. (my father in law owns a company where they make this kind of gear) So I was able to pick his brain a bit on this one. This was a fun project and has proven to be super useful and surprisingly accurate up to 2000 degrees Fahrenheit.

    Hope you enjoy and learn something as I did.


    186 More Best Homemade Tools eBook
    - Brian House
    www.HouseMade.us

  2. The Following 5 Users Say Thank You to House_Work For This Useful Post:

    Jon (Nov 4, 2019), Little Rabbit (Nov 5, 2019), Scotsman Hosie (Nov 6, 2019), Slim-123 (Nov 5, 2019), Toolmaker51 (Nov 9, 2019)

  3. #2
    Content Editor
    Supporting Member
    DIYer's Avatar
    Join Date
    Aug 2013
    Posts
    3,056
    Thanks
    772
    Thanked 1,850 Times in 1,652 Posts


    Thanks House_Work! We've added your Kiln Controller Upgrade to our Electronics category,
    as well as to your builder page: House_Work's Homemade Tools. Your receipt:


    2000 Tool Plans

  4. #3
    Supporting Member jdurand's Avatar
    Join Date
    May 2019
    Location
    Krasnodar Krai, Russian Federation
    Posts
    1,456
    Thanks
    126
    Thanked 742 Times in 416 Posts

    jdurand's Tools
    My kiln came with a proportional control much like (probably the same) as used on an electric cooker. Not as good as your PID controller by any means, you have to mentally guess what to set it to so it heats/cools at the right speed. Much easier just to change the setting.

    I'm figuring after we move I'll put a PID controller on mine but was thinking of making my own so I could load a profile (up to cone__ in XX minutes, hold for YY, then to cone__, etc.). That way I can be off doing other things while it does a full cycle and then shuts down.

    Anyway, future project for me.

  5. #4
    House_Work's Avatar
    Join Date
    Sep 2019
    Location
    Naples, FL
    Posts
    34
    Thanks
    0
    Thanked 68 Times in 25 Posts

    House_Work's Tools
    Yeah I bought a Auber PID controller so I could use the Ramp & Soak feature. Most PIDs don't have that functionality, just temp set, maybe a timer. This one works pretty well after you autotune it. Ive had mine up to 2000 F, takes about 2 hours or so to get there but it works. This PID has a 30 step program, so you can tell it to ramp up, soak, ramp down, and those times are modifiable. The interface stinks, but once you understand it, it isn't too bad.

    PS - I love Jim Henson's work. I've always wanted to make a puppet. Maybe one day I will.
    - Brian House
    www.HouseMade.us

  6. The Following User Says Thank You to House_Work For This Useful Post:

    jdurand (Nov 5, 2019)

  7. #5
    Supporting Member jdurand's Avatar
    Join Date
    May 2019
    Location
    Krasnodar Krai, Russian Federation
    Posts
    1,456
    Thanks
    126
    Thanked 742 Times in 416 Posts

    jdurand's Tools
    I missed that your controller has that already, have to look into it.

  8. #6
    Supporting Member DIYSwede's Avatar
    Join Date
    May 2019
    Location
    Stockholm, Sweden...
    Posts
    634
    Thanks
    415
    Thanked 799 Times in 319 Posts

    DIYSwede's Tools
    -Nice build, good choice of controller and pro looking electrics enclosure!

    Now - what wattage is your kiln cranking out? You're feeding it 240 VAC, right?
    What resistance heating alloy is used for the elements?

    Friendly tips: Check the conductors/ crimps and insulation at the wire terminals after some use, and retighten all these screws.
    You just might find insulation/ heatshrink has expired just a bit from these glowing bolts,
    and perhaps even getting a proper crimping tool would be worthwhile?
    The braided glass fibre tubes you salvaged in the teardown seem to have stood up pretty good thru the years.
    Those could be refitted over the new cables, if their more modern insulation give way...
    Lastly: Bolting the box directly on the kiln might impede the function of the SSRs cooling fins,
    so check that the box's rear side don't get more than lukewarm.

    Ah yes - the just a smallish correction: You hooked the DC feeds to the 2 SSRs in parallell - not serially (as the text said)...

    Just my 2 cents, ATB & Cheers
    Johan

  9. #7
    House_Work's Avatar
    Join Date
    Sep 2019
    Location
    Naples, FL
    Posts
    34
    Thanks
    0
    Thanked 68 Times in 25 Posts

    House_Work's Tools
    Hi Johan, yes all good suggestions. The kiln is rated for 40 amps, not 100% sure what it is actually putting out but I think I have it covered by using 2 40 amp SSR's divided among the coils. I agree on the cooling of the SSR's, and have already had once instance where they were stuck open due to being too warm. I used a laser thermometer to check the temp and they were under 90 degrees F but still stuck open. So I added a 12v computer fan to the box and opened up some vents, it has yet to happen again. I have gotten it up to 2000 degrees and held it there for 30 minutes without an issue. I will periodically check my heat shrinks and connectors to verify their integrity.

    All great suggestions and comments. Much appreciated.

    Brian.
    - Brian House
    www.HouseMade.us

  10. #8
    Supporting Member DIYSwede's Avatar
    Join Date
    May 2019
    Location
    Stockholm, Sweden...
    Posts
    634
    Thanks
    415
    Thanked 799 Times in 319 Posts

    DIYSwede's Tools
    Whoa!
    I cincerely hope the 40A rating was for 120V single phase (2 parallelled coil series) hookup, cranking out some 4,8 kW
    (didn't it take app 2 hrs to heat up to 2 000 F? Guess you'd certainly see if it took 9,6 kW - your house would probably "brown out" a bit).
    If you'd (I assume) hooked these coils in series, and feed them 240 V, they'll still just crank out those 4,8 kilowatts, but only suck 20 amps per phase.
    Did you even hook the two coils' mid points to neutral (kinda missed to see that in your über-fast hookup)?
    You could easily measure the max current of each phase with a cheap clamp ammeter.
    Good thing to mount a fan to the cooling fins...

    I might be mistaken here - but aren't the US 240 VAC actually "only" 2 phases, each at 120 VAC & 180 degrees apart?
    Over here in (most of Europe) we use the 230 VAC between phase and neutral - and the three phases are 120 deg apart,
    achieving 400V AC between two phases, hence the "230/ 400 VAC" system desctriptor.

    Good luck and keep up the good work!
    Cheers
    Johan

  11. #9
    Supporting Member jdurand's Avatar
    Join Date
    May 2019
    Location
    Krasnodar Krai, Russian Federation
    Posts
    1,456
    Thanks
    126
    Thanked 742 Times in 416 Posts

    jdurand's Tools
    The power into a USA house is a split phase. Industrial power works a bit differently.

    Start with 3 phase delta high voltage, say 1200V, 60Hz between poles (the very top wires).

    Put a 5:1 reduction transformer across one phase (any two wires of the 3-phase). The output is center tapped 240V.

    Tie the center tap to a ground stake at the base of the pole.

    From the pole run the bare ground and two insulated legs of that 240V winding.

    At the main fuse panel, tie the ground to a local ground stake and also use it for the white Neutral.

    For 120V circuits, one leg goes through a "smart" circuit breaker that will trip on ground faults, bad wiring, or old appliances (or sometimes because it's Tuesday). That "hot" leg along with a white neutral and bare or green ground is run to a one or more outlets or lights. Many appliances like a 100 Watt refrigerator need their own private outlet with wires back to a circuit breaker that only controls it.

    For 240V appliances, there are two circuit breakers, one on each "hot" leg. The handles are tied together so if one trips the other if forced to trip. Typically 240V appliances do NOT need the smart breakers as they almost always have a dedicated circuit, one breaker to one appliance.


    I'm SO looking forward to moving to 230V land where it's all the same and I don't need extension cords that are the size of a garden hose.


    186 More Best Homemade Tools eBook

  12. The Following User Says Thank You to jdurand For This Useful Post:

    DIYSwede (Nov 6, 2019)

Thread Information

Users Browsing this Thread

There are currently 1 users browsing this thread. (0 members and 1 guests)

Tags for this Thread

Bookmarks

Posting Permissions

  • You may not post new threads
  • You may not post replies
  • You may not post attachments
  • You may not edit your posts
  •