-
2 Attachment(s)
Portable Bandsaw Base
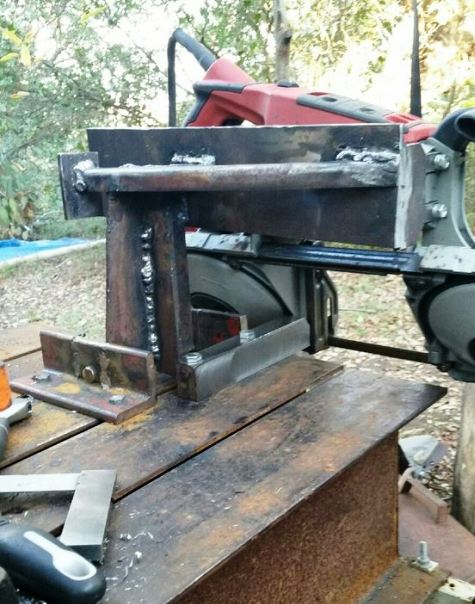
In keeping with my personal rule that anything I make or buy must do at least two useful things, I made a base mount for my Milwaukee portable band saw. The base is made so that it bolts onto my welding table (another function for the table) and is easily removed by loosening a few bolts. Parts are sawn by clamping to the welding table against the auxiliary fence which aligns with the saw's fence and I happen to have a foot switch that I may rig so that the saw shuts off automatically once through the work and it comes down against the hard stop I built in. It's just rigid enough without additional weight that makes it a pain to tote from storage to the table and back. The saw bolts to the base using four of the eight motor mounting screws and it can be taken off in just a few minutes. There's a rail for adding a sliding weight to increase the down force but it appears that it won't be needed.
The base converts my portable bandsaw into a horizontal cutoff saw that can be left unattended while cutting.
Attachment 32178
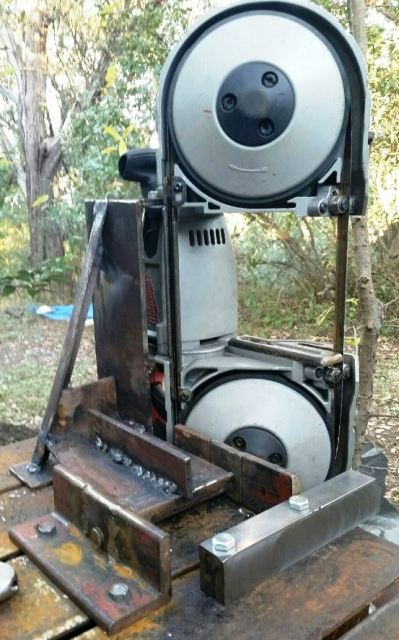
And with a simple flip it becomes a vertical bandsaw, though I haven't yet made a larger platen for that purpose.
Attachment 32179
I still have to grind my welds and then give it some paint but I've tried it and it makes nice even cuts. My max size is limited by the saw (6") but I rarely have anything that large to cut so I think it's going to improve the workflow here. It turned out a little rougher than I envisioned but I had to make several significant changes mid-build and the scars of those changes are apparent, but hey it works for its intended function and at a bargain basement cost.
-
Thanks guys.
I'm surprised at the lack of interest here - it's a versatile, useful tool.
-
<!-- BEGIN /var/www/html/homemadetools/protected/modules/zeus/views/tool/postUpdate.php -->
Thanks Crusty! We've added your Portable Bandsaw Base to our Bandsaws category,
as well as to your builder page: Crusty's Homemade Tools. Your receipt:
<div id="blocks">
<div class="block b1 pngfix">
<div class="bimg">
<div>
<a href="https://www.homemadetools.net/homemade-portable-bandsaw-base">
<img src="/uploads/228013/homemade-portable-bandsaw-base.jpeg"/>
</a>
</div>
</div>
<div class="head pngfix"></div>
<div class="left pngfix"></div>
<div class="right pngfix"></div>
<div class="blockover b1 pngfix">
<div class="title">
<a href="https://www.homemadetools.net/homemade-portable-bandsaw-base">Portable Bandsaw Base</a>
<span> by <a href="https://www.homemadetools.net/builder/Crusty">Crusty</a></span>
</div>
<div class="tags">tags:
<a href='https://www.homemadetools.net/tag/bandsaw'>bandsaw</a>, <a href='https://www.homemadetools.net/tag/mount'>mount</a> </div>
</div>
</div>
</div>
<!-- END /var/www/html/homemadetools/protected/modules/zeus/views/tool/postUpdate.php -->
-
Hey crusty, I really like the idea and I plan to use it in my shop... I am also going to look at your page.
-
There aren't any drawings for it but I can describe how I made it which might help you make something similar.
The base brackets are two pieces of heavy angle which clamp down to my welding table and a 5/8" pivot shaft rotates between them in reamed holes. An upright made from a piece of I-beam with some of the flanges trimmed off is welded to the pivot shaft. The upright has an arm made from 1/4" plate welded to it and there are two brackets of the same plate welded to the arm and bolted to two front and two rear motor bolts.
I made the brackets by cutting out pasteboard patterns which fit the motor at each end, then traced the contour on the plate and cut them out. Once the brackets were bolted to the motor I shimmed the saw sitting on a flat surface until the blade was completely parallel with the flat surface, then used a height gauge to scribe each bracket at the same height and parallel to the blade, then cut them off.
I assembled the base first, then propped up the saw with brackets attached and welded the brackets to the arm last, checking frequently for square as I went.
Try to make the motor brackets as short as practical so that the weight of the saw isn't hanging way out there. The axis of the rear saw wheel is within 1" of the pivot shaft axis and that seems to give about the right amount of downforce on the blade when cutting horizontal. I made my arm taller than it needed to be so that I could clamp a sliding weight onto it positioned to either increase or decrease the downforce but I don't think I'll need one now.
My base positions the blade so that it bottoms out 1/4" below the table's surface when in the horizontal position and a solid auxiliary fence bolts to my welding table in line with the saw's fence and stock is clamped to the table against the fence. I may add a small section of plate to extend the table surface out to the blade but it isn't necessary for reasonably stiff stock. There are hard stops welded in for both horizontal and vertical positions, a stiffener welded to the web of the I-beam upright and a diagonal brace from the top flange of the upright to the outer end of the arm. I did have to whittle away on my welding table some so that the rear wheel would clear it in the upright position but my mounting position puts it at a rear corner of the table that I've never needed to use.
If your table isn't dead flat (mine isn't) then the base brackets may make your pivot shaft seize when clamped down. I cut out portions of each bracket containing the pivot holes, clamped the brackets in position, shimmed the pivot shaft with the cutouts on it so that it was parallel to the table and welded the cutouts back to the brackets and now it pivots easily with no slop.
-
That sure is beefy looking. It is good idea. I made one of my portabands into a bench top vertical band saw. It gets lots of use.
-
It's just rigid enough while not too heavy to tote.
I made a platen yesterday for vertical use and I can tell that it's going to make my sabre saw collect rust now, plus it's gonna get used in horizontal cutoff mode a lot too. I wire tied the trigger down and plugged it into a foot switch for more convenient and hands off operation.
I'll take it apart this week, cut off some of the square corners so it looks better, clean it and paint it. But first I have a crane to mount in my pickup to put an end to moving steel by Manuel Labor.
ETA: While mounting my pickup bed hoist I needed some spacers to raise the base plate just above the pickup bed's rails so I used my bandsaw in horizontal cutoff mode to slice 4 pieces of water pipe to just the exact right length for spacers and it was done in a matter of a couple of minutes. This thing's going to be really useful.
-
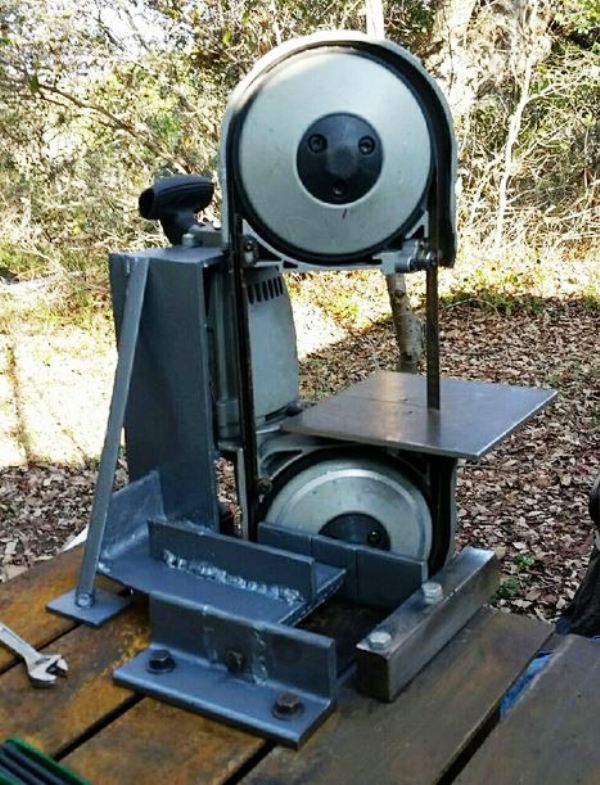
1 Attachment(s)
And here it is in vertical mode after a clean up and paint. The platen comes off with two screws and it becomes a really handy horizontal cutoff bandsaw.
Attachment 32356
-
I'm even more pleased with it after using it for a while and so I decided to go back and fix a couple of shortcuts that I took when I fabricated it.
I've since bored out the pivot holes and installed bronze bushings on the pivot shaft so that It won't be worn by repeated use. Then I got my angle grinder after some 1" plate, cut out a 15# chunk and made a clamp and now it has a sliding blade weight clamped onto the arm and it goes through steel just as quick as it's able. I also added another small stiffener to the upright which has ended all blade wander in the cut.
This is a really useful tool which has sped my operation up considerably and I didn't have to spend $700 to get it.
-
Thank you,Crusty.I've perchased the saw band about half an year ago and now looking for a couple of washing machine wheels or like that.
Such bandsaw is really nessesary thing,espesially if your workshop is placed at the 10th floor apartment.:)