Free 186 More Best Homemade Tools eBook:  
Get 2,000+ tool plans, full site access, and more.

User Tag List

Page 1 of 3 1 2 3 LastLast
Results 1 to 10 of 25

Thread: Repurposing a Torx Bit as a Broach.

  1. #1
    Supporting Member astroracer's Avatar
    Join Date
    May 2012
    Location
    Byron, Michigan
    Posts
    311
    Thanks
    20
    Thanked 569 Times in 174 Posts

    astroracer's Tools

    Repurposing a Torx Bit as a Broach.

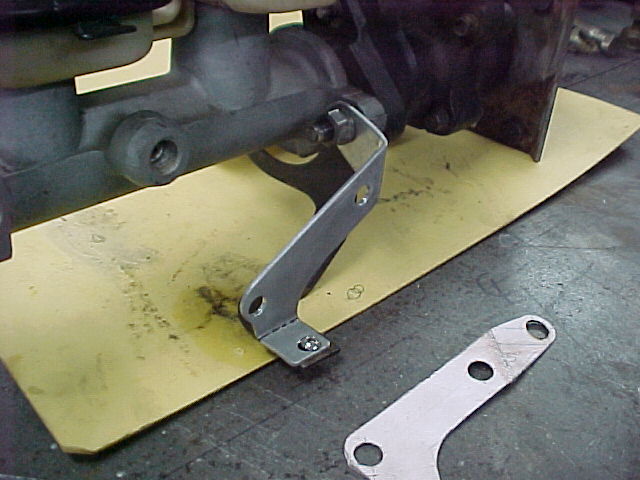
    I've been working on the brake set-up for my BadAst Astro Van build. This is a bracket I developed to hold the Wilwood Prop Valve I will be using.

    With the valve bolted on. Clear access to both of the outlets on the bottom of the valve and it's not going anywhere. Once the lines are made and bolted in it will be pretty solid.


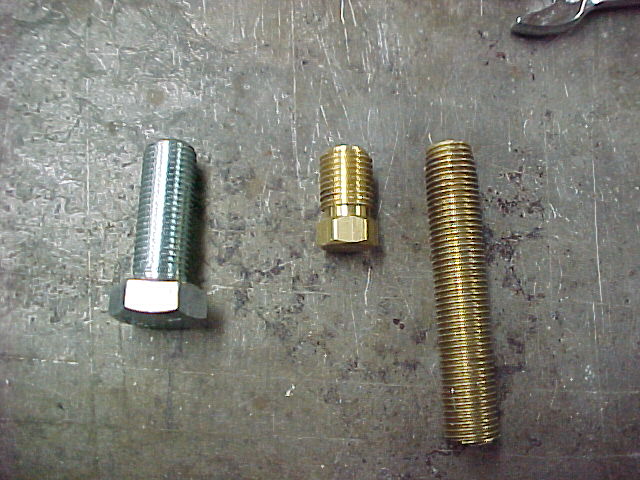
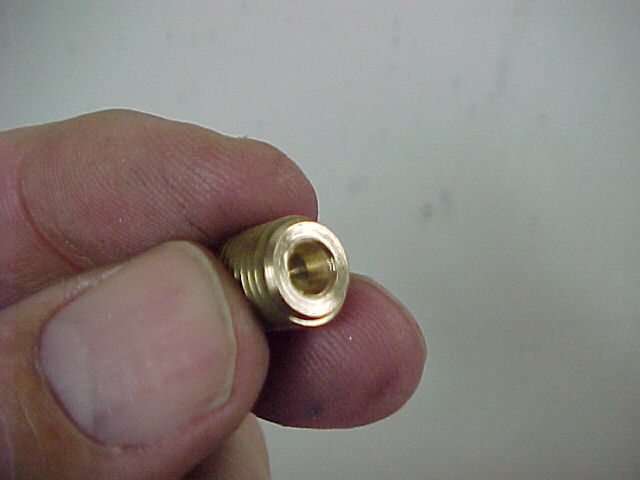
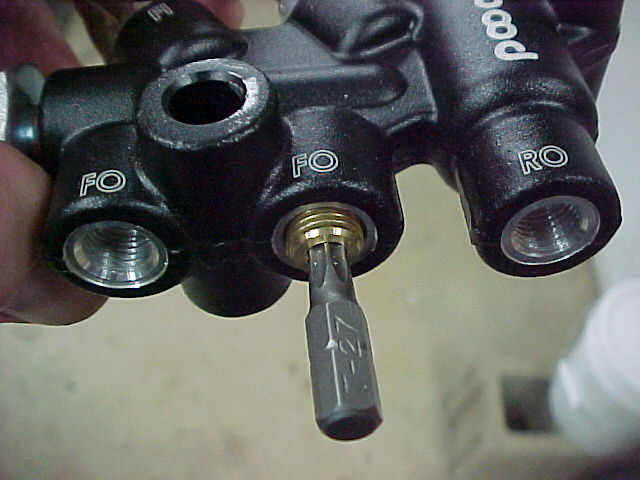
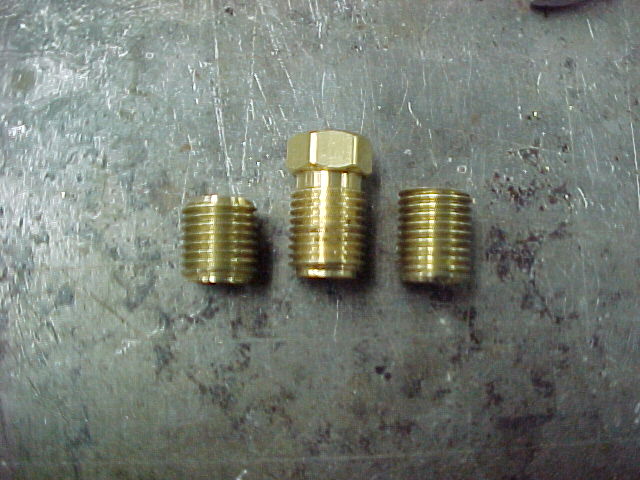
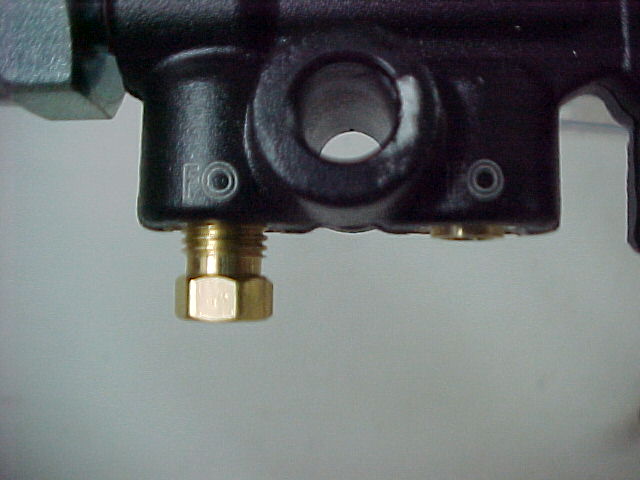
    I ran into a bit of an issue with the prop valve placement. It is too low. The outlet for the front brake line I need to plug is to close to the bracket underneath it. I didn't think it would be a problem finding a low profile inverted flare plug to fill the hole but I have found nothing that will work. The regular plugs are to tall and I do not want to remake the bracket OR the hardlines, so.... I will make a low profile plug.
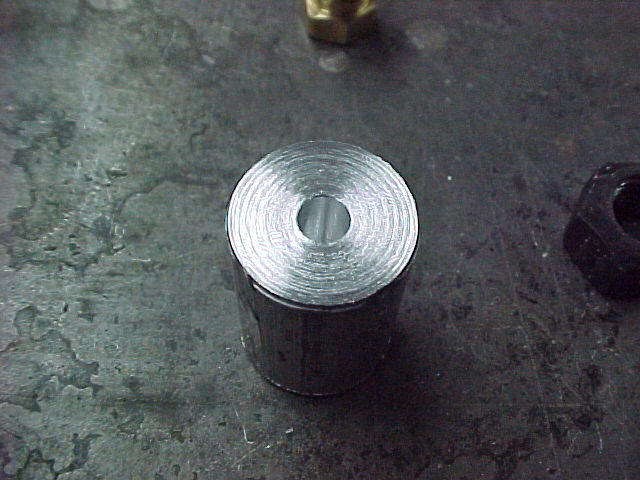
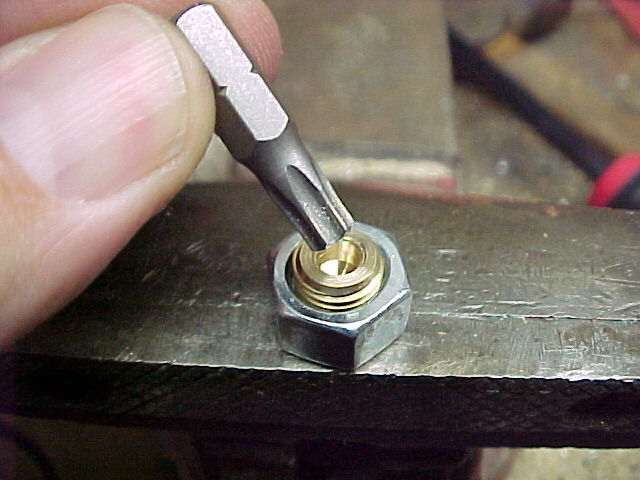
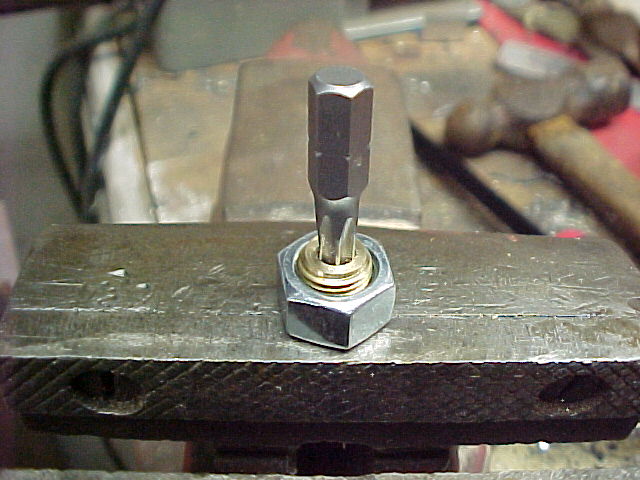
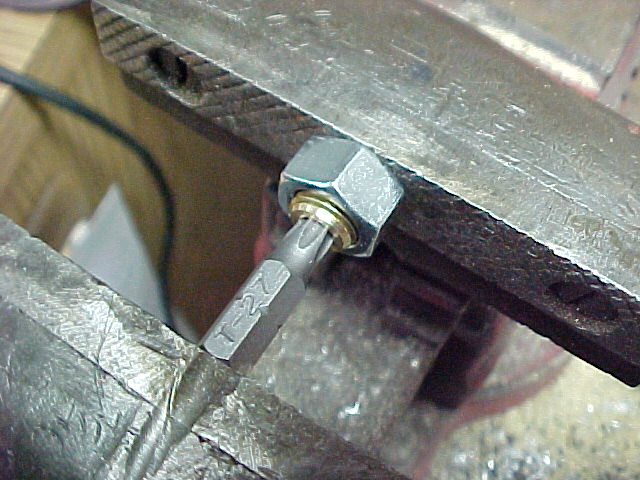
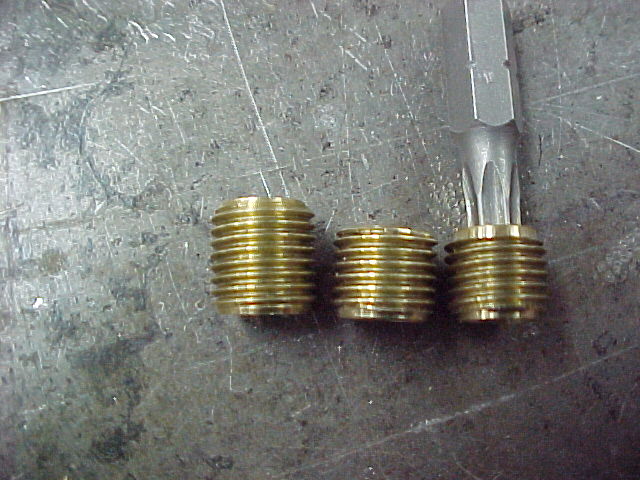
    I puttered around in the shop the other night trying to figure out how to tighten the plug and came up with this. I bored a .173 diameter hole in a test piece of aluminum.

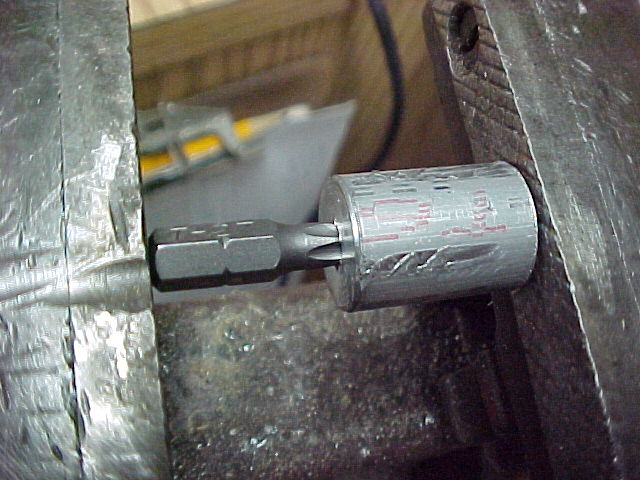
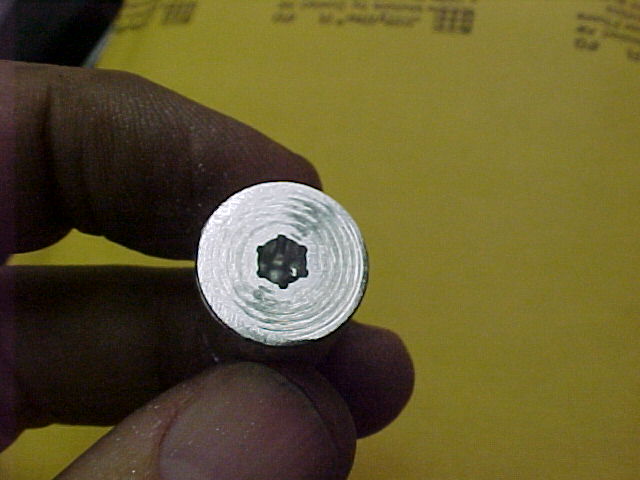
    Then I used a short Torx bit to "broach" a hole for the driver. I started it with a few taps from a hammer to make sure it was straight then just pressed it into the test piece with the 4" vise.


    Continued in next post.
    Mark

    186 More Best Homemade Tools eBook

  2. The Following 6 Users Say Thank You to astroracer For This Useful Post:

    blkadder (Apr 1, 2024), Home-PC (Apr 16, 2021), mwmkravchenko (Apr 22, 2018), nova_robotics (Apr 1, 2024), PJs (Jan 9, 2017), that_other_guy (Aug 26, 2018)

  3. #2
    Supporting Member astroracer's Avatar
    Join Date
    May 2012
    Location
    Byron, Michigan
    Posts
    311
    Thanks
    20
    Thanked 569 Times in 174 Posts

    astroracer's Tools
    This worked great! I have some 3/8-24 threaded brass rod coming from McMaster Carr today. Hopefully the technique will work as well on the brass.

    Making the inverted flare side is easy. A 3/16 drill and 90degree c'sink work perfect for that. Getting the "driver" side done will be the challenge.

    I got the threaded rod and made a couple of plugs tonight. Went as easy as I was hoping. The Torx driver pushed in just as easy as it did with the aluminum test piece. I'm happy.
    I got a foot of the 3/8-24 rod and used about half of this piece I cut off...

    Dilled a pilot hole and ran a 90 degree chamfering tool into the drilled hole to make the bevel.

    The beveled hole.

    2000 Tool Plans

  4. The Following 2 Users Say Thank You to astroracer For This Useful Post:

    blkadder (Apr 1, 2024), PJs (Jan 9, 2017)

  5. #3
    Supporting Member astroracer's Avatar
    Join Date
    May 2012
    Location
    Byron, Michigan
    Posts
    311
    Thanks
    20
    Thanked 569 Times in 174 Posts

    astroracer's Tools
    For the broaching job, I drilled the hole out to .173 dia. That is the one I used in the aluminum piece.

    I ran the fitting into a 3/8-24 nut so I could get the "broach" tapped in straight.

    Just a couple of light taps with hammer got the broach started.

    I then clamped the assembly into the vise and pressed away...

    Continued in next post.

  6. The Following 2 Users Say Thank You to astroracer For This Useful Post:

    blkadder (Apr 1, 2024), PJs (Jan 9, 2017)

  7. #4
    Supporting Member astroracer's Avatar
    Join Date
    May 2012
    Location
    Byron, Michigan
    Posts
    311
    Thanks
    20
    Thanked 569 Times in 174 Posts

    astroracer's Tools
    Didn't take much to do the job.

    I ran one into the prop valve.

    And checked the clearance. We are good to go.


    I made a couple of them while I was doing it. Now that I've made one the whole process only takes about 10 minutes.

    Now, on to bigger and better things!
    Mark

  8. The Following 31 Users Say Thank You to astroracer For This Useful Post:

    Alan Purdy (Mar 8, 2019), asterix (Jul 16, 2022), baja (Apr 1, 2024), blkadder (Dec 7, 2018), Charron63 (Nov 30, 2017), cogentia (Jul 15, 2022), Daturat100r (Apr 17, 2019), davesrepair (Apr 17, 2024), DIYer (Jan 7, 2017), Durrell (Apr 21, 2018), elk-a-holic (Apr 3, 2024), Frank S (Jan 7, 2017), GKK (Apr 16, 2019), high-side (Dec 8, 2018), Home-PC (Apr 16, 2021), Inner (Dec 7, 2018), mattthemuppet (Jan 6, 2017), NortonDommi (Apr 21, 2021), oldcaptainrusty (Apr 21, 2018), olderdan (Jan 6, 2017), Papa Bill (Apr 21, 2018), Paul Jones (Jan 5, 2017), PJs (Jan 6, 2017), Priemsy (Aug 15, 2018), Ralphxyz (Apr 3, 2024), rgsparber (Aug 15, 2018), rlm98253 (Apr 21, 2018), Scotsman Hosie (Apr 18, 2019), StephenL (Apr 17, 2019), tbdl (Apr 16, 2019), Woodgeezr (Jan 9, 2017)

  9. #5
    Content Editor
    Supporting Member
    DIYer's Avatar
    Join Date
    Aug 2013
    Posts
    3,056
    Thanks
    772
    Thanked 1,852 Times in 1,653 Posts


    Thanks astroracer! We've added your Broach to our Metalworking category,
    as well as to your builder page: astroracer's Homemade Tools. Your receipt:


  10. #6
    Supporting Member
    Join Date
    Mar 2013
    Location
    Perth Western Australia
    Posts
    77
    Thanks
    25
    Thanked 68 Times in 27 Posts

    Peter Sanders's Tools
    Very well done! :-)

  11. #7
    Supporting Member astroracer's Avatar
    Join Date
    May 2012
    Location
    Byron, Michigan
    Posts
    311
    Thanks
    20
    Thanked 569 Times in 174 Posts

    astroracer's Tools
    Thank You Sir! I made a few more yesterday. A bit shorter then the previous attempts. They give me plenty of clearance now with no worries.


    I don't know why these aren't available off the shelf... Not only do they provide for clearance I need but I think they look 100% better then those tall plugs do. My plug is on the right.

    Mark

  12. The Following 4 Users Say Thank You to astroracer For This Useful Post:

    PJs (Jan 9, 2017), Ralphxyz (Apr 3, 2024), rlm98253 (Dec 7, 2018), Scotsman Hosie (Apr 18, 2019)

  13. #8
    Supporting Member McDesign's Avatar
    Join Date
    Sep 2016
    Posts
    258
    Thanks
    5
    Thanked 121 Times in 63 Posts

    McDesign's Tools
    Quote Originally Posted by astroracer View Post
    Didn't take much to do the job.

    I ran one into the prop valve.

    And checked the clearance. We are good to go.


    I made a couple of them while I was doing it. Now that I've made one the whole process only takes about 10 minutes.

    Now, on to bigger and better things!
    Mark
    Lovely = got the same valve; had similar issues - I salute your solution!

  14. The Following 3 Users Say Thank You to McDesign For This Useful Post:

    Home-PC (Apr 16, 2021), Priemsy (Aug 15, 2018), Ralphxyz (Apr 3, 2024)

  15. #9
    Supporting Member astroracer's Avatar
    Join Date
    May 2012
    Location
    Byron, Michigan
    Posts
    311
    Thanks
    20
    Thanked 569 Times in 174 Posts

    astroracer's Tools
    I feel honored to receive your praise in your 1st post. Thank You.
    Mark

  16. #10
    Charron63's Avatar
    Join Date
    Oct 2017
    Location
    Tidewater VA
    Posts
    20
    Thanks
    33
    Thanked 8 Times in 5 Posts
    Hi
    If you take a sherical diamond stone tool mounted on 1/8th shank you can use a dremmel to dish out the face of your already hardened Torx etc bits and then they will cut like the grape ape...

  17. The Following 3 Users Say Thank You to Charron63 For This Useful Post:

    Ralphxyz (Apr 3, 2024), Scotsman Hosie (Apr 18, 2019), Wildwilly (Jan 14, 2024)

Thread Information

Users Browsing this Thread

There are currently 1 users browsing this thread. (0 members and 1 guests)

Bookmarks

Posting Permissions

  • You may not post new threads
  • You may not post replies
  • You may not post attachments
  • You may not edit your posts
  •