
 LinkBack URL
 About LinkBacks


OH ... the things we learn then we start to pay close attention to the details
The back story I have been working with machine tools for a long time. Up until this point, ± 0.001 has been the closest I have had to be. Typically not even that close was necessary. Now I am wanting to try some more challenging projects. While trying to work more closely, I have discovered my lathe needs a tune up. Reading about this tune up process, leveling is one of the places I have neglected. After moving a lathe to my basement several years go, not having a precision level, I used my best carpenters level, this was not good enough. Not having a precision level also makes it near impossible to correct this. This is the reason for this project.
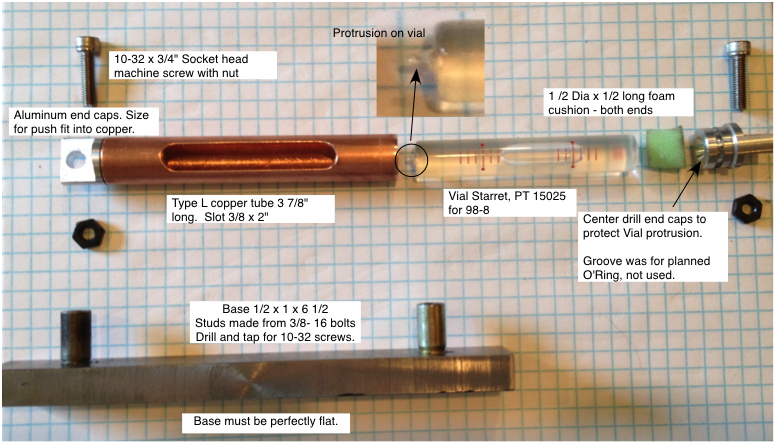
I do not want to spend lots of money on a precision level. Since I enjoy the challenge of building something special like this I thought I would try my hand at making one. My wife has already asked me, Why dont you just buy one? I seem to hear that a lot. Searching online for vials, I discovered there are so many, some with INCREDIBLE precision specifications. I settled on a replacement vial for a Starrett 98-8. I purchased that for $15.00 with shipping I have $23.00 in it. The rest of the components I made from materials I had in my, I will make something with this someday, collection.
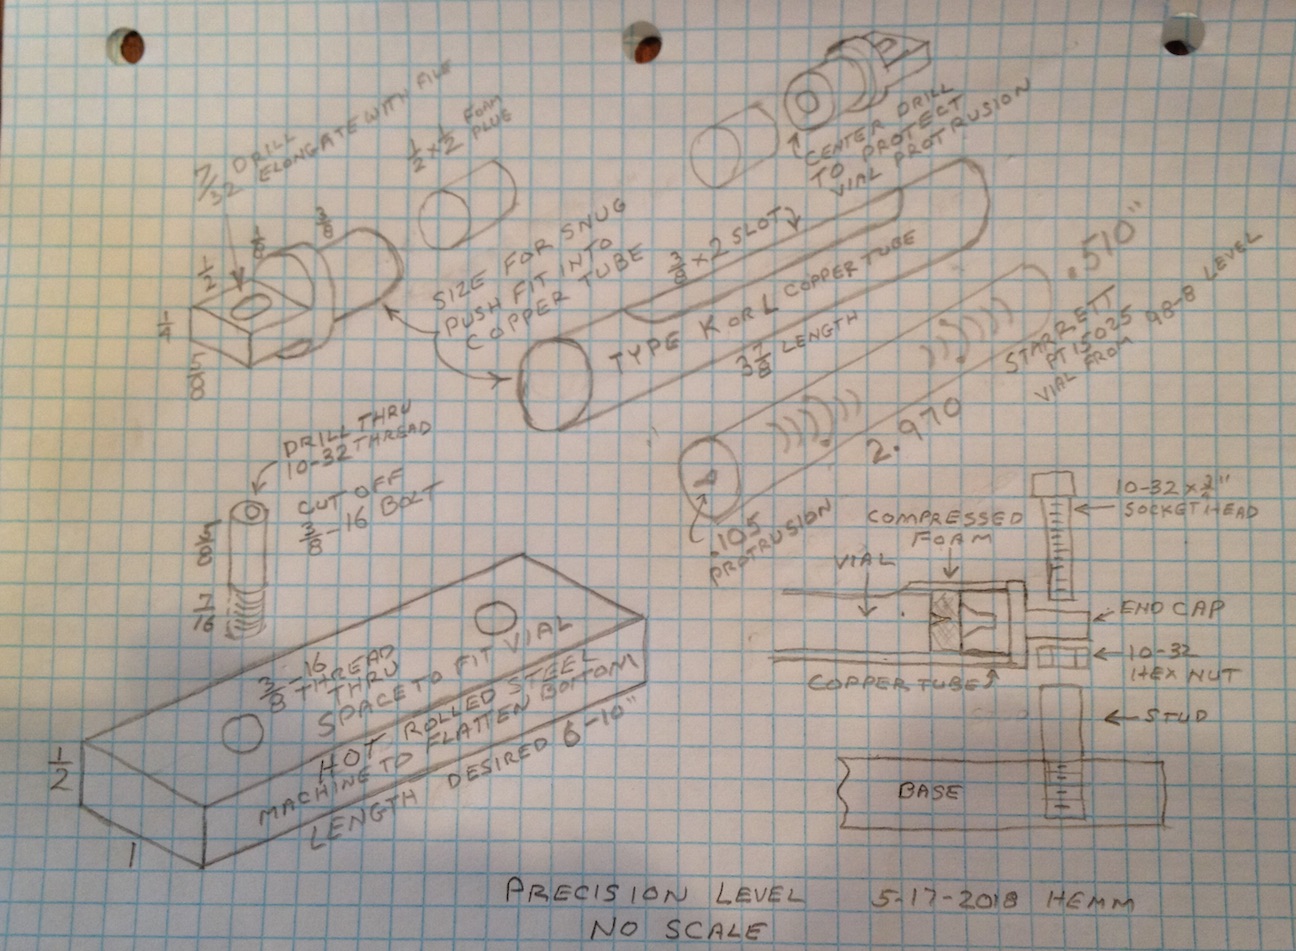
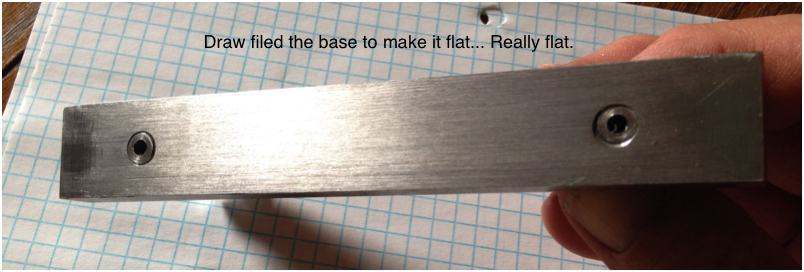
The base was a chunk of hot rolled steel, 1/2 x 1 I cut off a piece about 6 1/2 long, the longest I can fit in my 4 jaw chuck. I faced the 4 sides, to clean up piece and flatten the base.
The vial holder is a piece of type L copper plumbing pipe. If you choose to make one I recommend type K or L copper, type M has a very thin wall. I wish I had a piece of K to use. I cut a slot in that with my lathe using the compound rest mounted vertical on an adapter I made a while ago after seeing one on HomemadeTools.net - More Than 30,000 Homemade Tools - HomemadeTools.net Since I do not have milling cutters, I used a large center drill held in my collet chuck. It actually worked very well. The biggest problem was holding the tube securely enough without crushing it as the slot made the tube weaker. I ended up making aluminum plugs to slip inside the tube to prevent the vise from crushing it. I honed the inside with sand paper on a dowel, both before and after milling the slot.
The end caps for the vial holder are aluminum. The small end is sized to be a snug push fit into the copper tube. The small ends are center drilled just a little, because the vial has a little glass tip on one end from the manufacturing process. I had intended to use ORIngs to make a tight fit with the copper tube, but they work fine without them. The large end is sized to match the OD of the copper tube. Flats on the large end were milled using a 1/2 carbide router bit in the collet chuck along with my milling adapter.
The posts to hold the vial assembly are made from 3/8-16 bolts. They are cut to length so the threaded end will not stick out the bottom and the unthreaded part is long enough to hold in the collet. The posts are drilled thru and tapped for 10-32.
The vial is cushioned in the tube with 1/2 thick foam plugs that were cut using a sharpened piece of copper tube. This is not the best solution. The vial needs to be more secure than the foam makes it. I do not want to make the installation permanent by using something more secure until I am sure the design is good. On another forum, suggested using DAP 33 window glazing compound to seat a replacement vial in their Starrett level. I may try that later.
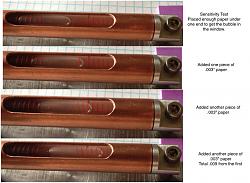
The vial assembly went together well, the vial is held snug, but it can move, being held in place with only the friction from the foam cushions. Simply cleaning the glass with a tissue knocked the level out of adjustment.
This is how you calibrate the level. Starrett 98-12 Level
During testing I discovered that the bottom was not flat. It was tapered from the center toward the ends about .001 so, pressing down one end, made the other end, .002 high. (each time I try to get more and more precise, I learn my lathe needs a tune up) I corrected this by draw filing the base and checking with my best straight edge. Of course I never noticed this taper when facing small parts, but over the 6 length of this bar, it sure did show up.
Attached are photos and a sketch of the level if you want to try it. I can promise it will bring your understanding of level to a whole new level, unless of course, you are already .. on the level


 Reply With Quote

Bookmarks