Free 186 More Best Homemade Tools eBook:  
Get 2,000+ tool plans, full site access, and more.

User Tag List

Page 1 of 3 1 2 3 LastLast
Results 1 to 10 of 28

Thread: Tool box drone headache rack and lift out tray

  1. #1
    Supporting Member Frank S's Avatar
    Join Date
    Aug 2015
    Location
    Peacock TX
    Posts
    11,210
    Thanks
    1,982
    Thanked 8,784 Times in 4,206 Posts

    Frank S's Tools

    Tool box drone headache rack and lift out tray

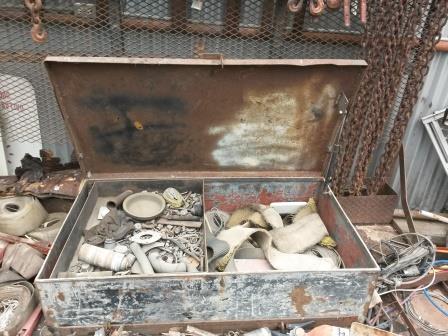
    Another of my few remaining tools and equipment I made long ago.
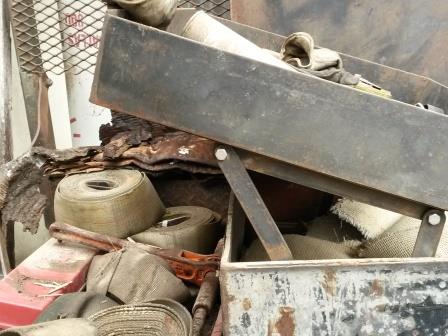
    Back in the late 80's to early 90's we needed a headache rack on one of our trucks this was what I did
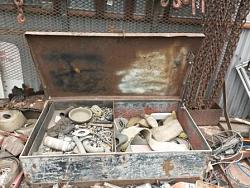
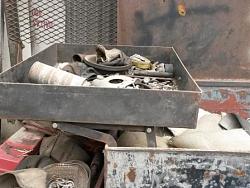
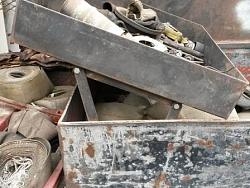
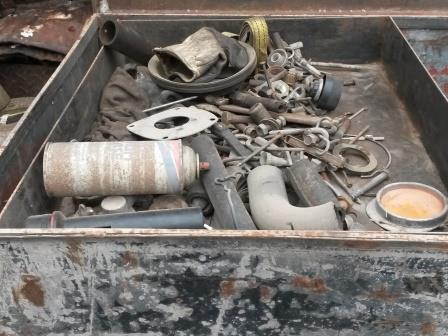
    the headache rack was made with locking bars for the chains binders and below them there was a locking rack for straps. Since the truck had a long wheel base I mounted it on a drone which served as a platform to stand on for retrieving and replacing the load binding equipment as well as a mount for the tool box. in the tool box I made a tray which could be lifted up and clear of the box allowing clear access to the bottom of the box
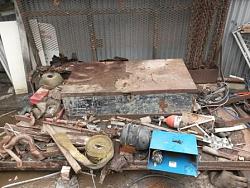
Tool box drone headache rack and lift out tray-20161007_151618c.jpg Tool box drone headache rack and lift out tray-20161007_151634c.jpg Tool box drone headache rack and lift out tray-20161007_151701c.jpg Tool box drone headache rack and lift out tray-20161007_151723c.jpg
    Tool box drone headache rack and lift out tray-20161007_151734c.jpg Tool box drone headache rack and lift out tray-20161007_151742c.jpg

    186 More Best Homemade Tools eBook
    Never try to tell me it can't be done
    When I have to paint I use KBS products

  2. The Following 2 Users Say Thank You to Frank S For This Useful Post:

    Paul Jones (Oct 9, 2016), PJs (Oct 11, 2016)

  3. #2
    Supporting Member C-Bag's Avatar
    Join Date
    Aug 2015
    Location
    California, central coast
    Posts
    720
    Thanks
    689
    Thanked 876 Times in 471 Posts

    C-Bag's Tools
    Nice one Frank. I love the idea of those kinds of hinges but they are tough to lay out. Did you do it through experimentation or CAD? Or have an example laying around? Those kinds of hinges like on hoods like what I've seen Astro make are cool but a mystery to me.

    2000 Tool Plans

  4. #3
    Supporting Member Frank S's Avatar
    Join Date
    Aug 2015
    Location
    Peacock TX
    Posts
    11,210
    Thanks
    1,982
    Thanked 8,784 Times in 4,206 Posts

    Frank S's Tools
    C-bag that was done with a COC program, (chalk on concrete) a good 8 years before I even touched the keyboard of a computer and 10 years before I got my first computer with Solidworks 99 installed.
    I've made lots of goofy stuff through out the years like one of my old welding rigs, that had hidden drop down slide out drawers, swing out tool boxes doors that unfolded to reveal service manuals. I carried 2 of the medium large Act bottles 3 large Oxygen 1 50 lb CO2 and a small Argon tank on it all were mounted and for the most part semi concealed my welder was a Hobart 400 amp Diesel with 300 amp badges, a Hobart Hefty CC/CV suitcase wire feeder, a 12000 lb winch with level wind rolls mounted under the bed and telescoping gin poles tucked away out of sight. I built my air compressor out of an IMT under hood V4 head on a 40 gallon Aluminum truck air start tank with a 2 cyl 16 HP electric start engine The truck was another unique thing And I will restate THING because I took an 81 F350 169" wheel base chassis doubled the frame from the front main cross-member back then wedged a 1160 Cat V8 225 HP turned up to 250 HP @ 750FT lb torque,by raising the cab 4 " and cutting-in a 4' doghouse in the firewall, with a 10 speed Road-ranger 610 coupled to a Spicer 48 2 speed mounted backwards the rear end was donated from a 30 ft motor home the cab was a 81 F250 super cab the whole THING was painted 1957 corvette yellow with a black bed when I had everything spooled out and opened up it was more like something out of the transformer movie UGLY as heck, but short of having a lathe and a mill unless you counted my Du-more versa mill there were enough tools and equipment to do just about anything in the way of machinery repairs
    Never try to tell me it can't be done
    When I have to paint I use KBS products

  5. The Following 2 Users Say Thank You to Frank S For This Useful Post:

    Paul Jones (Oct 11, 2016), Toolmaker51 (Oct 17, 2016)

  6. #4
    Content Editor
    Supporting Member
    DIYer's Avatar
    Join Date
    Aug 2013
    Posts
    3,056
    Thanks
    772
    Thanked 1,852 Times in 1,653 Posts


    Thanks Frank S! We've added your Headache Rack to our Storage and Organization category,
    as well as to your builder page: Frank S's Homemade Tools. Your receipt:


  7. #5
    Supporting Member KustomsbyKent's Avatar
    Join Date
    Dec 2014
    Location
    South Dakota
    Posts
    241
    Thanks
    2,343
    Thanked 181 Times in 107 Posts

    KustomsbyKent's Tools
    Quote Originally Posted by C-Bag View Post
    Nice one Frank. I love the idea of those kinds of hinges but they are tough to lay out. Did you do it through experimentation or CAD? Or have an example laying around? Those kinds of hinges like on hoods like what I've seen Astro make are cool but a mystery to me.
    Those are called 4-bar linkages, and while a CAD program is helpful, it's not necessary either. As Frank S. states, he uses Chaulk on Concrete. I like to draw on the steel table with a whiteboard marker, and then use cardboard and thin wood strips with stick pins to simulate the movement. The length of the arms, and position of the holes is critical to determining the actual movement and final location/orientation vs initial location/orientation.

    The simplest 4-bar linkage is a parallelogram, gives fairly parallel movement within reason. There are specific names for some linkage sets, and has to do with the length of the arms and how they are arranged. You can read a lot more about them here: https://en.wikipedia.org/wiki/Four-bar_linkage

    Do a simple experiment, and cut out 4 cardboard strips about 1" wide, and 6" long. Anchor one of them to the table top, this is your base or ground link. Then place a link on each end, these are called Crank and Rocker, and use stick pins to make the pivot. Now add a top connecting link, using 2 more stick pins, and now you can hinge it back and forth. If you kept everything spaced evenly, you will have a parallelogram linkage.
    Now shorten just one of the links by 1/2" and see how it affects it, start with the Crank. Now you have a crude model to test and learn, and determine what you want. Small changes can have big effects, so watch out!
    I will often do this before I go to CAD, and then after I've modeled it in CAD as a final verification.

    If you have an existing 4-bar linkage, based on the length of the links, equations will tell you what type it is, and predict the movement.

    Many car hoods and trunk lid "hinges" are 4-bar linkages.

    Hat's off to Frank S for making a nice example of this with his tool box tray, you can see that he put a dog-leg in one of the links so that it clears the top edge of the tool box.

  8. The Following 3 Users Say Thank You to KustomsbyKent For This Useful Post:

    C-Bag (Oct 13, 2016), Paul Jones (Oct 13, 2016), PJs (Oct 15, 2016)

  9. #6
    Supporting Member C-Bag's Avatar
    Join Date
    Aug 2015
    Location
    California, central coast
    Posts
    720
    Thanks
    689
    Thanked 876 Times in 471 Posts

    C-Bag's Tools
    Thanks Kent. I particularly like the cardboard/stickpin approach. Those are things I have readily available and should have been an obvious choice to model 4 bar linkage with. I often let the fog of war/just want to get 'er done get in the way of proper planning.

    When I let Frank's 4 bar linkage just sit I could see the apparently simple parallelogram but the crook in the back pair threw me. What's really intriguing though is the way that crook raises the leading edge of the drawer to clear the side, but makes it end up level and the crook ends up being the stop. I'm always drawn to simple genius.

  10. The Following 2 Users Say Thank You to C-Bag For This Useful Post:

    Paul Jones (Oct 13, 2016), PJs (Oct 15, 2016)

  11. #7

    Join Date
    Feb 2014
    Posts
    15
    Thanks
    5
    Thanked 6 Times in 3 Posts

    racer-john's Tools
    Where do you see the "crook" I can only see two of the pivots in the supplied pics.

  12. #8
    Supporting Member C-Bag's Avatar
    Join Date
    Aug 2015
    Location
    California, central coast
    Posts
    720
    Thanks
    689
    Thanked 876 Times in 471 Posts

    C-Bag's Tools
    If you look at pic #3 where arm goes over the edge of the box there's a bend in the bar link there. Just barely visible.

  13. The Following 2 Users Say Thank You to C-Bag For This Useful Post:

    Paul Jones (Oct 13, 2016), PJs (Oct 15, 2016)

  14. #9
    Supporting Member Frank S's Avatar
    Join Date
    Aug 2015
    Location
    Peacock TX
    Posts
    11,210
    Thanks
    1,982
    Thanked 8,784 Times in 4,206 Posts

    Frank S's Tools
    Kent gave a good description of how 4 bar links work.
    One year when I was quite young I received, get this no less than 3 Gilbert Erector sets, with the advanced master construction and young engineer modeling options for Christmas. I must have spent a million hours building and remodeling the things I made with those sets.
    The sets were in metal boxes about 30" long. Intrigued by the workings of a convertible top on car one of my uncles was rebuilding I set out to try and duplicate the accordion lattice framework using my tens of 1000's of parts on hand.
    IN part much of my later projects were deeply rooted in my childhood construction projects that winter and for many following years as well.
    I guess its now nearly 50 years since I last played with one of those sets but I can still to this day almost visualize exactly how many nuts, bolts ,beams, girders, pulleys shaft;s motors , belts and other various parts it took to construct some of my projects back then, but I might not remember what I ate for super 3 days ago
    Never try to tell me it can't be done
    When I have to paint I use KBS products

  15. The Following User Says Thank You to Frank S For This Useful Post:

    Toolmaker51 (Oct 17, 2016)

  16. #10
    Supporting Member C-Bag's Avatar
    Join Date
    Aug 2015
    Location
    California, central coast
    Posts
    720
    Thanks
    689
    Thanked 876 Times in 471 Posts

    C-Bag's Tools
    Quote Originally Posted by Frank S View Post
    Kent gave a good description of how 4 bar links work.
    One year when I was quite young I received, get this no less than 3 Gilbert Erector sets, with the advanced master construction and young engineer modeling options for Christmas.
    No wonder, I only got a hand me down set of Lincoln Logs

  17. The Following 2 Users Say Thank You to C-Bag For This Useful Post:

    Paul Jones (Oct 17, 2016), Toolmaker51 (Oct 17, 2016)

Thread Information

Users Browsing this Thread

There are currently 1 users browsing this thread. (0 members and 1 guests)

Bookmarks

Posting Permissions

  • You may not post new threads
  • You may not post replies
  • You may not post attachments
  • You may not edit your posts
  •