Free 186 More Best Homemade Tools eBook:  
Get 2,000+ tool plans, full site access, and more.

User Tag List

Results 1 to 7 of 7

Thread: Trouble with old sewing machine

  1. #1
    Supporting Member rendoman's Avatar
    Join Date
    Nov 2015
    Location
    Italy
    Posts
    435
    Thanks
    451
    Thanked 496 Times in 241 Posts

    rendoman's Tools

    Trouble with old sewing machine

    I all
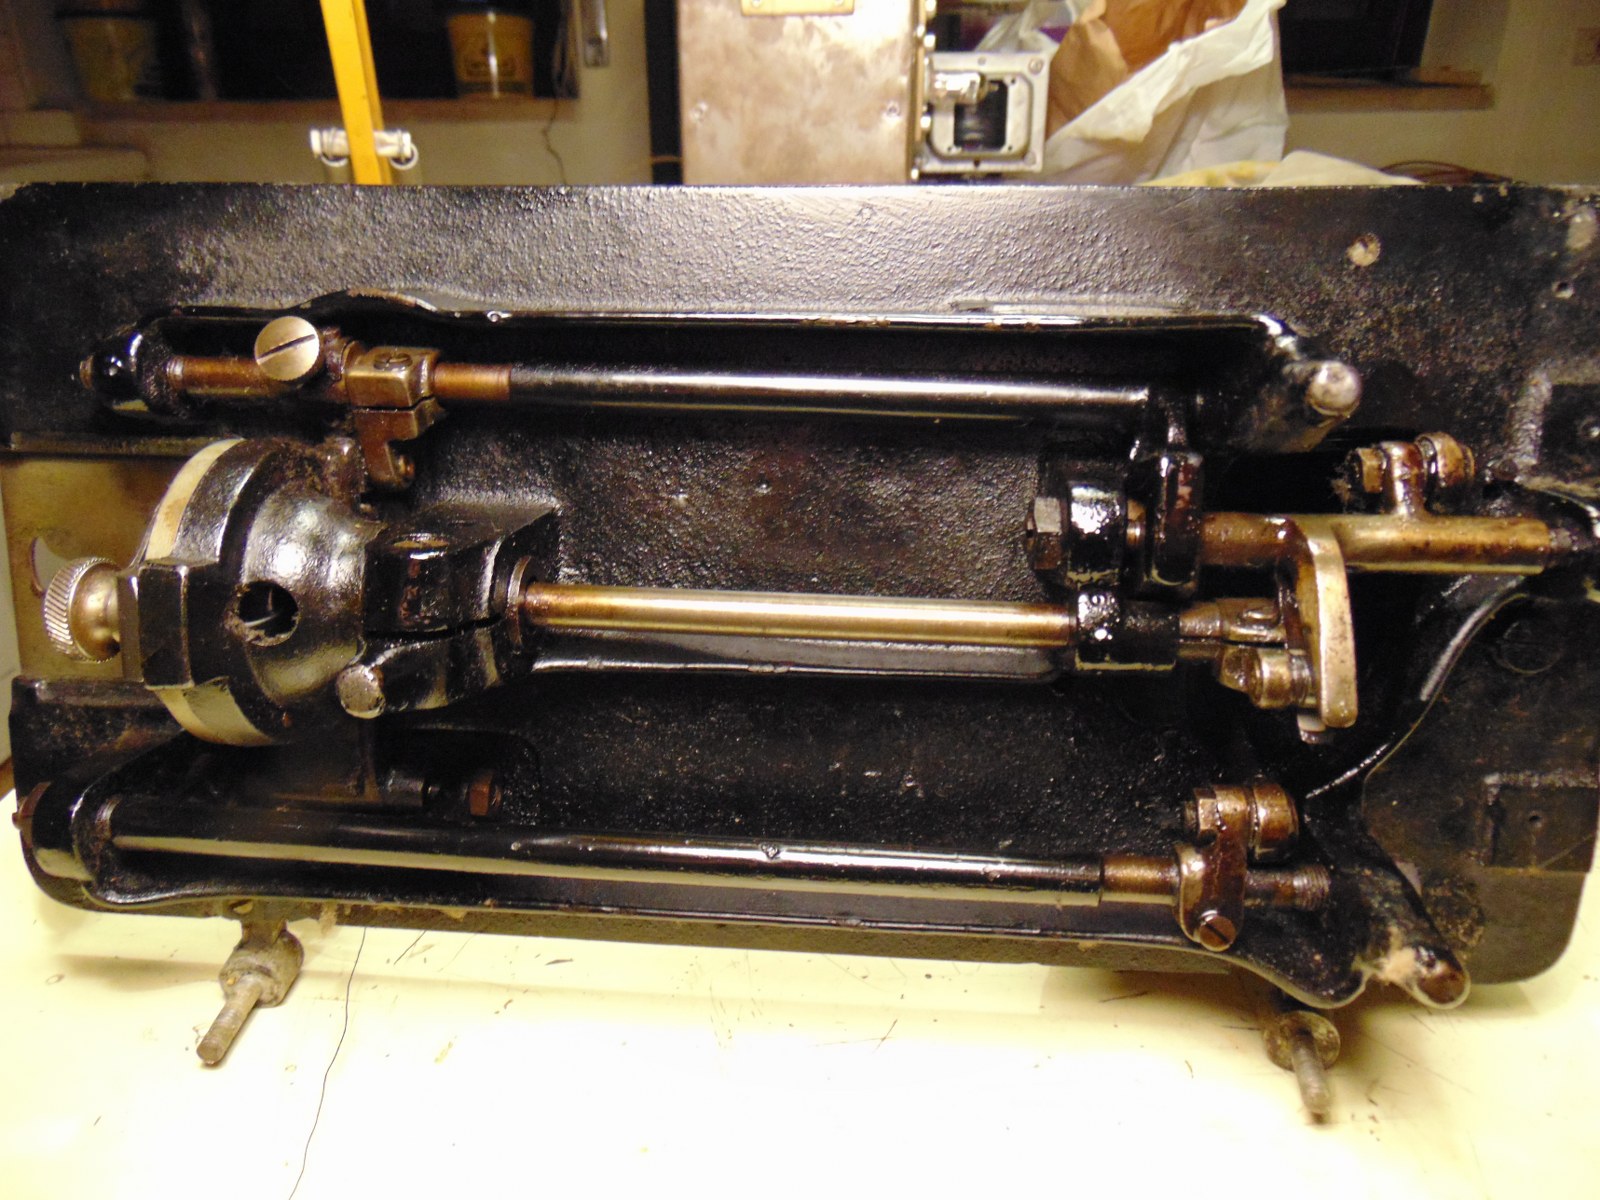
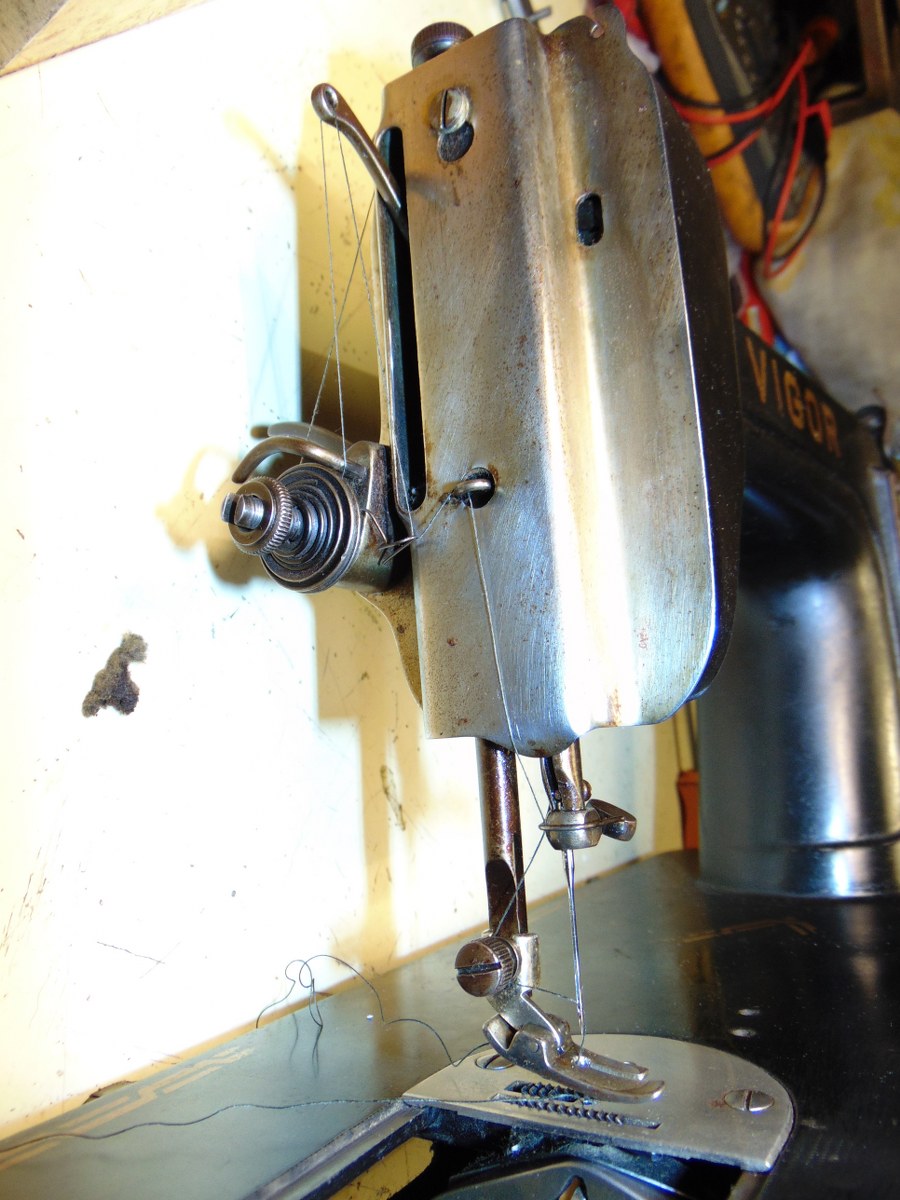
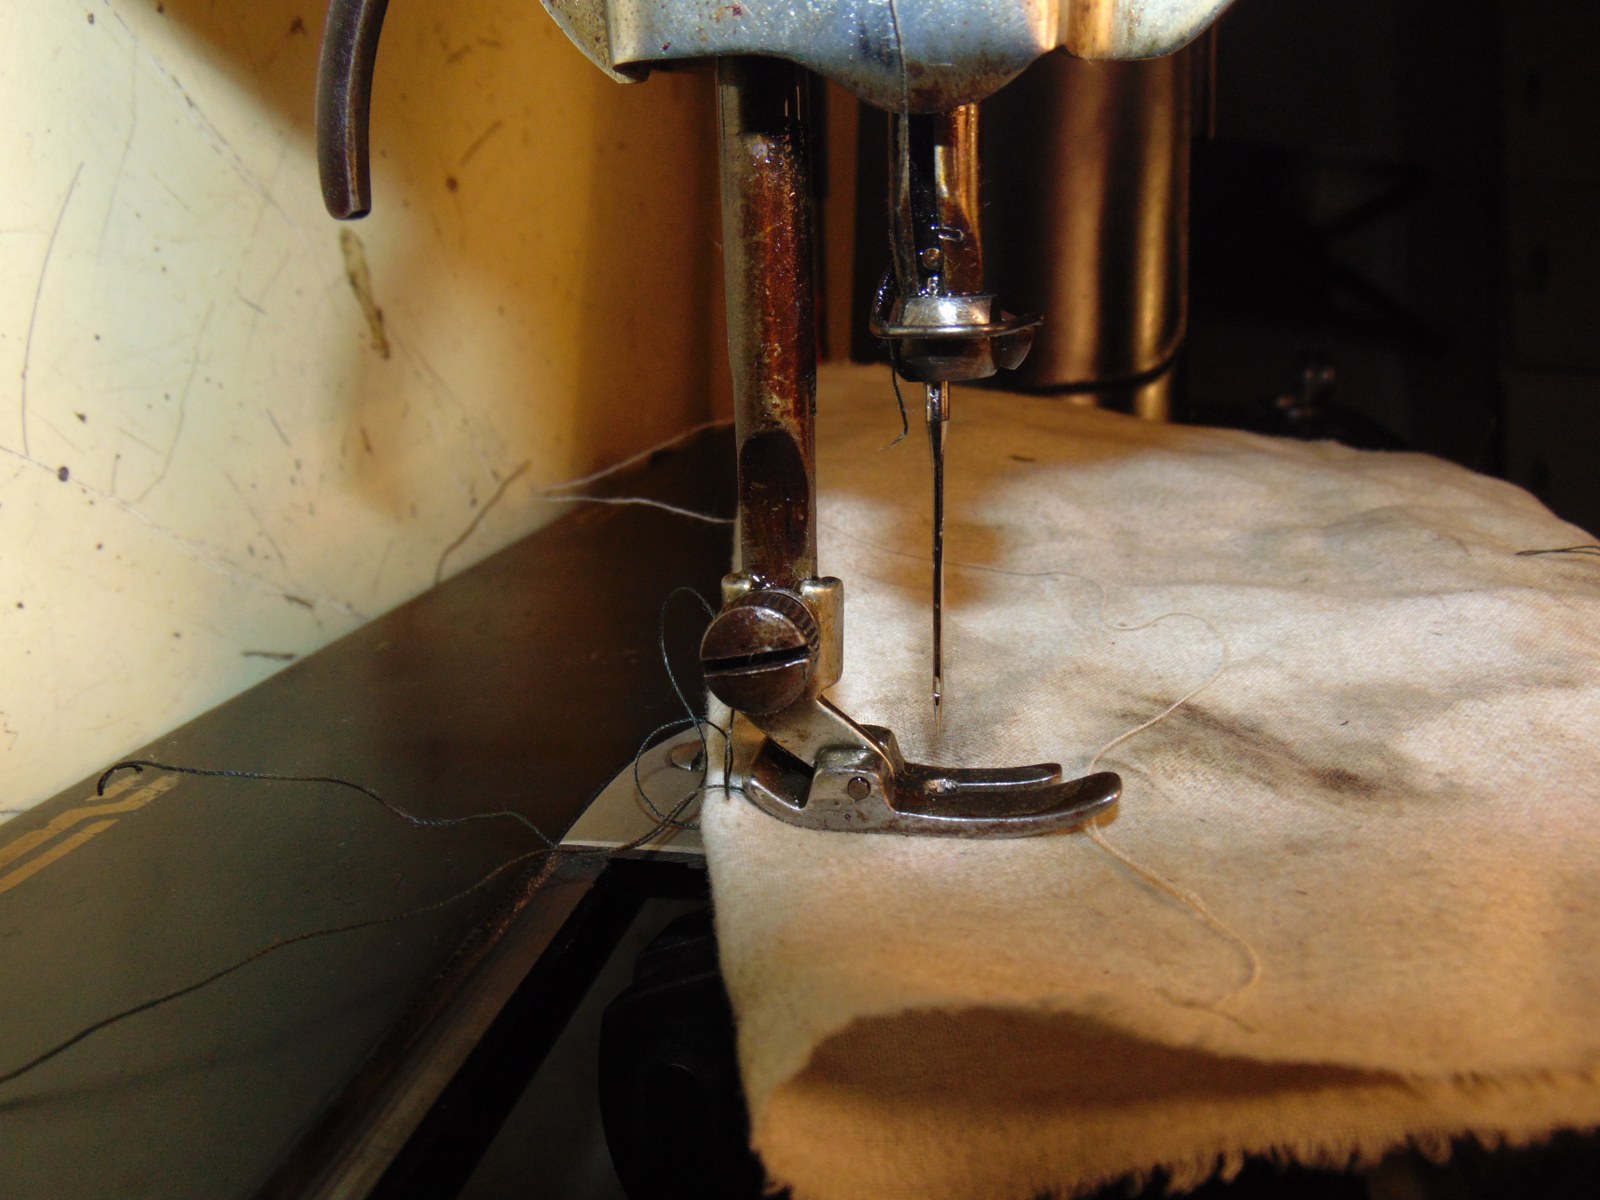
    I have an old Vigor sewing machine (maybe from 1920), in good external condition.
    I cleaned and oiled the links, the action is smooth but the machine is still not working.
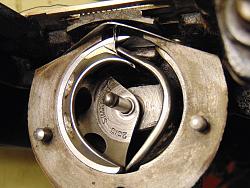
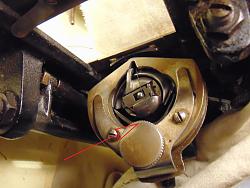
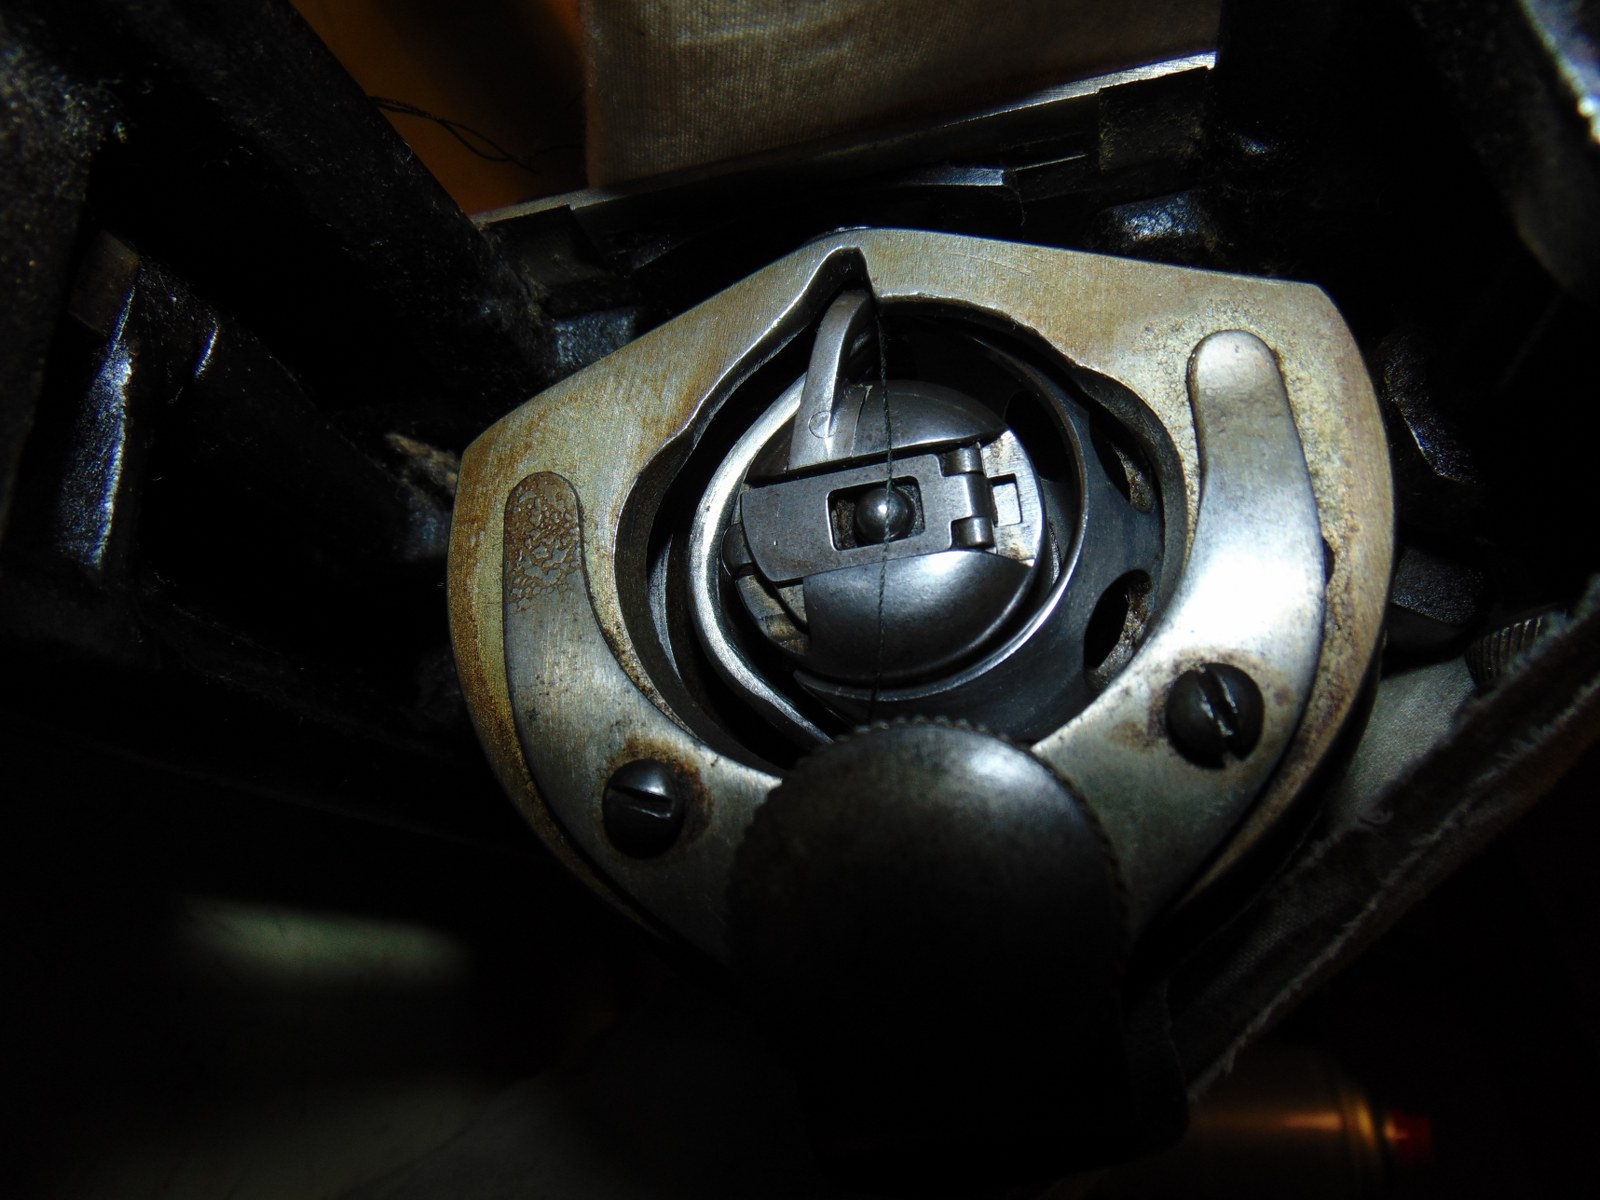
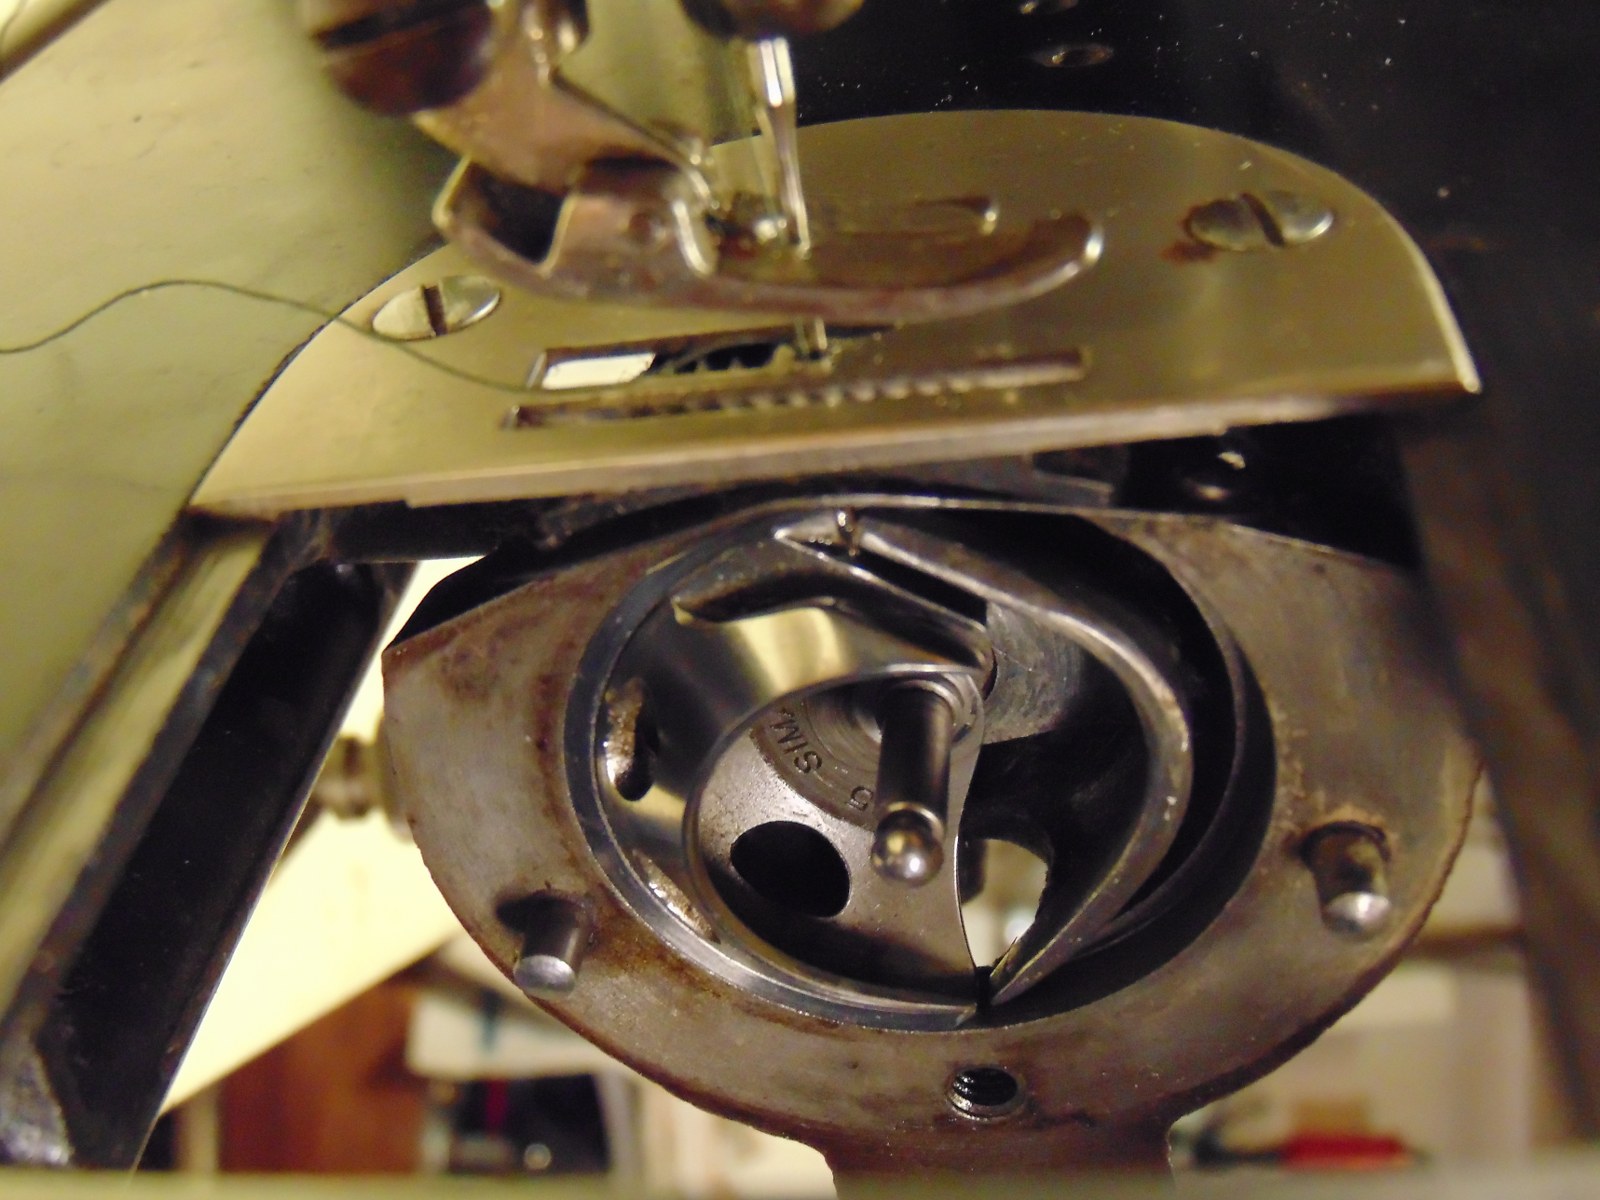
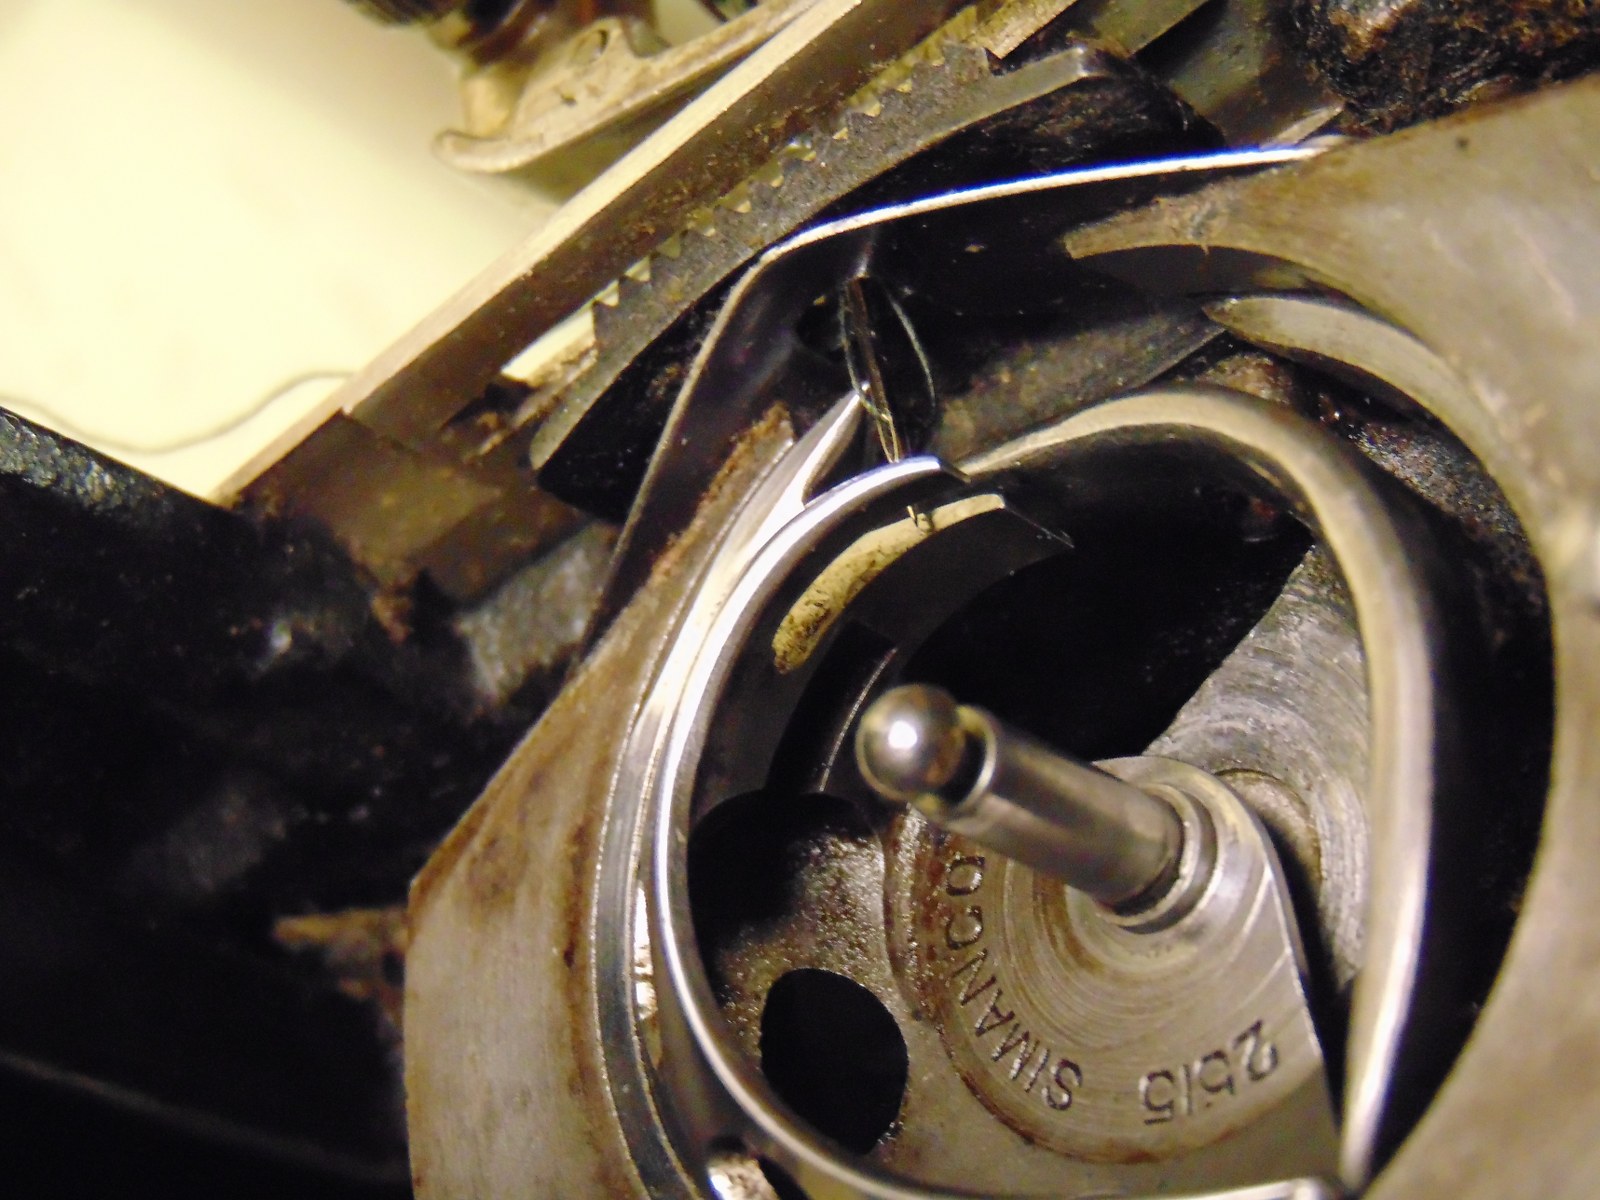
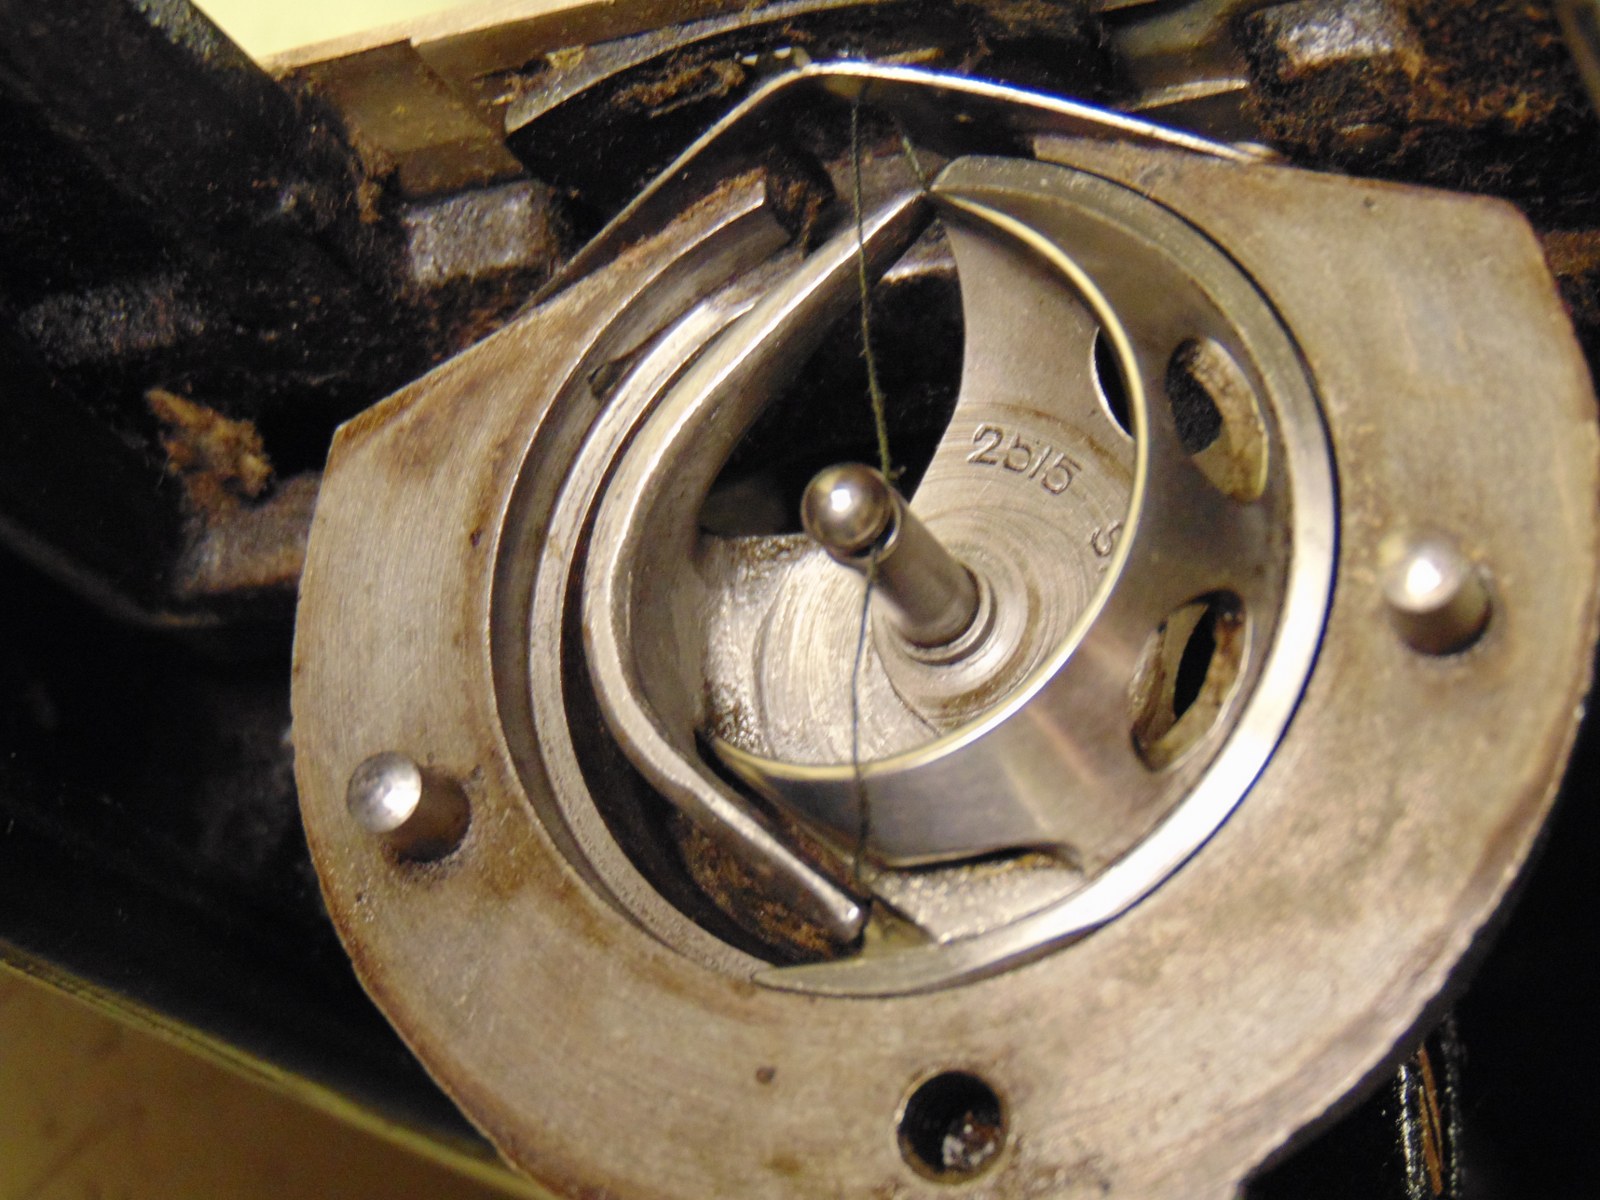
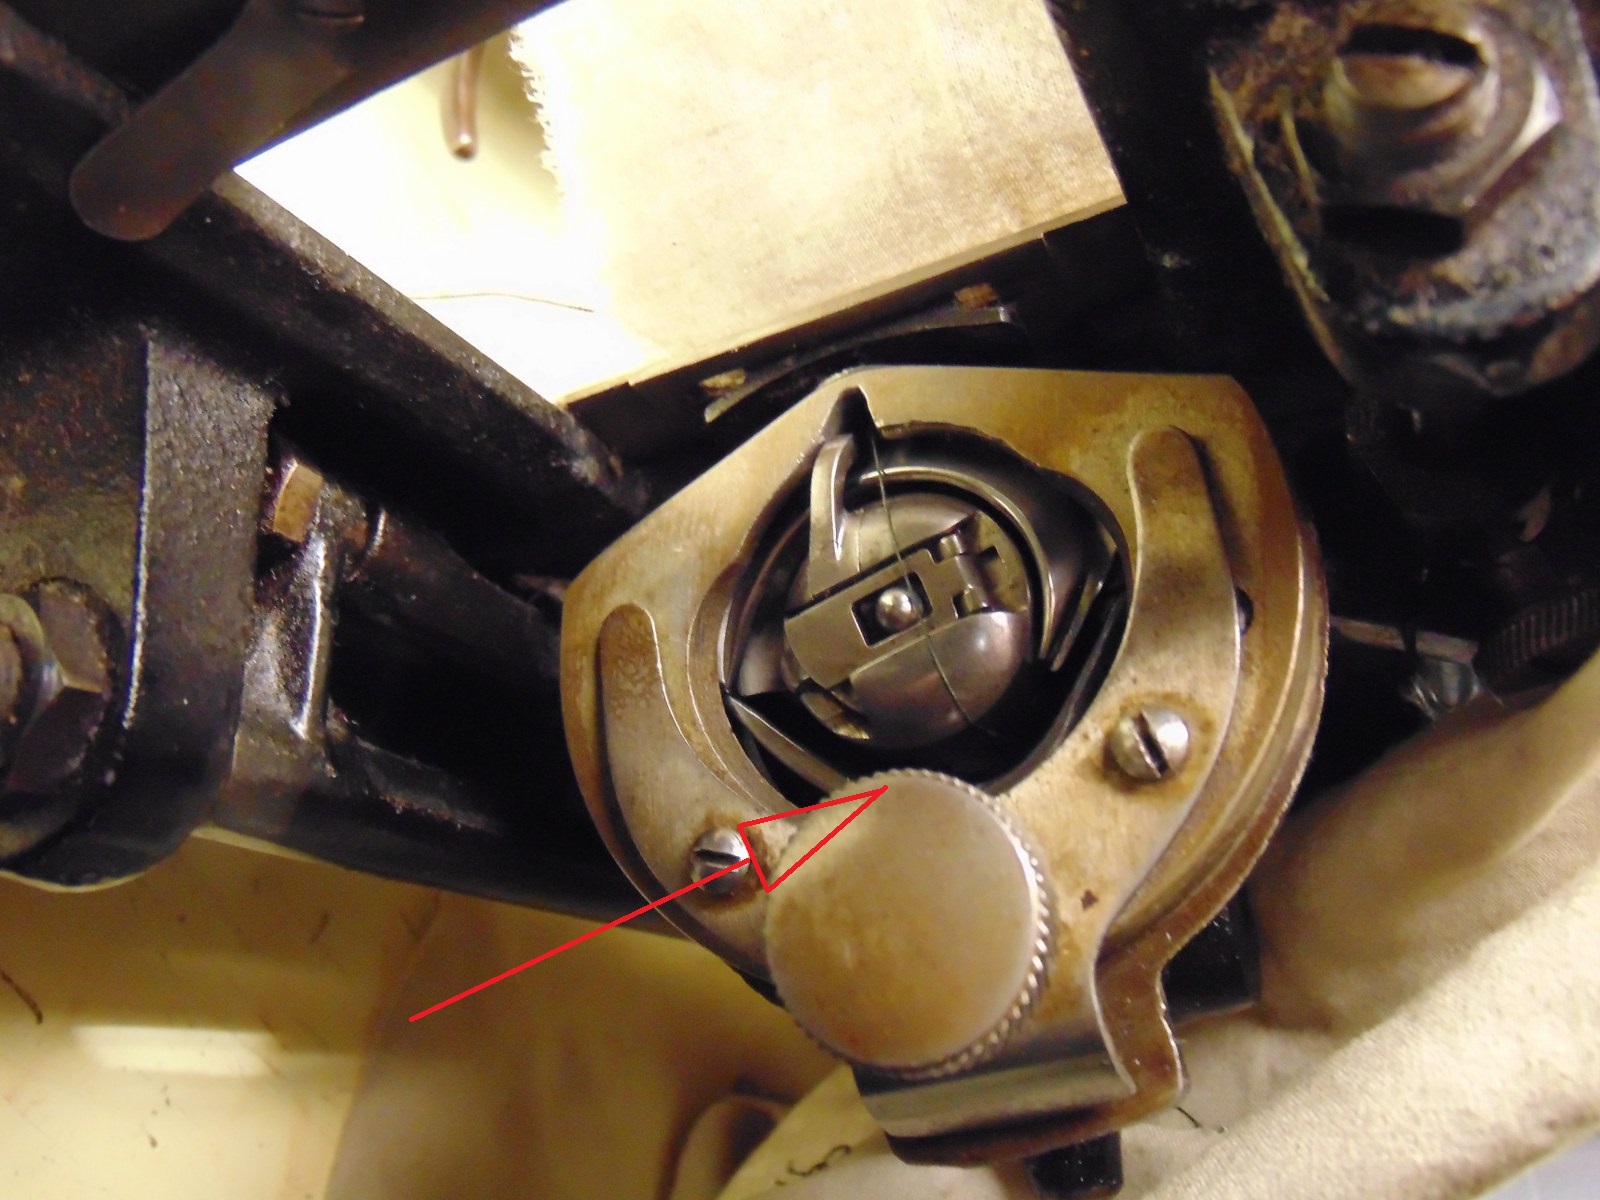
    I'm not so sure about the path of wire, nor if the shuttle is ok

    When I try to advance the wire doesn't make a turn around the shuttle and makes a tangle, causing wire breakage. Maybe it's a timing trouble, or worn parts
    Have some advice? I'm a noob of sewing machines, but I want to learn how to use

    Saluti
    Stefano

    Trouble with old sewing machine-dsc02022_1600x1200.jpg Trouble with old sewing machine-dsc02023_1600x1200.jpg

    Trouble with old sewing machine-dsc02025_900x1200.jpg Trouble with old sewing machine-dsc02026_1600x1200.jpg

    Trouble with old sewing machine-dsc02028_1600x1200.jpg Trouble with old sewing machine-dsc02030_1600x1200.jpg

    Trouble with old sewing machine-dsc02032_1600x1200.jpg Trouble with old sewing machine-dsc02033_1600x1200.jpg

    Trouble with old sewing machine-dsc02034_1600x1200.jpg Trouble with old sewing machine-dsc02035_1600x1200.jpg

    Trouble with old sewing machine-dsc02036_1600x1200.jpg

    186 More Best Homemade Tools eBook

  2. The Following 2 Users Say Thank You to rendoman For This Useful Post:

    PJs (Feb 12, 2017), Toolmaker51 (Feb 13, 2017)

  3. #2
    Supporting Member Toolmaker51's Avatar
    Join Date
    Feb 2016
    Location
    Midwest USA
    Posts
    5,331
    Thanks
    7,042
    Thanked 2,980 Times in 1,893 Posts

    Toolmaker51's Tools
    Used to sew insulation materials. Toolmaking is an expansive category, but I recall little of use to you.
    On the other hand, this appears to be a common homemaker machine. Those operate very much alike. A Google.com 'sewing machine problems' search pulled a zillion hits. Typical pages are ''5 common issues...'' etc. Unless it was dropped or won't cycle, sewing mechanisms are fixed by cleaning and careful lubrication, as things a homemaker could attend to. Can't speculate on Italy, but I'd think crafting is better rooted there, and shops to accomplish repairs exist. Vastly produced machines here were 'Singer' 'White' brands, and did a large portion of contract building as well, starting pre 1900. By interpreting the control labels, a similar unit and pdf manual should be easy to find.
    Cool history note. Singer was commissioned by US Govt in 1925 to conduct feasibility studies theorizing production of 100 1911A1 .45 ACP pistols units per hour. In 1940 an educational production was awarded on 500 units. The 100 p/h was not achieved but the 'educational study' still advanced manufacturing practices and tooling was absorbed by Remington and Ithaca.
    Those 500 units are among the most sought after today; enough so that many appearing are faked.

    2000 Tool Plans
    Sincerely,
    Toolmaker51
    ...we'll learn more by wandering than searching...

  4. The Following 2 Users Say Thank You to Toolmaker51 For This Useful Post:

    PJs (Feb 13, 2017), rendoman (Feb 13, 2017)

  5. #3
    Supporting Member rendoman's Avatar
    Join Date
    Nov 2015
    Location
    Italy
    Posts
    435
    Thanks
    451
    Thanked 496 Times in 241 Posts

    rendoman's Tools
    Thanks for the history note, i didn't know!
    I'm searching info, Vigorelli factory is closed and there are spare parts for recent production.
    I'm searching for old Singer manuals (similar in shape) like for example the model 15-91. I have to find an old singer with more or less the same operation and study how to operate. Luckily old tech papers are easy to find but since it's my first time with sewing machine, I don't want to make a mess and find myself with a bunch of pieces on the table

    The good old local shop of sewing machines closed few years ago, I went to another one that told me to buy a new one, because repair my old vigor cost much and not worth it (this without seeing the machine).

    http://parts.singerco.com/IPinstManuals/15-91.pdf

    http://parts.singerco.com/IPinstManuals/66.pdf

  6. The Following 2 Users Say Thank You to rendoman For This Useful Post:

    PJs (Feb 13, 2017), Toolmaker51 (Feb 13, 2017)

  7. #4

    Join Date
    Feb 2017
    Posts
    2
    Thanks
    0
    Thanked 3 Times in 2 Posts
    Hello Stefano
    I think I can help you with the sewing machine. I used to work with a carpet binding machine which looked very similar to this one.
    First the threading is not correct. Go from the spool on top of the machine to the guide on top rear at the left end as in picture #1. From there down between the tension disks from the back and up inside the curved guide Then go through the thin spring. Next go through the tension lever that goes up and down (from the back to the front), then down through the guide loop on the end plate.The thread then goes down through the guide on the top of the needle and straight down to the needle passing through it from left to right.

    When the needle goes down through the material it must go low enough so that the eye of the needle goes below the the point of the shuttle (shuttle hook). Looking at picture # 7 and assuming that the needle is still coming down and that the shuttle hook is still moving to the left then all is good. The shuttle has to rotate further to the left and the needle must come down more. (The space between the needle and the hook in this picture should be about the thickness of a strip of paper … almost touching)
    .Picture #8 shows the needle and shuttle in the correct positions assuming that the needle is starting up and the shuttle is starting to rotate to the front. The material you are sewing holds the thread as the needle starts to go up. This makes the loop of thread beside the needlet that the shuttle hook has to catch as it comes forward.
    Picture #10 shows this correctly.
    The shuttle must now rotate to the left until the loop in at the bottom as in picture # 11. This is when the tension lever above quickly jerks the thread up the rest of the way around the bobbin holder and up through the space in the shuttle race and then up tight against the back in the material. If the timing is not correct (needle does not go far enough down or the shuttle hook does not go far enough back) then you will not get a stitch.

  8. The Following 2 Users Say Thank You to JEmmelkamp For This Useful Post:

    PJs (Feb 14, 2017), rendoman (Feb 14, 2017)

  9. #5
    Supporting Member rendoman's Avatar
    Join Date
    Nov 2015
    Location
    Italy
    Posts
    435
    Thanks
    451
    Thanked 496 Times in 241 Posts

    rendoman's Tools
    Hi!
    Many thanks for the advice!
    I'll try to change the path of wire and make a detailed video, it can be better compared to pictures
    The sure thing for now is that I not get a stitch, I never thought that sewing machines were so complicated

  10. The Following User Says Thank You to rendoman For This Useful Post:

    PJs (Feb 14, 2017)

  11. #6
    Supporting Member rendoman's Avatar
    Join Date
    Nov 2015
    Location
    Italy
    Posts
    435
    Thanks
    451
    Thanked 496 Times in 241 Posts

    rendoman's Tools
    I tried a couple of video, uploaded on youtube
    In the Singer manual of 19-91 model (it seems close to my machine) I found a schematic for wire and I tried to replicate with your advice.

    I don't know if it's normal, but the bobbin case and close parts have some movement.


    Singer schematic
    Trouble with old sewing machine-singer-15-91.jpg

    Trouble with old sewing machine-dsc02040_1600x1200.jpg Trouble with old sewing machine-dsc02041_1600x1200.jpg

    Trouble with old sewing machine-dsc02042_1600x1200.jpg Trouble with old sewing machine-dsc02043_1600x1200.jpg

    lower position of needle

    Trouble with old sewing machine-dsc02047_1600x1200.jpg

    Trouble with old sewing machine-dsc02048_1600x1200.jpg

    Trouble with old sewing machine-dsc02049_1600x1200.jpg Trouble with old sewing machine-dsc02050_1600x1200.jpg

  12. The Following User Says Thank You to rendoman For This Useful Post:

    PJs (Feb 16, 2017)

  13. #7

    Join Date
    Feb 2017
    Posts
    2
    Thanks
    0
    Thanked 3 Times in 2 Posts
    I think you are pretty close on the threading. In picture #5 stay behind the curved rod guide when you go between the tension disks the over it and then simply under the small spring (not around it). This is before you go through the tension lever that goes up & down. The small spring is there to keep the thread behind the curved rod when the tension lever goes downward.
    The movement in the bobbin area is normal & OK…. There has to be enough room for the thread to pass around the bobbin case and up through the space between the shuttle driver race and the tail of the shuttle.
    Do you have a loaded bobbin in the bobbin case? The bobbin looks like two small disks with a tube between them. It is wound with thread in the apparatus up near the hand wheel. The bobbin is small enough to sit inside the bobbin case, and the thread on the bobbin is passed under a flat spring on the flat side of the bobbin case. When you load the bobbin case in the machine, pull about 2 inches of thread out and let it hand loose on the right side of that little finger on the bobbin case.
    In the pictures from your first post, #7 and #8 show the shuttle hook rotating to the left (back of the machine) and then coming toward the front and catching the thread loop. This is correct. If you put the machine in this position again, hold the end of the thread to the right of the needle, and watch as you turn the hand wheel. The shuttle hook will catch the loop pulling it to the right or forward, go half a turn and it should slip off the end on the hook. At this instant, the tension lever jerks the thread up and it will catch on the mounting shaft of the bobbin case. Normally it would slip over the bobbin case thereby completing one stitch ( a single loop around the bobbin thread).
    Before you start sewing, and before you put material under the needle, hold the end of the thread to the right of the needle and turn the hand wheel around once. This will pass the thread around the bobbin once. When you then slide something thin under the foot, it will lift the bobbin thread up to the top side. Now hold both threads, put the material under the presser foot and let it down. The machine should now sew!


    186 More Best Homemade Tools eBook

  14. The Following User Says Thank You to JEmmelkamp For This Useful Post:

    PJs (Feb 16, 2017)

Thread Information

Users Browsing this Thread

There are currently 1 users browsing this thread. (0 members and 1 guests)

Bookmarks

Posting Permissions

  • You may not post new threads
  • You may not post replies
  • You may not post attachments
  • You may not edit your posts
  •