3 Attachment(s)
Yet another Honey-Do: Growling washing machine, Pt 1
After some 7 years of immaculate service our Ariston Hotpoint "ECO" 8 kg capacity & 1600 rpm spin, "WMD 863B EU" model,
started some "growling" in its spin cycle, driving my beloved up the wall (see pic - the machine: neither the partner nor the wall):
Attachment 35073
The sound got louder and louder thru the weeks, making us all realize: "Some things needs to get done by somebody."
My 1st thought: Change of bearings & oil seal: How hard can that be? Famous last words...
Also being cheap-to-the-bone - I didn't want to spend app 620 bucks for a new washer of similar capacity,
so I forewarned about a 1 week standstill for our present one, giving all the sensitive persons in the area time to clean their necessities.
Meanwhile, doing some Interweb research regarding spare bearing kits for the model in question: Nada!
There was a spare part being offered, all right: An entire "drum unit" for a mere 200 bucks.
"BS" I thought - a purported "eco friendly" machine would never provide that sort of landfill waste...
-Any reader suggestions on the environmental friendliness of ditching an entire drum to replace a coupla bearings and a seal?
So: Armed with the necessary and sufficient tools and hopefully ditto skills and knowledge for the job,
I happily unplugged the water and drain hose and electrical cable without mishaps.
Reverse engineered the machine : top lid, front and rear panels, unbolting the motor and belt,
dislodged the front bellows, unplugged all the electrical connectors AFTER marking all their proper places,
taking cellphone shots of crucial places, loosen the concrete top weight and marking all the bolts.
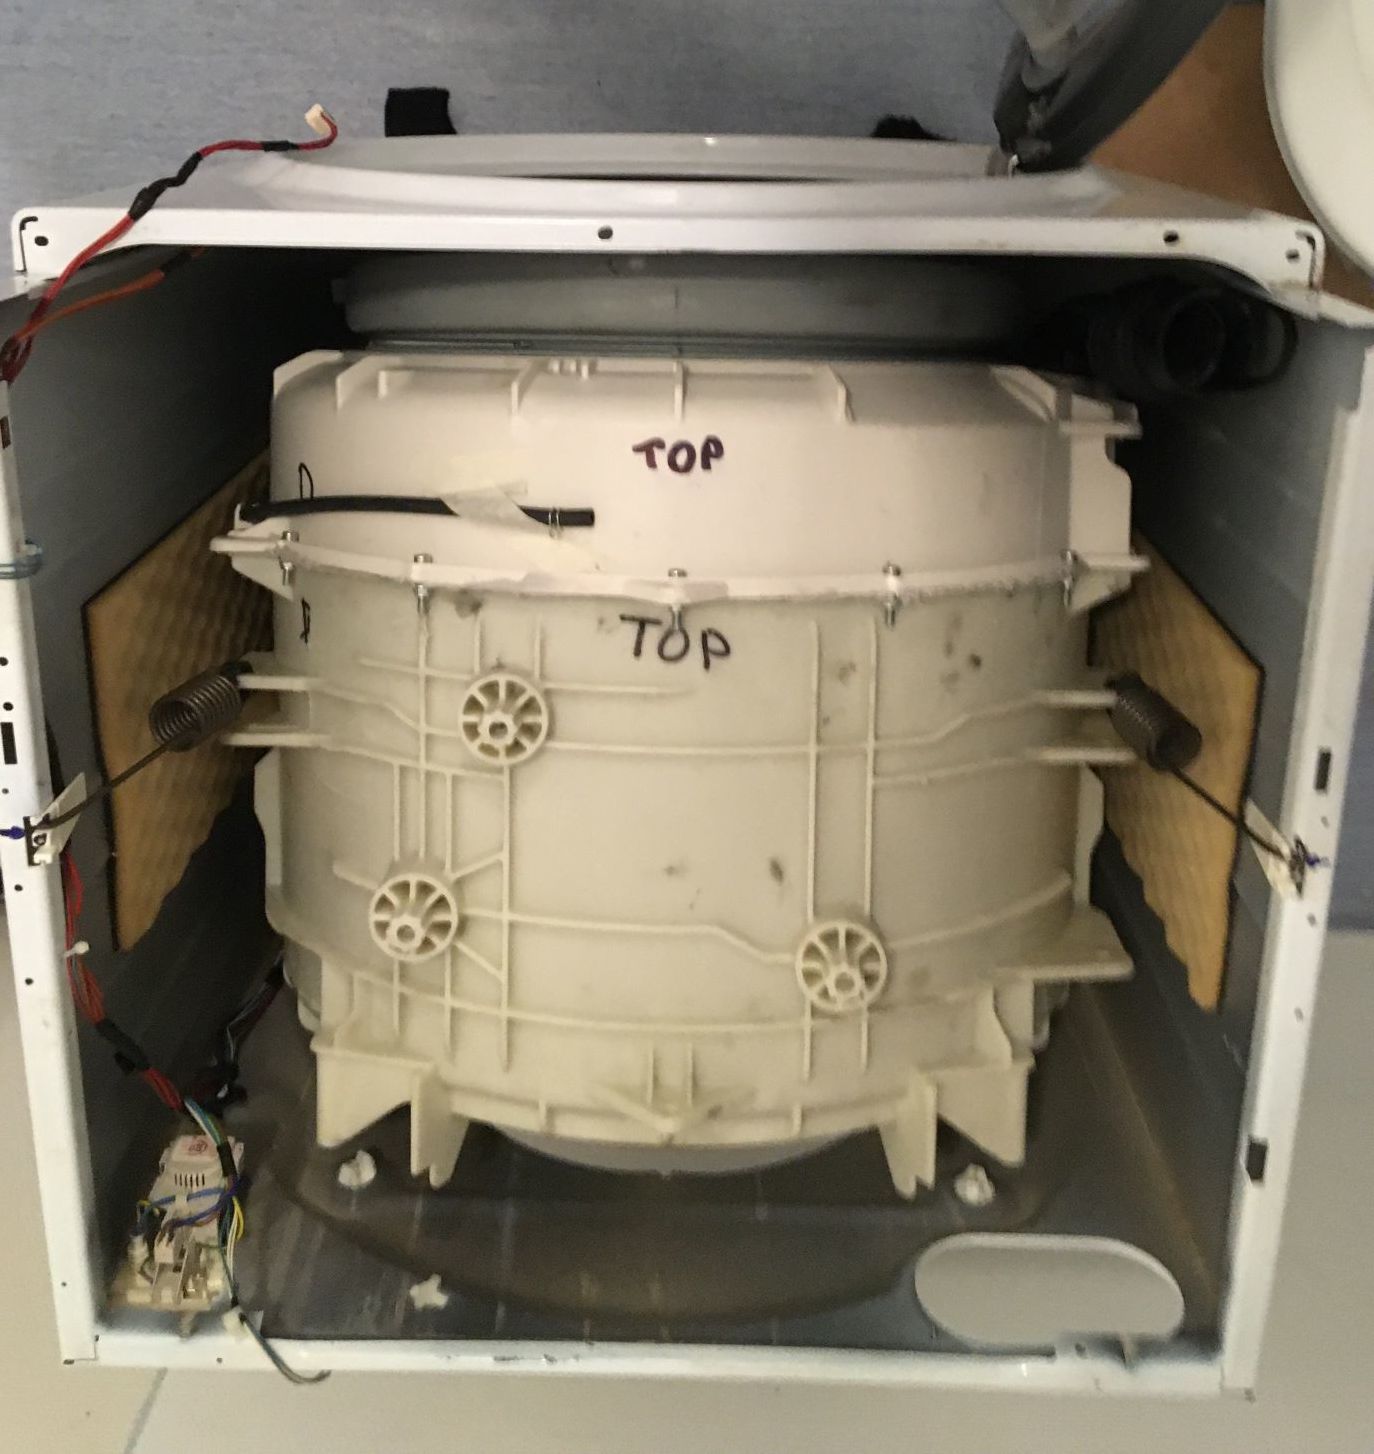
Last was the bottom hose clamp, then "the Sealed Unit" was just hanging in two springs on two dampers.
Turning the drum did produce a resonant growl in the unit, so I seemed on the right track.
Getting the unit up and out of the enclosure went smooth though it was a pretty heavy lift.
The entire machine weighs in at over 75 kgs. Unbolted the bottom concrete block.
45 minutes had elapsed - this was going even better than expected!:)
-Y'a all still remember the "Pt 1" in the title, right?
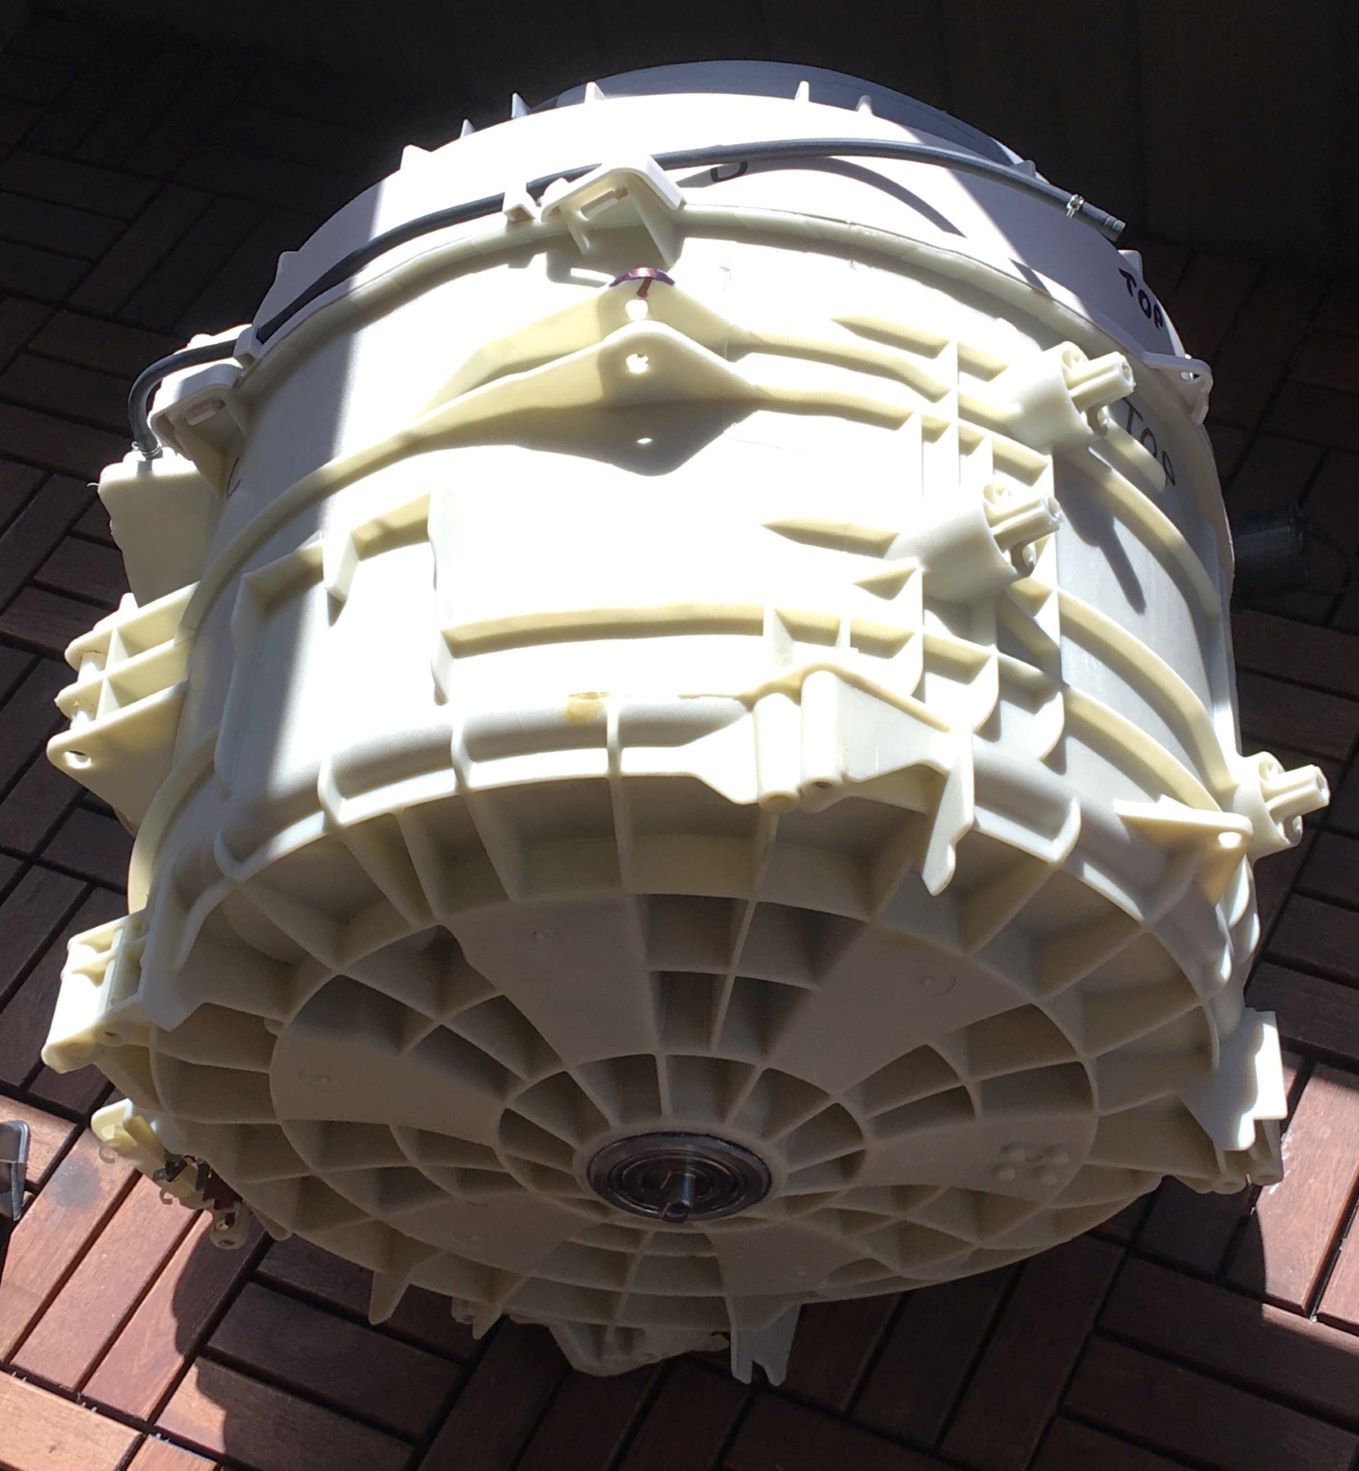
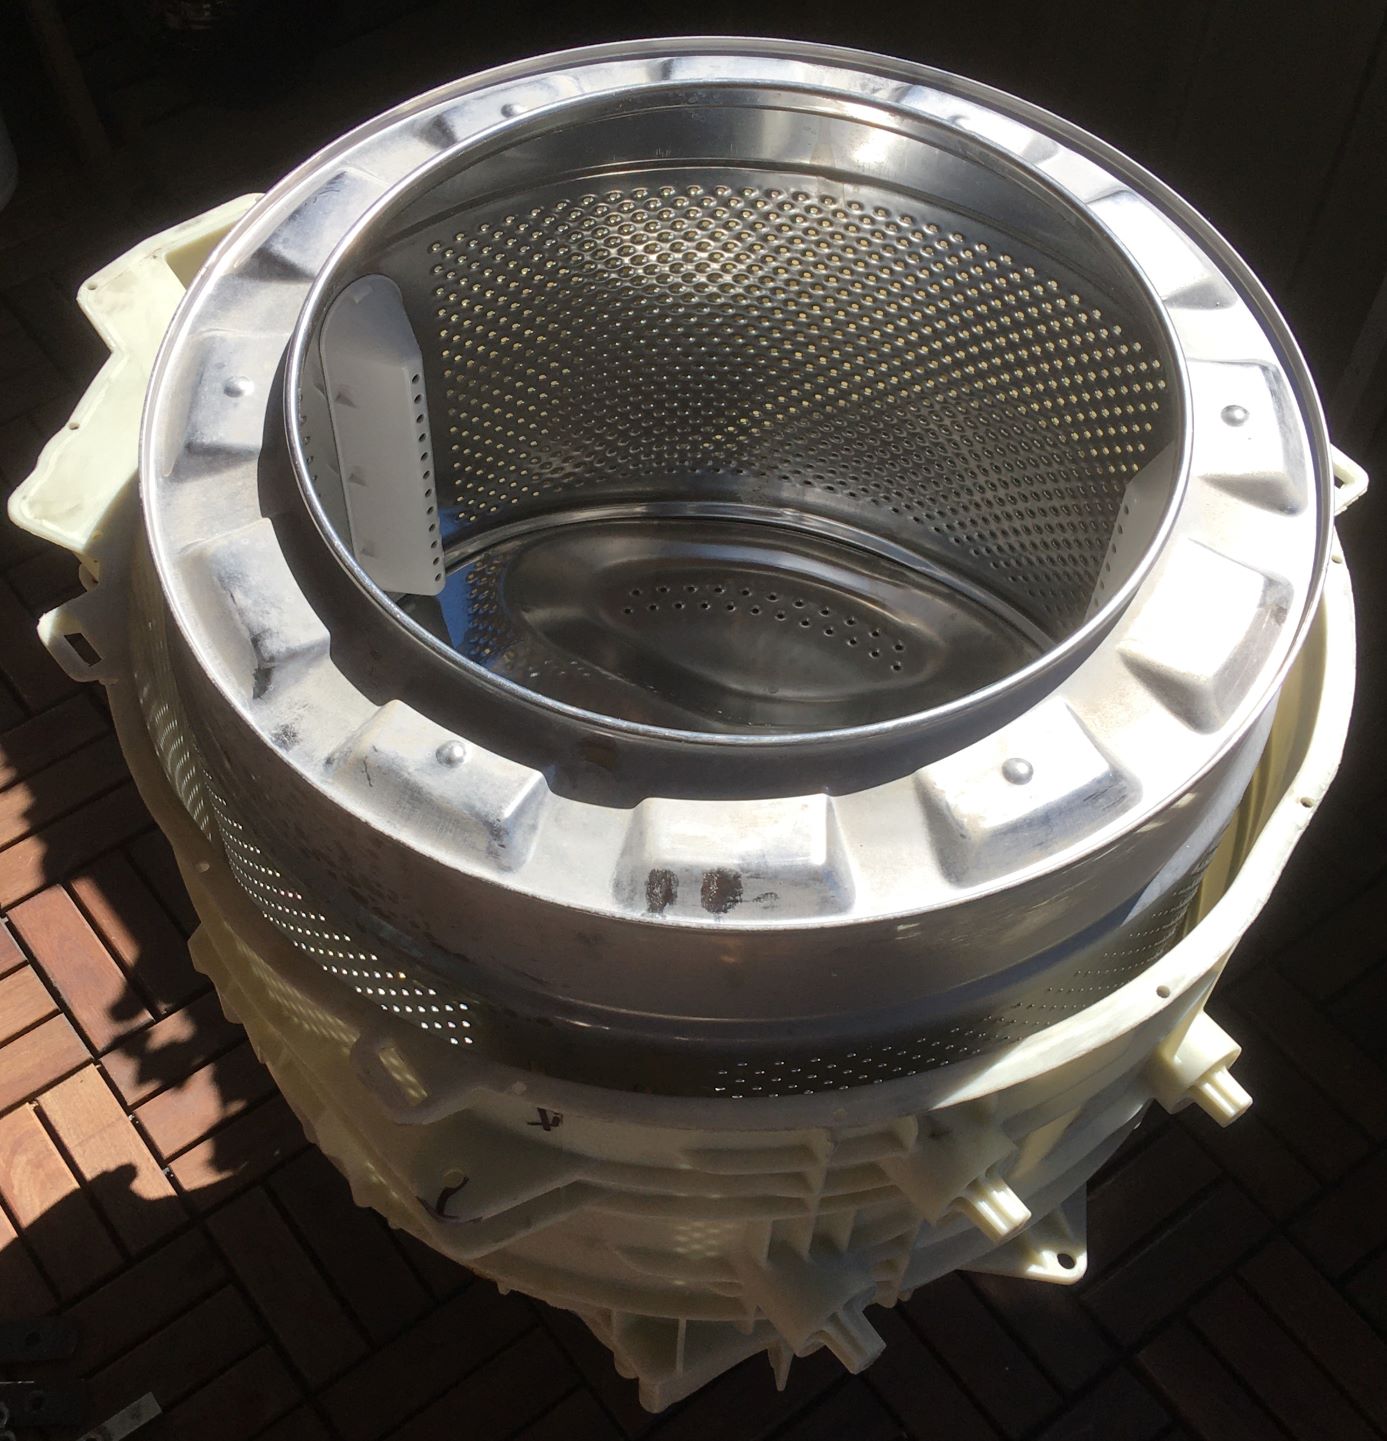
-Voila: "The Unit".
Attachment 35071
The Greeks called their fundamental constituent particle "Atom", "ἄτομος": greek for "inseparable",
only to be proved false some 25 centuries later.
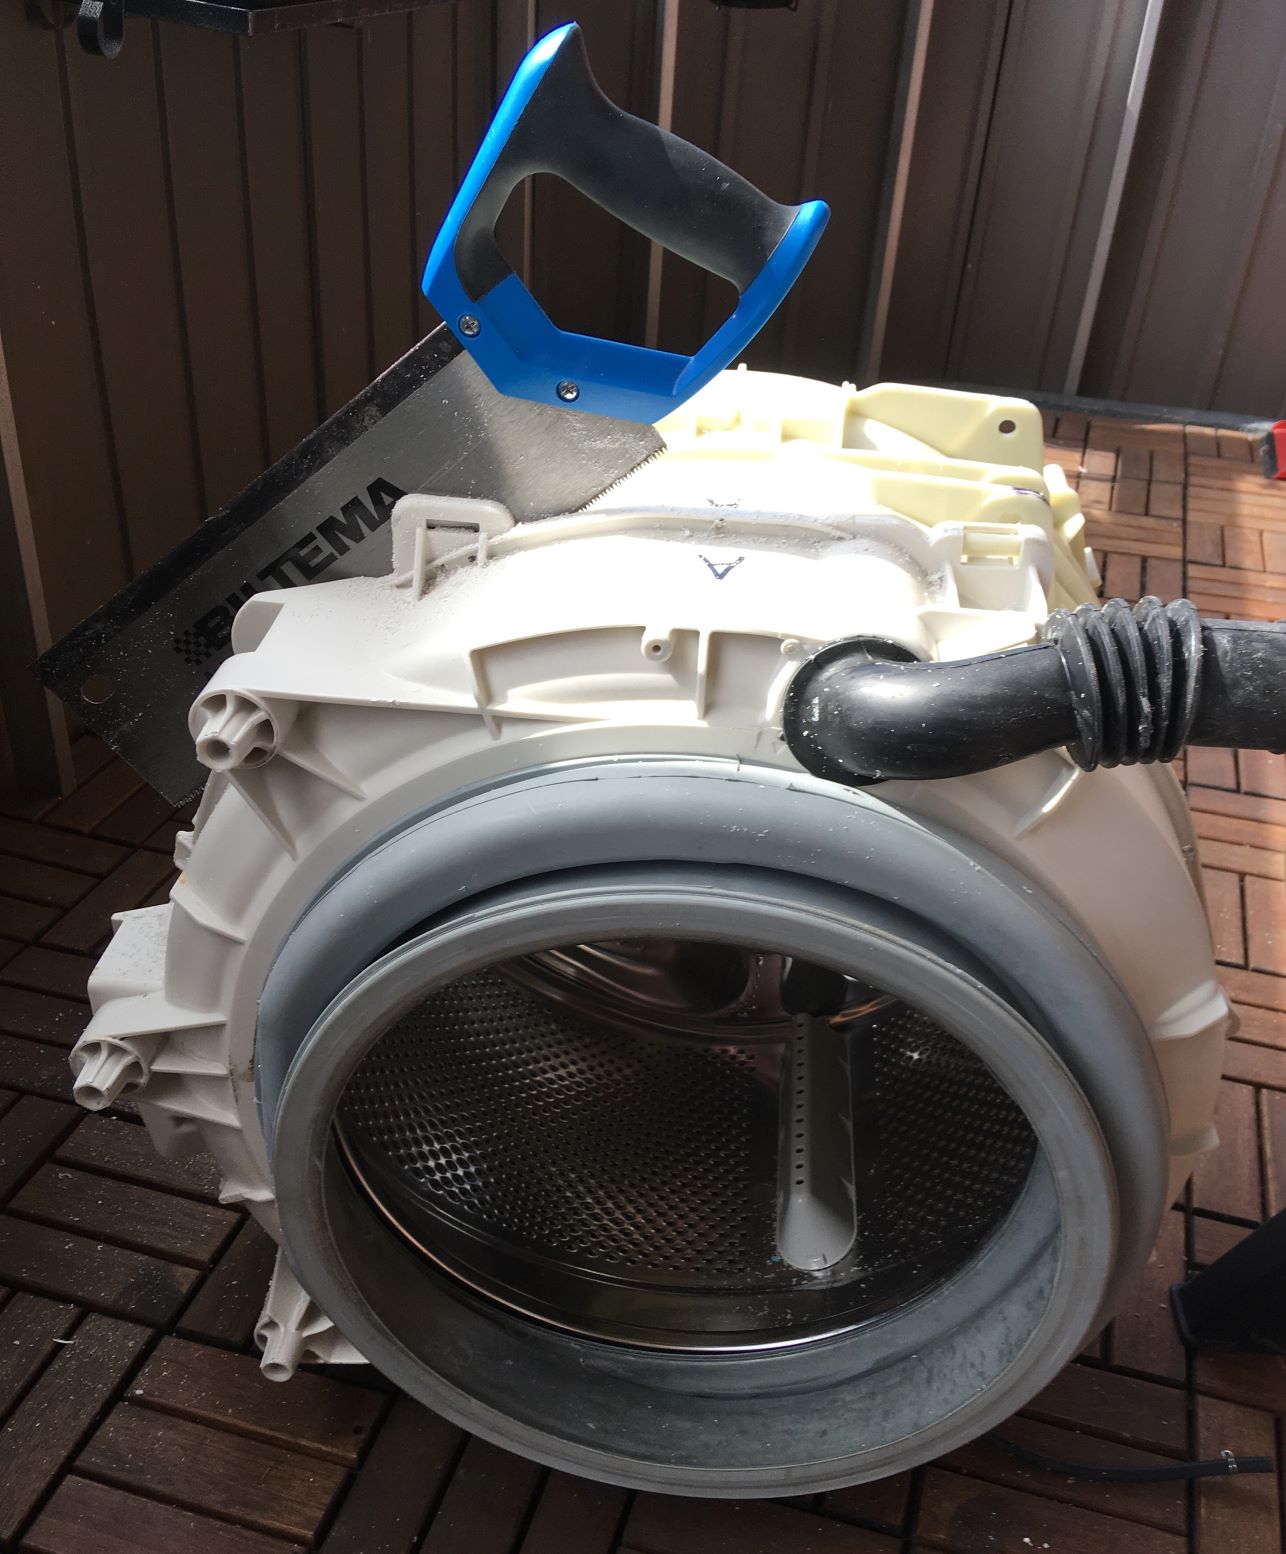
Consequently I was very much in the mood for dividing "The Unit" (alleged by some manufacturer) into its constituent parts:
Attachment 35072
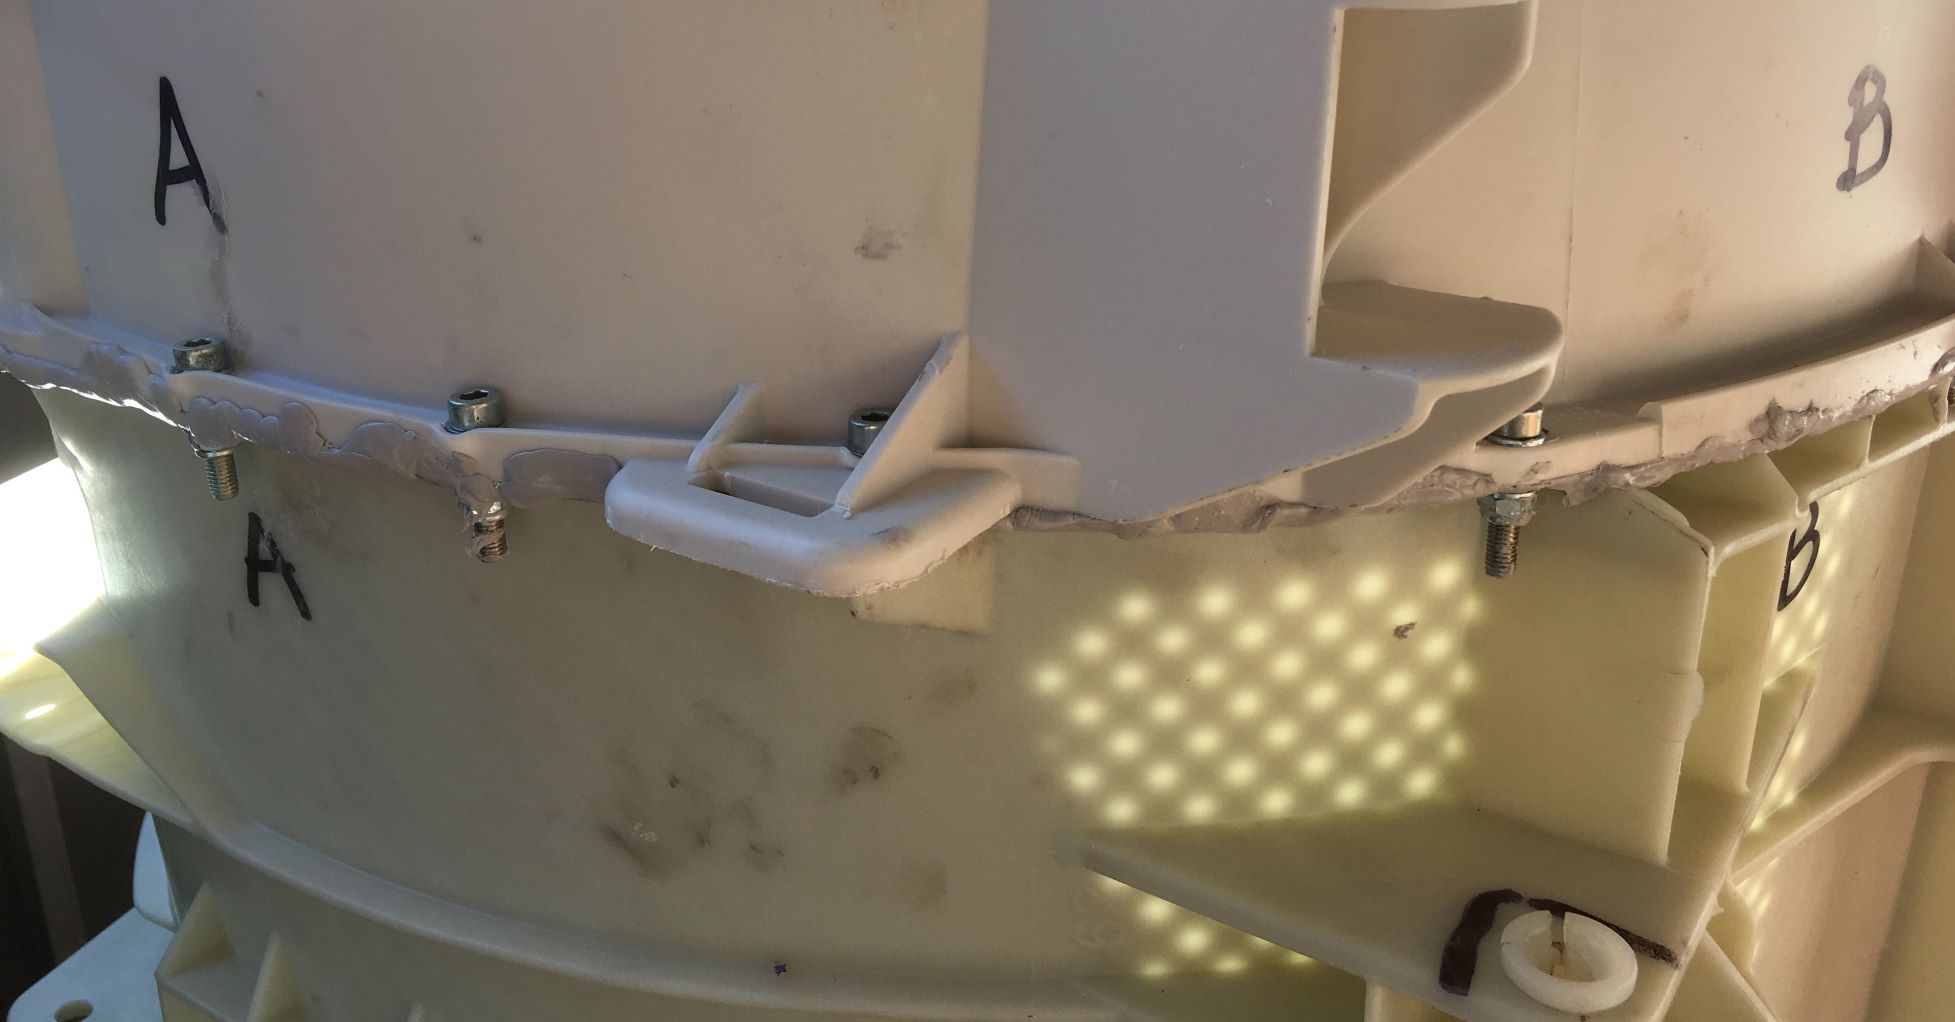
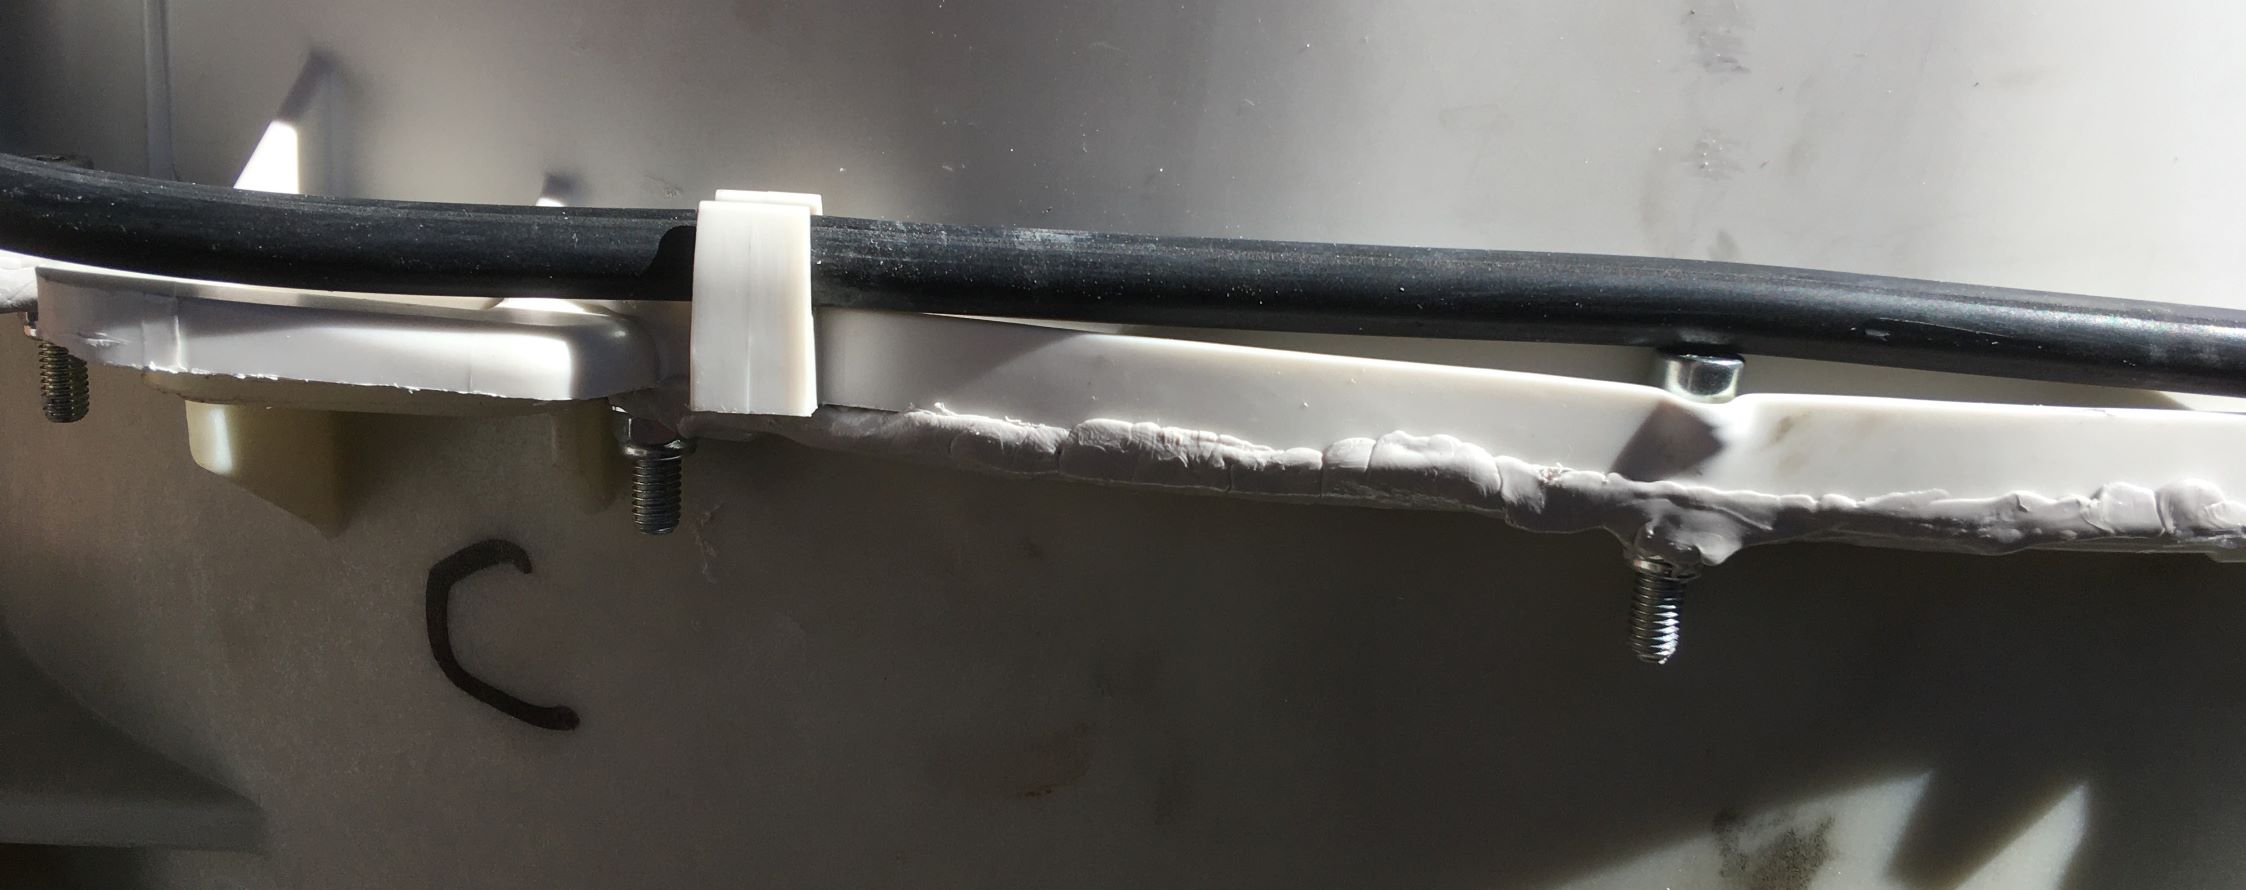
Trying to prove I'm not entirely nuts, I had previously drilled a lot of 5,2 mm holes through the "weld seam" in the two halves,
providing a means of rigidly holding them together with M5 screws and nuts in the bright, promising future.
Hypothesis for keeping the previously "Sealed Unit" water-tight will probably be revealed and tested,
given I can get the old bearings out, and new ones could be found and delivered.
2B continued...
8 Attachment(s)
Growling washing machine, Pt 2...
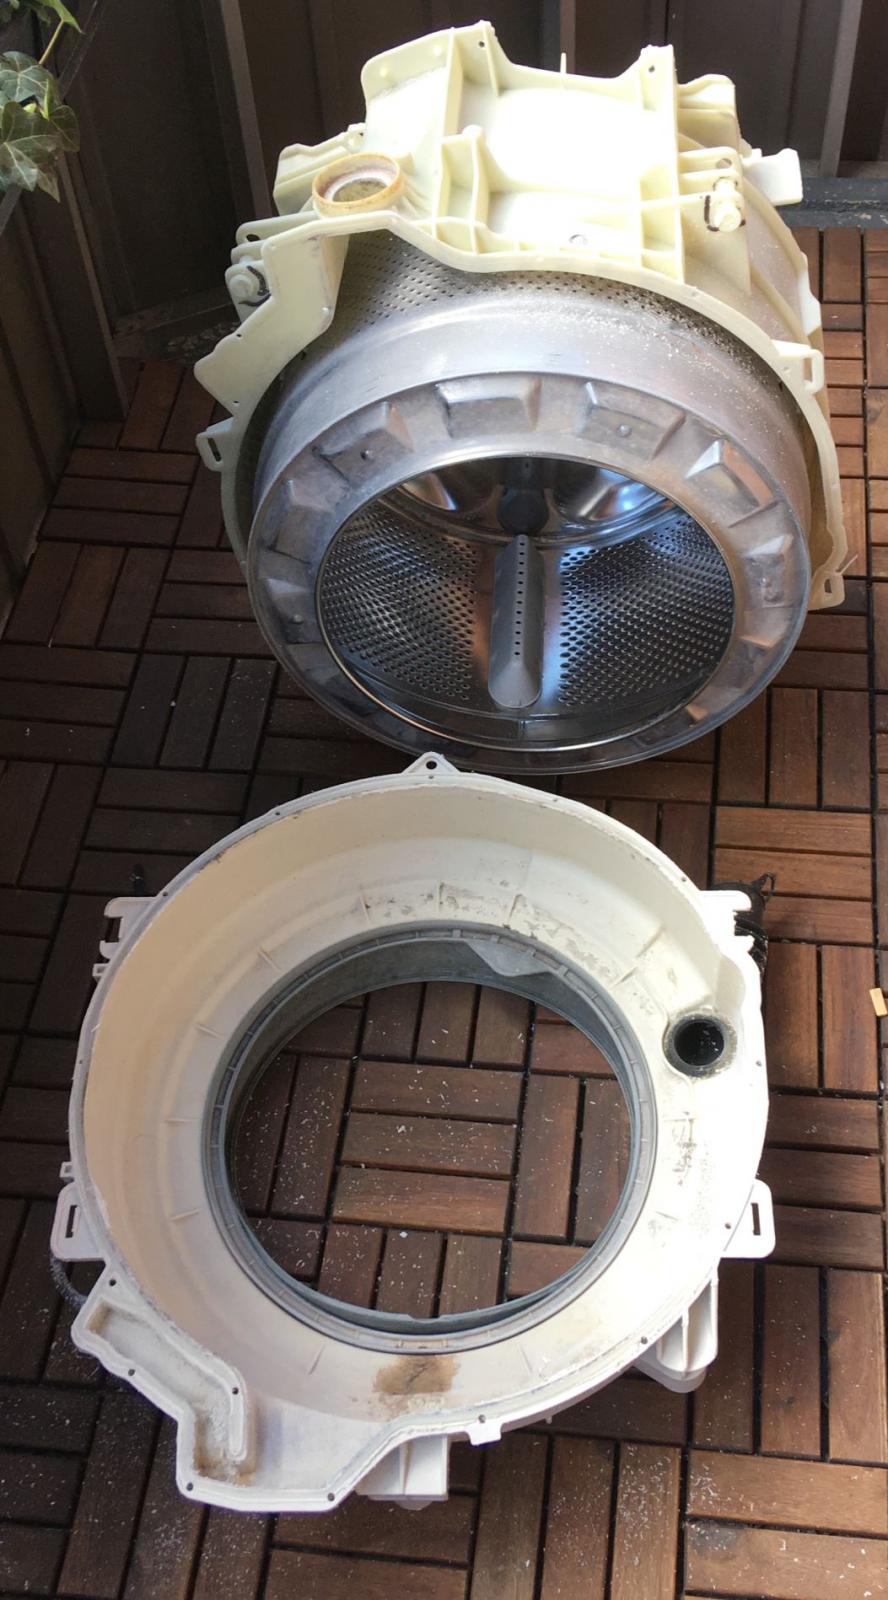
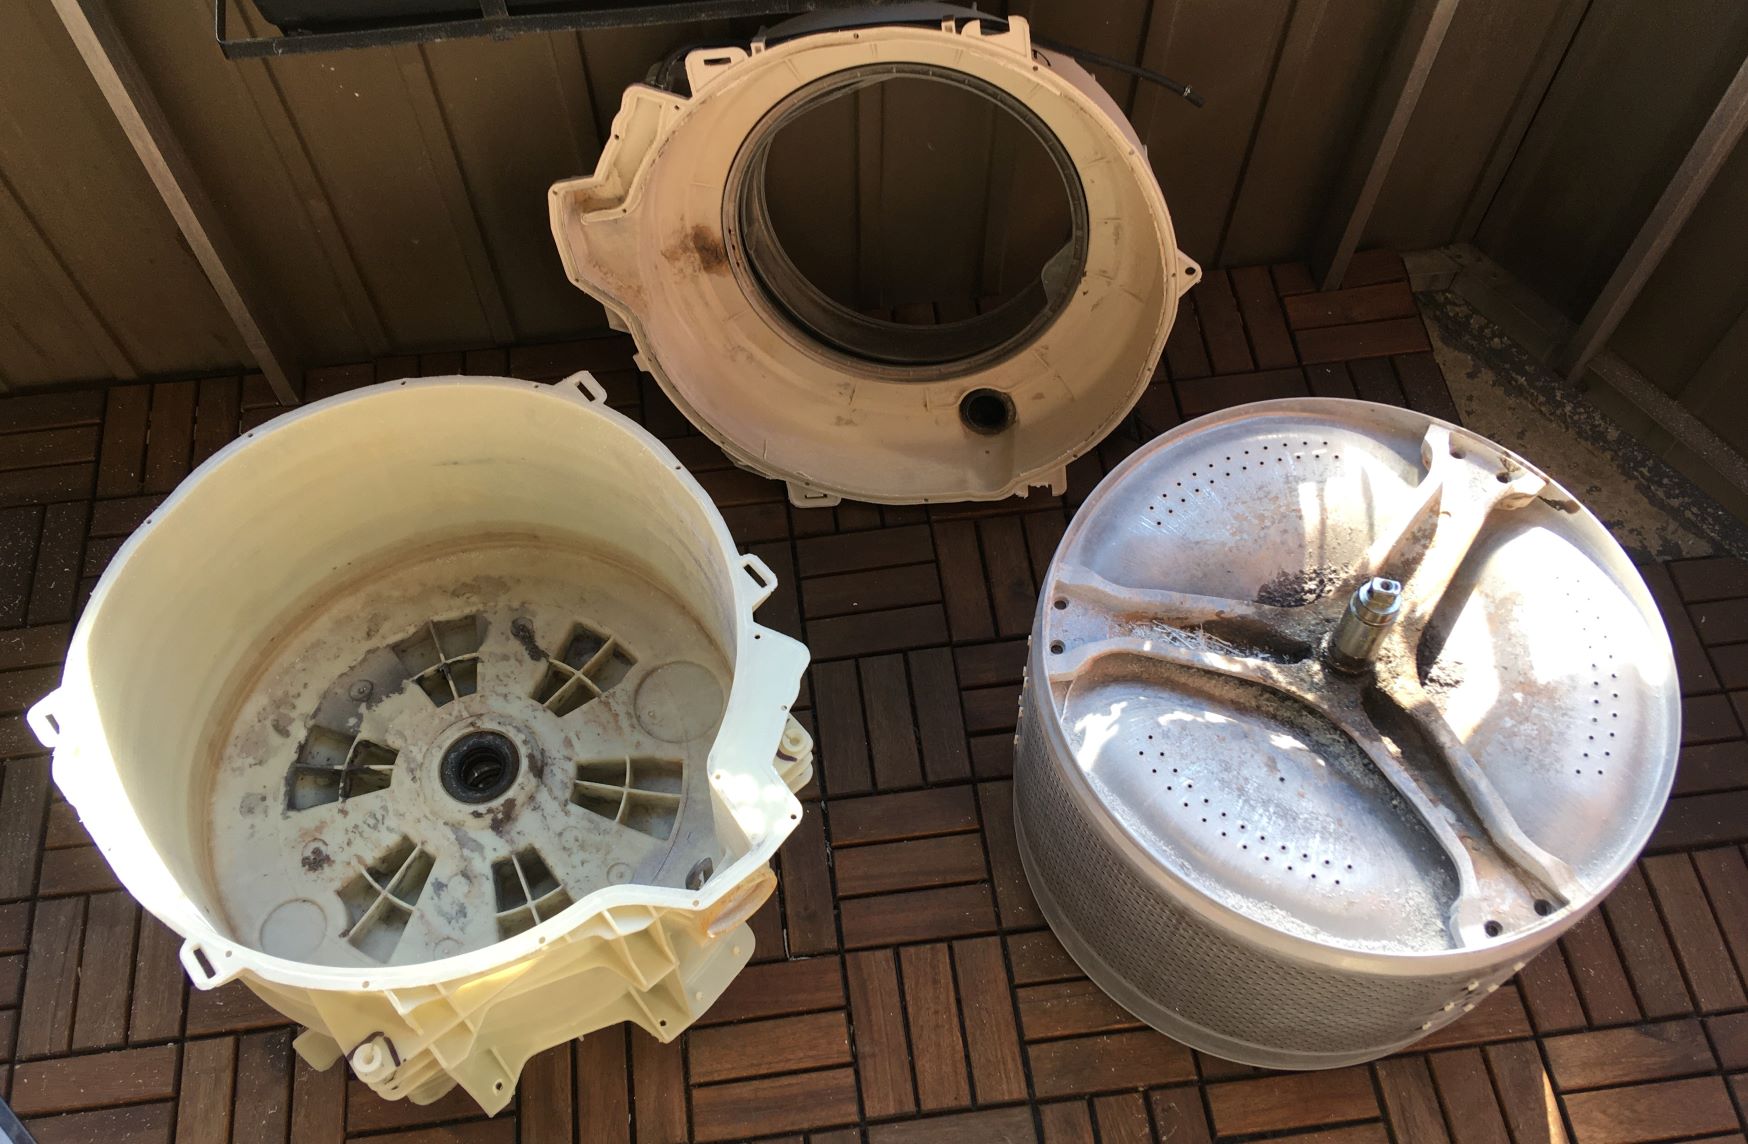
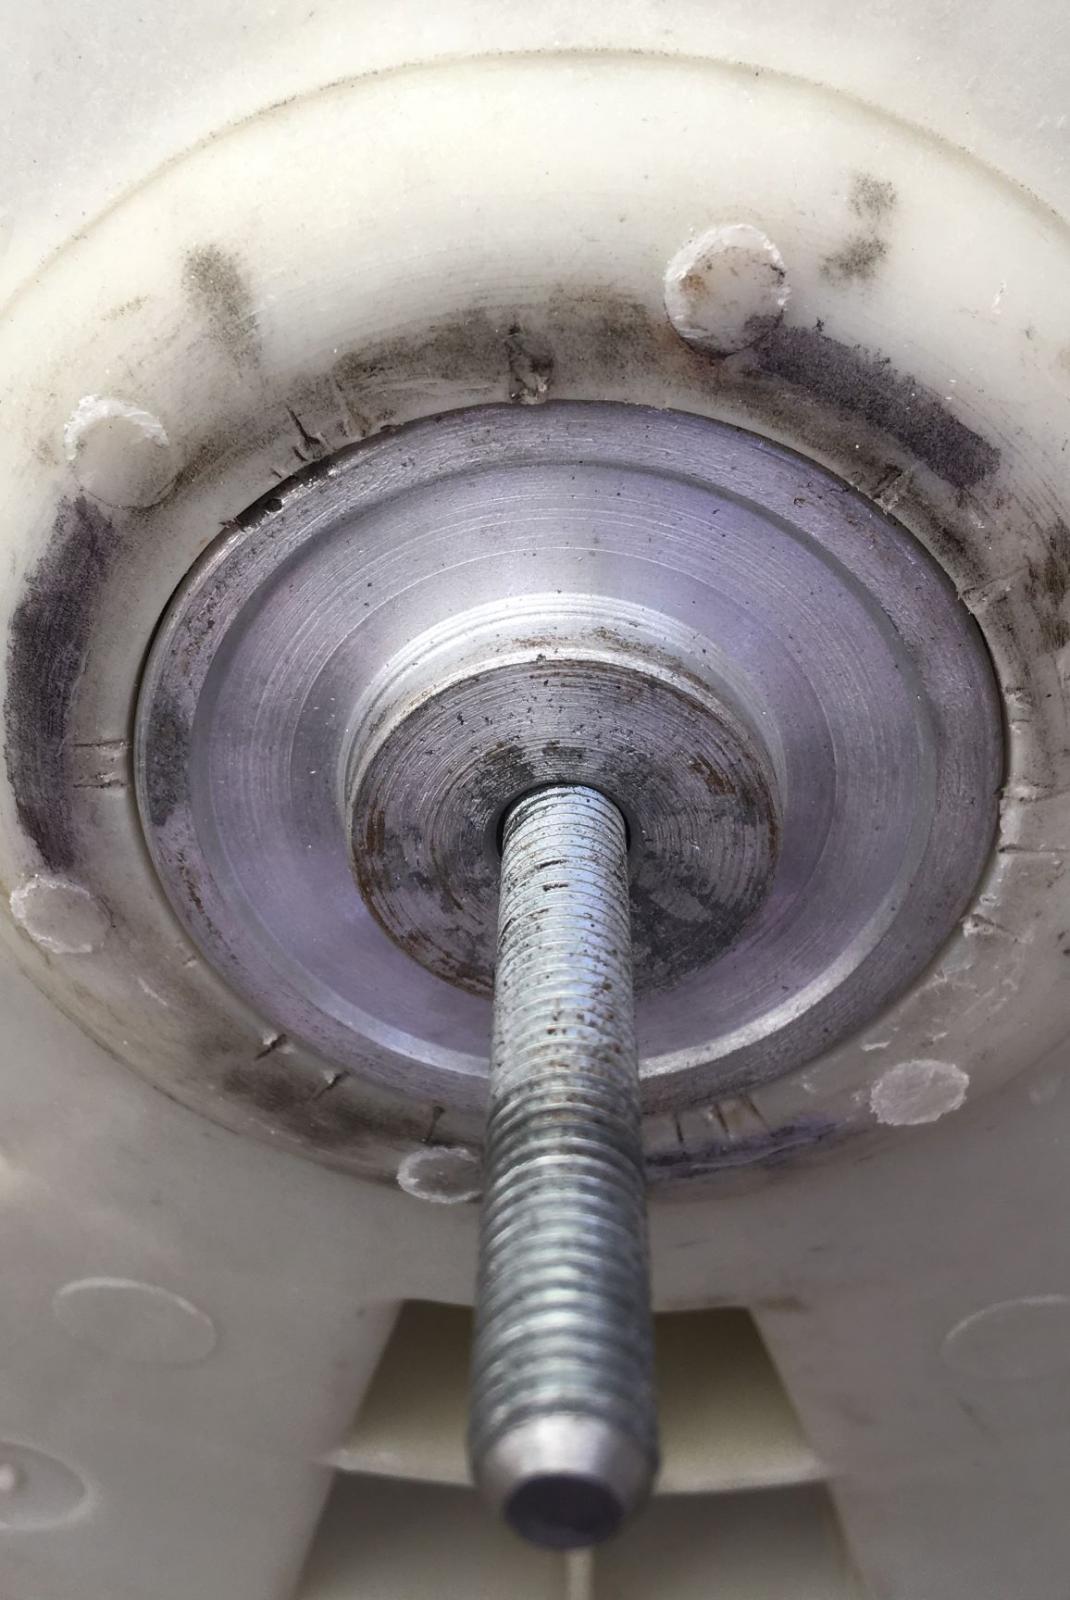
Being at it again, as time is money and winners never quit - successfully sawed the previously "Sealed Unit" apart.
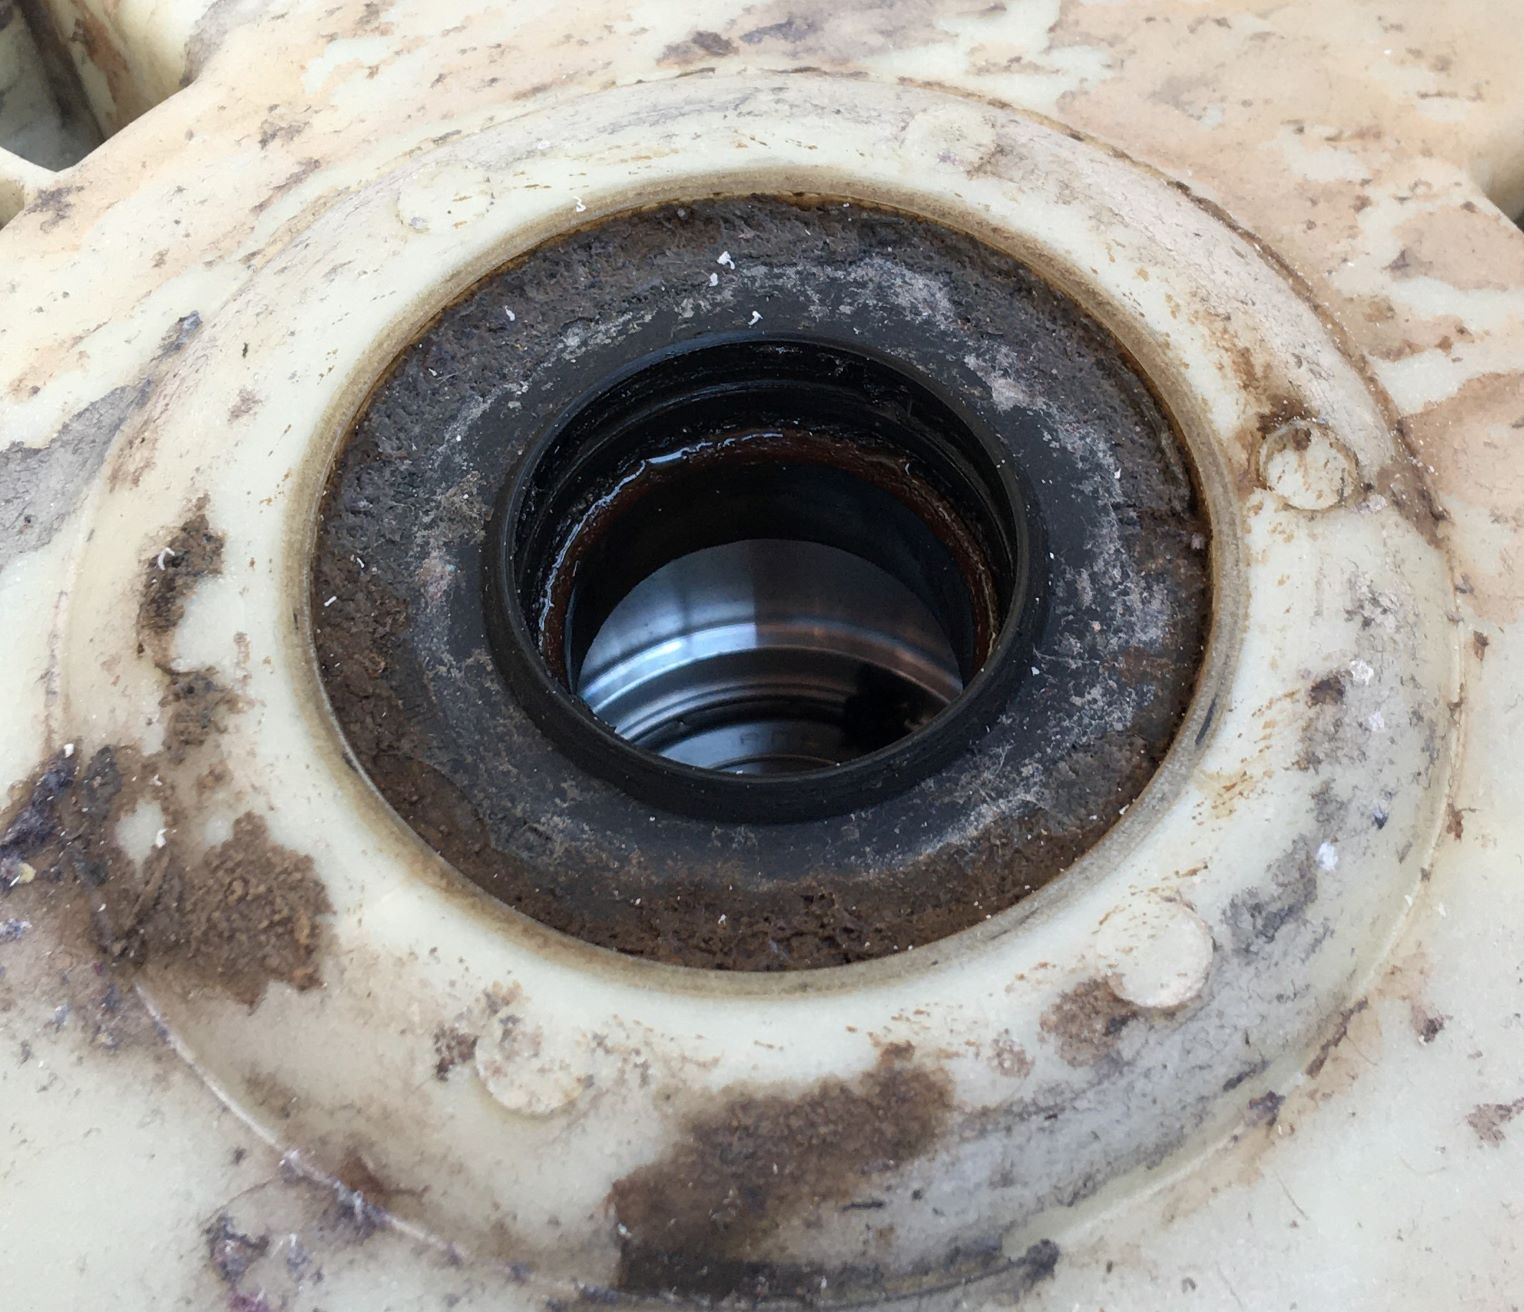
Drum and its axle spider intact from rust, but the insides carry app a pound of organic and non-organic yecchy compounds...
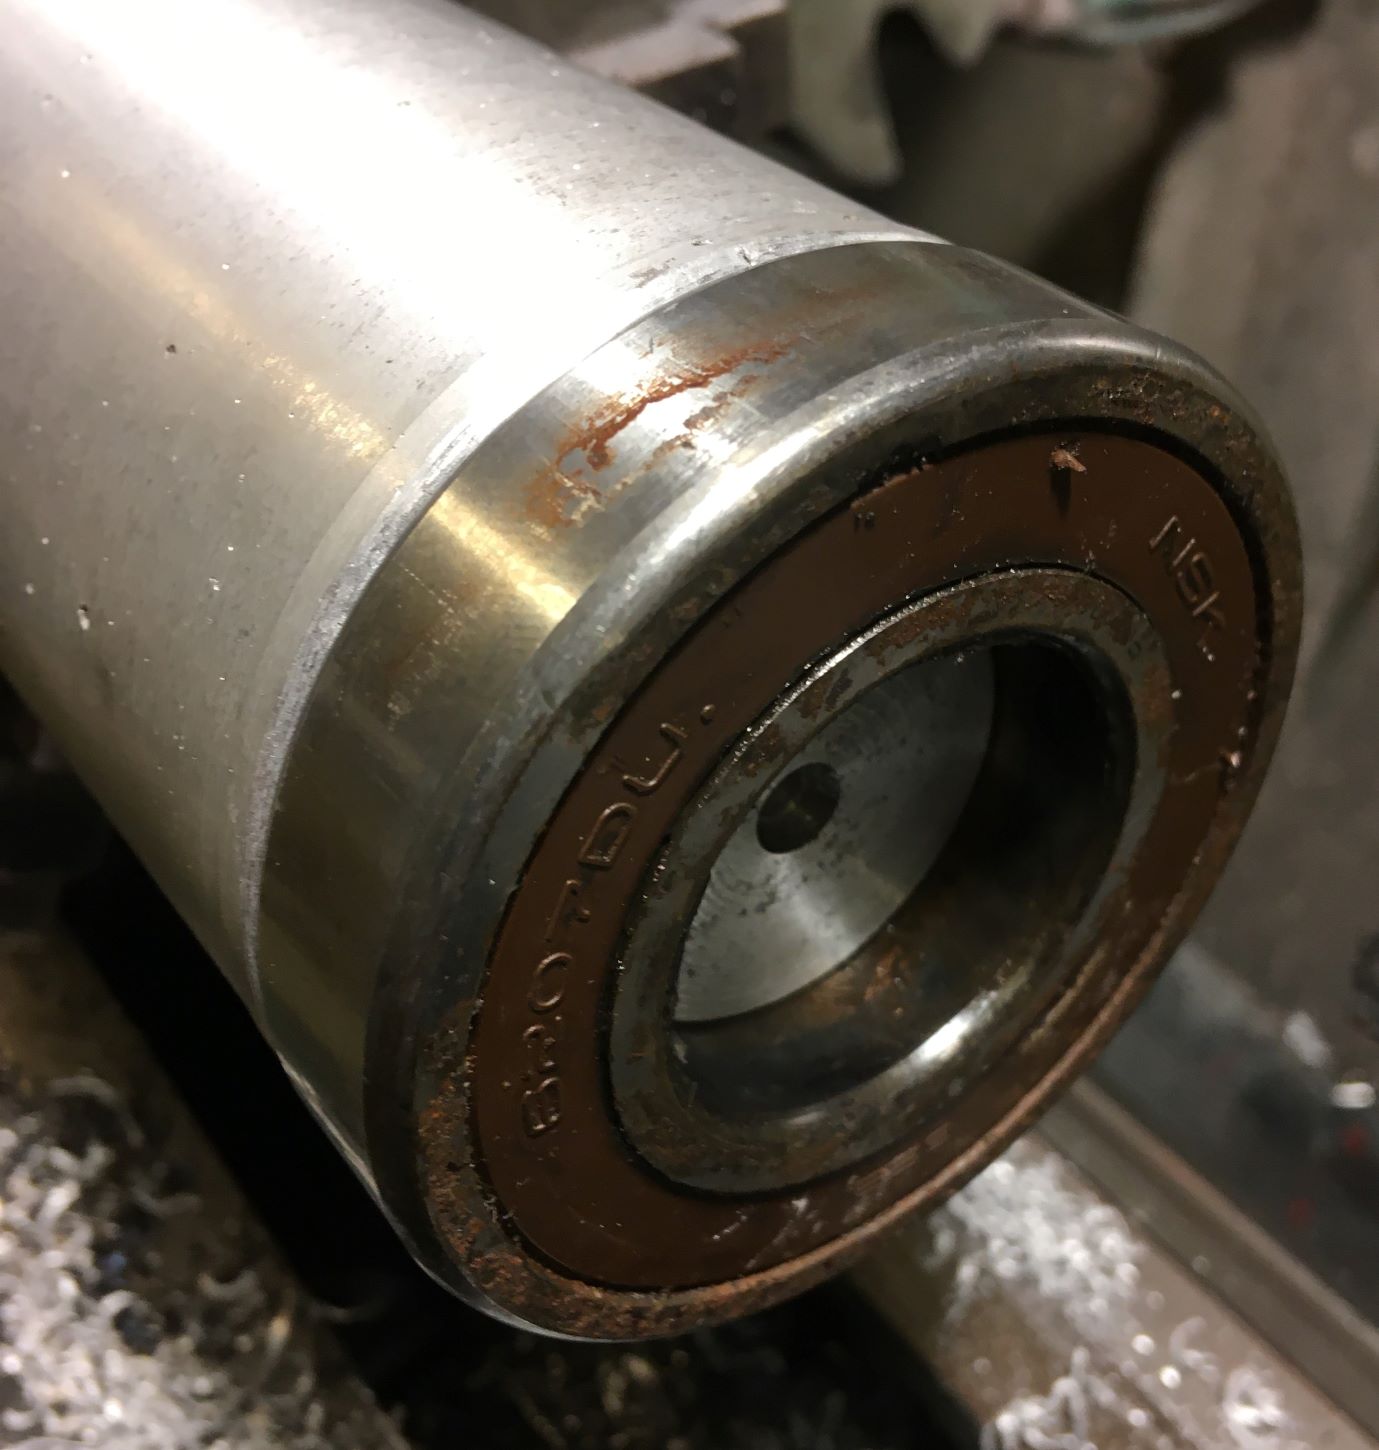
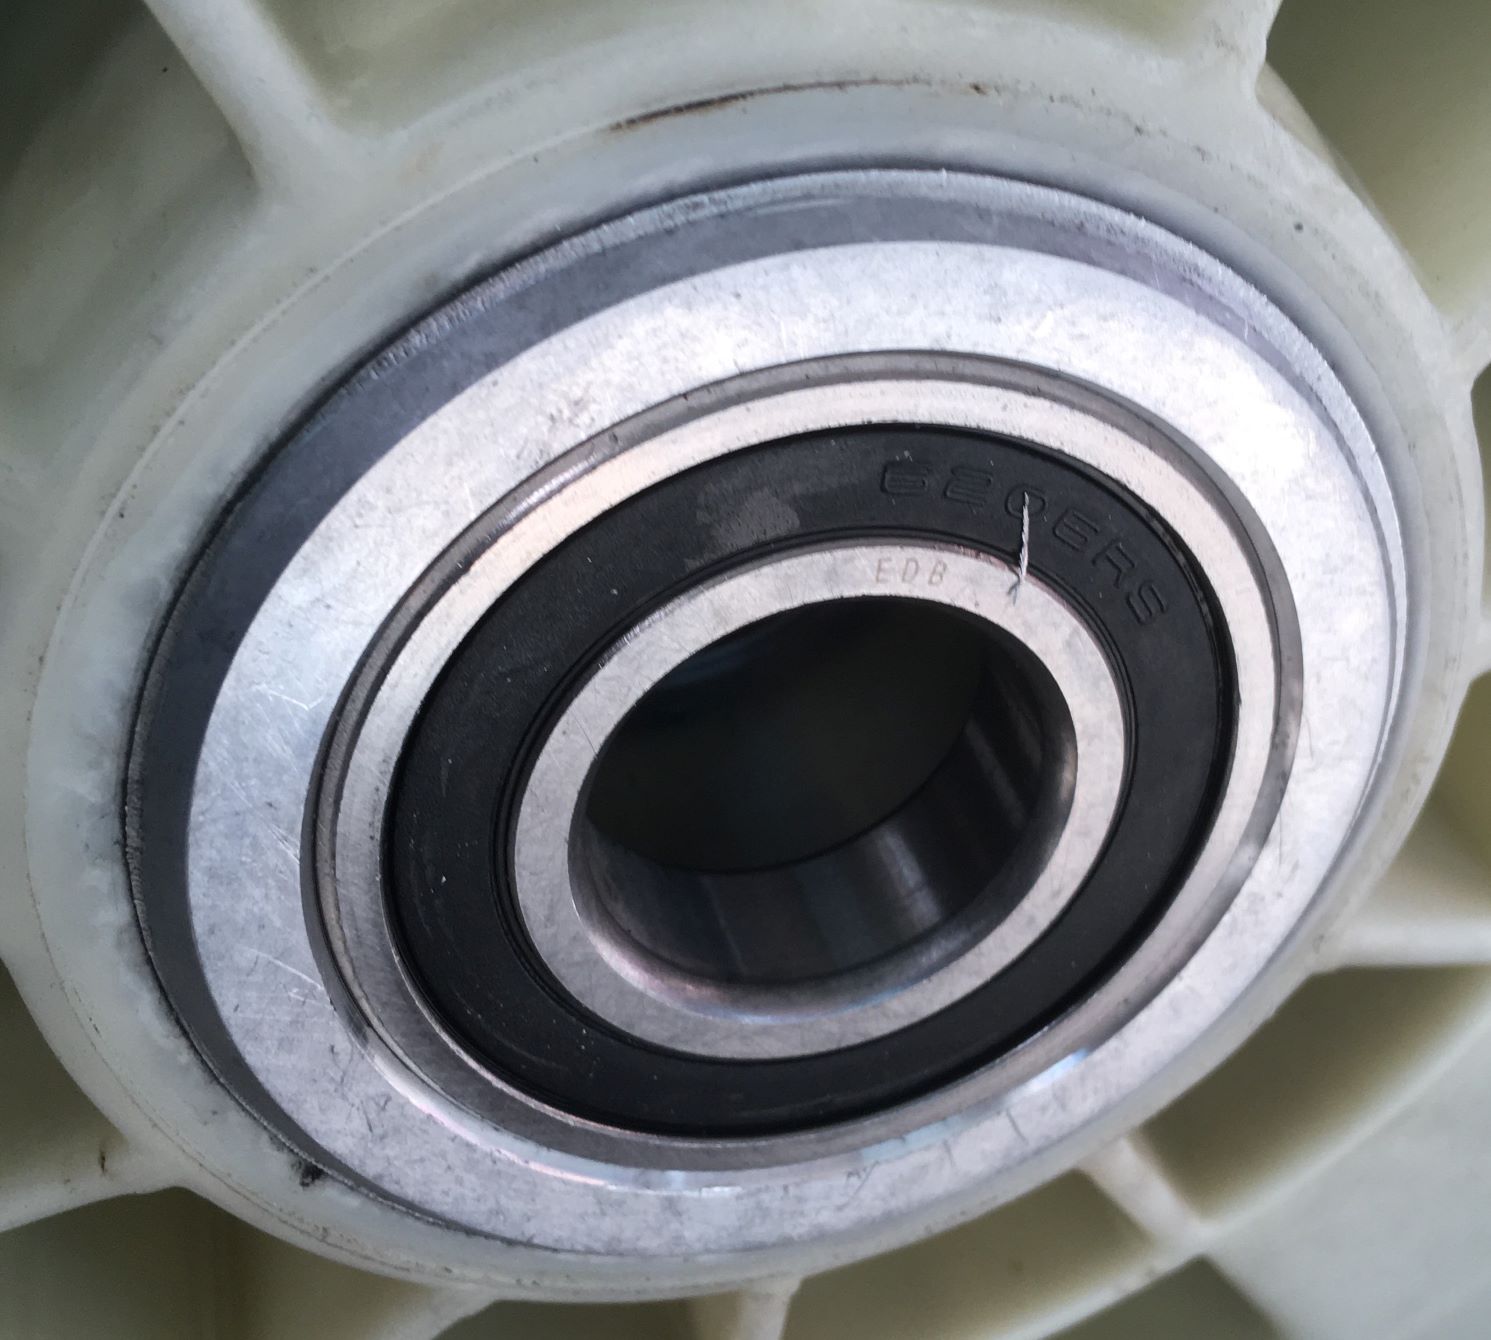
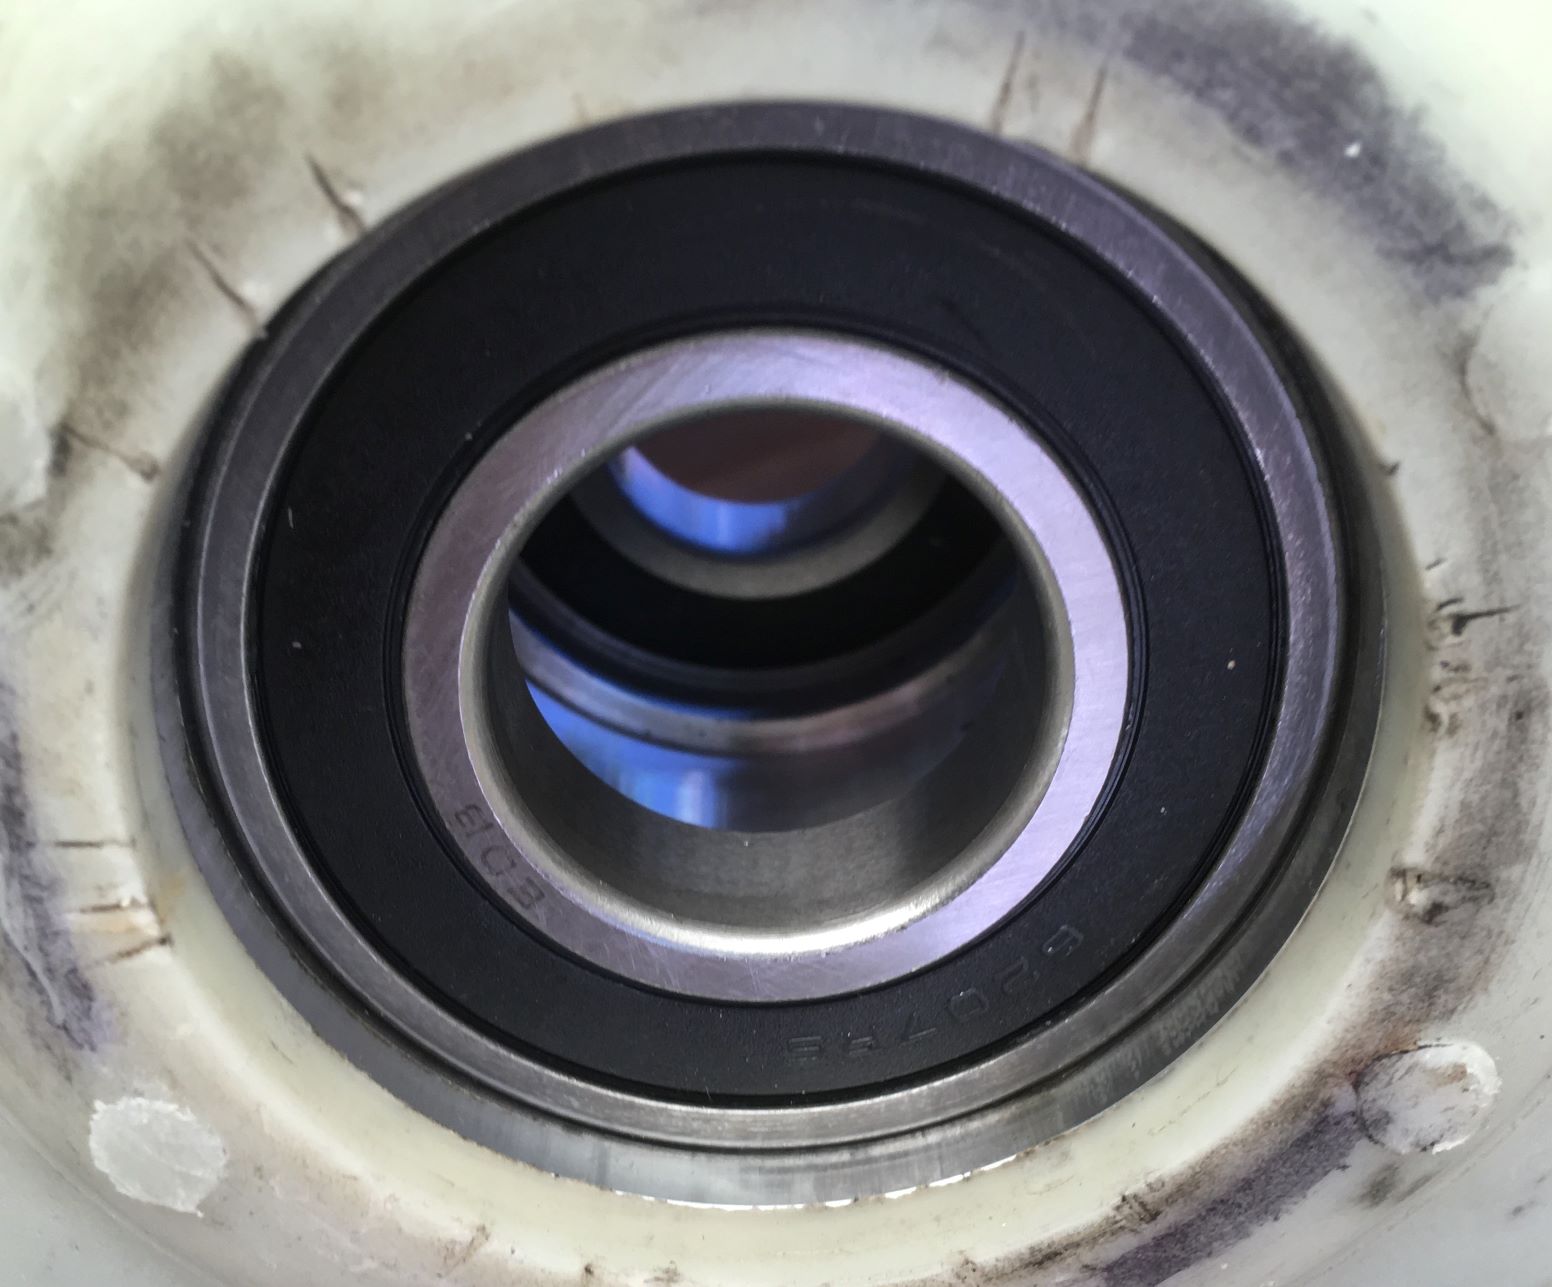
Reason for failure: Oil seal (ROLF 40,2x72x10/13,5mm) had cracked its inner lip,
ruining the balls in the first NSK 6207 DU sealed bearing, the Polish rear PPL 6206 Z still intact.
Attachment 35111 Attachment 35112 Attachment 35113
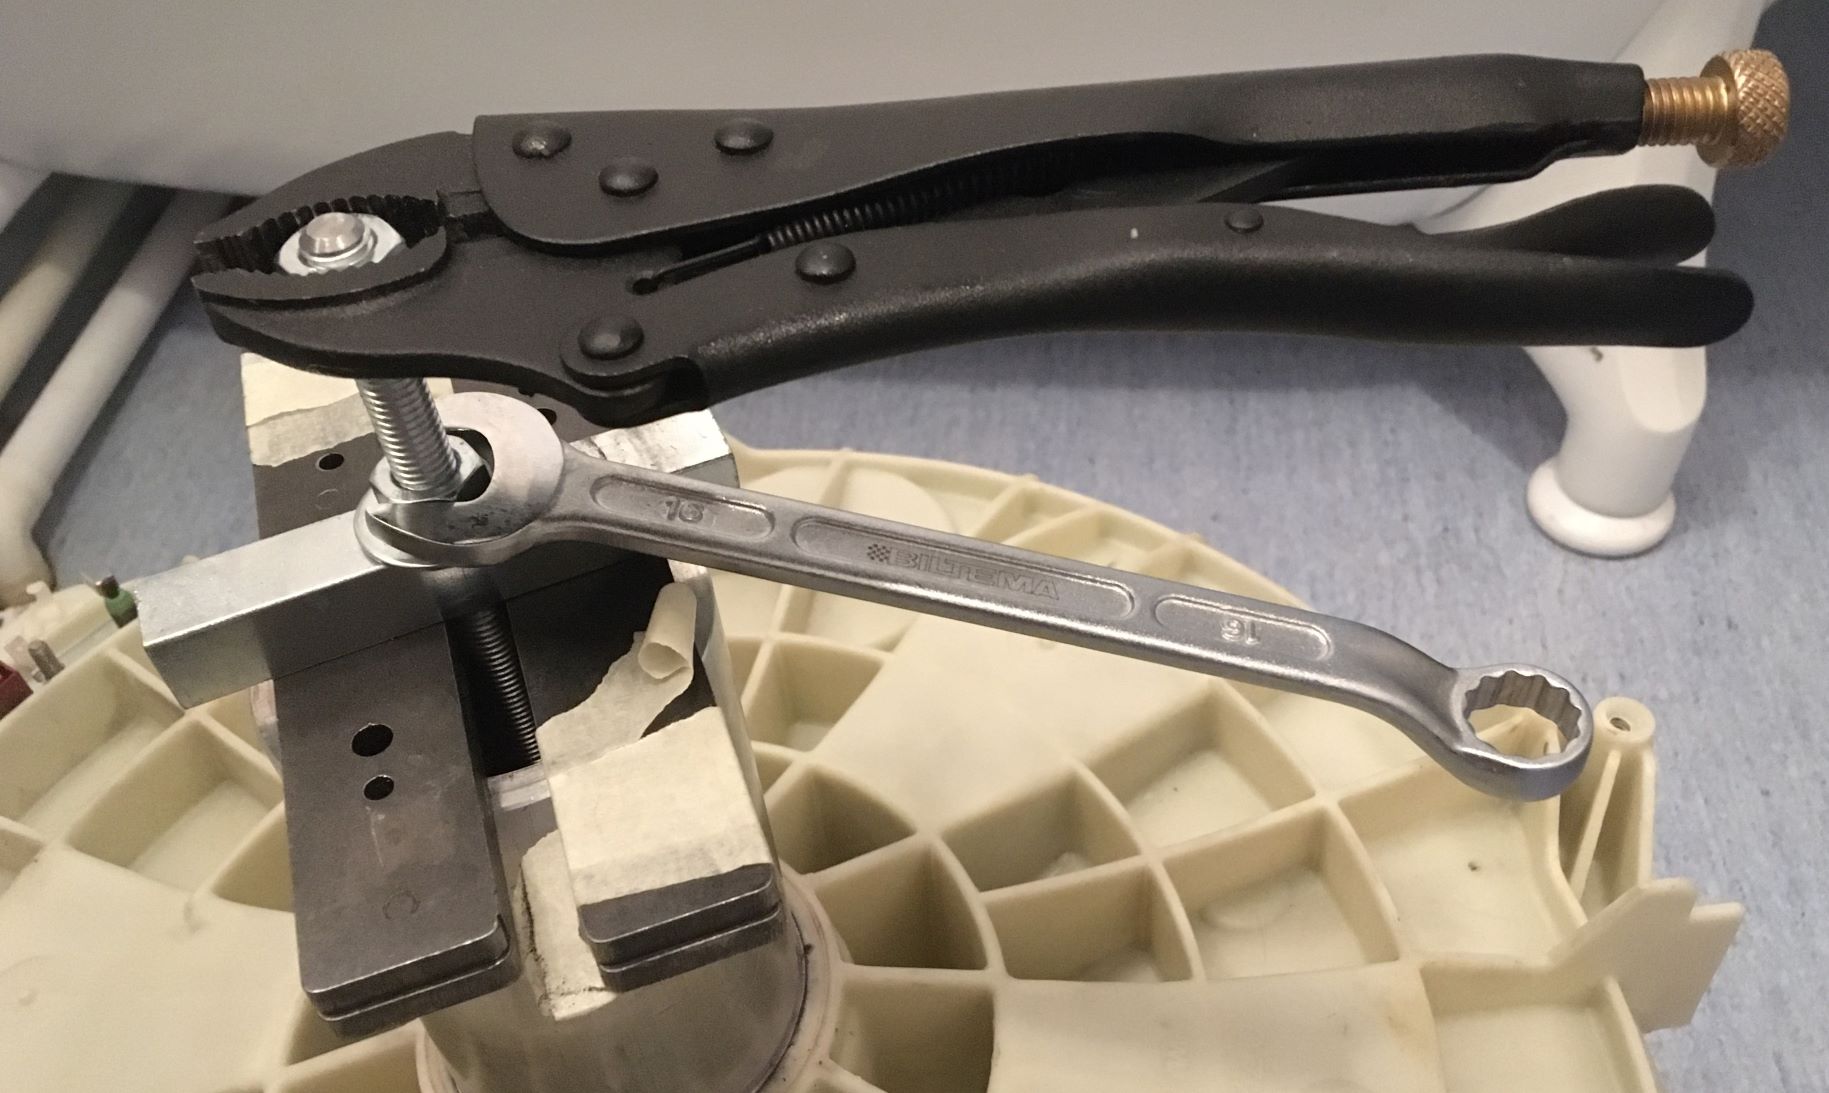
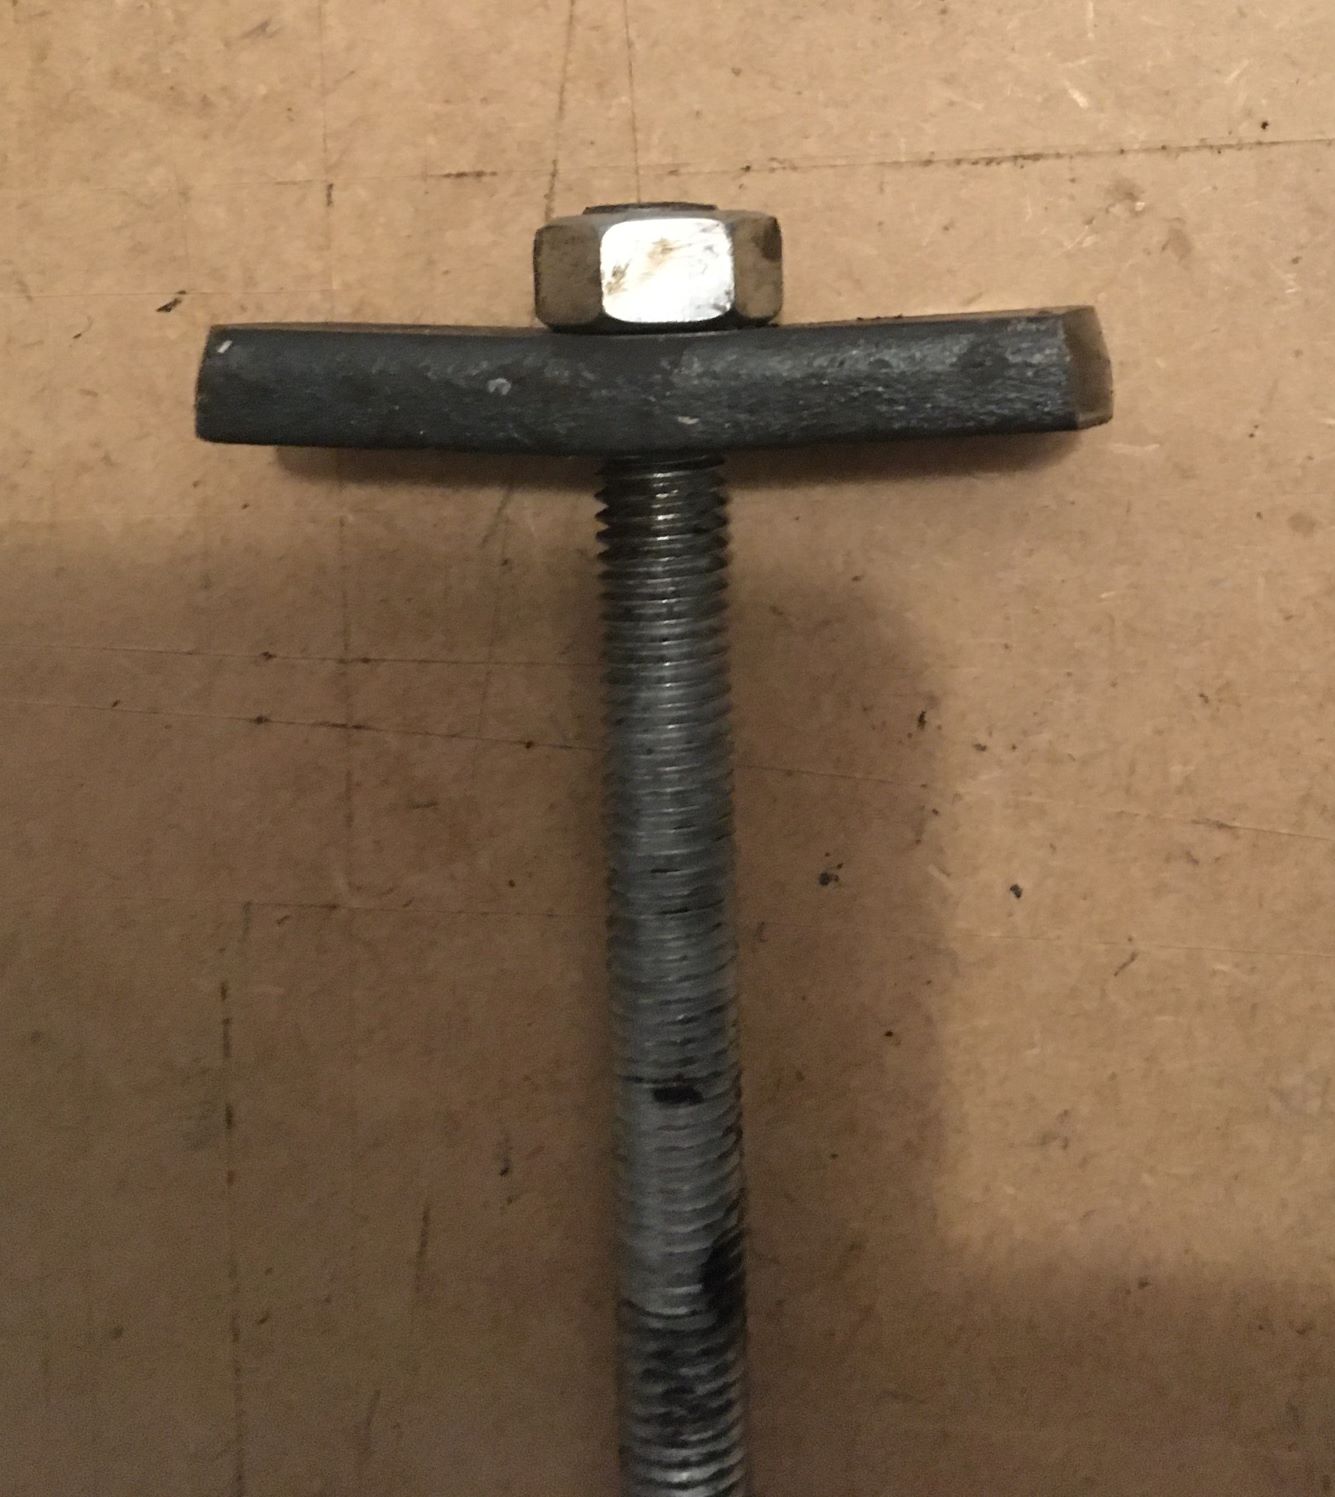
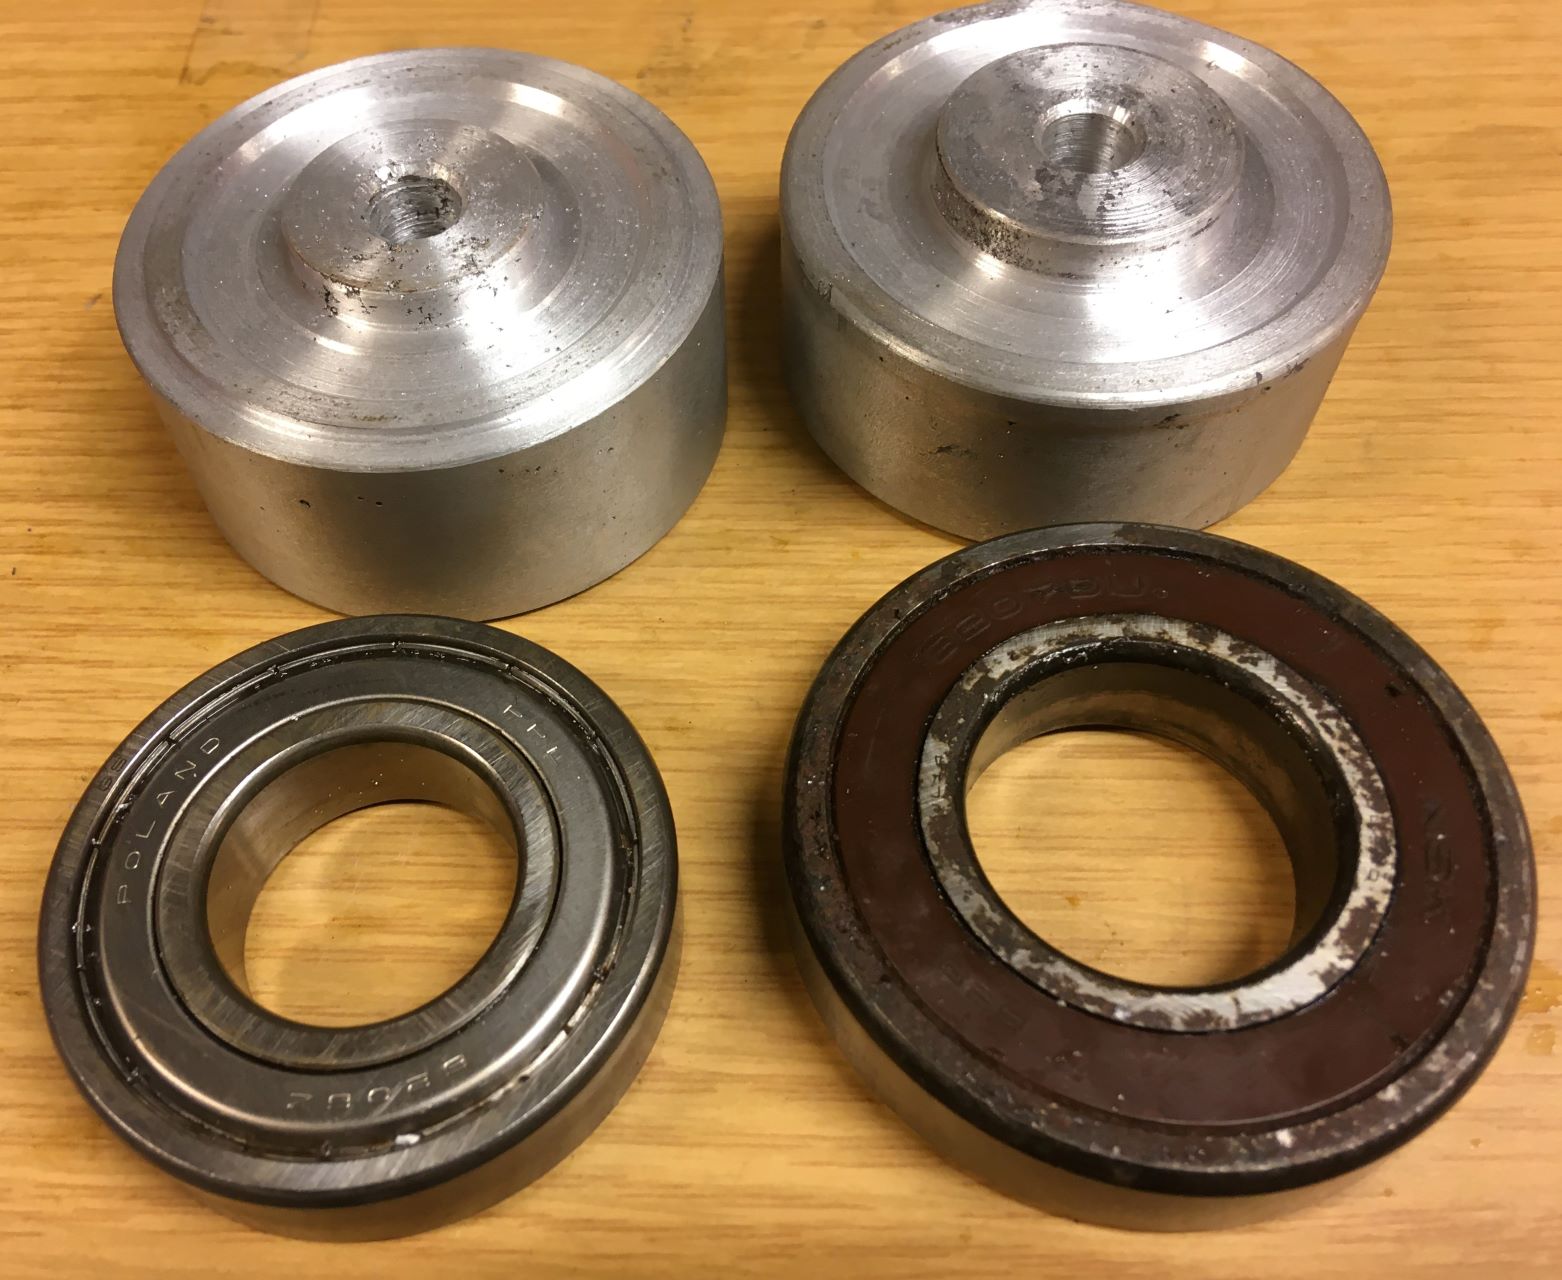
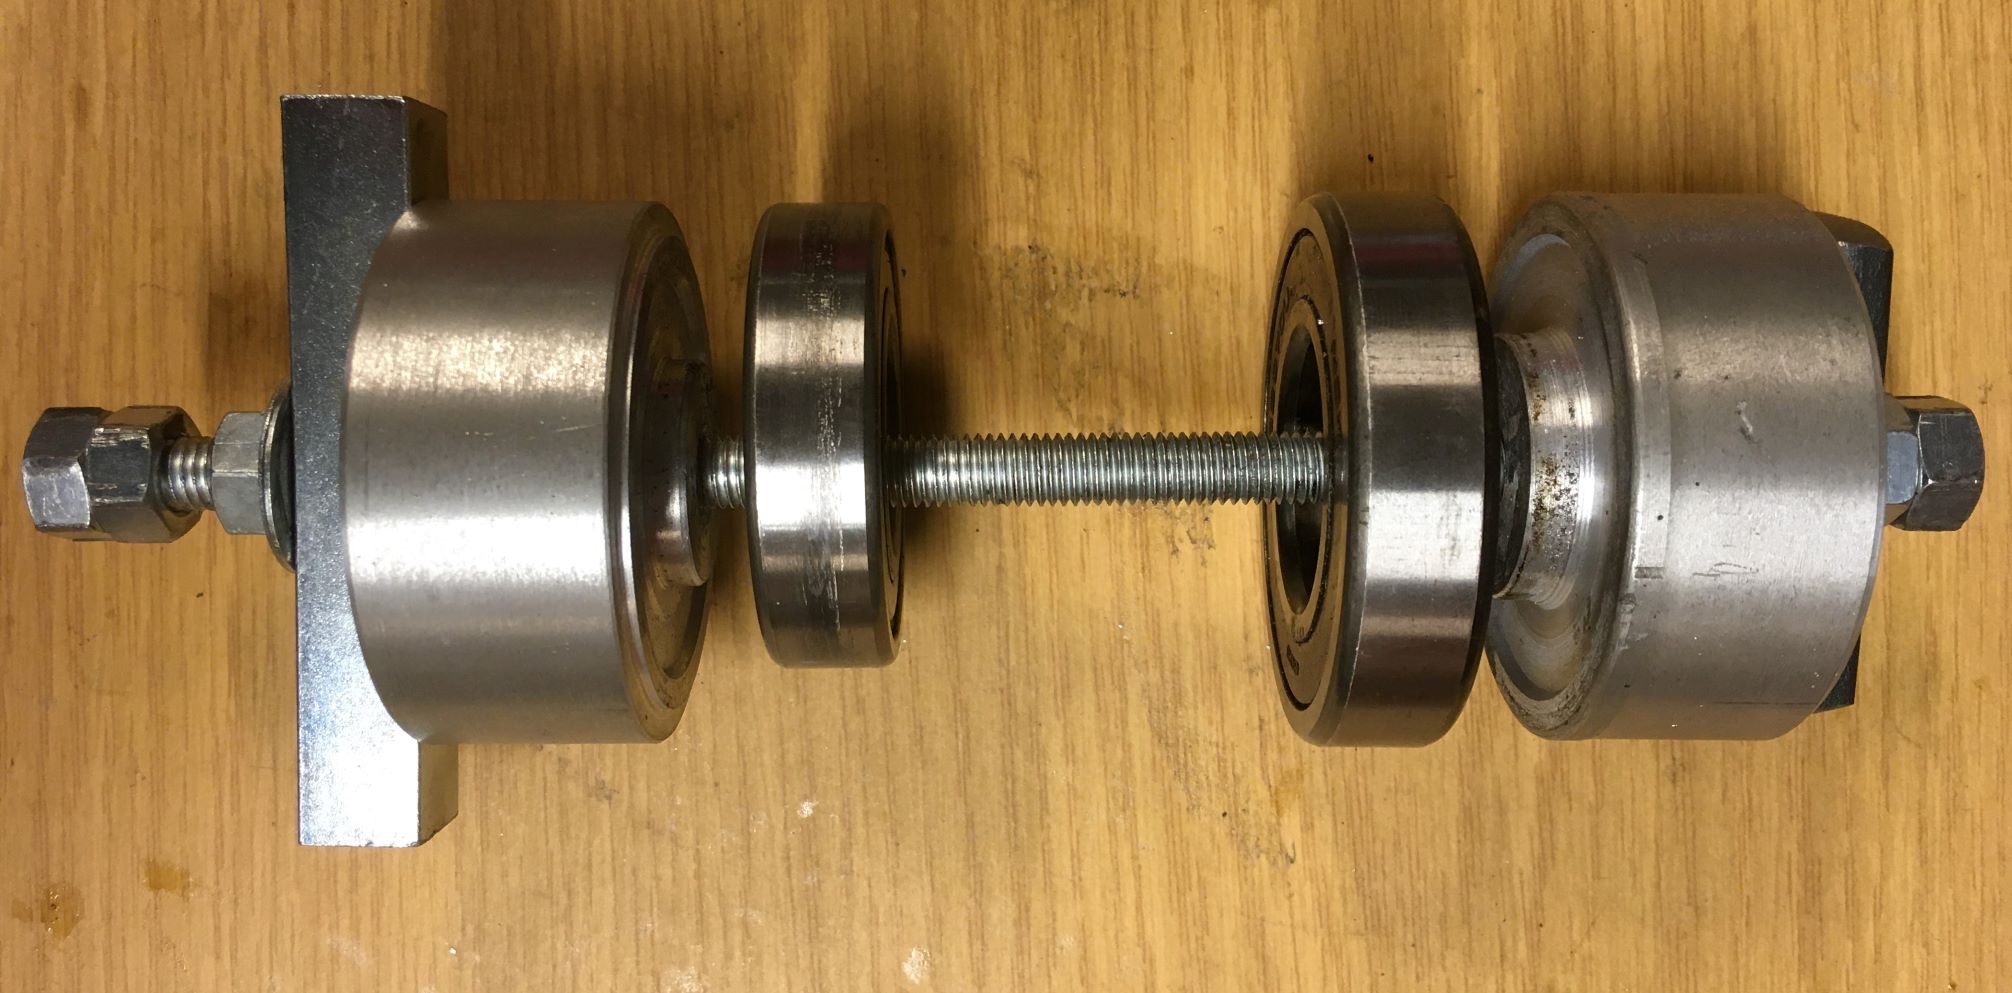
I had to provide a few quickly improvised tools for taking out the bearings, their housing being a tapered affair:
Attachment 35110 Attachment 35114 Attachment 35115
Heat from a hair dryer, application of homebrewed "Ed's Red" creep oil, yanking the wrenches and knocking from the rear,
finally got the bearings and the remains of the oil seal out. Real tight press fit taking its toll on the impromptu tools:
Attachment 35116 Attachment 35117
Cleaning & decalcification will commence, as orders have been placed for SKF 6206 & 6207 RSH "Explorer",
and another (non-Italian this time) oil seal.
50 bucks delivered by Schenker is the minimum "Learning Fee" for yours truly -
add another 10 for fasteners, sealant etc.
Then some DIY bearing-setting tools will be made, an expired but full CO2 extinguisher
brought home from work for freezing the bearings and drum axle before mounting.
I might also have to modify a borrowed Alfra hydraulic hand punch for the last shove of the bearings,
as the darned tub just won't fit into the hydraulic press at work...:)
Next: Refitting the drum and tub halves together: liberally seal up the gap with RTV silicone* and bolt together,
let sit for curing some 72-ish hours. Add concrete counterweights, drop down with drum opening to front.
Bolt up, add hoses, hook wires up, add covers - (check for "leftover" pieces) and test run!
At least - that's the "Plan A". Then the (formerly) sealed tub might leak, the electronics go AWOL
or other mishaps will happen through Providence or my own fault, that'll surely keep me alert!:)
I can always buy another sealed tub as a first emergency exit, or even a new machine if I get entirely bored.
* -Any HMT:ers knowledgeable about the >90 deg C heat-, acid- & alkali-resistance of run-of-the-mill cheap RTV?
Other suggestions and points of view welcome as well, as always!
Cheers
Johan
4 Attachment(s)
Growling washing machine, Pt 3...
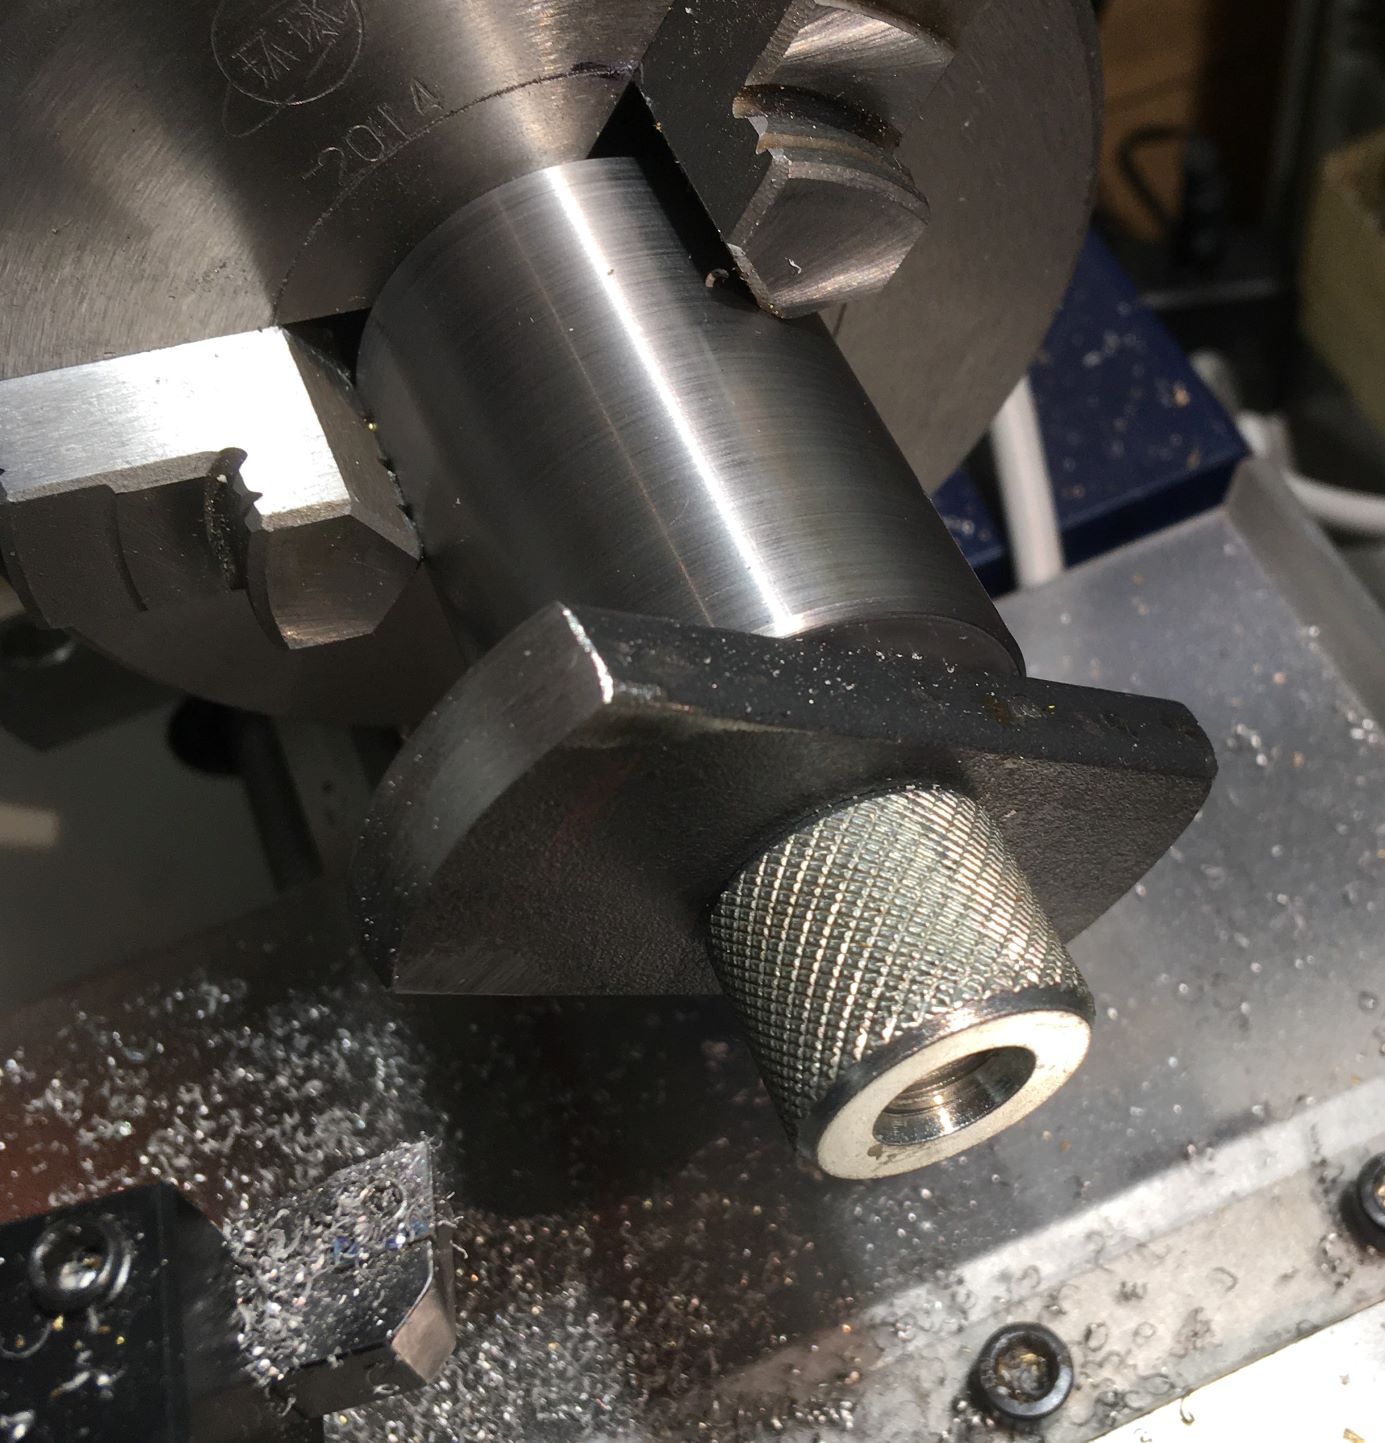
While awaiting arrival of the new bearings and oil seal, I might as well get prepared for their installation.
The first casting I ever made a few years ago was dirty and porous, so I might as well use it for some temporary job.
All DIY: pouring the melt into Cocoa Milk cans, hence the small groove (from the can's mouth) near the cutting tool.
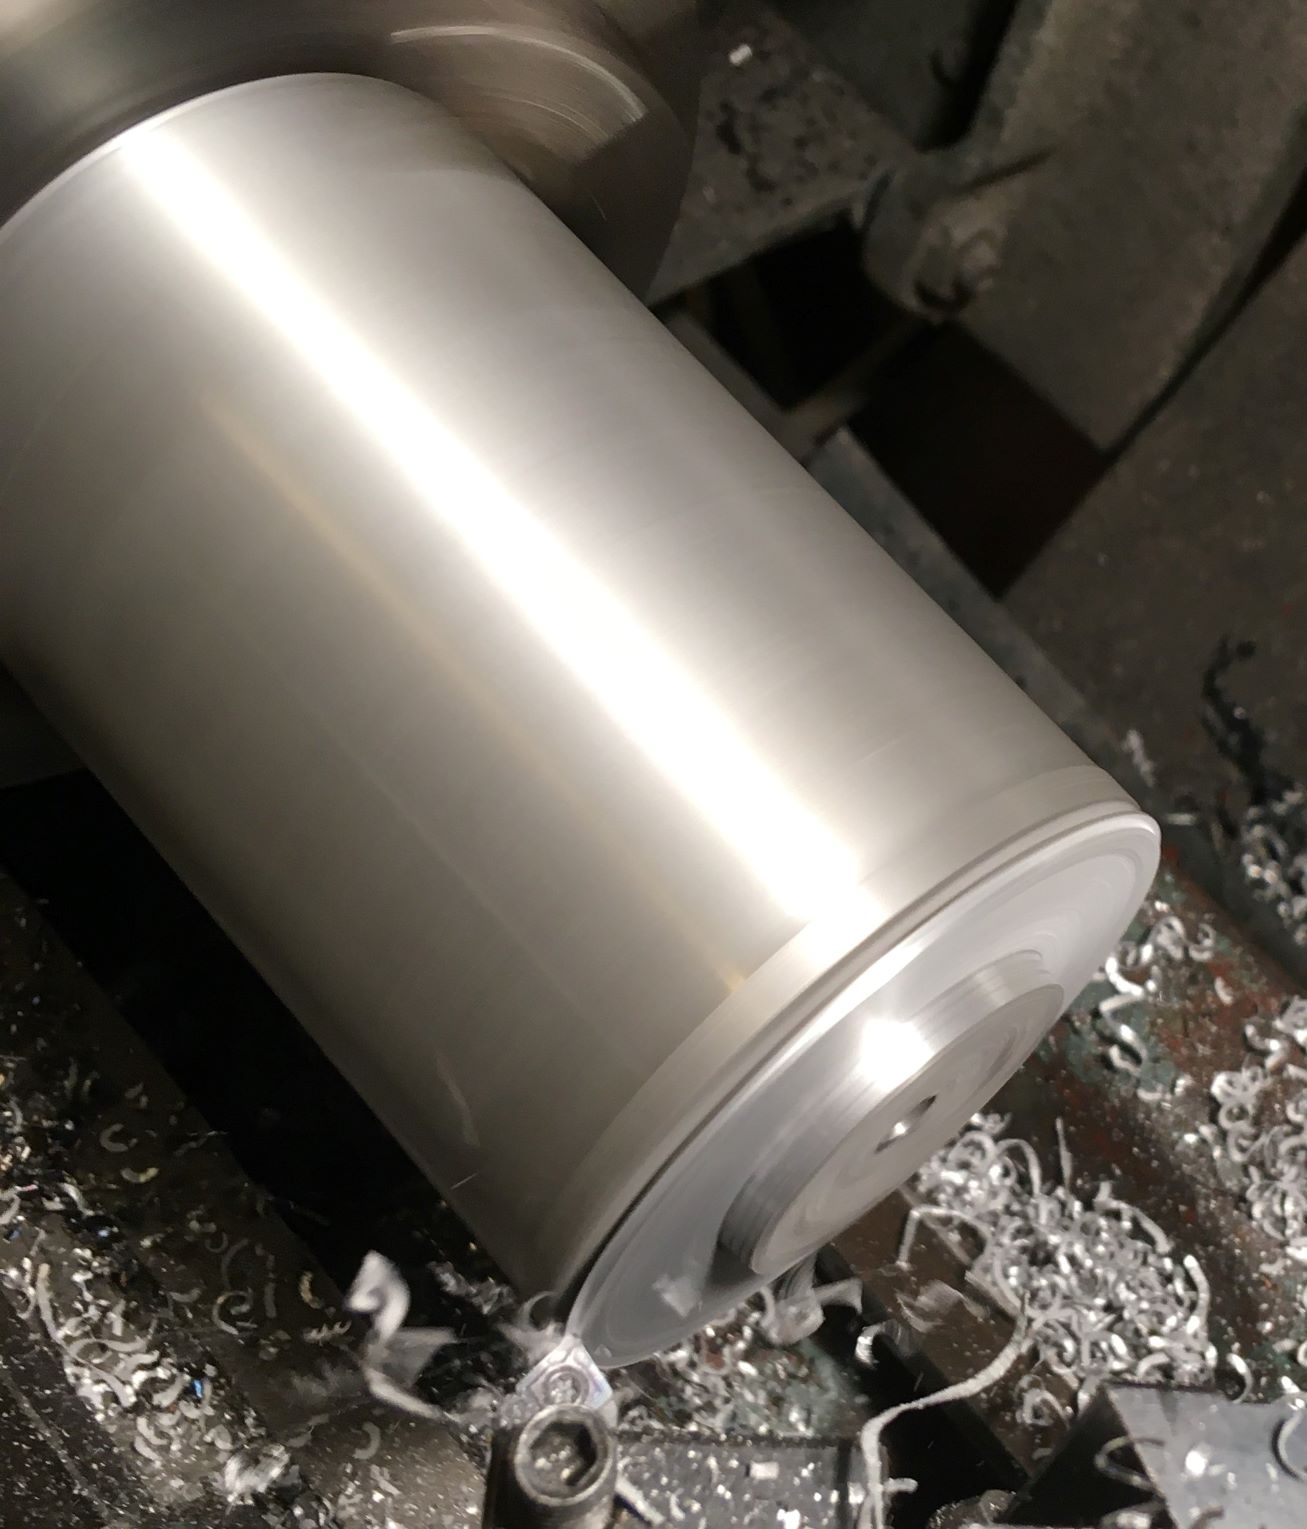
AlSiZn (of unknown proportions) billet in the chuck, making a pair of bearing mandrels:
Attachment 35136 Attachment 35137
Machines excellently, as the high Si content makes for short, curly chips.
Carbide insert at high revs still makes a decent satin finish outta this POS,
though inner porosity is really bad at the center. AlSi dulls HSS tools pretty quick
(I've since learned to only stick to remelting with previously diecast stuff containing AlSi9Cu3Fe)
These mandrels will only bear on the outer race - the rest is relieved. Right pic: Entire "2nd line of defense" unit.
Attachment 35138 Attachment 35139
This will only be used as an eventuality, if the following won't suffice - as my "1st line" method for fitting the bearings will be:
1) Heat the bearing aluminum housing up to ca 80 deg C (175 F, well below the glass temp of the surrounding plastic)
2) Freeze the bearing and its aluminium mandrel in the (upside down turned) nozzle of an (upside down turned)
CO2 extinguisher, releasing the liquid CO2 (inside at 20 deg C & 850 psi) to -78 deg C (-108 F).
3) Drop the now smaller bearing & mandrel/ cold sink into the now biggie bearing seat.
4) Clobber in place if needed.
5) Rinse and repeat for the other side's bearing.
If the above won't be sufficient to properly seat them - enter "2nd line of defense" M10 all-thread, bushings, nuts and tiiiighten.
Whack/ tighten 'em and repeat 'til done.
As of now, I don't feel any urge to make some adaptors to the Alfra 75 kN Hand Hydraulic punch press as a last resort.
Anyone's suggestions, cautions on the above methods (i.e. freezing a bearing and then whacking it into place),
or perhaps where I'll find any formulas for thermo-shrinking a 62 & 72 mm ball bearing at -78 deg C
into an aluminium housing (@ +80 deg C) with a total temp diff of 160 deg C?
Thanks for bearing with me (NO pun intended - seriously!) this far thru this long-winded, verbose and still unfinished thread.
(My SWMBO secretly pities all you guys still standing after this barrage of words)
Johan
2 Attachment(s)
Growling washing machine, Pt 4... The Bottomless evilness of tools.
Thanks, Moby Duck for chiming in on the acid/ alkali flavors of RTV -
for me just to delve deeper into the type I've got -
it smells of acetal acid, and it will only come into contact with plastics and stainless bolts anyhow.
Thanks to others pitching me forward with silent cheers and discrete appreciations-
guess there's nothing more sweet than seeing another fellow human getting deeper into trouble? :D
You all read the headline - and already felt the smell of blood - right?
1) Bearings and oil seal has arrived - no problem there. (Uh-oh... Here we go...).
2) Old bearings in the freezer for Stage 1 cooling to -25 deg C since last nite,
tryouts with CO2 extinguisher (Stage 2) down to -70 ish deg C will soon commence.
(Trying a quick "in-and-out" to get the feel of the play when cold, and the time for it setting in).
I can always pull/ whack an old bearing out - with the new ones I'll only have one shot at it!
I unfortunately don't have a 3" mike to check dia before and after freezing...
-Yes, Frank I'll get my Arctic Grade mittens for this job, thank you!
Yup - I'll also start with the smaller bearing as a "worst case", as the bigger will shrink even more.
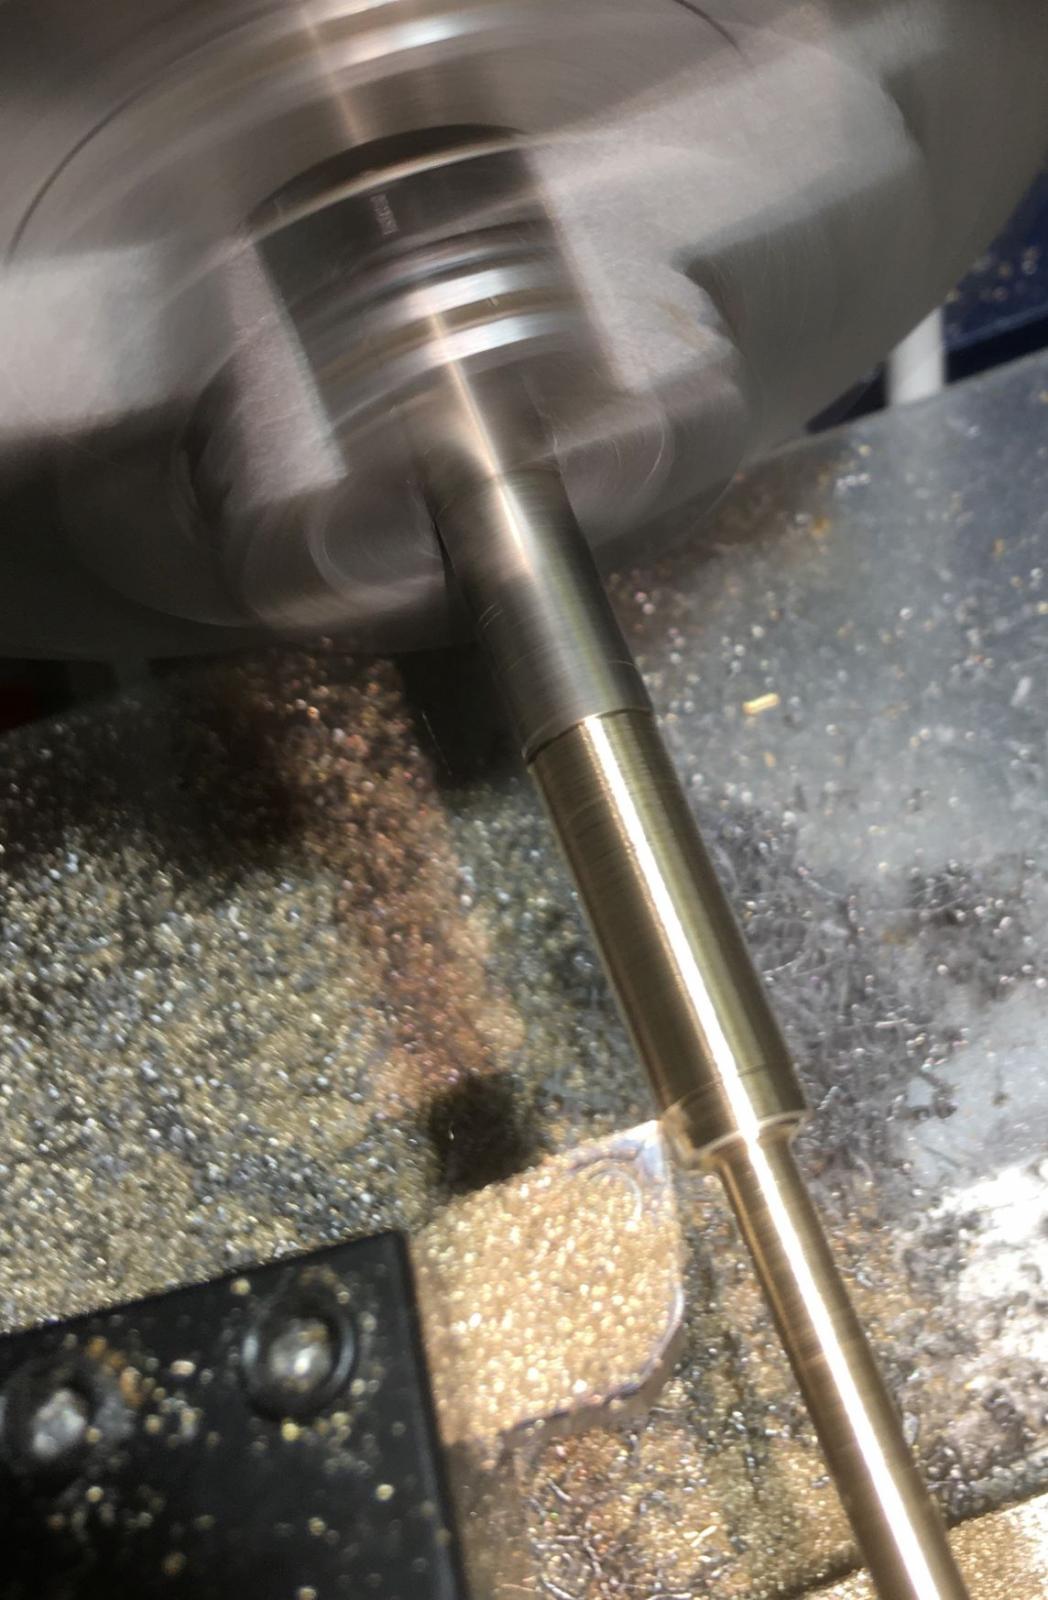
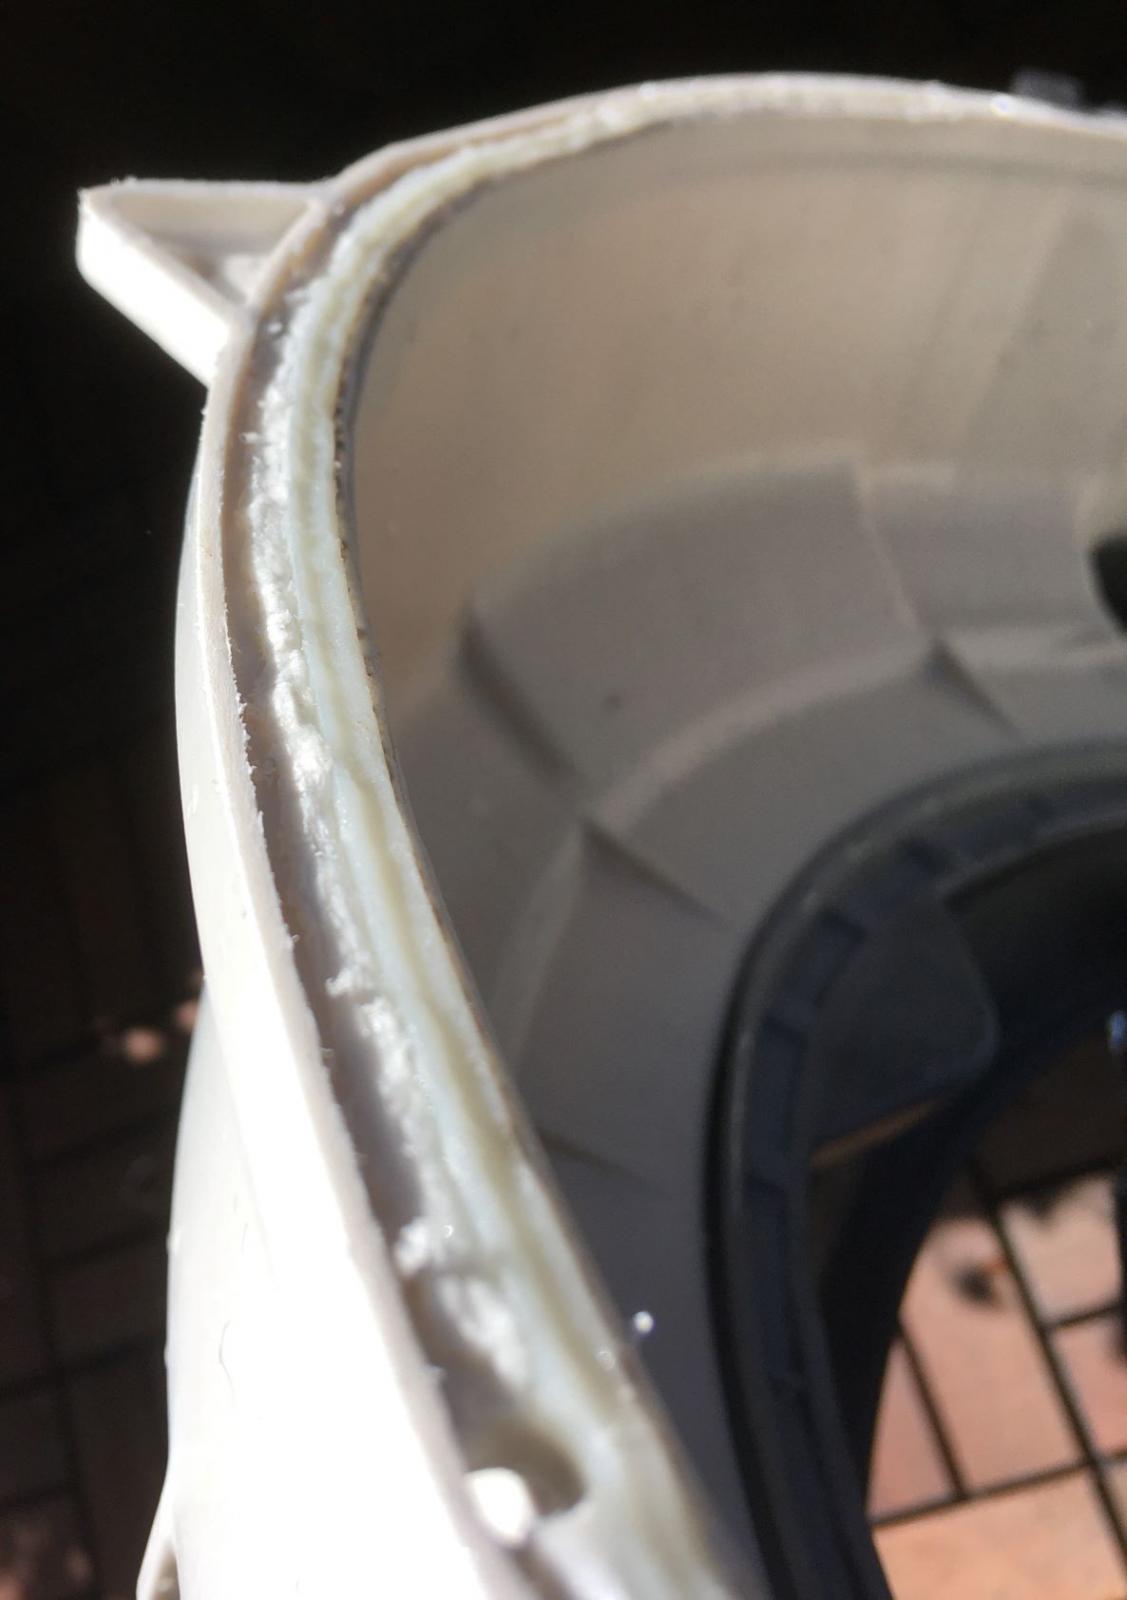
3) As per some readers' excellent suggestions, I've decided to carve out an "O-ring groove" around the tub's perimeter,
to have something for the RTV seal to stick into when the drum whirrs along at 1600 rpm.
Hence I figured a DIY tip for my soldering iron would do as a DIY "curved hot chisel".
Chucking up a piece of 6 mm brass (former electrical plug pin) taking it down to 4,2 mm:
Attachment 35156
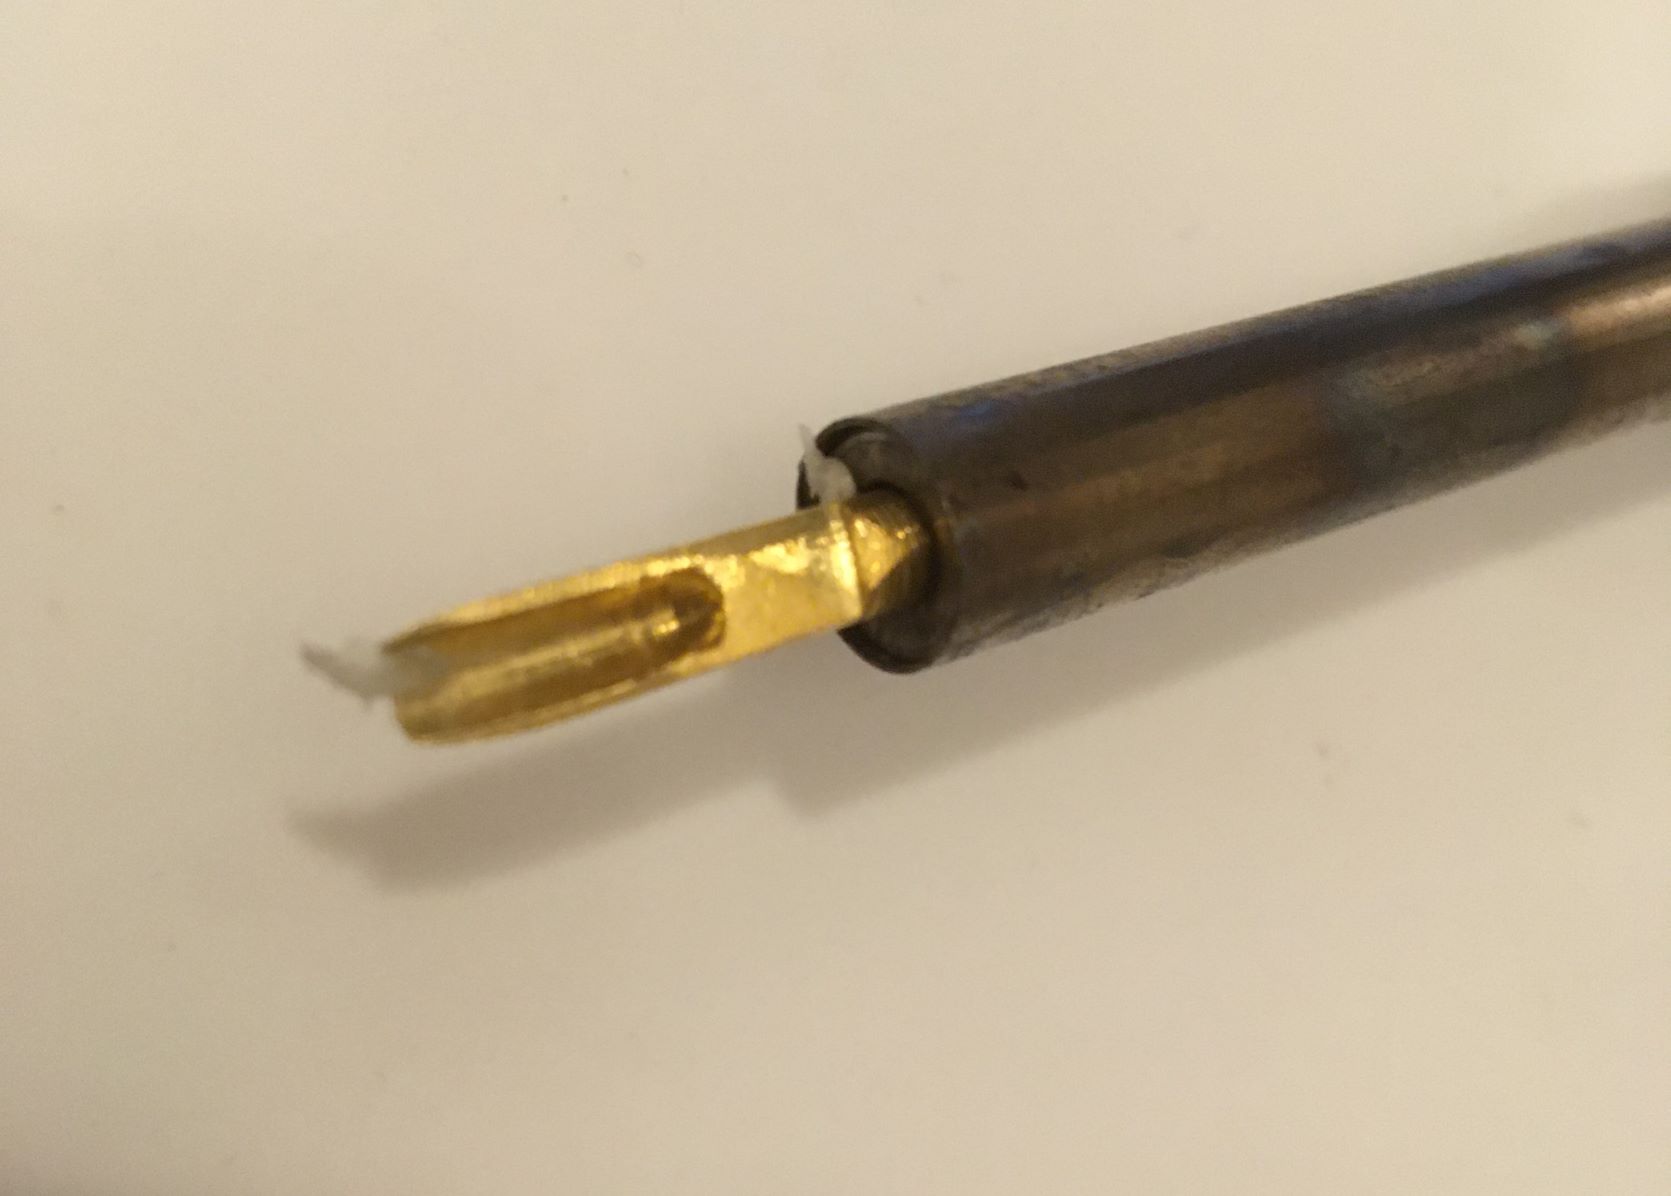
then drilling a 2,5 mm hole, 1/2" deep, taper the end, file half of it off: a 10 min job, and voila:
Attachment 35157
Plugged in, waited for a 2 minute warm-up, and off I went (sorry: no pics).
Worked like a charm, "the swarf" curled up nicely and out of the chisel groove.
After about 1/4 of the perimeter (and 5 minutes) the soldering iron finally died,
a quickie resistance check proved that the (sealed) heating element's nichrome wire now is "permanently open".
There's certain times I think some tools fails me when I need them the most, just to spite me - only for the heck of it.
So - Plan B: I can't score another soldering iron 'til tomorrow.
Have to make the bearing tryout tonite.
My hands will be filled (not frozen) up - so no pics there either.
Guess I'll return with Pt 5, whether you want it or not.
Growling washing machine, Pt 4b...
Short followup on the (relative) progress of the DIYed "RTV O-ring/ seal tub perimeter groove":
Ditched the promising "sodding iron" due to lack of contemporary devices available with a replaceable tip.
"Modern" ones comes as a complete "sodding station" at a pretty steep price (for a Cheapo like me) -
not the temp controlled all-in-one iron I bought for 20 bucks 30 years ago.
Tip & heating element is today "a unit" instead... -Now, where did I hear that word recently?
I'm also NOT needing a whole & heavy "station" in my portable tool portfolio for those night calls :)
Instead: Armed with my Ferm (Dremel) and its flexible shaft (discount find)
and an appropriate 3 mm rotary burr i give the following report of Proper Dremel Handling:
(Provide yourself with patience and humility - this isn't something personal against you,
any other idiot taking on this job will suffer just like you.) :
1) Hang the Dremel high (but not in the cable, Stupid!), let the shaft hang freely downwards.
2) Grease the inner flexible shaft thoroughly before starting. Then every hour of service.
3) Run only 'til you can feel the warmth off the flexible shaft, let it take a cool-off break.
My guesstimate is a 50% duty cycle at 10 minutes on/ off.
4) Don't run it wide open - minimum speed is plenty enuff.
5) Use goggles, hearing protection, gloves and a non-synthetic coverall. Be "positively elsewhere" - i. e. outside, far away.
Yup - those tiny statically charged plastic shards from the burr will stick to anything synthetic,
and though the tool & shaft is happily just whirring along, the resonant sound from the burr working the tub is "impressive",
and NOT something your next of kin or neighbor will take for the approximate hour it takes to finish off.
6) Use a small planer to rid the edge of the unintended ridges the burr inevitably will create, sand the edge.
Then the next easy step - fit the bearings, drum, seal up the tub joint and bolt the whole shebang together.
-But that's the beddy-bye story for another day, kids!''
Disclaimer: No responsibility will be taken, either explicitly or implied for any actions taken in accordance to
(or defiance of) the above mentioned "Natural Law of Dremel Usage". So there.
10 Attachment(s)
Growling washing machine, Pt 5. Fitting bearings, drum and the drum halves together
Saturday Noon, 3 weeks to Summer solstice: Sunshine, still +20 C in the shadow, mild breeze.
Time to "gittit done"... That means: Everything to get the tub and its innards sealed up for a 72 hr cure...
Some of you happy few readers still bearing (no pun) with me, might remember the CO2 extinguisher ball bearing freezer idea.
Well - the test on the previous night left me with a pretty good conclusion from the old bearing freezing test:
Starting with a 100 C heated Aluminum bearing seat, moving in with a frozen ("-70-ish" C, as my IR thermo bottoms out at -50)
bearing almost instantly pulls the heat from the very heat conductive Al, making it "Insta-Shrink" on the bearing,
as Al thermal expansion also is bigger than steel's. So neither heat nor cold will be applied to the new bearings - mere force.
(Example: I make Al round stock by pouring the melt into steel tubes - stock only get a loose fit within when it's cold again)
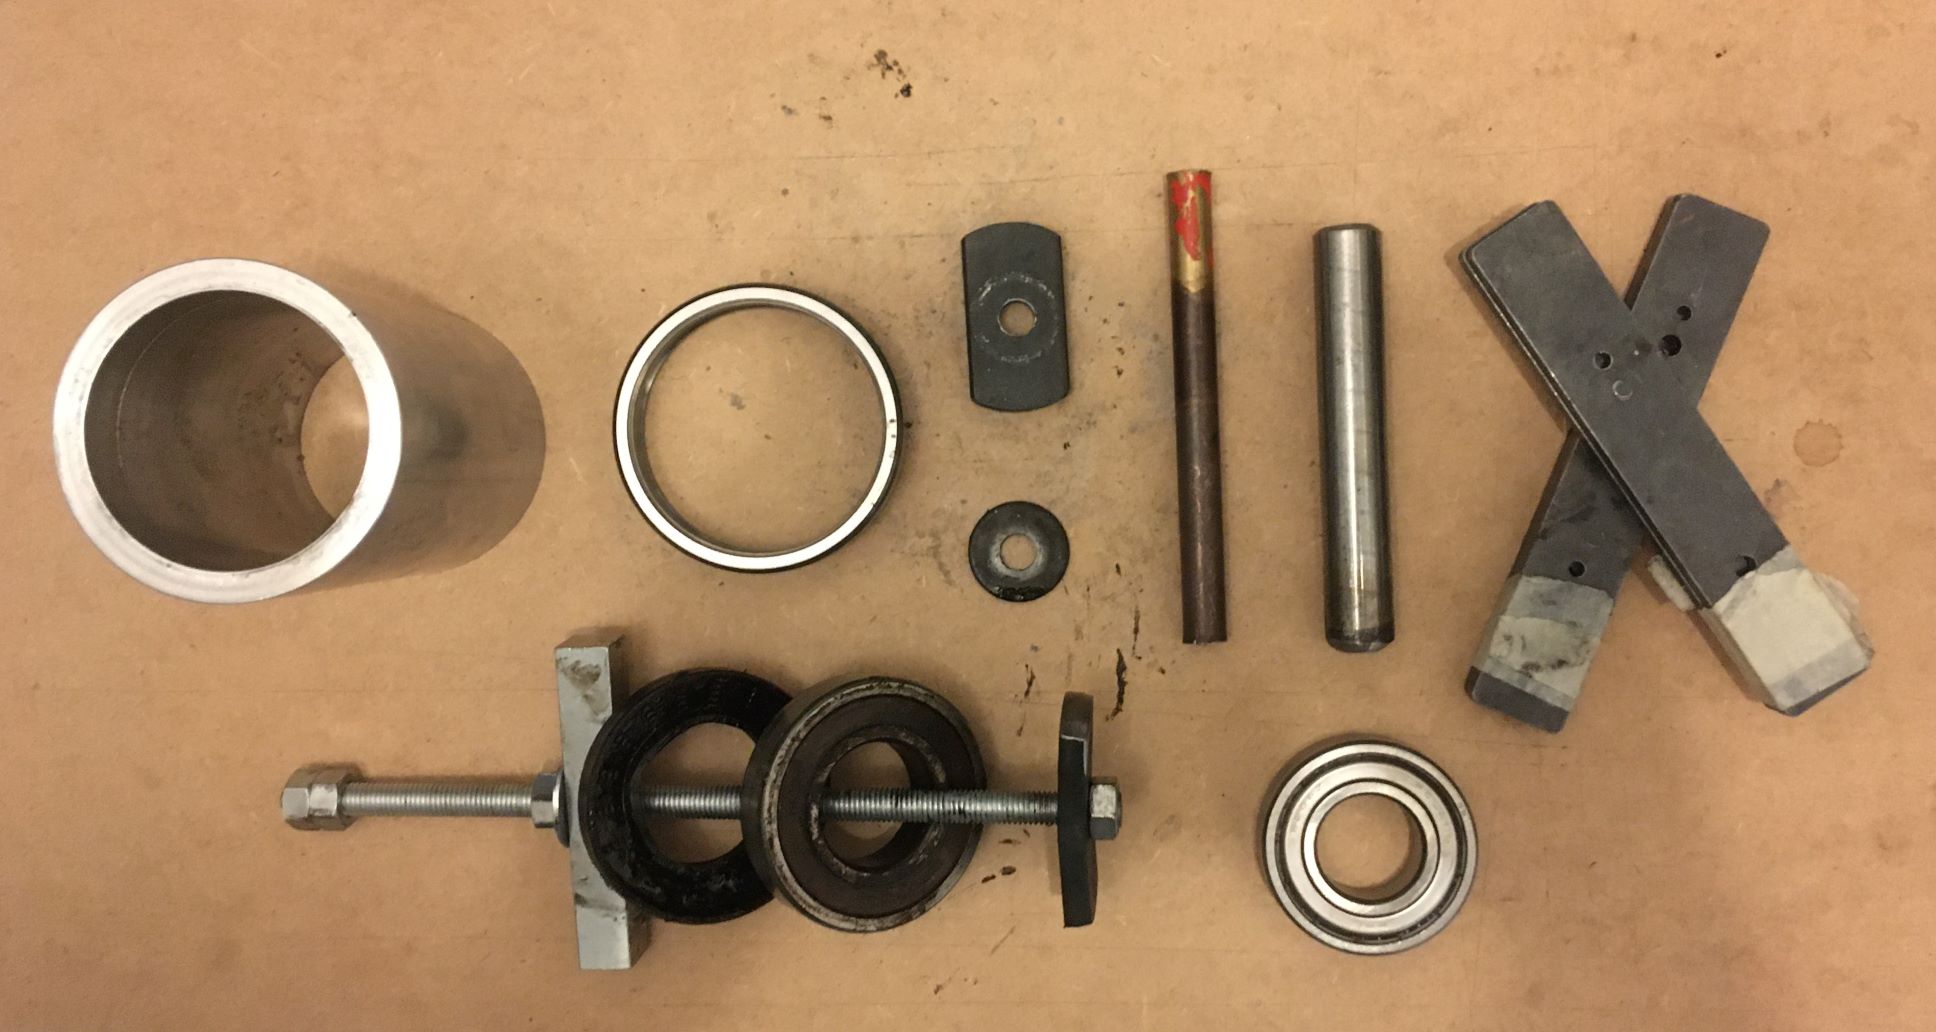
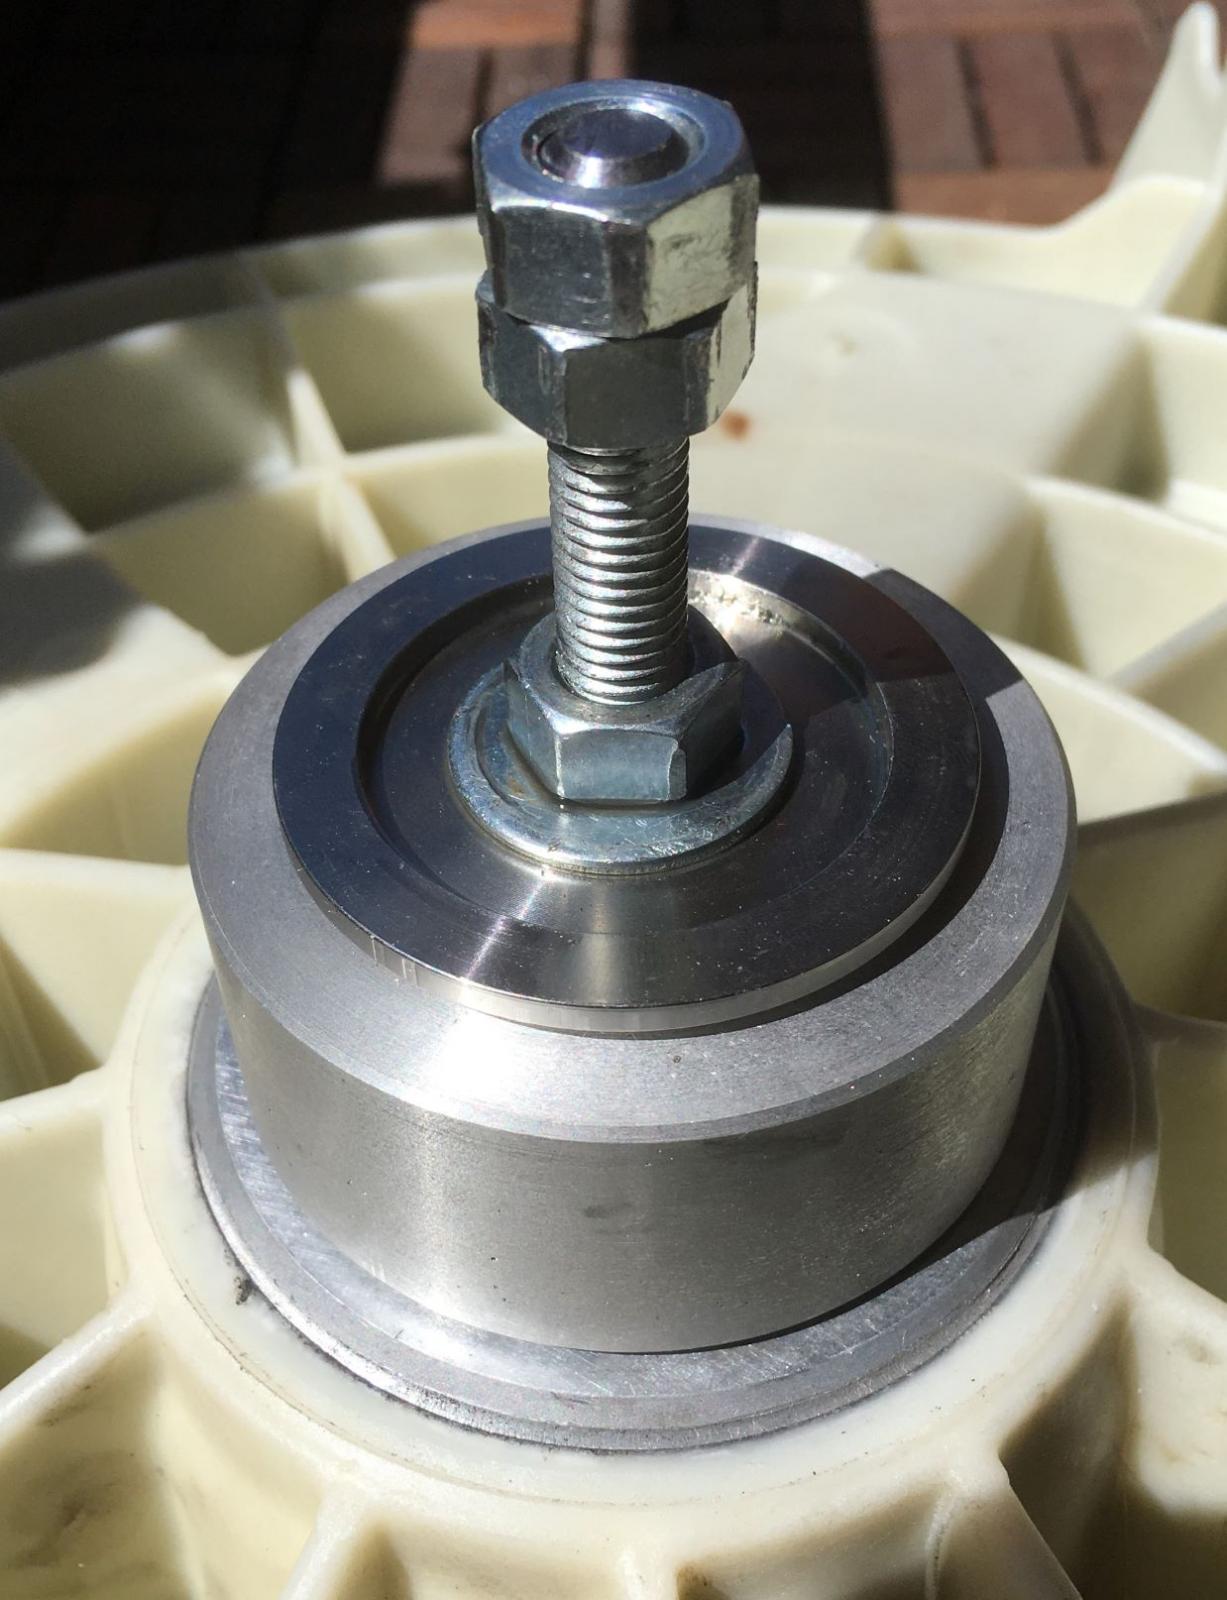
Starting out with the bearings and their ass'y hardware:
Attachment 35184 Attachment 35185 Attachment 35186 Attachment 35187
The whole affair went so smooth and quick I forgot to take any pics of the oil seal being fitted, sealed and greased,
then suddenly the previously meticulously cleaned drum merely jumped in. -No sweat.
Hardest was catching up with the flow: gathering the bolts, washers, nuts, tools and a 2 year old leftover tube of RTV:
Attachment 35188 Attachment 35189 Attachment 35190
Having drilled app 20 holes around the tub perimeter, fitting the washers and M5 locknuts was the biggest challenge,
desperately trying not to get the grey silicone (nicely matching our kitchen tiles) on my hands, tools or clothes.
Lemme say that part of today's operations went "So-So".
Attachment 35191 Attachment 35192 Attachment 35193
Left sunbathing on our balcony in the afternoon sun - three hours after startup today -
With a pretty big WAF (Wife Acceptance Factor), and an amazed teen-age (usually dad-sceptical) daughter.
It really doesn't take much more to keep this Swedish Cheapskate happy,
and "being at it" thru some years now, I coincidentally seem to have acquired a certain portion of luck?
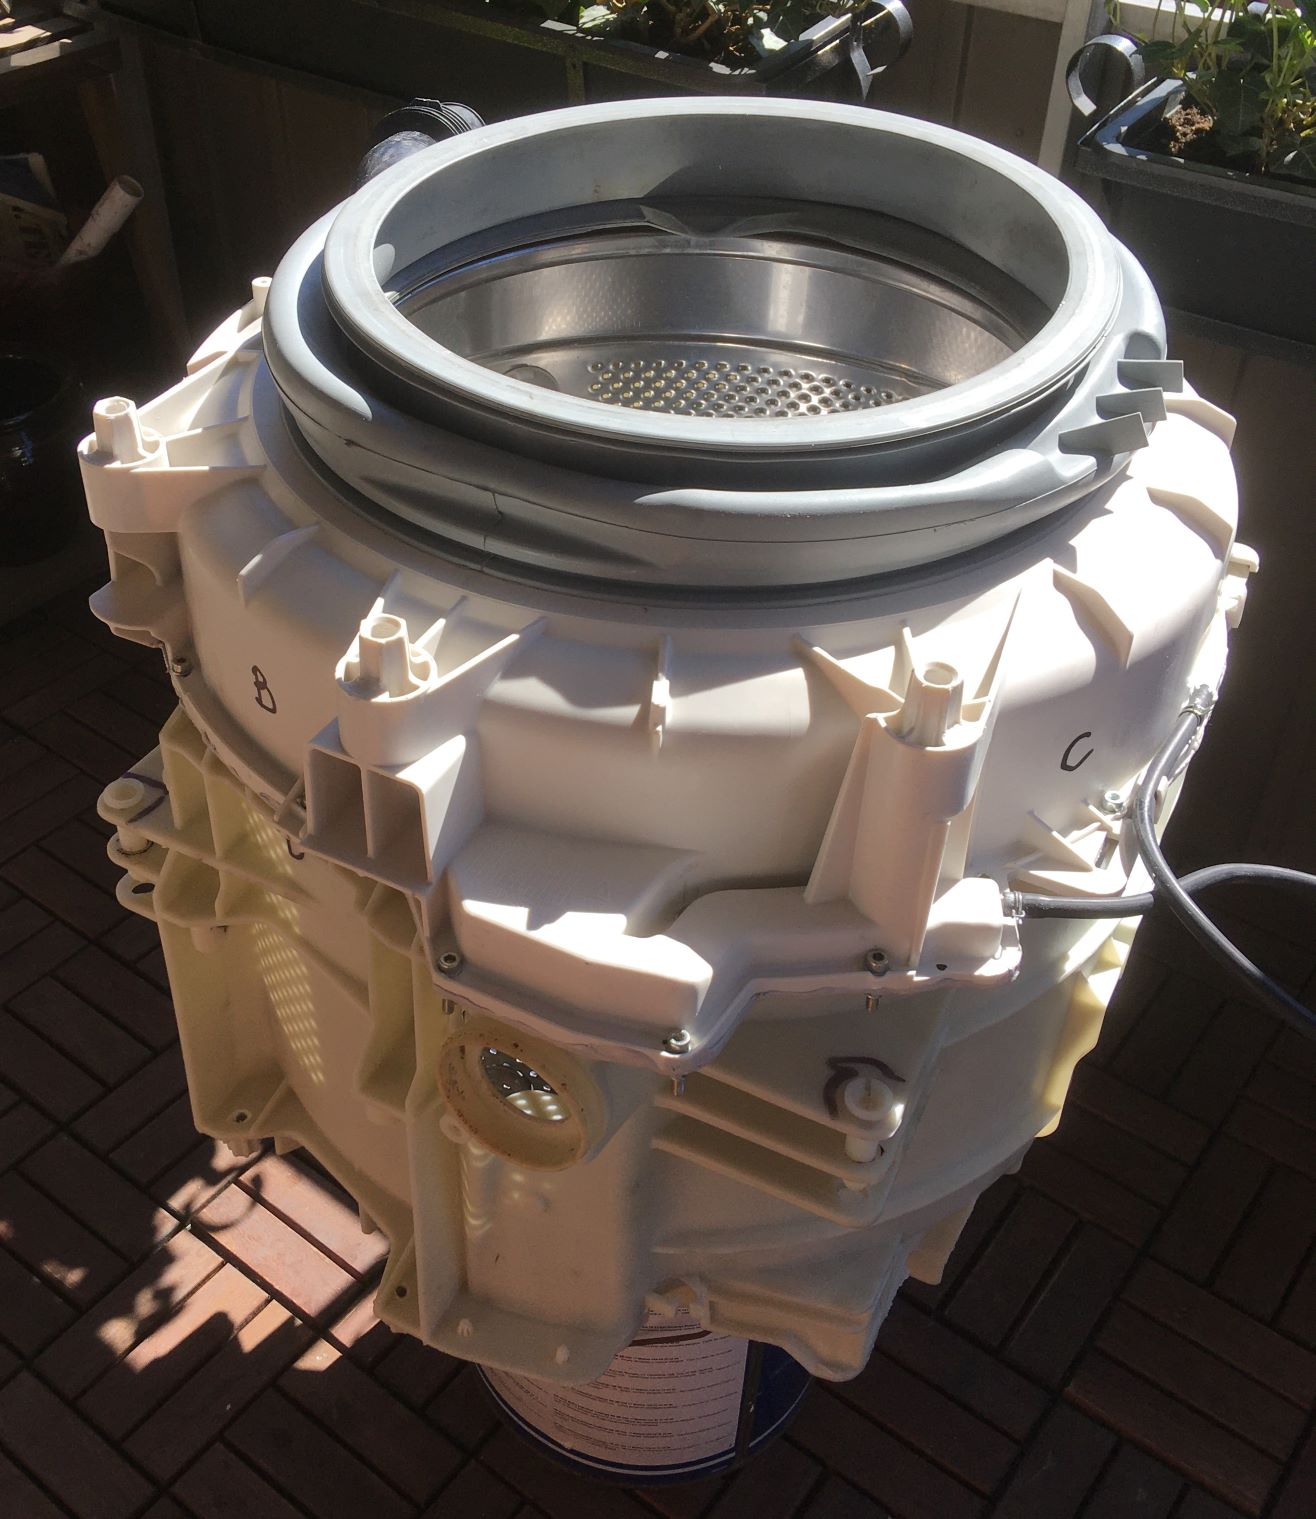
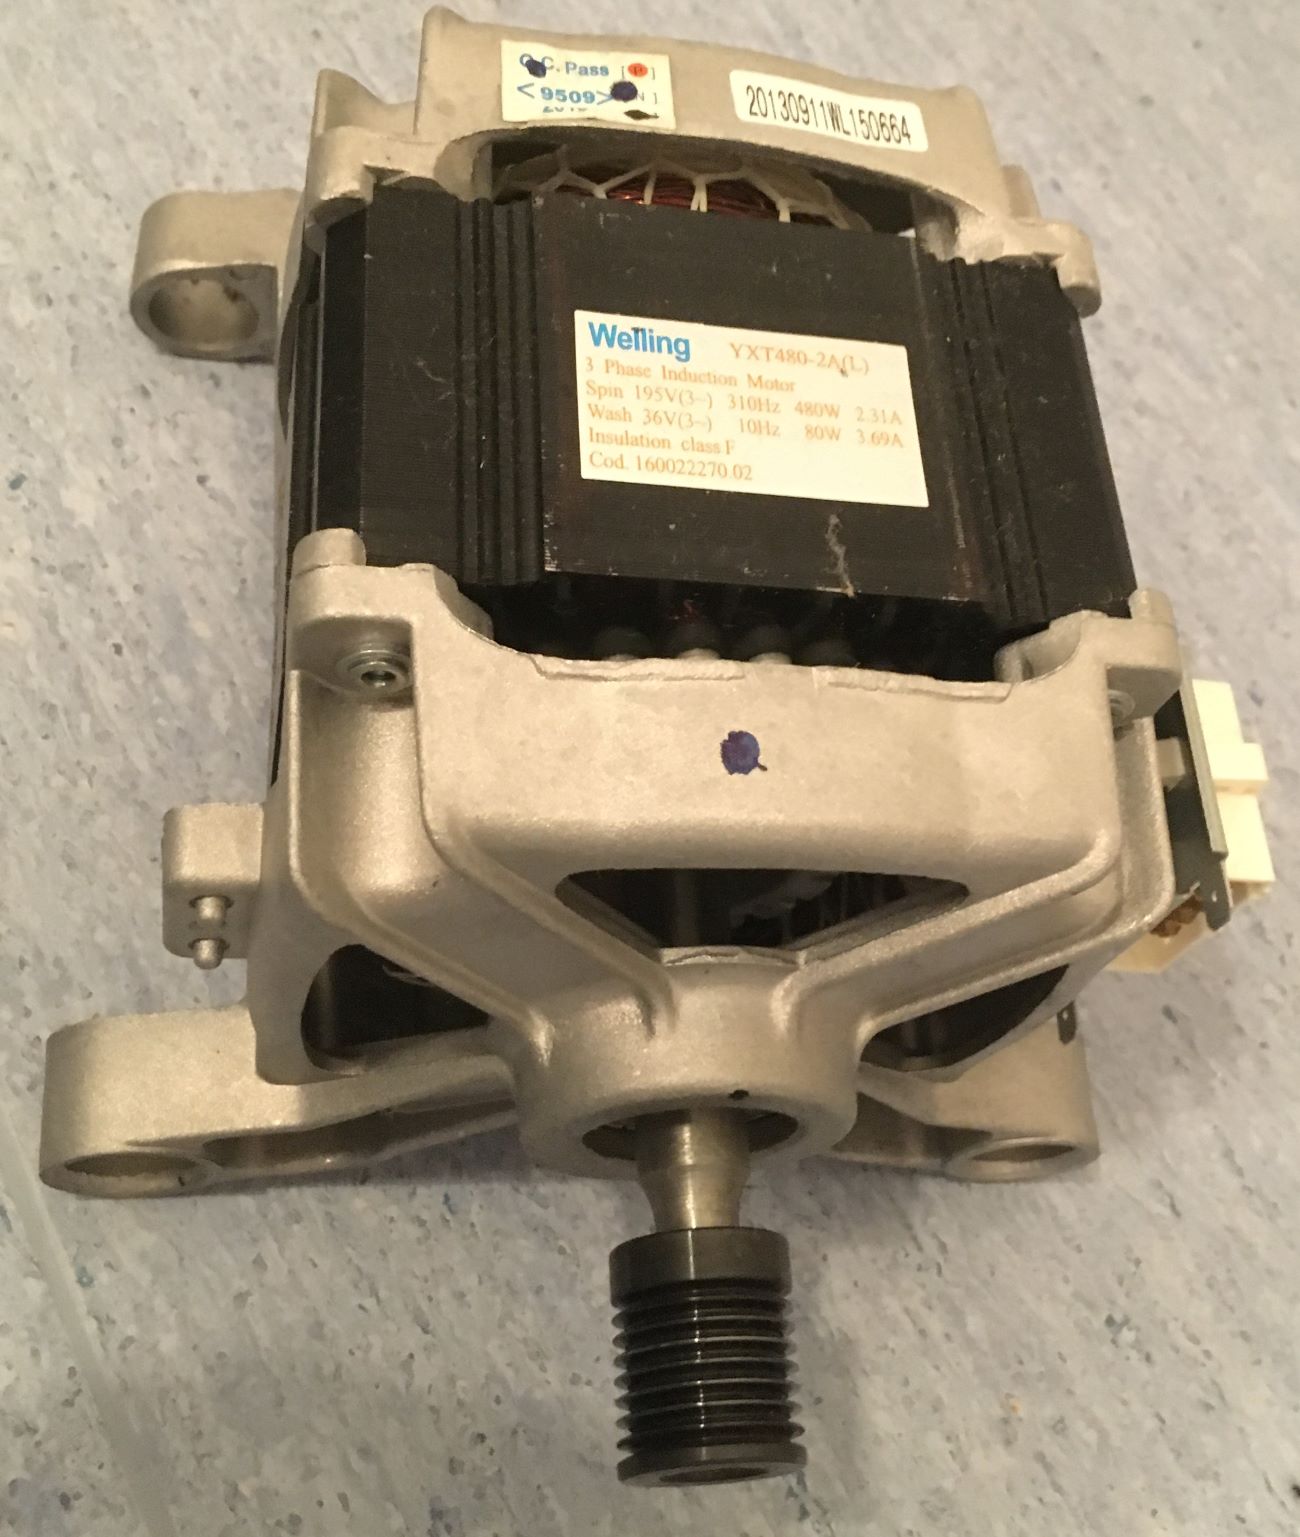
Tomorrow, when the tub is semi-cured, refitting the motor, belt, concrete weights and drop the thing into the chassis,
hook-up of springs, dampers, wires, hoses and bellows - refitting all stays, electronics, panels etc,
giving ithe RTV a coupla days of extra curing before the final test:
-Will it be water-tight? -Will it even run? "The mystery deepens as the plot thickens."
4 Attachment(s)
Growling washing machine, Hopefully the 2nd to last part.
Yet another sunny, warm Sunday, so I started early preparing for "the Last Sprint".
By exploiting "the Next-of-kin", we managed to levitate the drum unit upwards and down into the chassis:
Attachment 35211 Attachment 35212
Motor looks brand new, no wear detectable, it just slipped in - fitted the Poly-V belt,.
The trays for detergent and softeners got a well-needed cleanout,
treated their insides with Liquid Car Wax, to avoid build-up of Yecch again.
Connectors, hoses and panels went in as planned - not a single leftover part, no tools left inside either,
so I hooked it up to the mains, water supply and drain. No leakage, no GFCI or fuse breaking.
Seems I haven't broken anything at all thru this little adventure into the unknown, yet..!
So - I guess the job's done!
Now I've just have to sit on my hands for a few days for the RTV to finally cure,
before starting it mulching its way thru the big pile-ups of all our dirty laundry, before my final report...
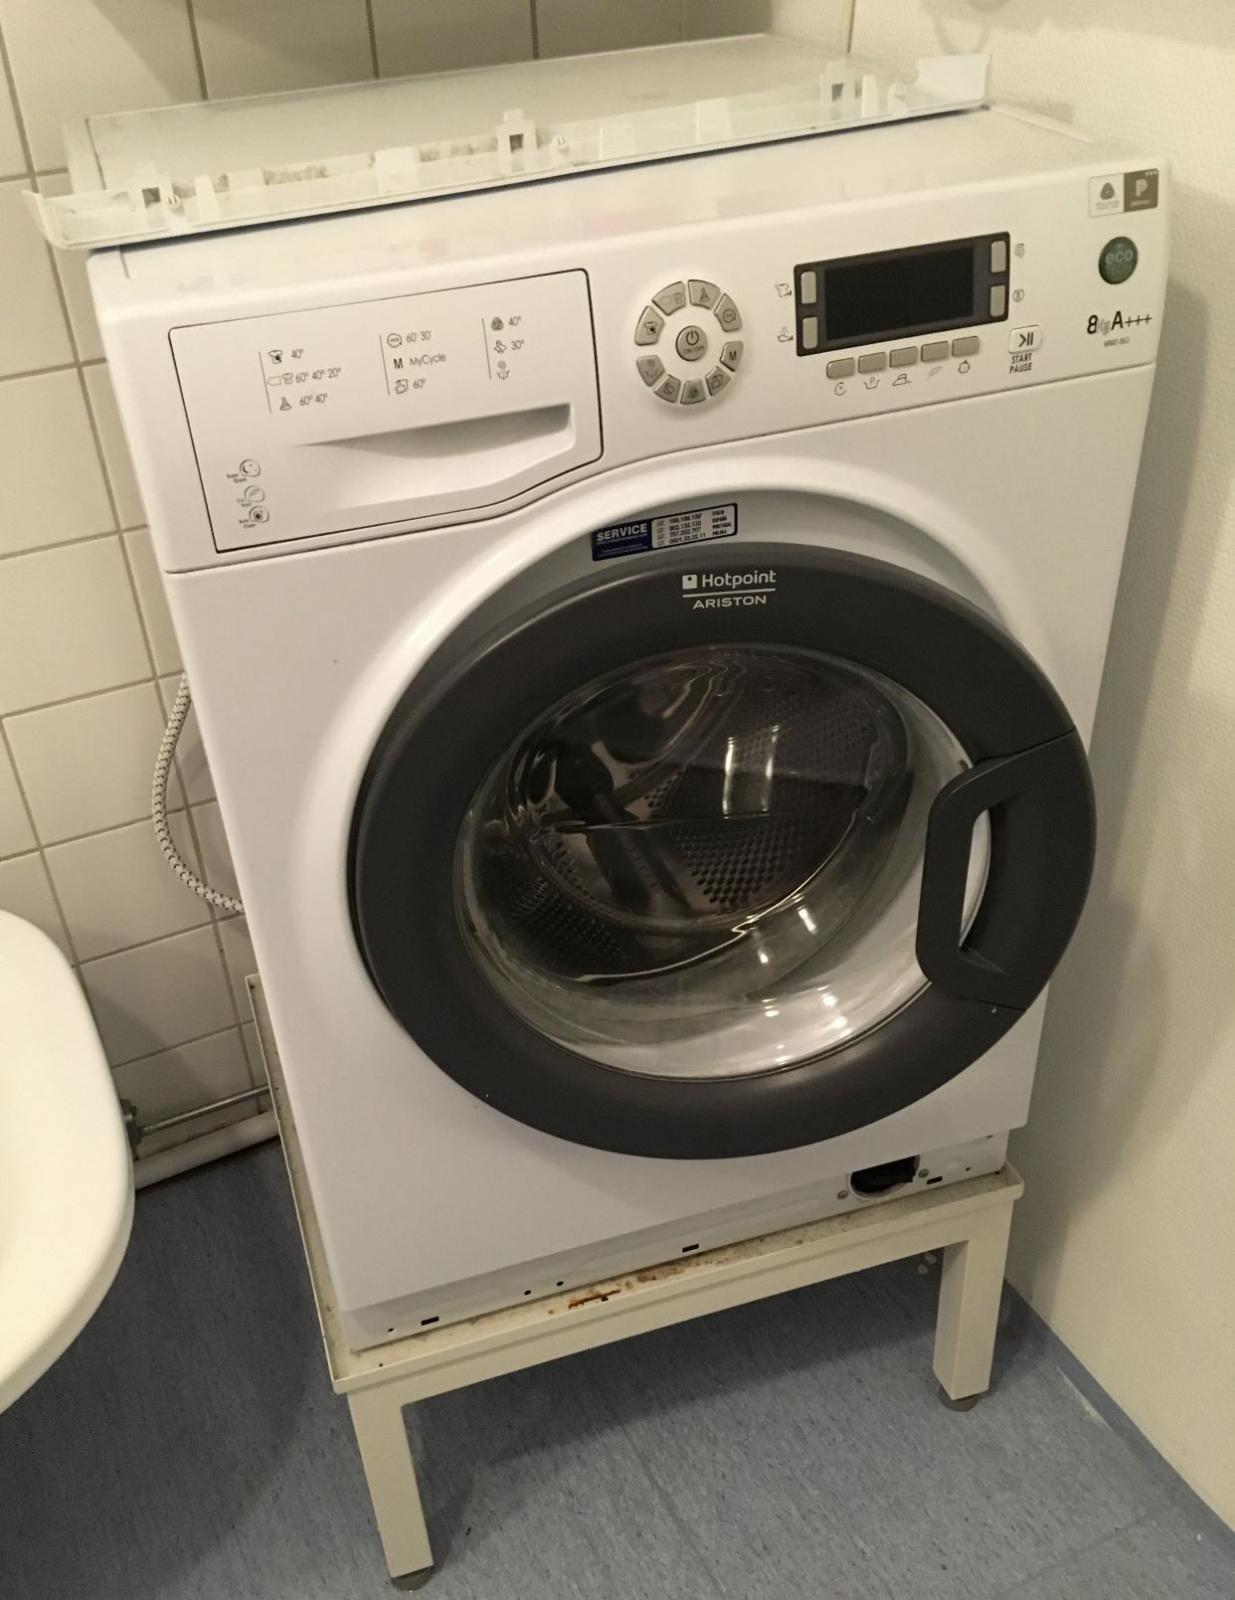
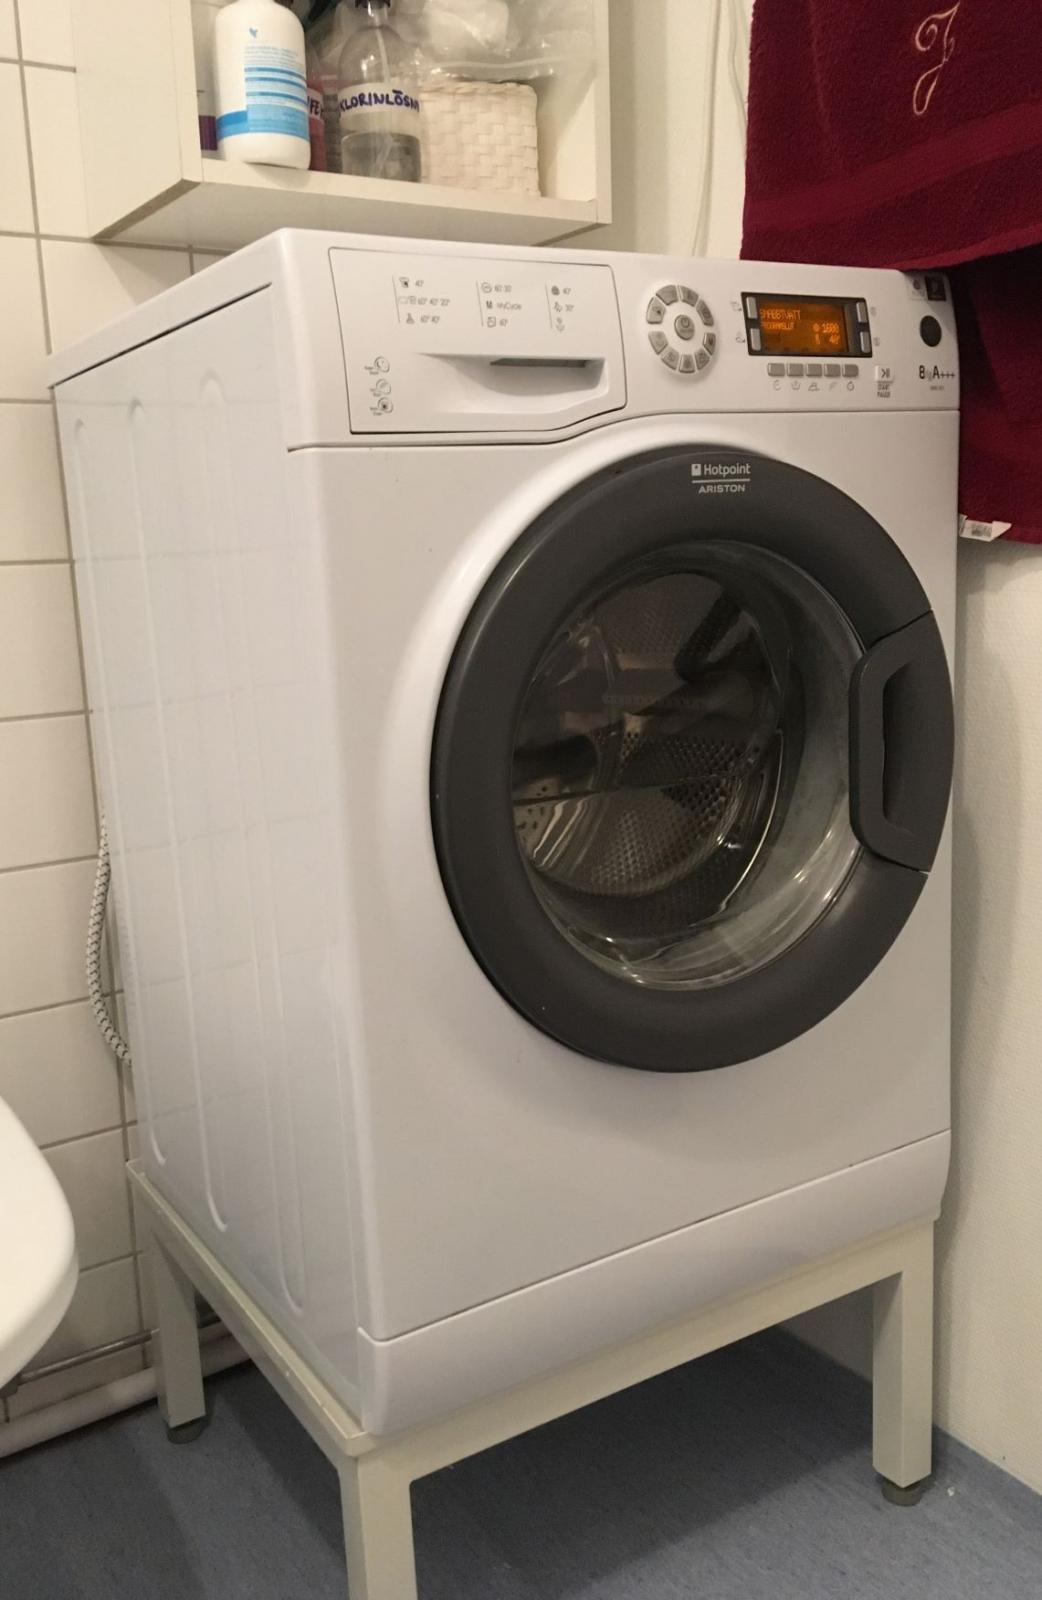
Not much have changed, though: "Before" and "After" shots:
Attachment 35214 Attachment 35213
-Does anybody have any questions?
PS: Half an hour after posting the above I suddenly realized that I hadn't attached the rubber hose
from the detergent/ softener trays to the drum. A start would've been neither good nor fun...
Only a 15 minute fix though, but still a bummer, which just goes to show that I got cock-sure during the last moments.:D
And absolutely consequential to this, I broke my self-imposed RTV cure time limit (another 24 h) and just ran the darned thing.
No leaks whatsoever, works great, spin cycle hardly heard even @ 1600 rpm.
Providence seemingly watched over this fool today.
Now this washer is up for "the long term test"...:)
