Free 186 More Best Homemade Tools eBook:  
New: 300+ fresh build posts/day from 275 forums → BuildThreads.com

User Tag List

Page 1 of 4 1 2 3 4 LastLast
Results 1 to 10 of 33

Thread: Yet another Honey-Do: Growling washing machine, Pt 1

Hybrid View

  1. #1
    Supporting Member DIYSwede's Avatar
    Join Date
    May 2019
    Location
    Stockholm, Sweden...
    Posts
    637
    Thanks
    424
    Thanked 880 Times in 340 Posts

    DIYSwede's Tools

    Smile Yet another Honey-Do: Growling washing machine, Pt 1

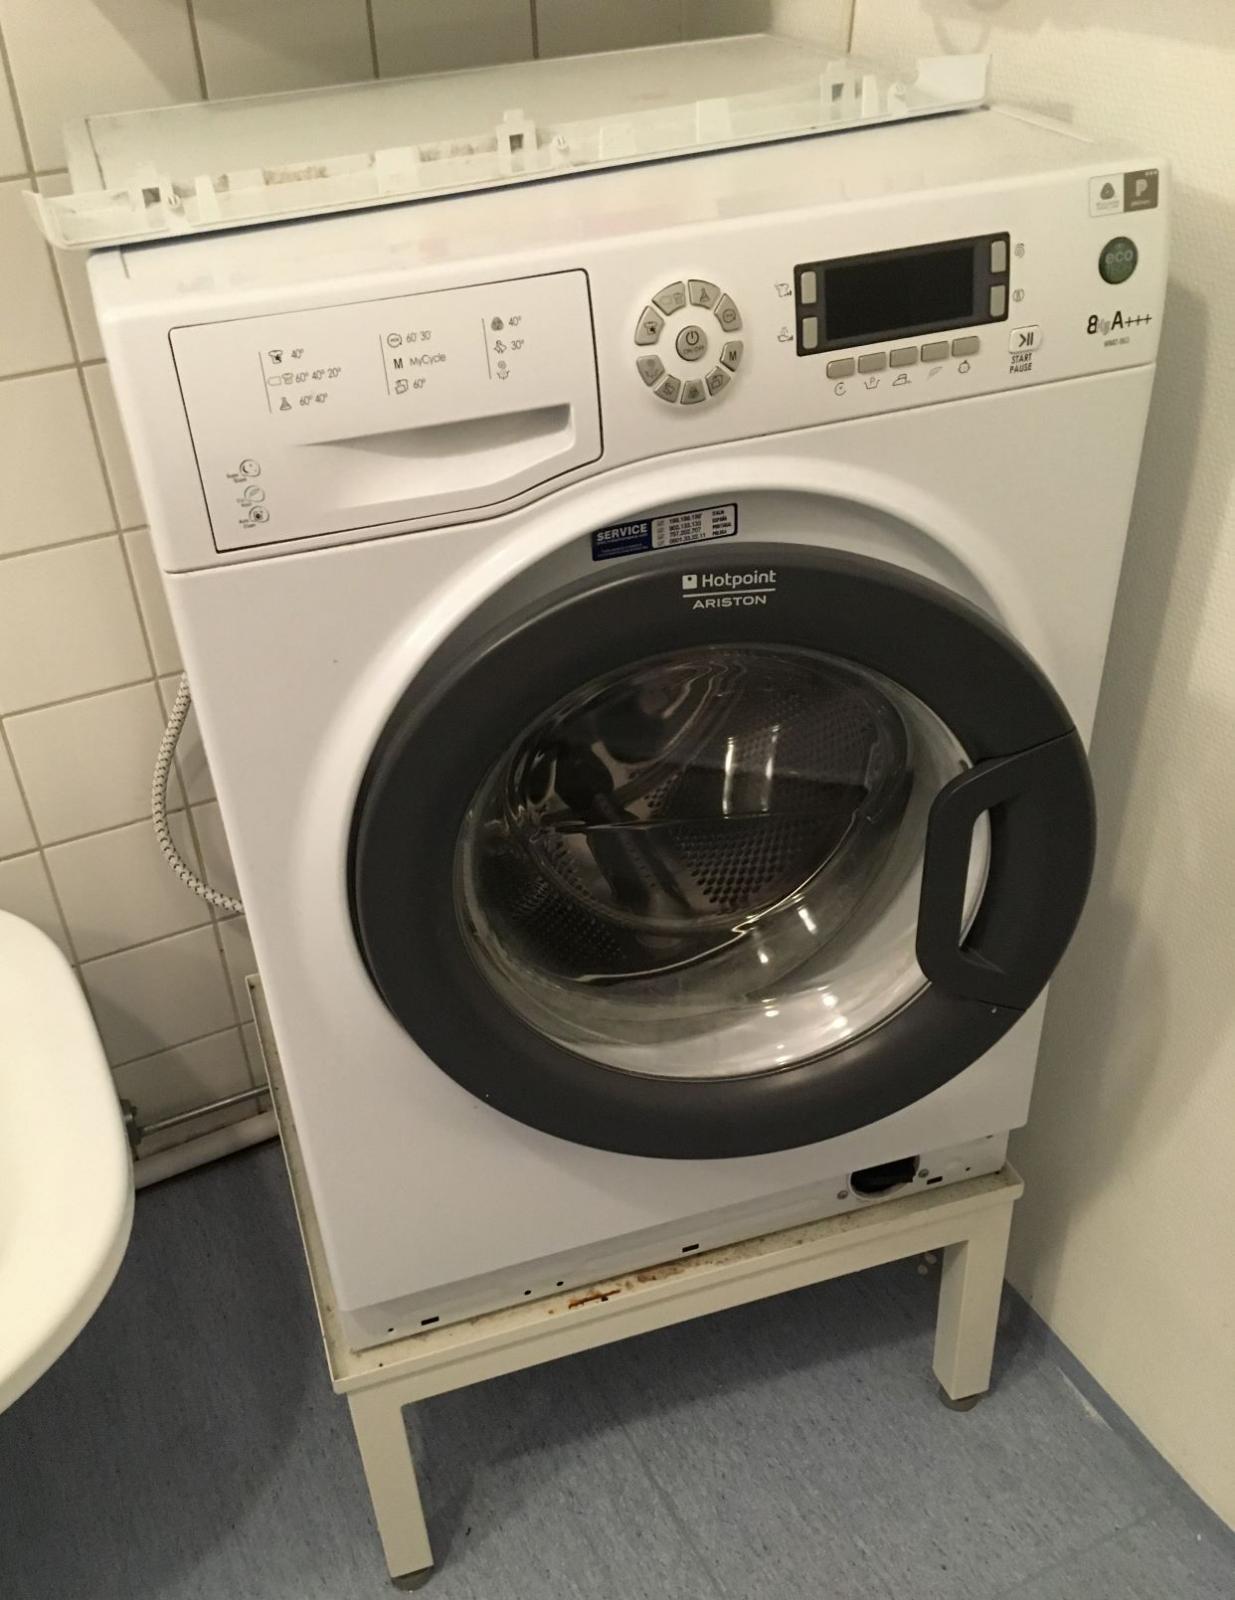
    After some 7 years of immaculate service our Ariston Hotpoint "ECO" 8 kg capacity & 1600 rpm spin, "WMD 863B EU" model,
    started some "growling" in its spin cycle, driving my beloved up the wall (see pic - the machine: neither the partner nor the wall):

    Yet another Honey-Do: Growling washing machine, Pt 1-wmd-863b-eu.jpg

    The sound got louder and louder thru the weeks, making us all realize: "Some things needs to get done by somebody."
    My 1st thought: Change of bearings & oil seal: How hard can that be? Famous last words...
    Also being cheap-to-the-bone - I didn't want to spend app 620 bucks for a new washer of similar capacity,
    so I forewarned about a 1 week standstill for our present one, giving all the sensitive persons in the area time to clean their necessities.

    Meanwhile, doing some Interweb research regarding spare bearing kits for the model in question: Nada!
    There was a spare part being offered, all right: An entire "drum unit" for a mere 200 bucks.
    "BS" I thought - a purported "eco friendly" machine would never provide that sort of landfill waste...

    -Any reader suggestions on the environmental friendliness of ditching an entire drum to replace a coupla bearings and a seal?

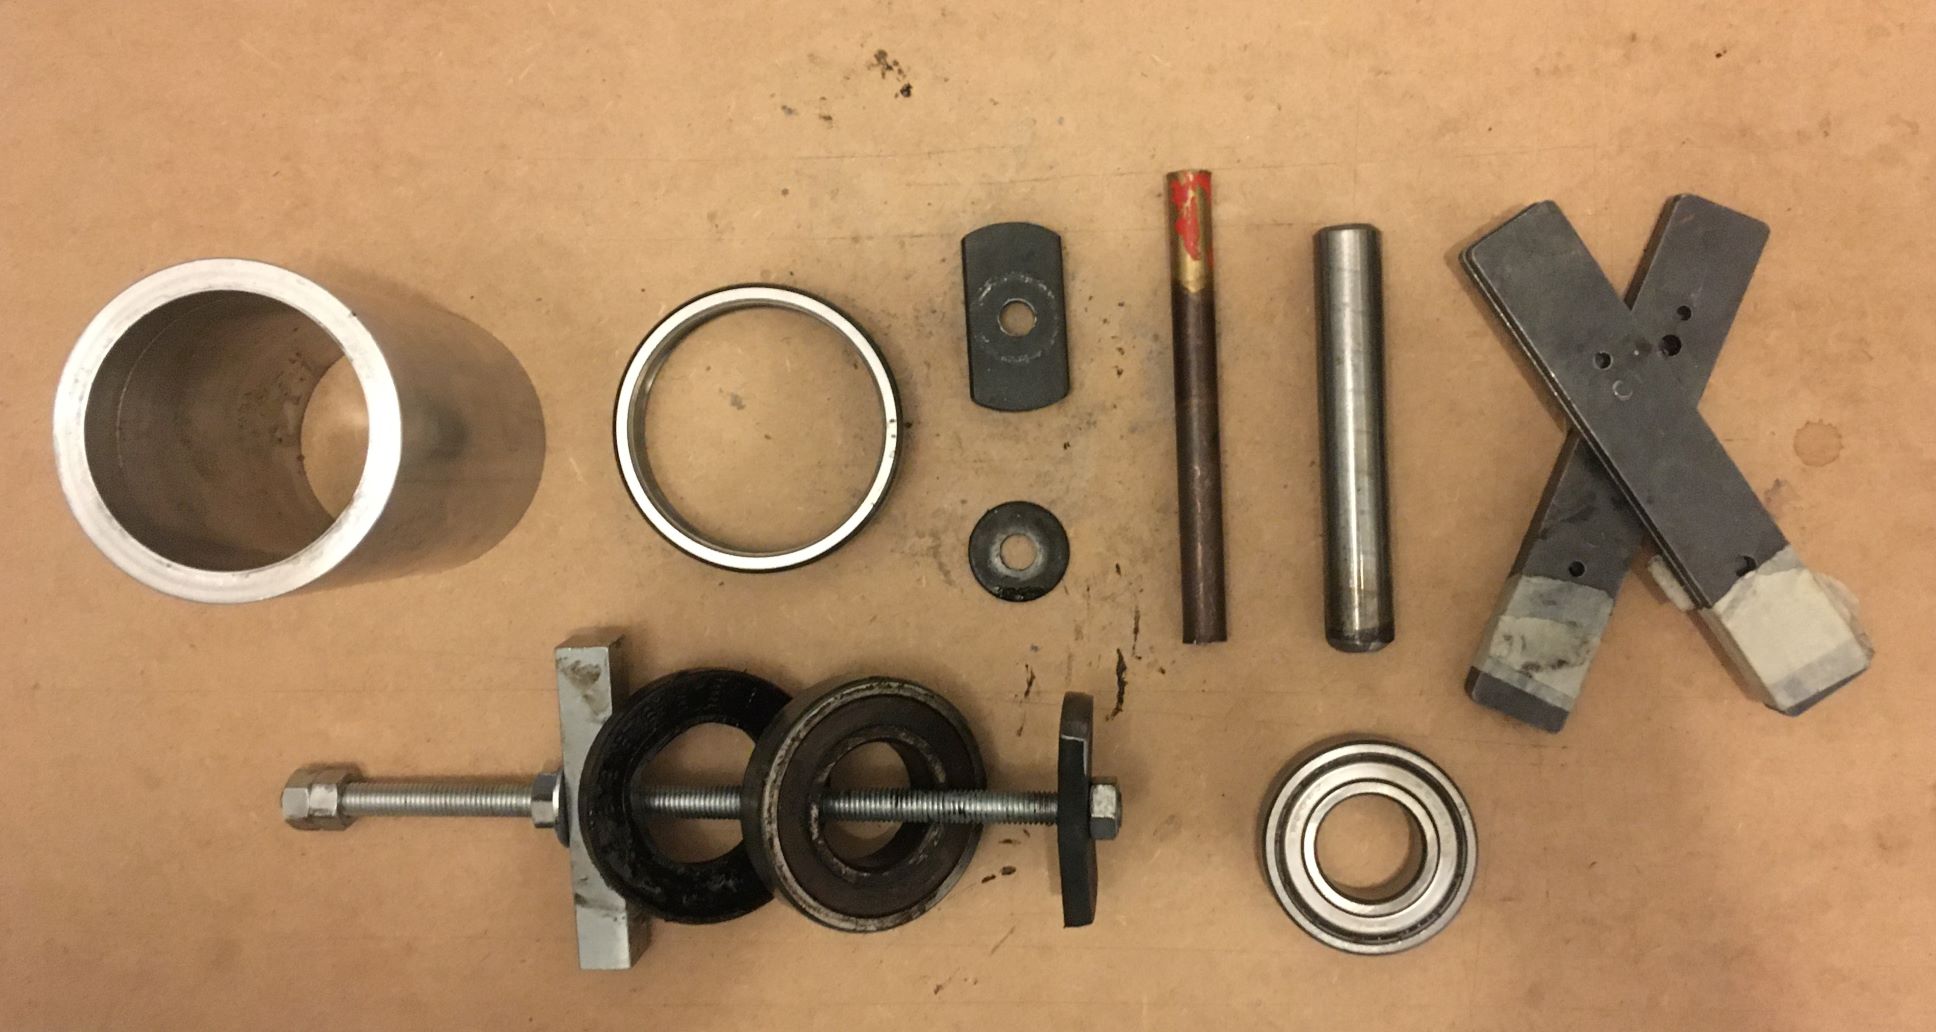
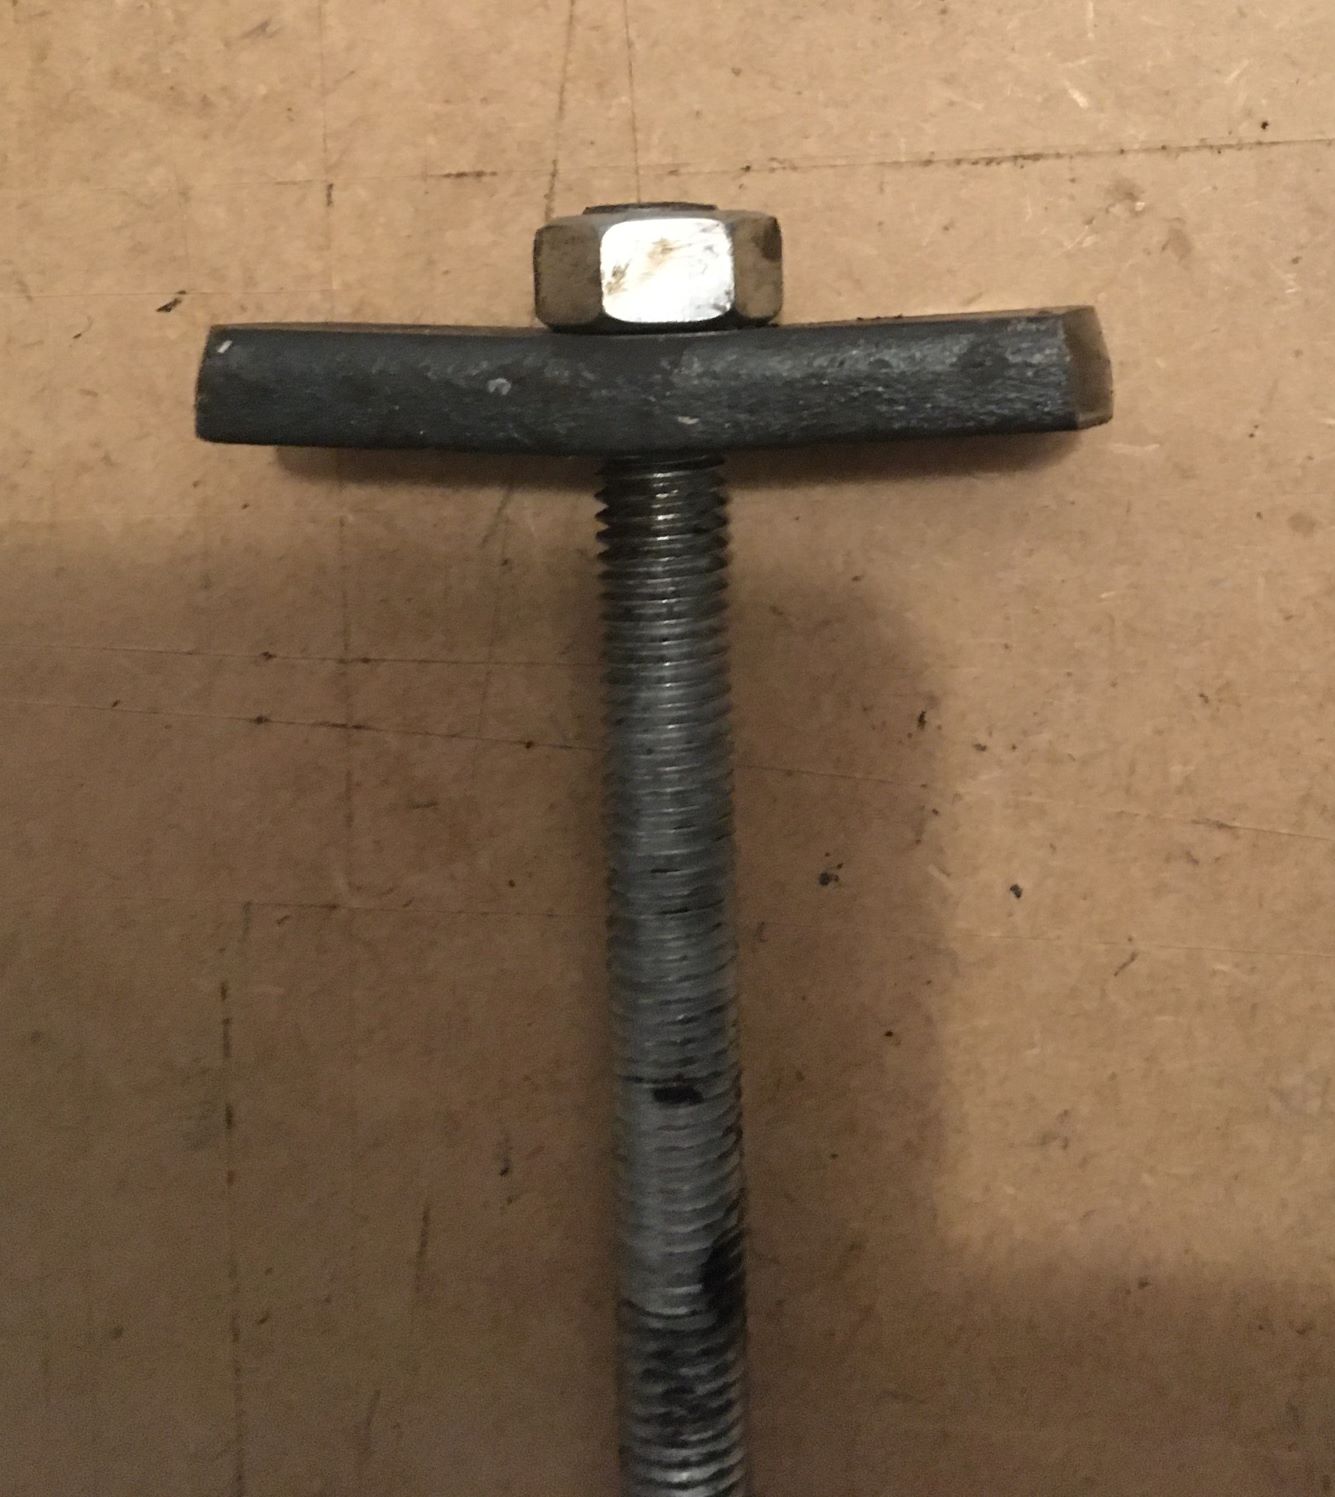
    So: Armed with the necessary and sufficient tools and hopefully ditto skills and knowledge for the job,
    I happily unplugged the water and drain hose and electrical cable without mishaps.
    Reverse engineered the machine : top lid, front and rear panels, unbolting the motor and belt,
    dislodged the front bellows, unplugged all the electrical connectors AFTER marking all their proper places,
    taking cellphone shots of crucial places, loosen the concrete top weight and marking all the bolts.

    Last was the bottom hose clamp, then "the Sealed Unit" was just hanging in two springs on two dampers.
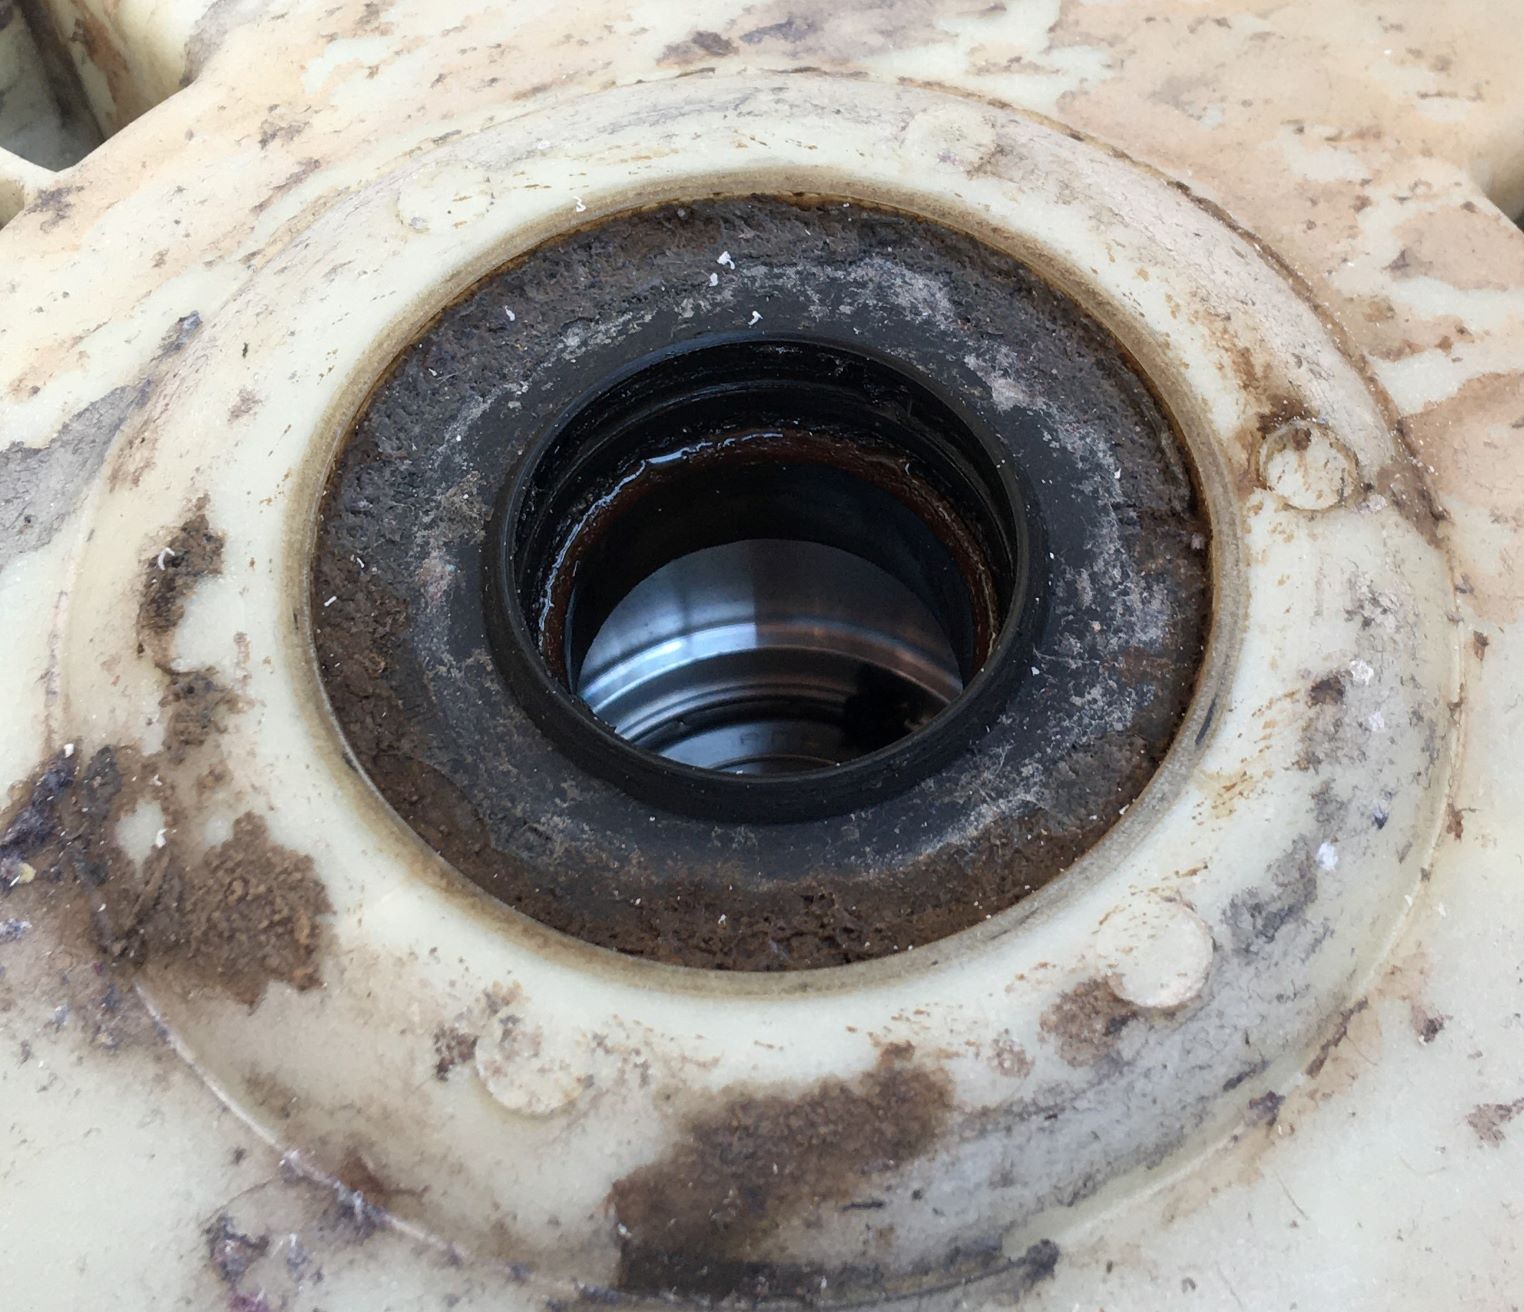
    Turning the drum did produce a resonant growl in the unit, so I seemed on the right track.
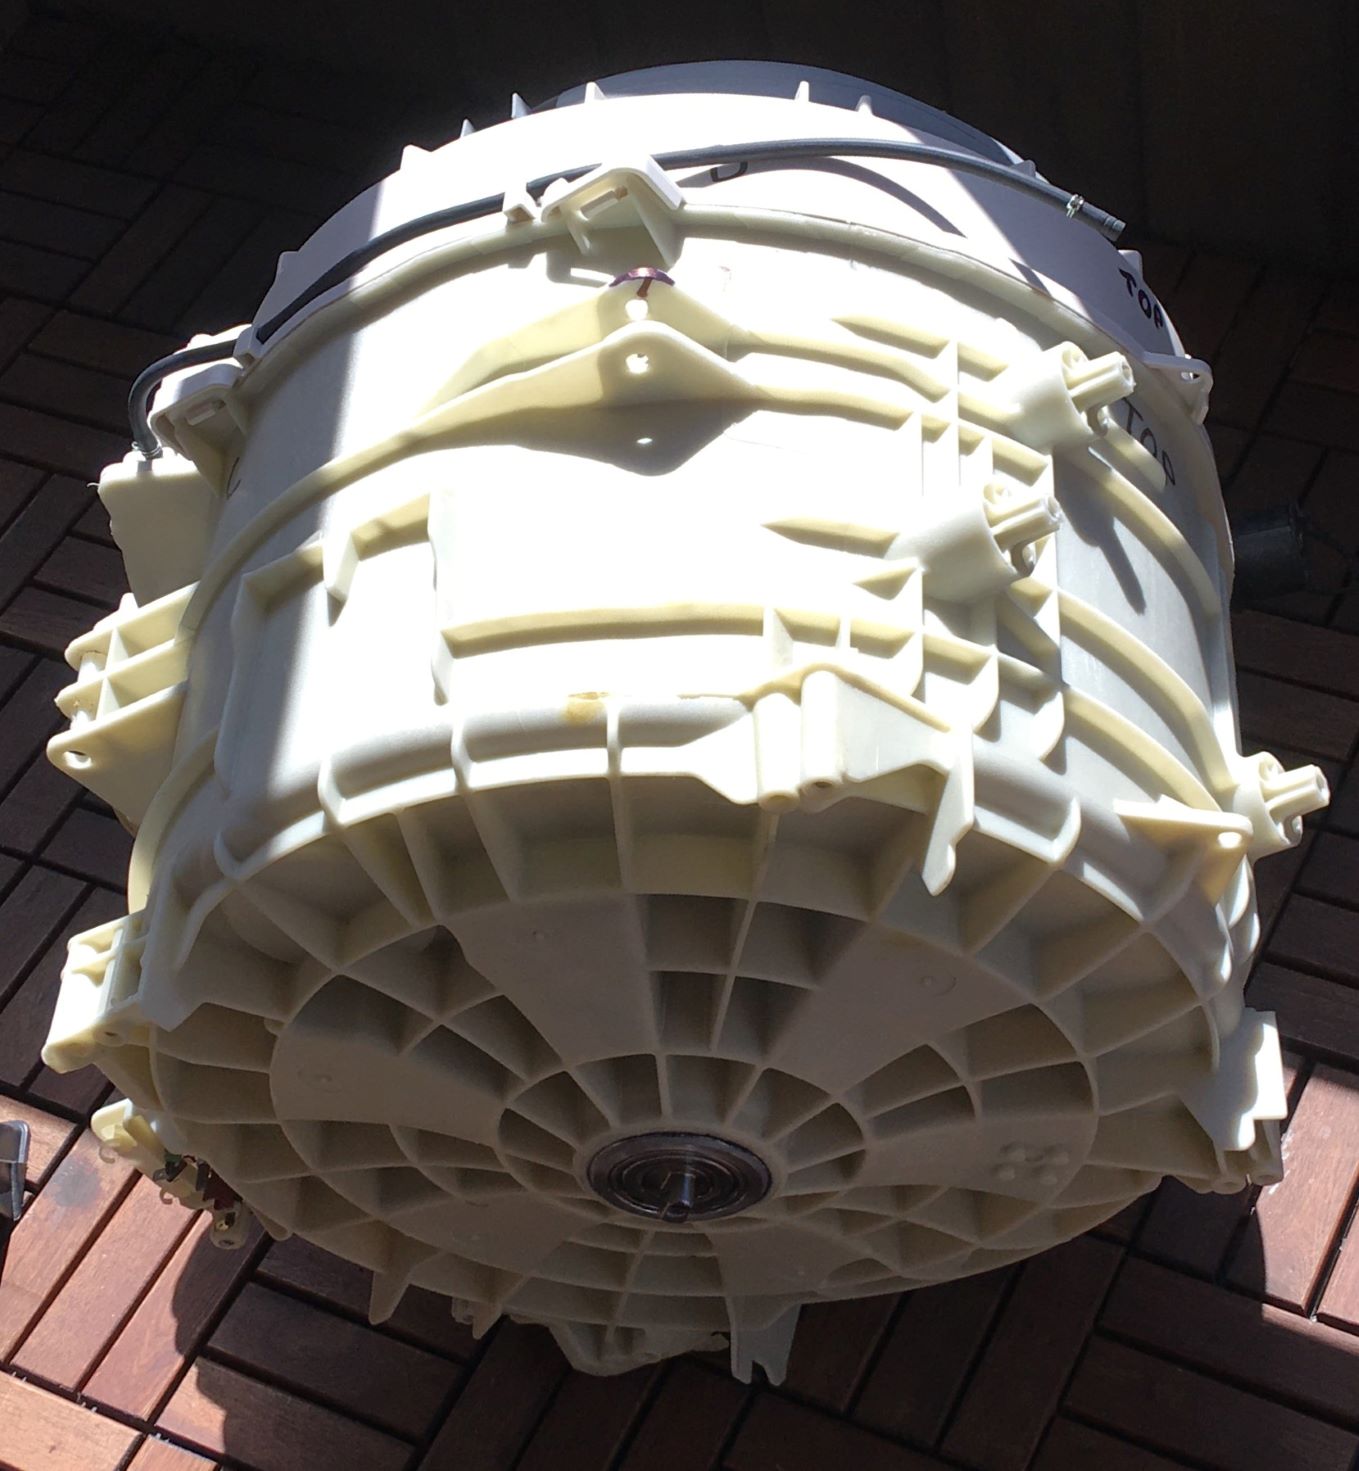
    Getting the unit up and out of the enclosure went smooth though it was a pretty heavy lift.
    The entire machine weighs in at over 75 kgs. Unbolted the bottom concrete block.
    45 minutes had elapsed - this was going even better than expected!
    -Y'a all still remember the "Pt 1" in the title, right?

    -Voila: "The Unit".

    Yet another Honey-Do: Growling washing machine, Pt 1-welded-drum....jpg

    The Greeks called their fundamental constituent particle "Atom", "ἄτομος": greek for "inseparable",
    only to be proved false some 25 centuries later.
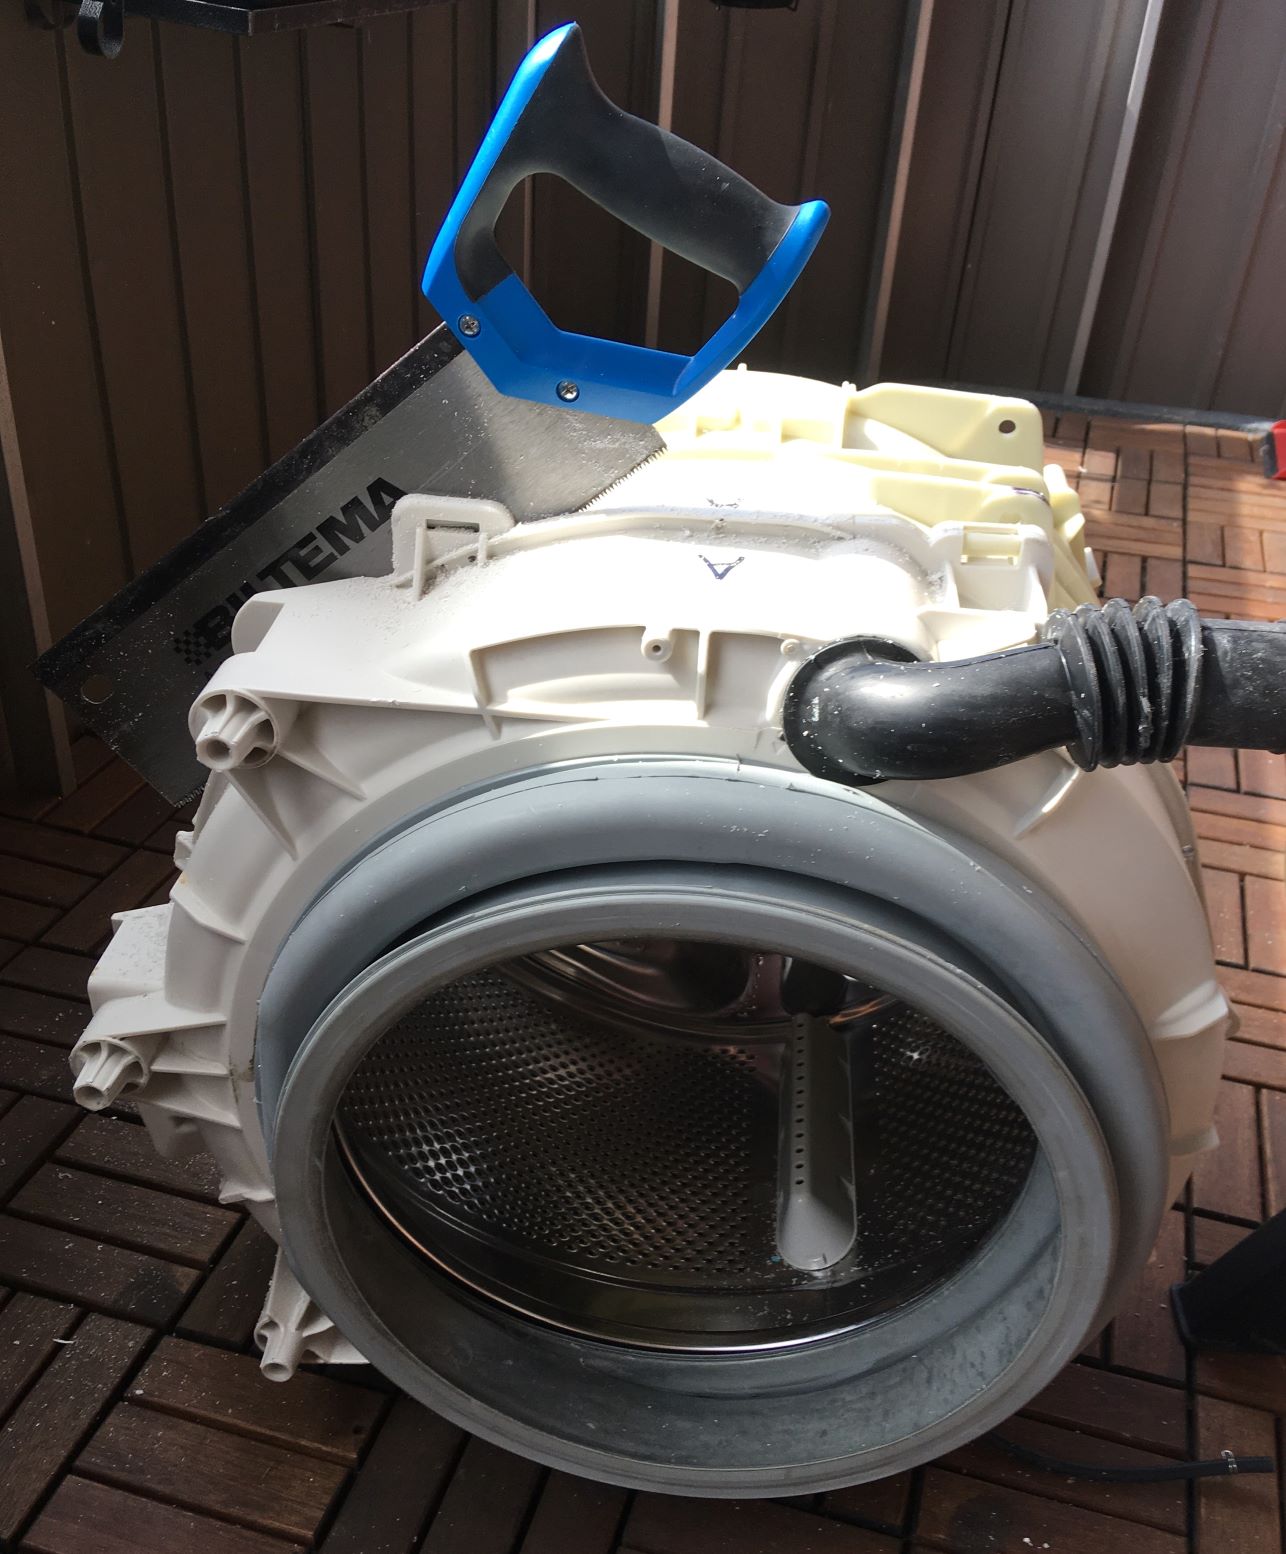
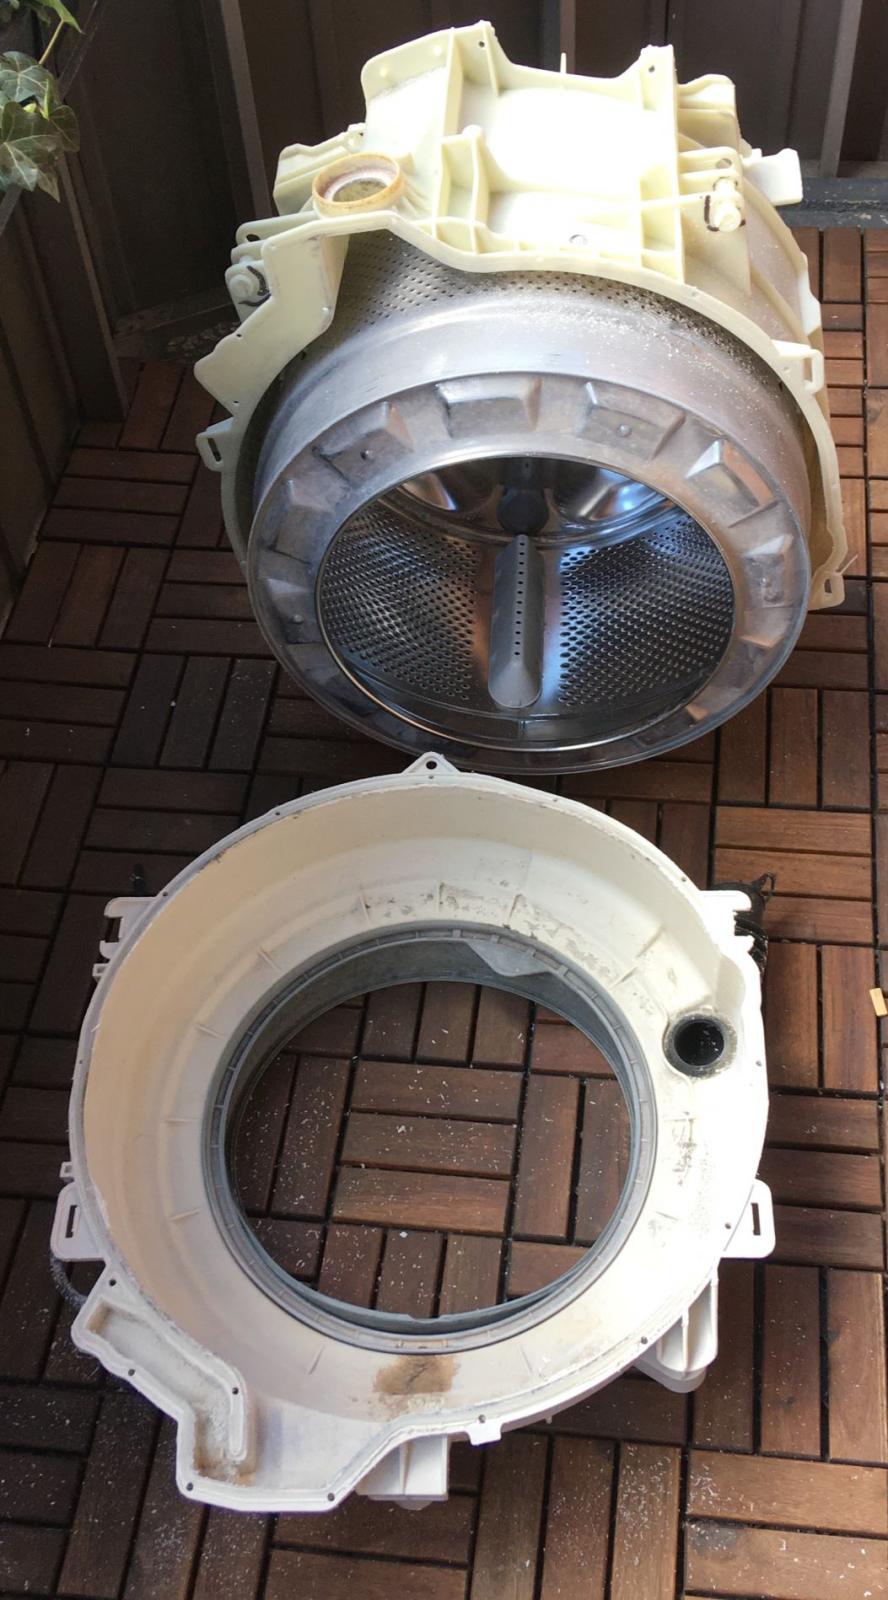
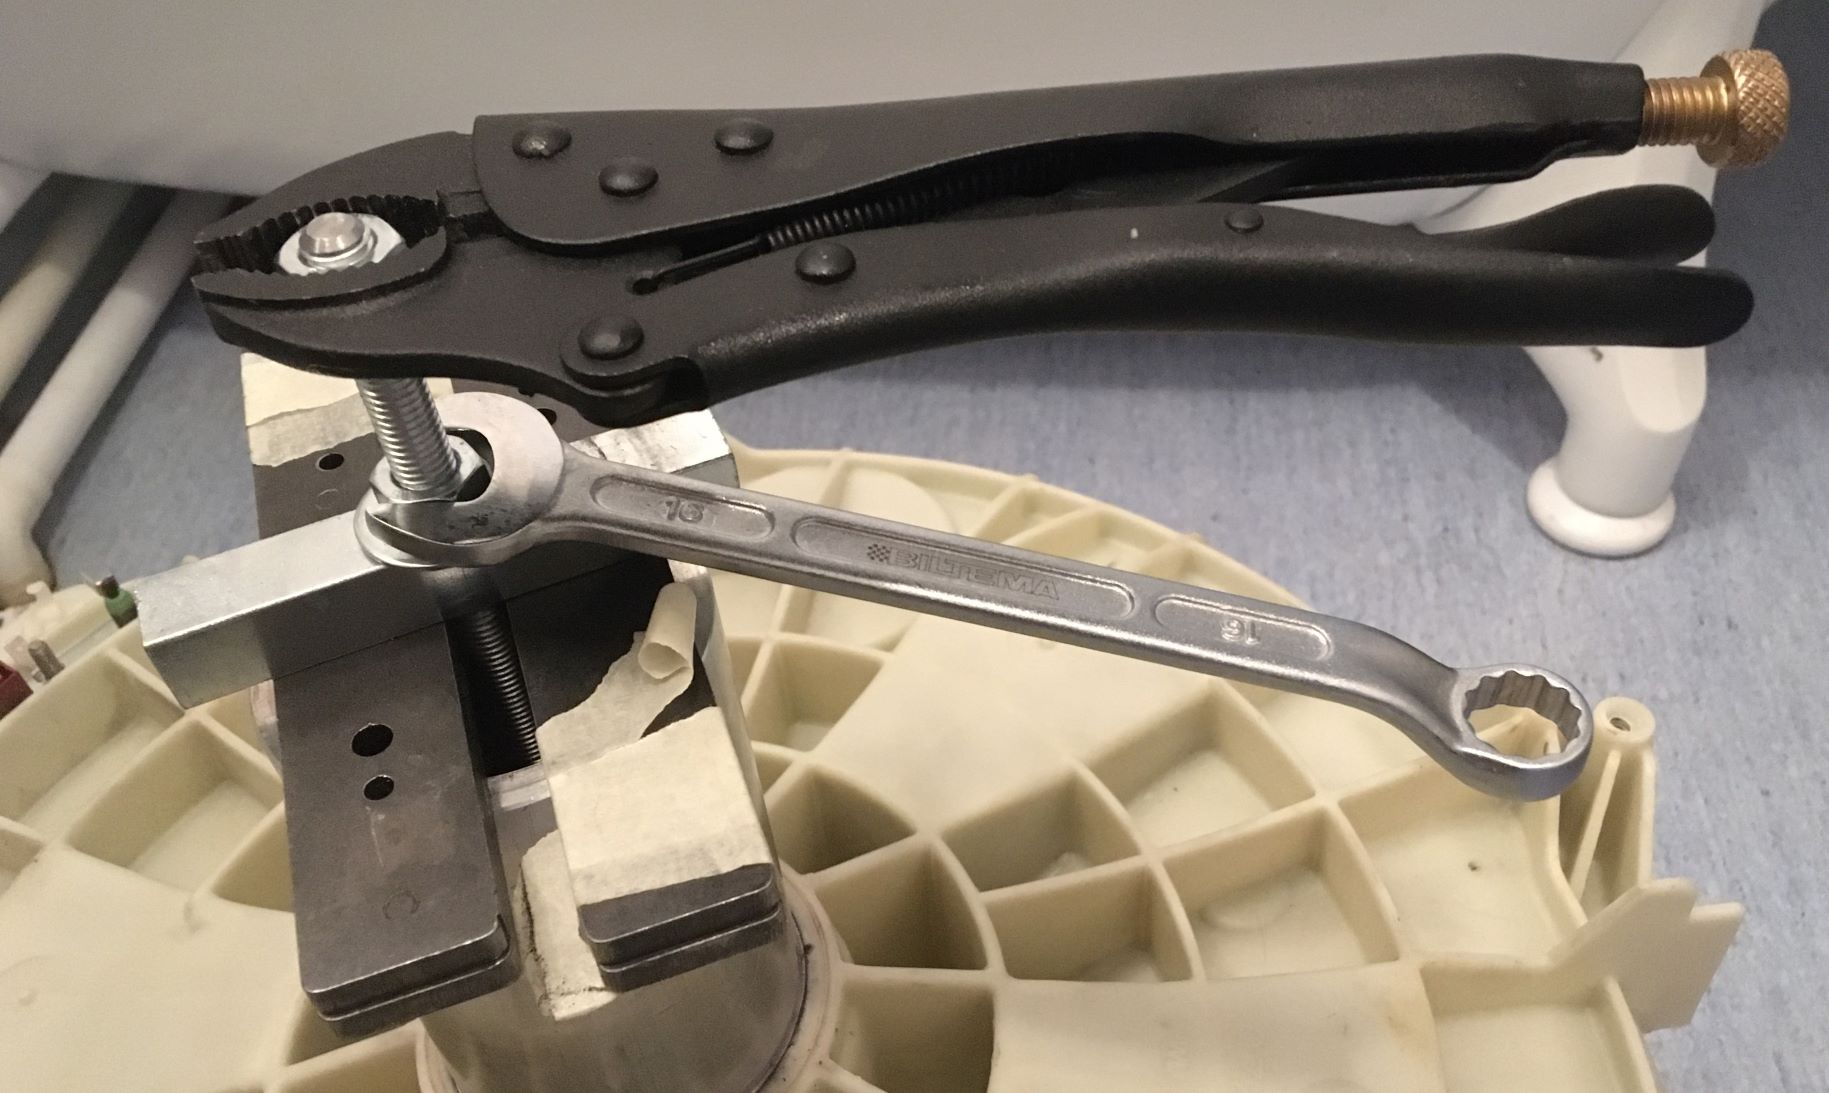
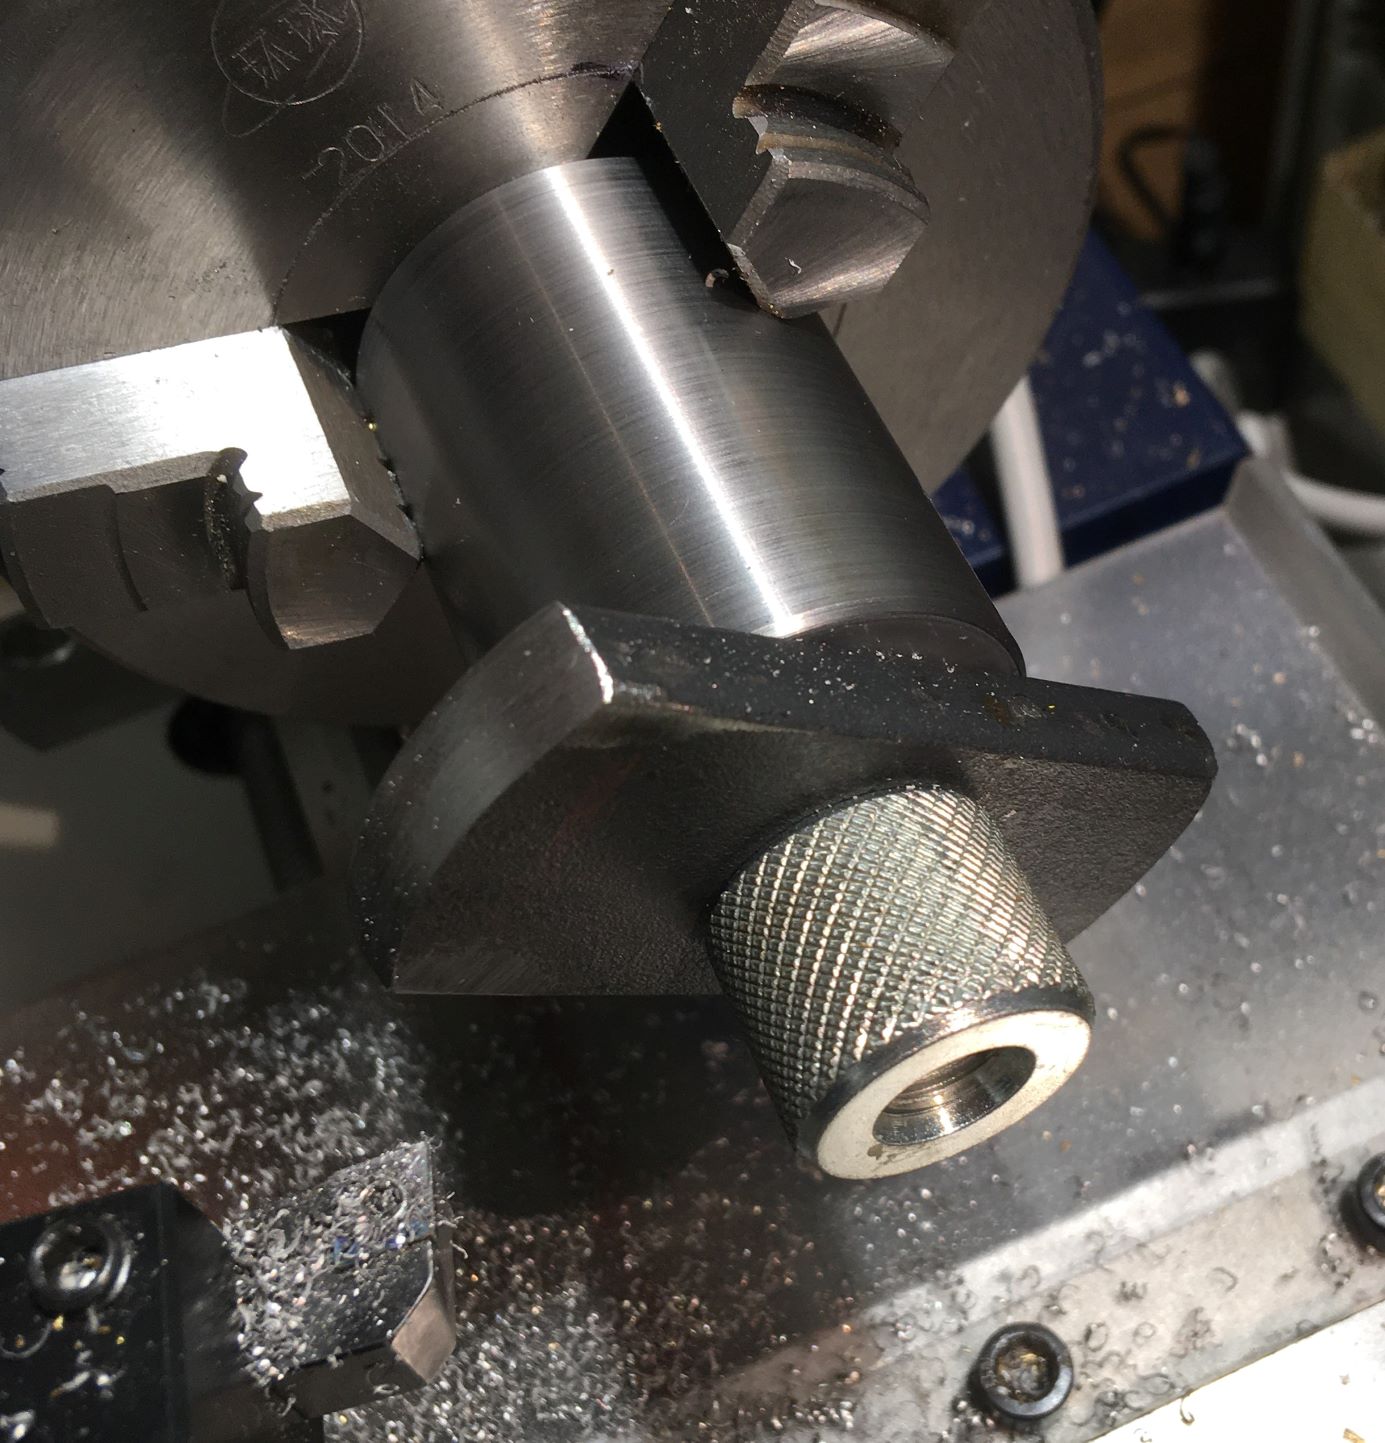
    Consequently I was very much in the mood for dividing "The Unit" (alleged by some manufacturer) into its constituent parts:

    Yet another Honey-Do: Growling washing machine, Pt 1-unsealing-drum.jpg

    Trying to prove I'm not entirely nuts, I had previously drilled a lot of 5,2 mm holes through the "weld seam" in the two halves,
    providing a means of rigidly holding them together with M5 screws and nuts in the bright, promising future.
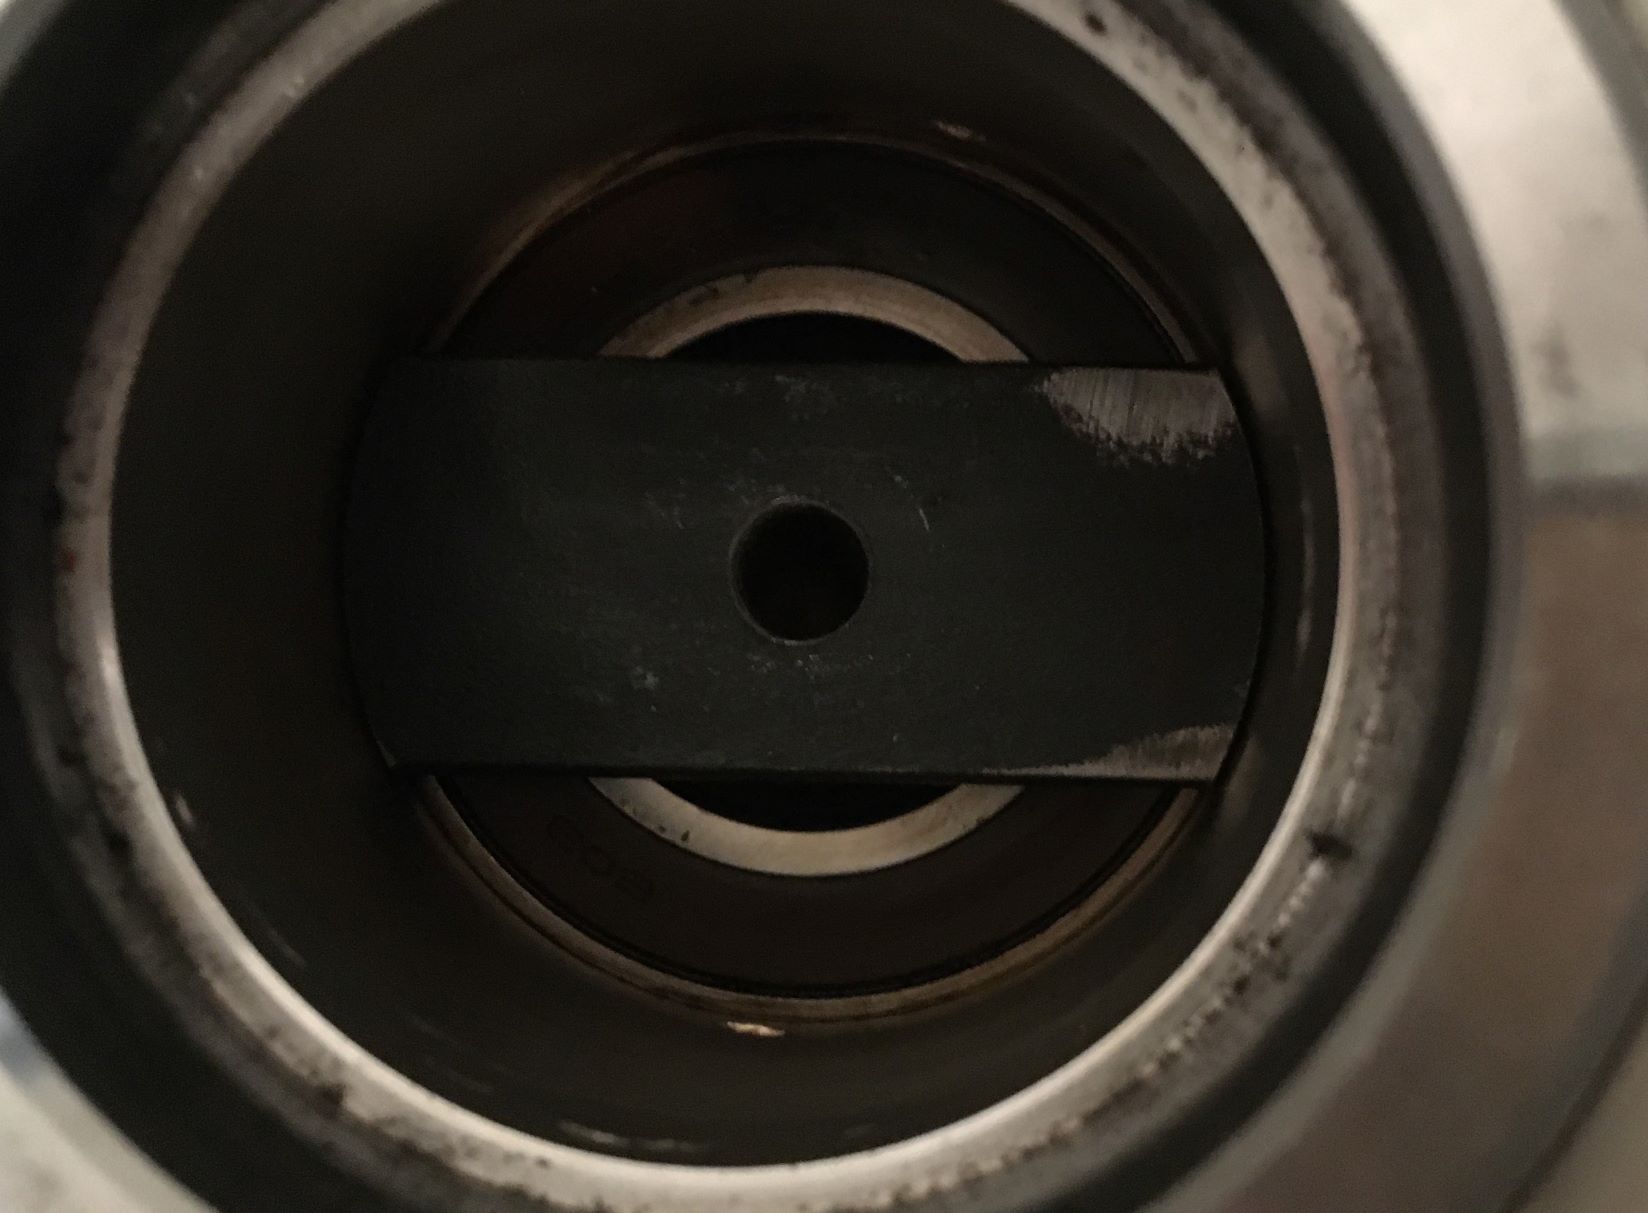
    Hypothesis for keeping the previously "Sealed Unit" water-tight will probably be revealed and tested,
    given I can get the old bearings out, and new ones could be found and delivered.

    2B continued...
    Last edited by DIYSwede; May 23, 2020 at 02:31 PM. Reason: cleaned line breaks

  2. The Following 3 Users Say Thank You to DIYSwede For This Useful Post:

    Crusty (May 23, 2020), Frank S (May 23, 2020), Scotsman Hosie (May 25, 2020)

  3. #2
    Supporting Member Crusty's Avatar
    Join Date
    May 2019
    Location
    Dry Gulch, Tx
    Posts
    749
    Thanks
    220
    Thanked 926 Times in 345 Posts

    Crusty's Tools
    This brings back memories of the time that I replaced a drum belt on our clothes dryer. What I discovered in that seemingly endless episode was that I had to completely disassemble the dryer, suspend the new belt alone in the air, and then reassemble all of the dryer parts around that suspended belt. If I ever meet the guy that designed that thing I may still choke him.
    If you can't make it precise make it adjustable.

  4. #3
    Supporting Member Toolmaker51's Avatar
    Join Date
    Feb 2016
    Location
    Midwest USA
    Posts
    5,355
    Thanks
    7,074
    Thanked 3,571 Times in 2,210 Posts

    Toolmaker51's Tools
    Quote Originally Posted by Crusty View Post
    This brings back memories of the time that I replaced a drum belt on our clothes dryer. What I discovered in that seemingly endless episode was that I had to completely disassemble the dryer, suspend the new belt alone in the air, and then reassemble all of the dryer parts around that suspended belt. If I ever meet the guy that designed that thing I may still choke him.
    Can't. Sorry my good man; I've already done so.
    Sincerely,
    Toolmaker51
    ...we'll learn more by wandering than searching...

  5. #4
    Supporting Member Frank S's Avatar
    Join Date
    Aug 2015
    Location
    Peacock TX
    Posts
    12,617
    Thanks
    2,677
    Thanked 11,107 Times in 5,389 Posts

    Frank S's Tools
    I sincerely wish you good luck on the separation, and subsequent bearing replacement, but I hold fear that you will probably have to resort to option "A" my least preference as well. However since they do offer a full drum motor unit as a replacement part option "B" in this case may be viable. These things are designed by sadomasochists, however let's hope that you are able to procure new bearings and figure out how to make a seal for it. You may have to resource the bearings by dimensional sizing only as they are most likely without numbers on them or are proprietary in nature
    Last edited by Frank S; May 23, 2020 at 08:36 AM.
    Never try to tell me it can't be done
    When I have to paint I use KBS products

  6. #5
    Supporting Member DIYSwede's Avatar
    Join Date
    May 2019
    Location
    Stockholm, Sweden...
    Posts
    637
    Thanks
    424
    Thanked 880 Times in 340 Posts

    DIYSwede's Tools
    Thanks, Frank - If I need to order the whole drum ass'y at least I tried, and learned a few things under way.
    Which isn't bad at all !
    Re Ball Bearings - SKF is a Swedish company, after all! The oil seal might be harder...

    Cheers!
    Johan

  7. #6
    Supporting Member DIYSwede's Avatar
    Join Date
    May 2019
    Location
    Stockholm, Sweden...
    Posts
    637
    Thanks
    424
    Thanked 880 Times in 340 Posts

    DIYSwede's Tools

    Growling washing machine, Pt 2...

    Being at it again, as time is money and winners never quit - successfully sawed the previously "Sealed Unit" apart.
    Drum and its axle spider intact from rust, but the insides carry app a pound of organic and non-organic yecchy compounds...

    Reason for failure: Oil seal (ROLF 40,2x72x10/13,5mm) had cracked its inner lip,
    ruining the balls in the first NSK 6207 DU sealed bearing, the Polish rear PPL 6206 Z still intact.

    Yet another Honey-Do: Growling washing machine, Pt 1-opened-carcass.jpg Yet another Honey-Do: Growling washing machine, Pt 1-gizzards.jpg Yet another Honey-Do: Growling washing machine, Pt 1-failed-oil-seal.jpg

    I had to provide a few quickly improvised tools for taking out the bearings, their housing being a tapered affair:

    Yet another Honey-Do: Growling washing machine, Pt 1-diy-bearing-puller.jpg Yet another Honey-Do: Growling washing machine, Pt 1-turning-bearing-puller.jpg Yet another Honey-Do: Growling washing machine, Pt 1-snug-fitting-puller.jpg

    Heat from a hair dryer, application of homebrewed "Ed's Red" creep oil, yanking the wrenches and knocking from the rear,
    finally got the bearings and the remains of the oil seal out. Real tight press fit taking its toll on the impromptu tools:

    Yet another Honey-Do: Growling washing machine, Pt 1-diy-gadgets.jpg Yet another Honey-Do: Growling washing machine, Pt 1-puller-after-job.jpg

    Cleaning & decalcification will commence, as orders have been placed for SKF 6206 & 6207 RSH "Explorer",
    and another (non-Italian this time) oil seal.
    50 bucks delivered by Schenker is the minimum "Learning Fee" for yours truly -
    add another 10 for fasteners, sealant etc.

    Then some DIY bearing-setting tools will be made, an expired but full CO2 extinguisher
    brought home from work for freezing the bearings and drum axle before mounting.
    I might also have to modify a borrowed Alfra hydraulic hand punch for the last shove of the bearings,
    as the darned tub just won't fit into the hydraulic press at work...

    Next: Refitting the drum and tub halves together: liberally seal up the gap with RTV silicone* and bolt together,
    let sit for curing some 72-ish hours. Add concrete counterweights, drop down with drum opening to front.
    Bolt up, add hoses, hook wires up, add covers - (check for "leftover" pieces) and test run!

    At least - that's the "Plan A". Then the (formerly) sealed tub might leak, the electronics go AWOL
    or other mishaps will happen through Providence or my own fault, that'll surely keep me alert!
    I can always buy another sealed tub as a first emergency exit, or even a new machine if I get entirely bored.

    * -Any HMT:ers knowledgeable about the >90 deg C heat-, acid- & alkali-resistance of run-of-the-mill cheap RTV?
    Other suggestions and points of view welcome as well, as always!

    Cheers
    Johan
    Last edited by DIYSwede; May 24, 2020 at 06:04 AM. Reason: Terrible line breaks

  8. The Following User Says Thank You to DIYSwede For This Useful Post:

    Scotsman Hosie (May 26, 2020)

  9. #7
    Supporting Member Moby Duck's Avatar
    Join Date
    Jan 2016
    Posts
    413
    Thanks
    1,313
    Thanked 251 Times in 161 Posts

    Moby Duck's Tools
    I don’t know much about the acid or alkali resistance of cheap RTV but I do know that it comes in two types, one type is acid based and the other is alkali based. If you apply the wrong one, (alkali), to an aluminium joint it will eat away at the metal and the seal won’t last very long. If you apply the acid one to a sealed electrical box, the acid fumes released during curing will corrode the electrical connections.

  10. #8
    Supporting Member Frank S's Avatar
    Join Date
    Aug 2015
    Location
    Peacock TX
    Posts
    12,617
    Thanks
    2,677
    Thanked 11,107 Times in 5,389 Posts

    Frank S's Tools
    Is there a way you can very carefully cut a grove all the way around in the surface area where the 2 plastic housings mate up to each other say a grove of about 1 mm deep and wide in 1 or both of the mating surfaces this would allow the RTV to create an o ring out of itself thus providing a much better possibility for a good seal.
    I regularly do this on machined surfaces of engines where the manufacture decided that RTV was enough of a seal between 2 machined surfaces but over time had become focal points of oil or water leaks.
    Doing this also creates a cavity which holds the RTV in place should there be any slight vibration movement.
    An explanation shown here
    https://www.homemadetools.net/homema...e-cutting-tool
    Never try to tell me it can't be done
    When I have to paint I use KBS products

  11. The Following User Says Thank You to Frank S For This Useful Post:

    DIYSwede (May 24, 2020)

  12. #9
    Supporting Member DIYSwede's Avatar
    Join Date
    May 2019
    Location
    Stockholm, Sweden...
    Posts
    637
    Thanks
    424
    Thanked 880 Times in 340 Posts

    DIYSwede's Tools
    Thanks, Frank - I totally buy your suggestion!
    There's enough material in the two flanges to provide this, either by a smallish Dremel burr or a more crude soldering iron.
    Then finely sand the two faces flat, though my saw provided a really nice initial cut -
    the saw has no kerf on the teeth and some blade friction seemed to smooth out the mating surfaces.

  13. #10
    Supporting Member Frank S's Avatar
    Join Date
    Aug 2015
    Location
    Peacock TX
    Posts
    12,617
    Thanks
    2,677
    Thanked 11,107 Times in 5,389 Posts

    Frank S's Tools
    Quote Originally Posted by DIYSwede View Post
    Thanks, Frank - I totally buy your suggestion!
    There's enough material in the two flanges to provide this, either by a smallish Dremel burr or a more crude soldering iron.
    Then finely sand the two faces flat, though my saw provided a really nice initial cut -
    the saw has no kerf on the teeth and some blade friction seemed to smooth out the mating surfaces.
    I wish you luck, slow is the go word time spent is time saved
    Never try to tell me it can't be done
    When I have to paint I use KBS products

  14. The Following User Says Thank You to Frank S For This Useful Post:

    DIYSwede (May 25, 2020)

Thread Information

Users Browsing this Thread

There are currently 1 users browsing this thread. (0 members and 1 guests)

Bookmarks

Posting Permissions

  • You may not post new threads
  • You may not post replies
  • You may not post attachments
  • You may not edit your posts
  •