3 Attachment(s)
Yet another Honey-Do: Growling washing machine, Pt 1
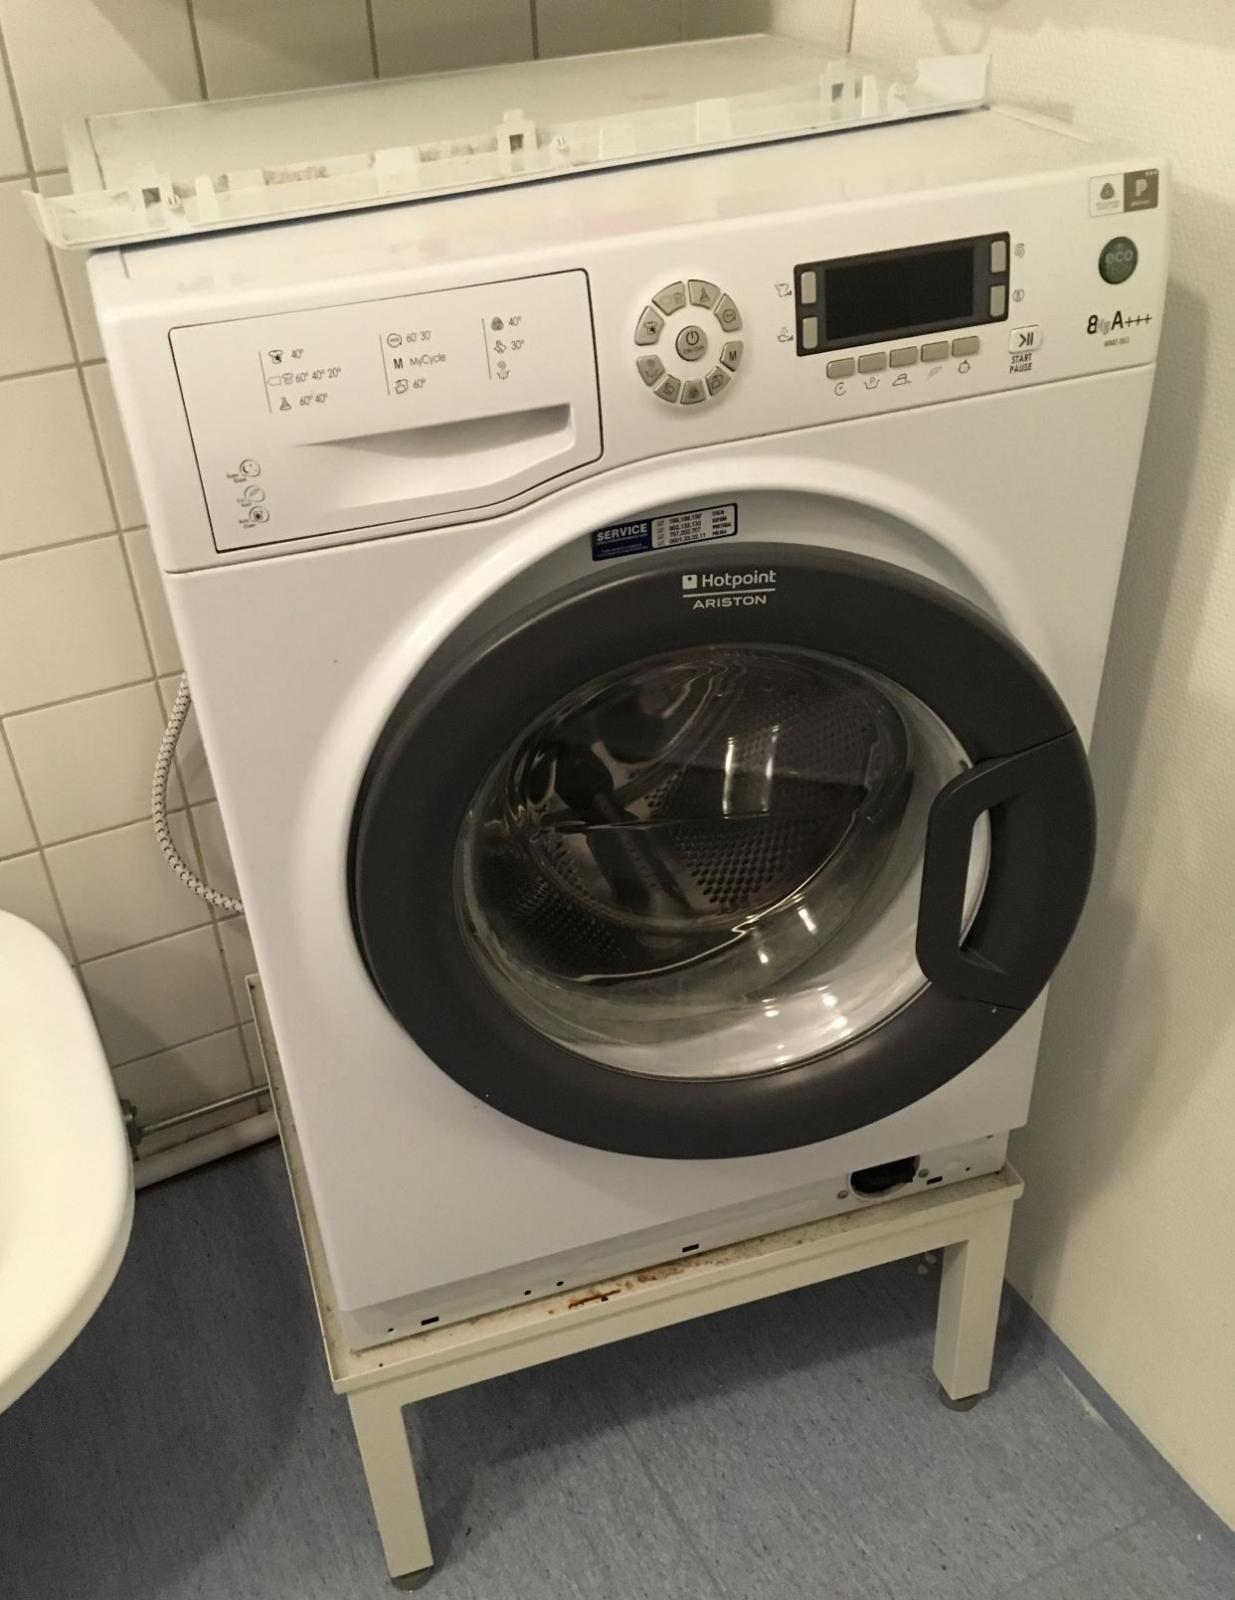
After some 7 years of immaculate service our Ariston Hotpoint "ECO" 8 kg capacity & 1600 rpm spin, "WMD 863B EU" model,
started some "growling" in its spin cycle, driving my beloved up the wall (see pic - the machine: neither the partner nor the wall):
Attachment 35073
The sound got louder and louder thru the weeks, making us all realize: "Some things needs to get done by somebody."
My 1st thought: Change of bearings & oil seal: How hard can that be? Famous last words...
Also being cheap-to-the-bone - I didn't want to spend app 620 bucks for a new washer of similar capacity,
so I forewarned about a 1 week standstill for our present one, giving all the sensitive persons in the area time to clean their necessities.
Meanwhile, doing some Interweb research regarding spare bearing kits for the model in question: Nada!
There was a spare part being offered, all right: An entire "drum unit" for a mere 200 bucks.
"BS" I thought - a purported "eco friendly" machine would never provide that sort of landfill waste...
-Any reader suggestions on the environmental friendliness of ditching an entire drum to replace a coupla bearings and a seal?
So: Armed with the necessary and sufficient tools and hopefully ditto skills and knowledge for the job,
I happily unplugged the water and drain hose and electrical cable without mishaps.
Reverse engineered the machine : top lid, front and rear panels, unbolting the motor and belt,
dislodged the front bellows, unplugged all the electrical connectors AFTER marking all their proper places,
taking cellphone shots of crucial places, loosen the concrete top weight and marking all the bolts.
Last was the bottom hose clamp, then "the Sealed Unit" was just hanging in two springs on two dampers.
Turning the drum did produce a resonant growl in the unit, so I seemed on the right track.
Getting the unit up and out of the enclosure went smooth though it was a pretty heavy lift.
The entire machine weighs in at over 75 kgs. Unbolted the bottom concrete block.
45 minutes had elapsed - this was going even better than expected!:)
-Y'a all still remember the "Pt 1" in the title, right?
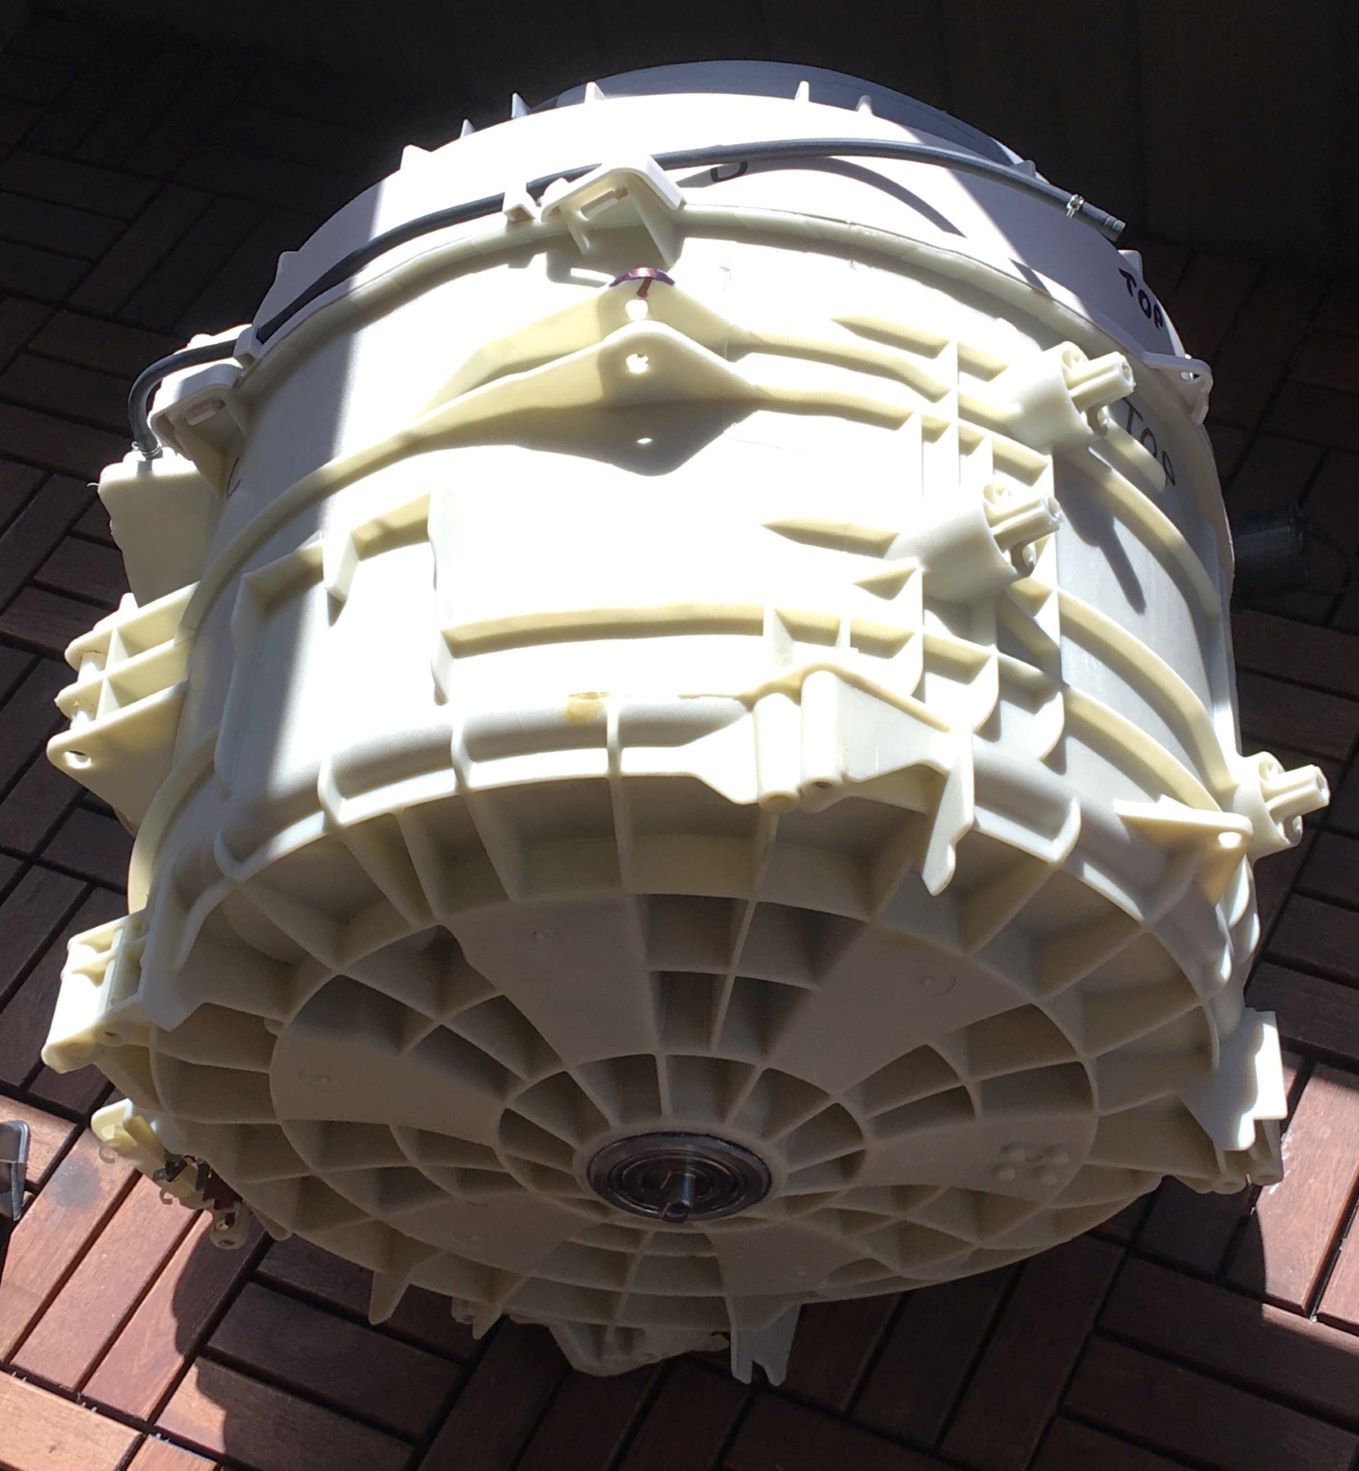
-Voila: "The Unit".
Attachment 35071
The Greeks called their fundamental constituent particle "Atom", "ἄτομος": greek for "inseparable",
only to be proved false some 25 centuries later.
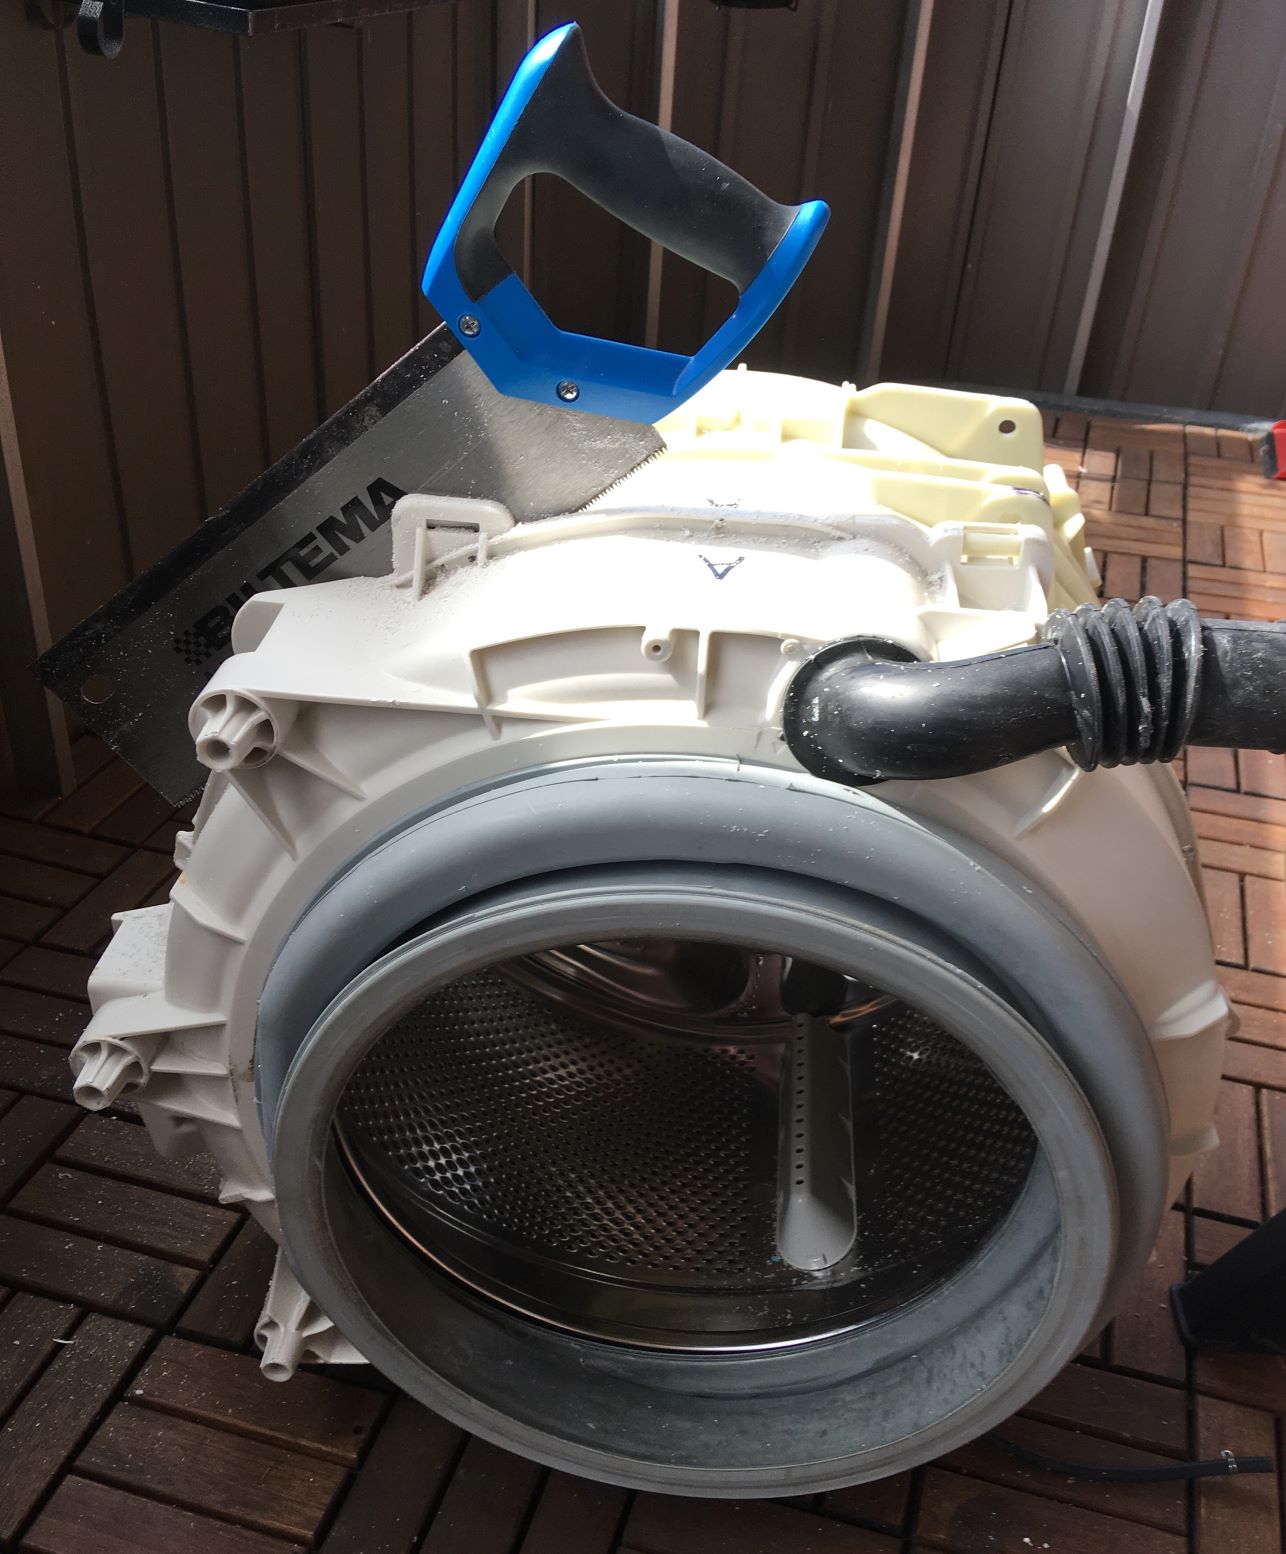
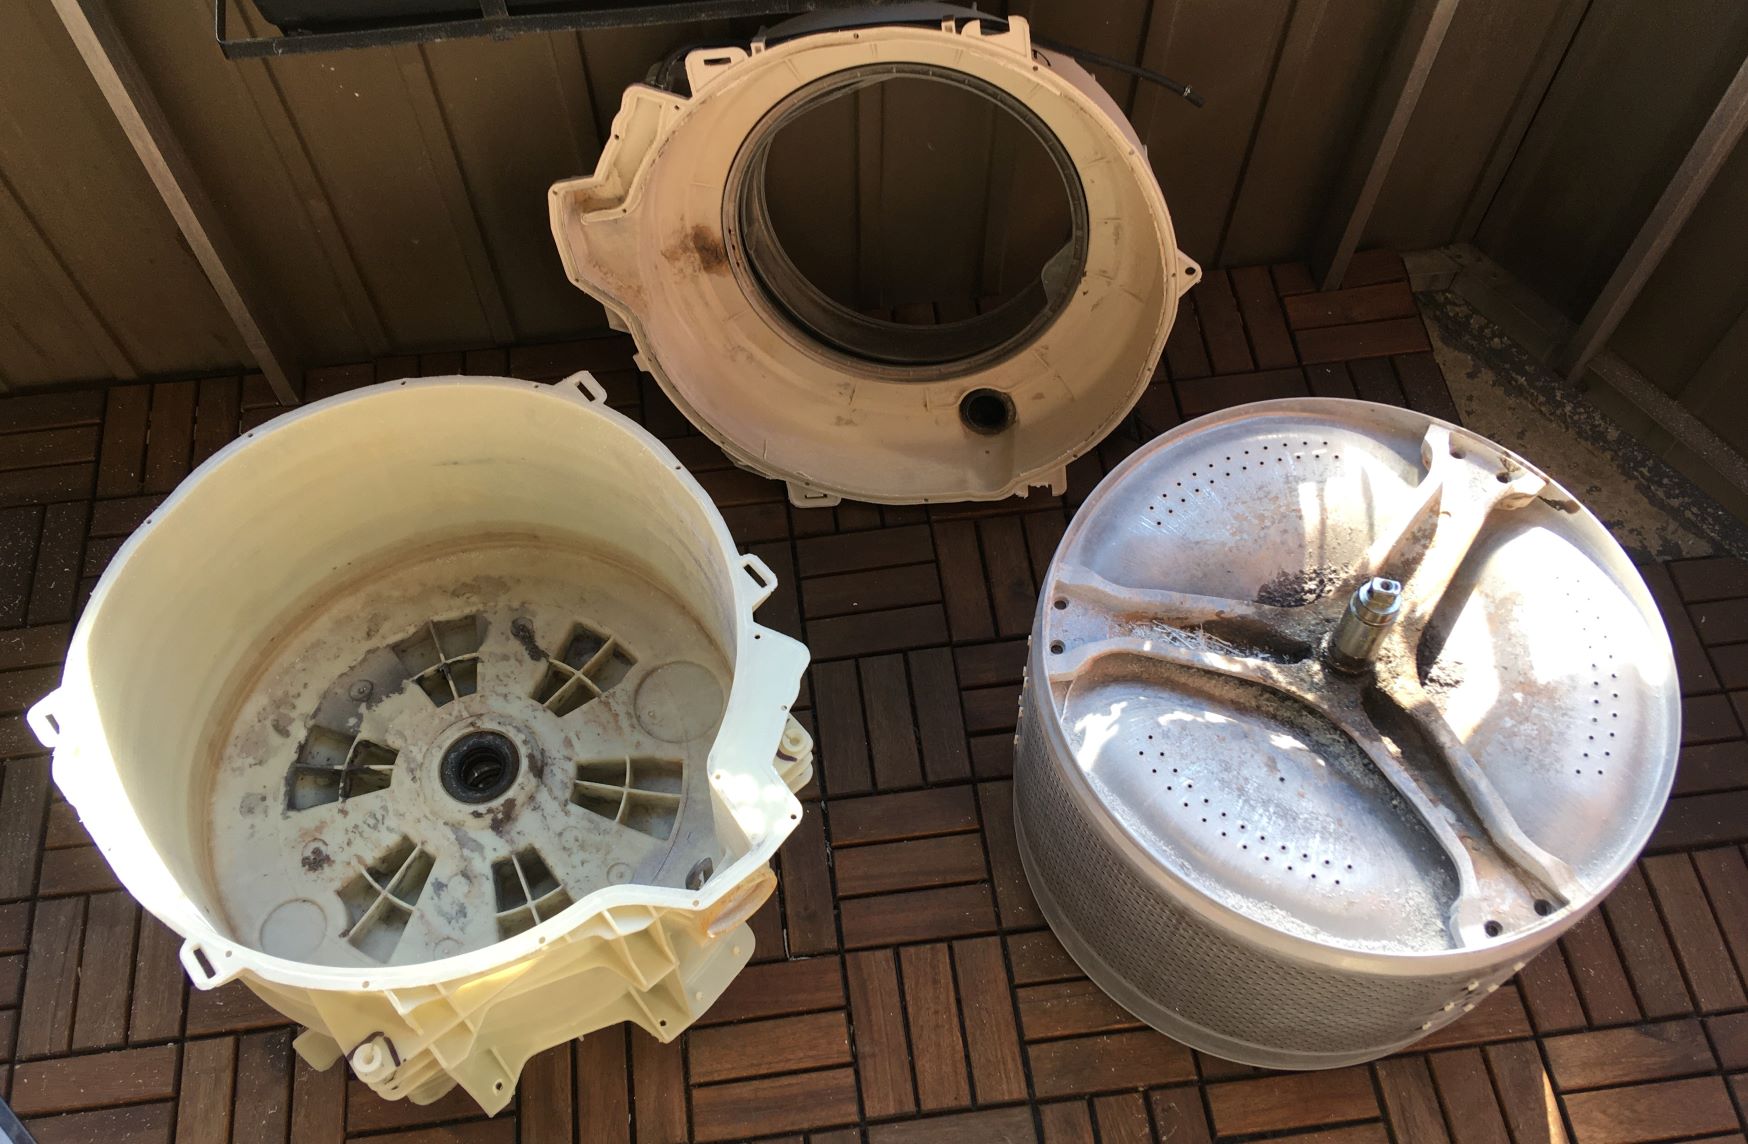
Consequently I was very much in the mood for dividing "The Unit" (alleged by some manufacturer) into its constituent parts:
Attachment 35072
Trying to prove I'm not entirely nuts, I had previously drilled a lot of 5,2 mm holes through the "weld seam" in the two halves,
providing a means of rigidly holding them together with M5 screws and nuts in the bright, promising future.
Hypothesis for keeping the previously "Sealed Unit" water-tight will probably be revealed and tested,
given I can get the old bearings out, and new ones could be found and delivered.
2B continued...
8 Attachment(s)
Growling washing machine, Pt 2...
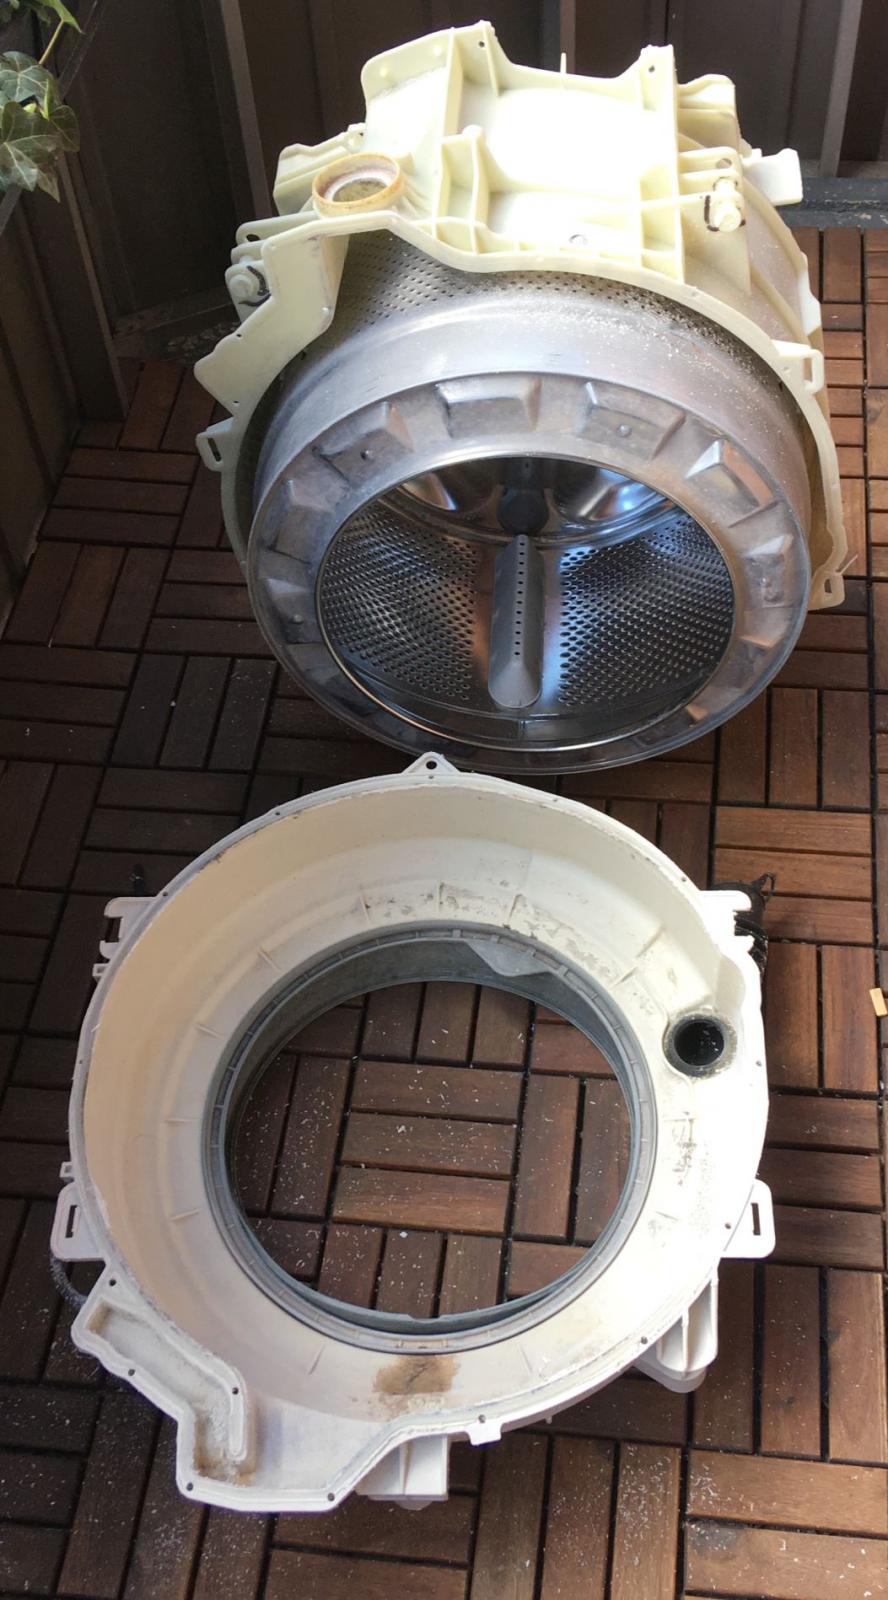
Being at it again, as time is money and winners never quit - successfully sawed the previously "Sealed Unit" apart.
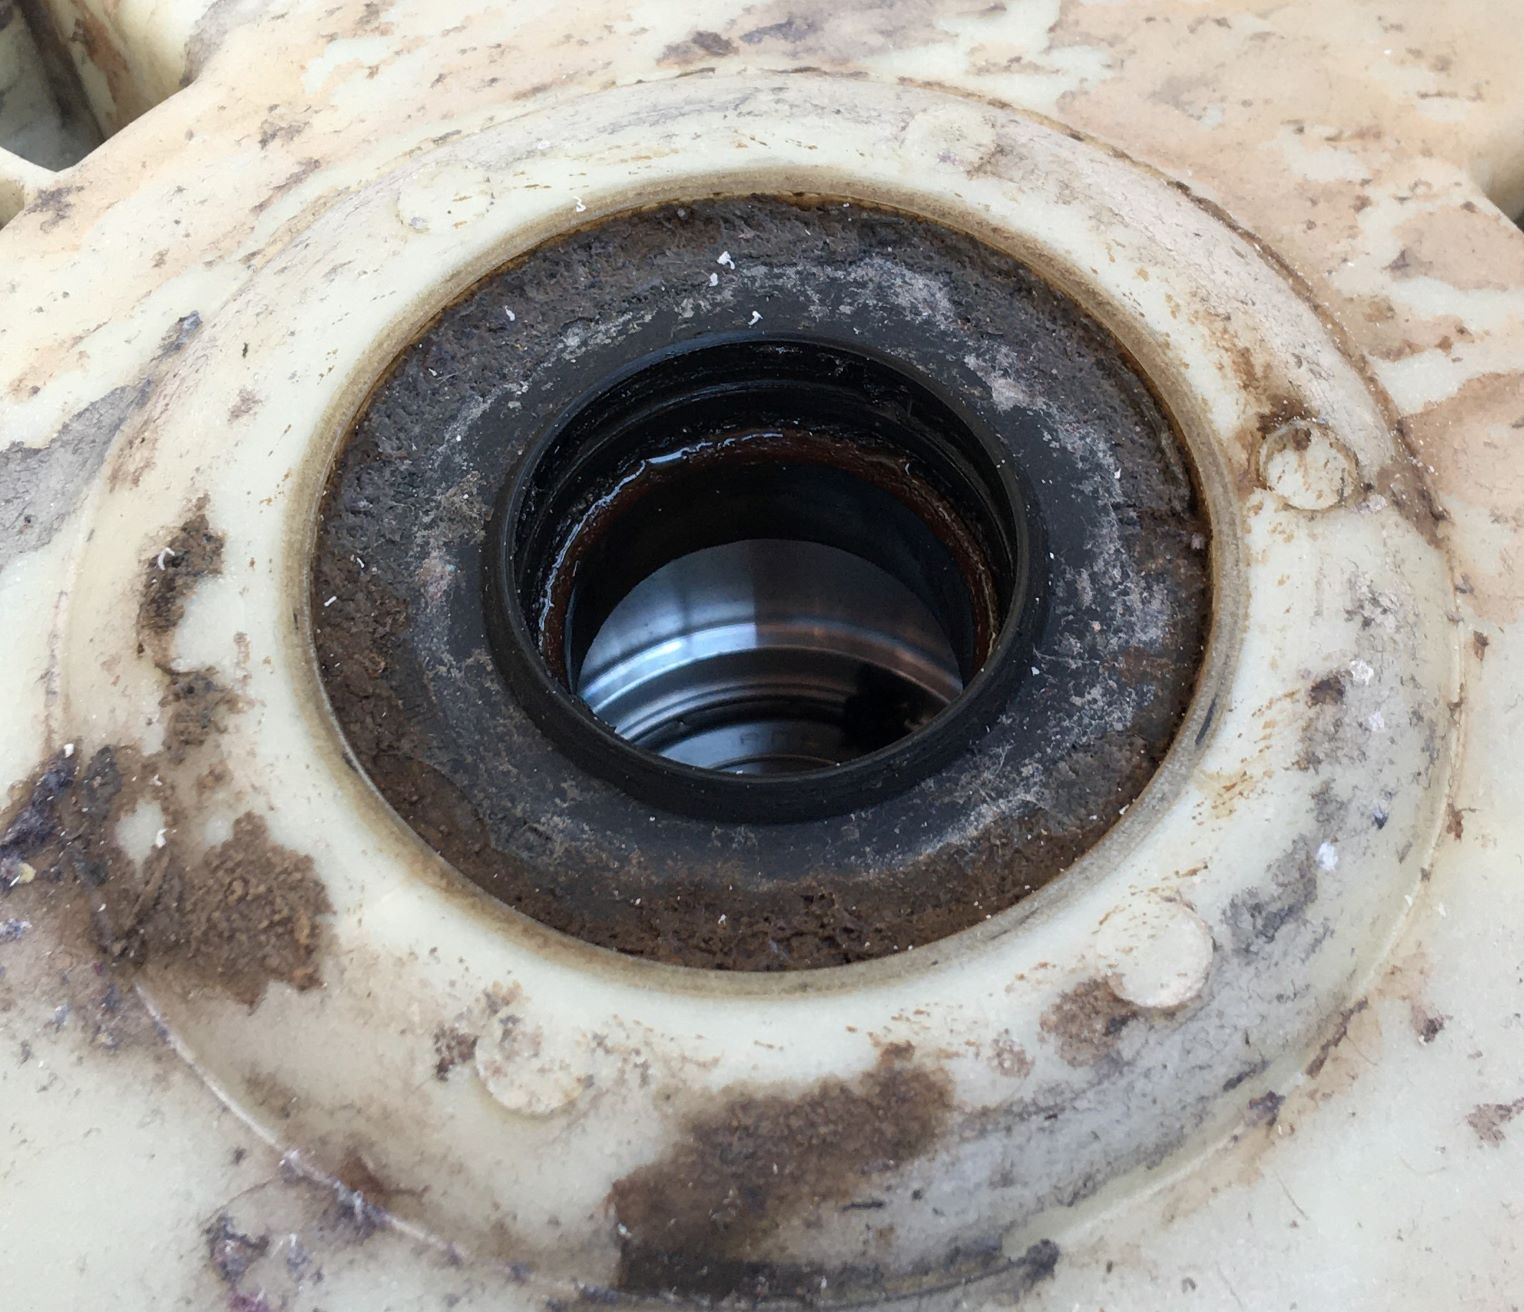
Drum and its axle spider intact from rust, but the insides carry app a pound of organic and non-organic yecchy compounds...
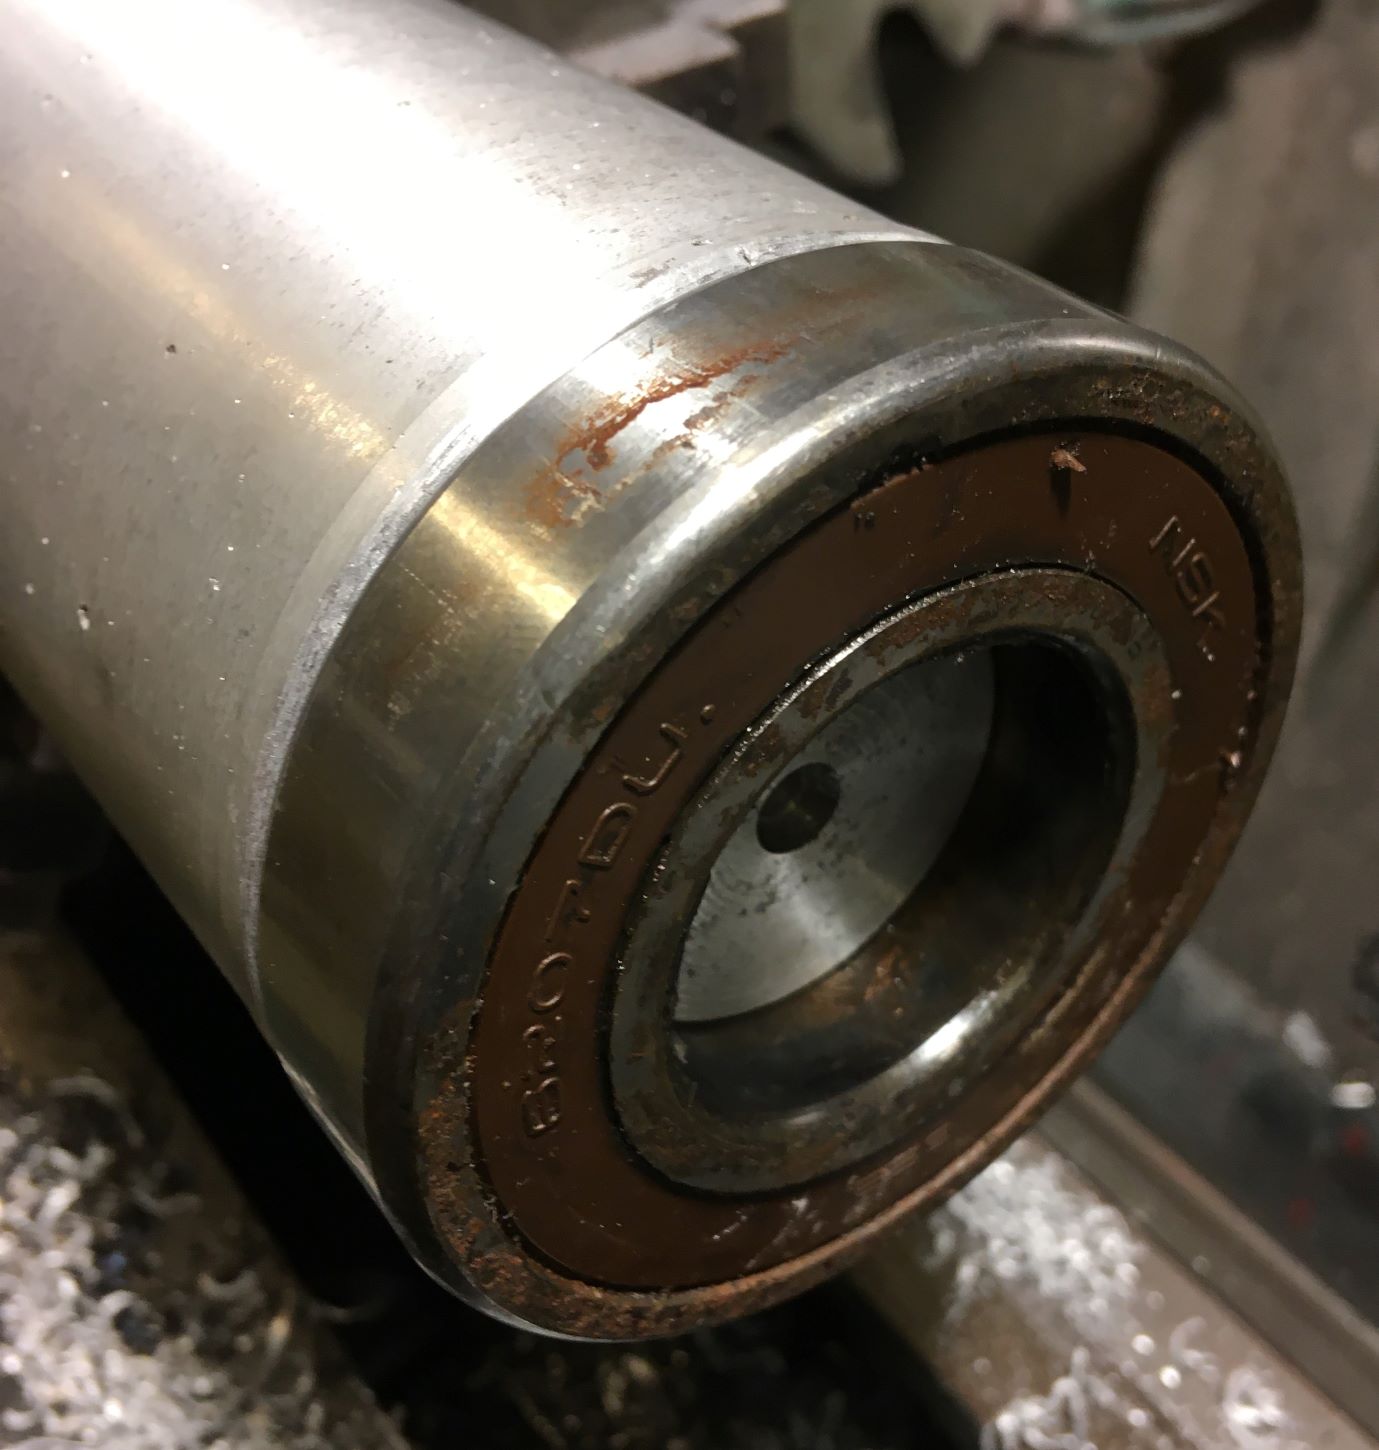
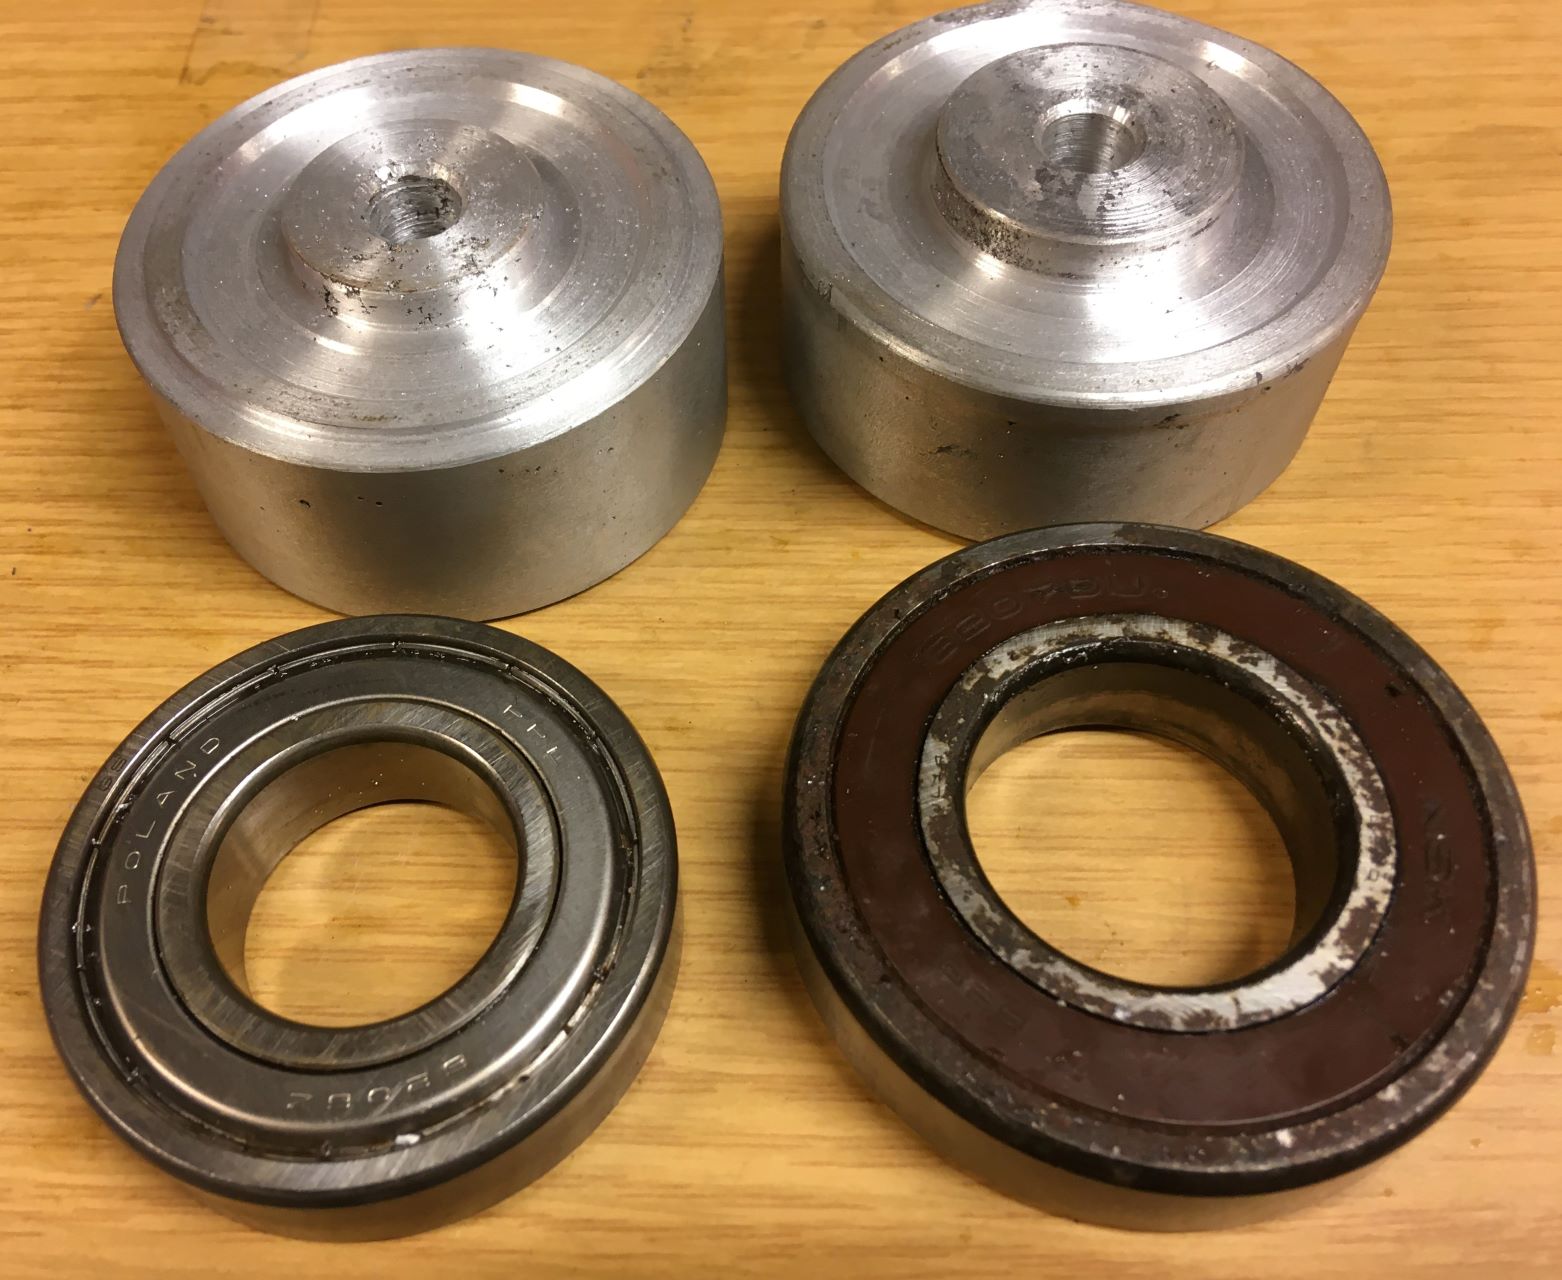
Reason for failure: Oil seal (ROLF 40,2x72x10/13,5mm) had cracked its inner lip,
ruining the balls in the first NSK 6207 DU sealed bearing, the Polish rear PPL 6206 Z still intact.
Attachment 35111 Attachment 35112 Attachment 35113
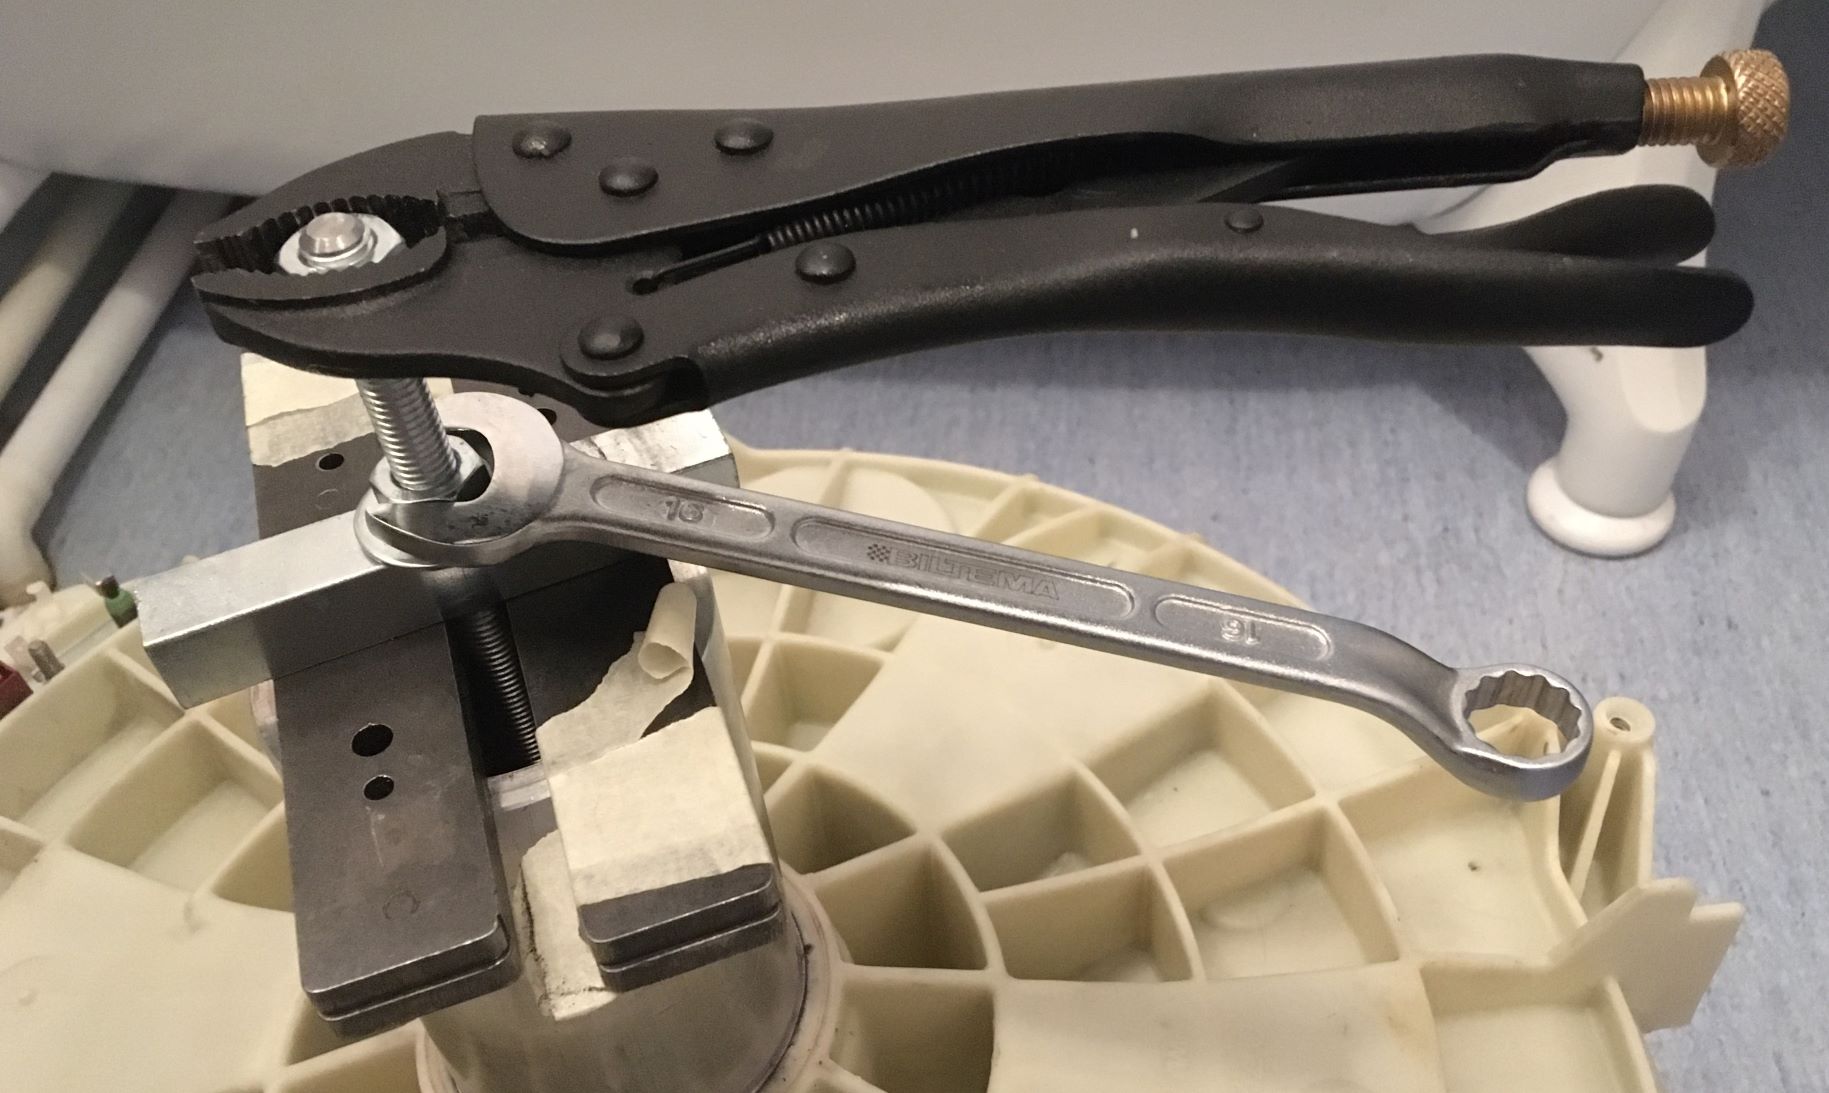
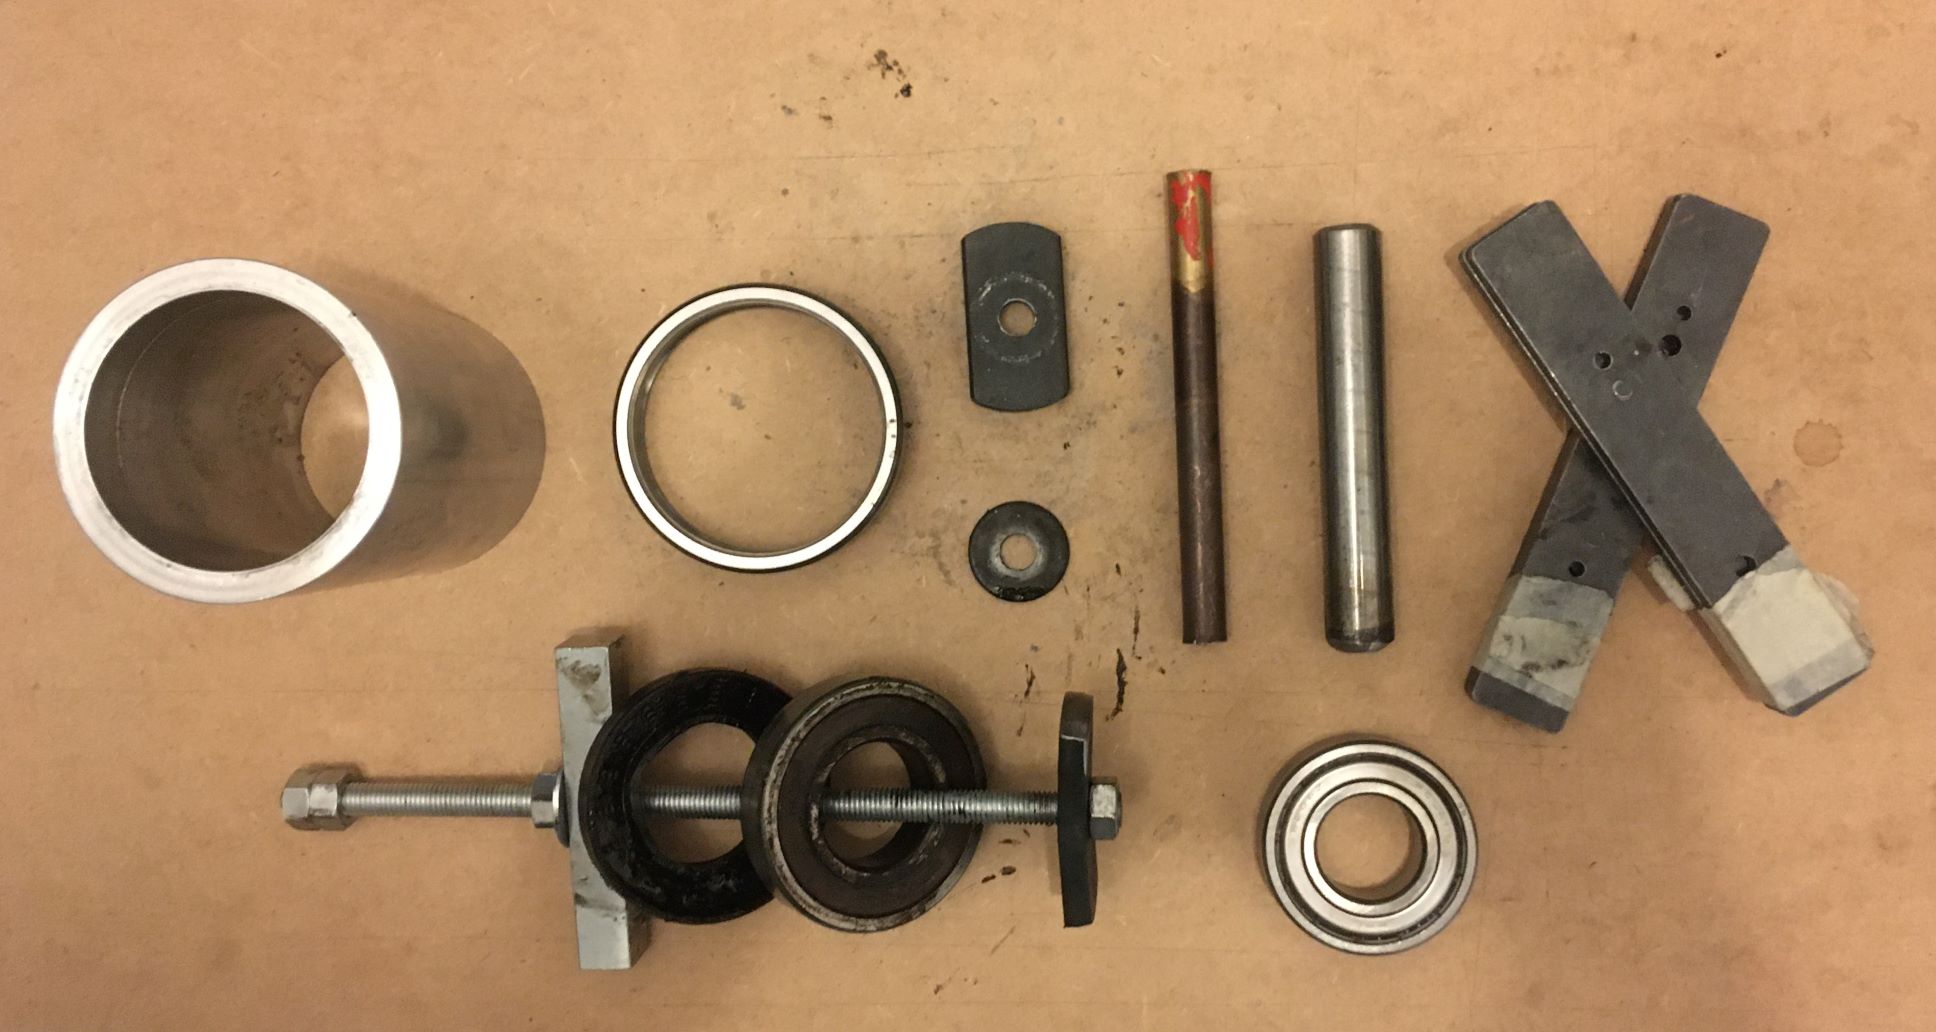
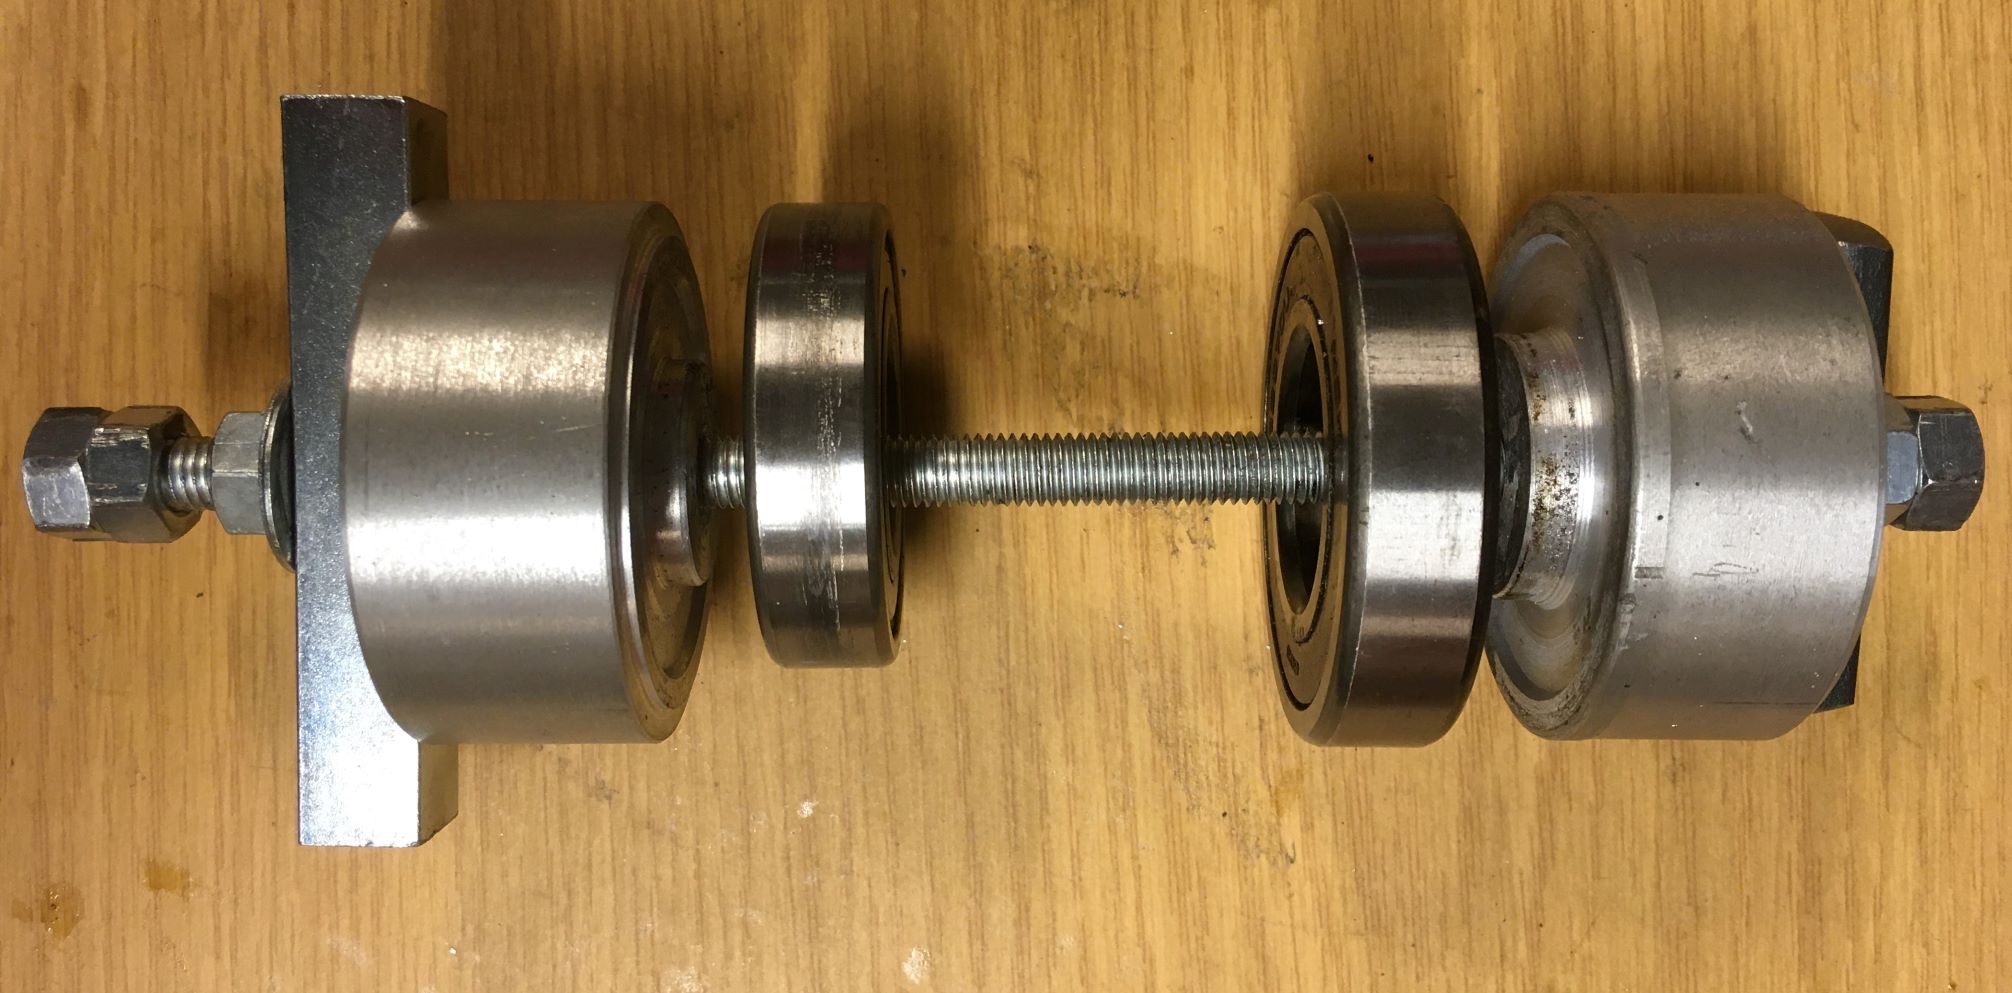
I had to provide a few quickly improvised tools for taking out the bearings, their housing being a tapered affair:
Attachment 35110 Attachment 35114 Attachment 35115
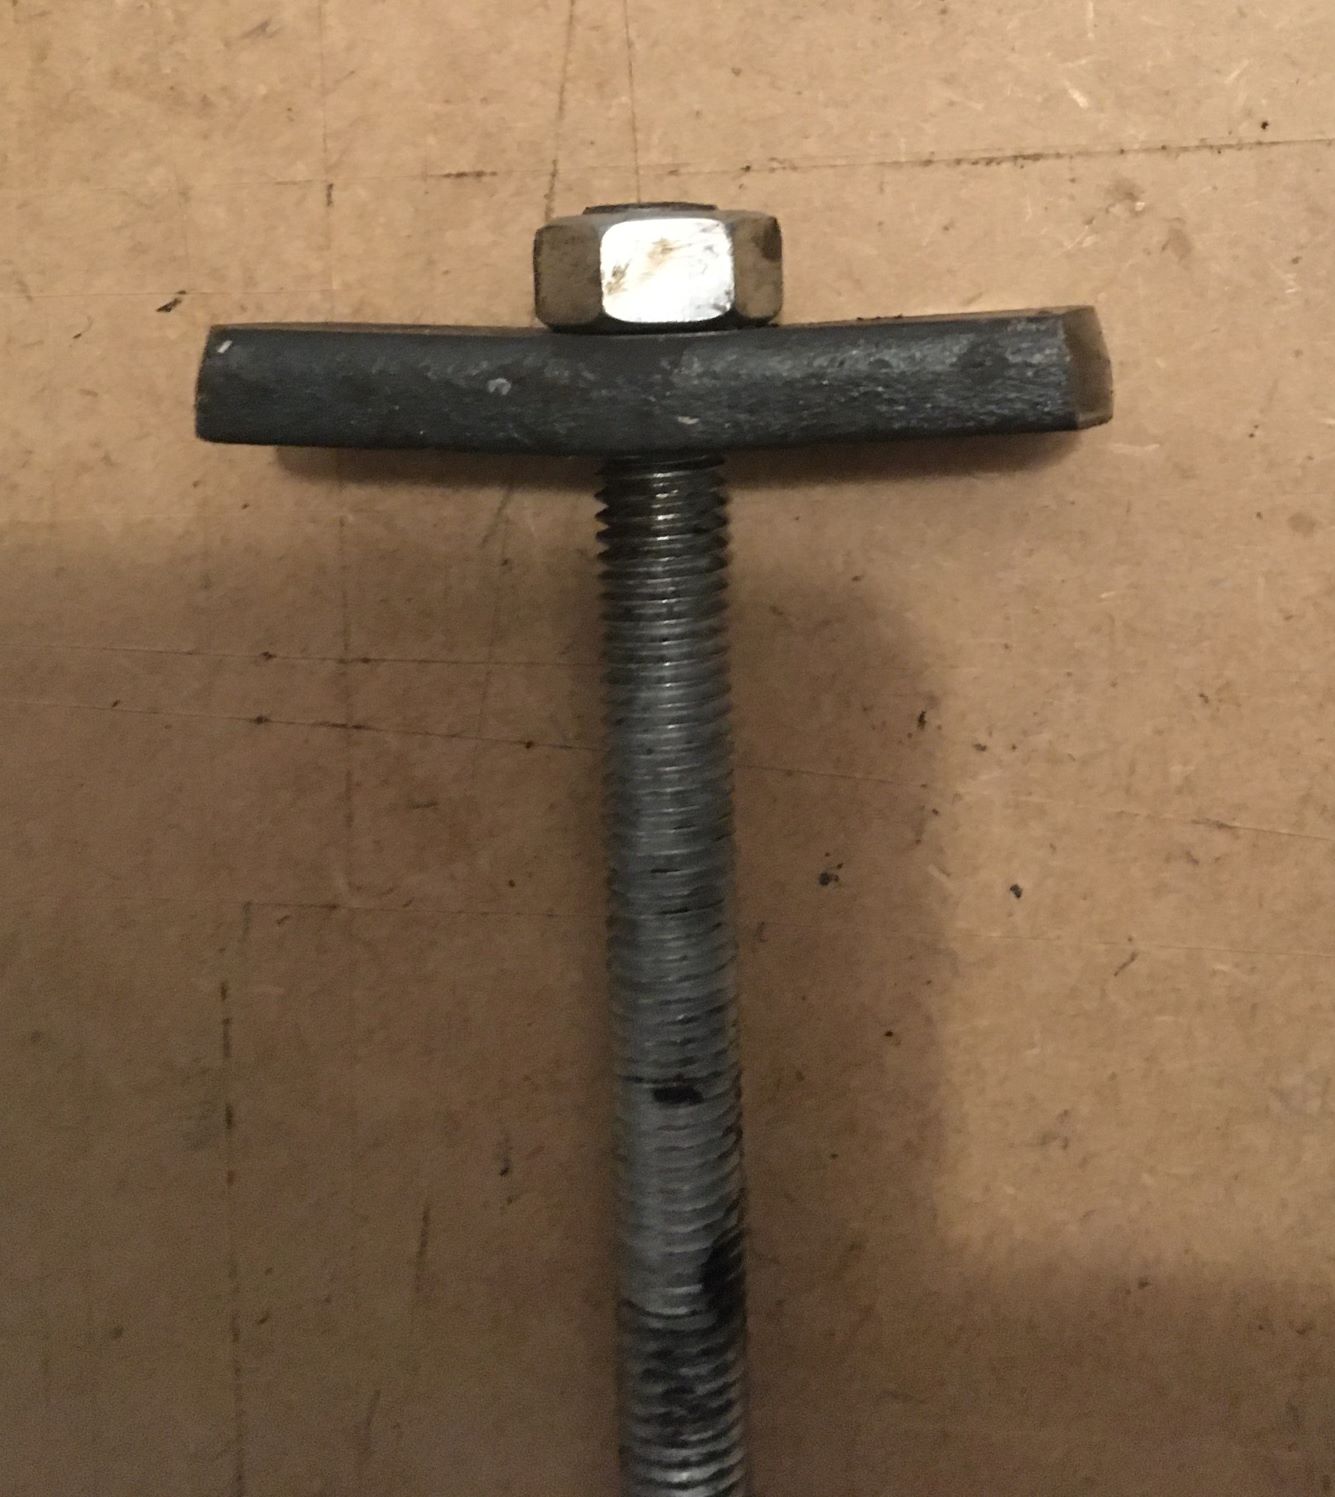
Heat from a hair dryer, application of homebrewed "Ed's Red" creep oil, yanking the wrenches and knocking from the rear,
finally got the bearings and the remains of the oil seal out. Real tight press fit taking its toll on the impromptu tools:
Attachment 35116 Attachment 35117
Cleaning & decalcification will commence, as orders have been placed for SKF 6206 & 6207 RSH "Explorer",
and another (non-Italian this time) oil seal.
50 bucks delivered by Schenker is the minimum "Learning Fee" for yours truly -
add another 10 for fasteners, sealant etc.
Then some DIY bearing-setting tools will be made, an expired but full CO2 extinguisher
brought home from work for freezing the bearings and drum axle before mounting.
I might also have to modify a borrowed Alfra hydraulic hand punch for the last shove of the bearings,
as the darned tub just won't fit into the hydraulic press at work...:)
Next: Refitting the drum and tub halves together: liberally seal up the gap with RTV silicone* and bolt together,
let sit for curing some 72-ish hours. Add concrete counterweights, drop down with drum opening to front.
Bolt up, add hoses, hook wires up, add covers - (check for "leftover" pieces) and test run!
At least - that's the "Plan A". Then the (formerly) sealed tub might leak, the electronics go AWOL
or other mishaps will happen through Providence or my own fault, that'll surely keep me alert!:)
I can always buy another sealed tub as a first emergency exit, or even a new machine if I get entirely bored.
* -Any HMT:ers knowledgeable about the >90 deg C heat-, acid- & alkali-resistance of run-of-the-mill cheap RTV?
Other suggestions and points of view welcome as well, as always!
Cheers
Johan
4 Attachment(s)
Growling washing machine, Pt 3...
While awaiting arrival of the new bearings and oil seal, I might as well get prepared for their installation.
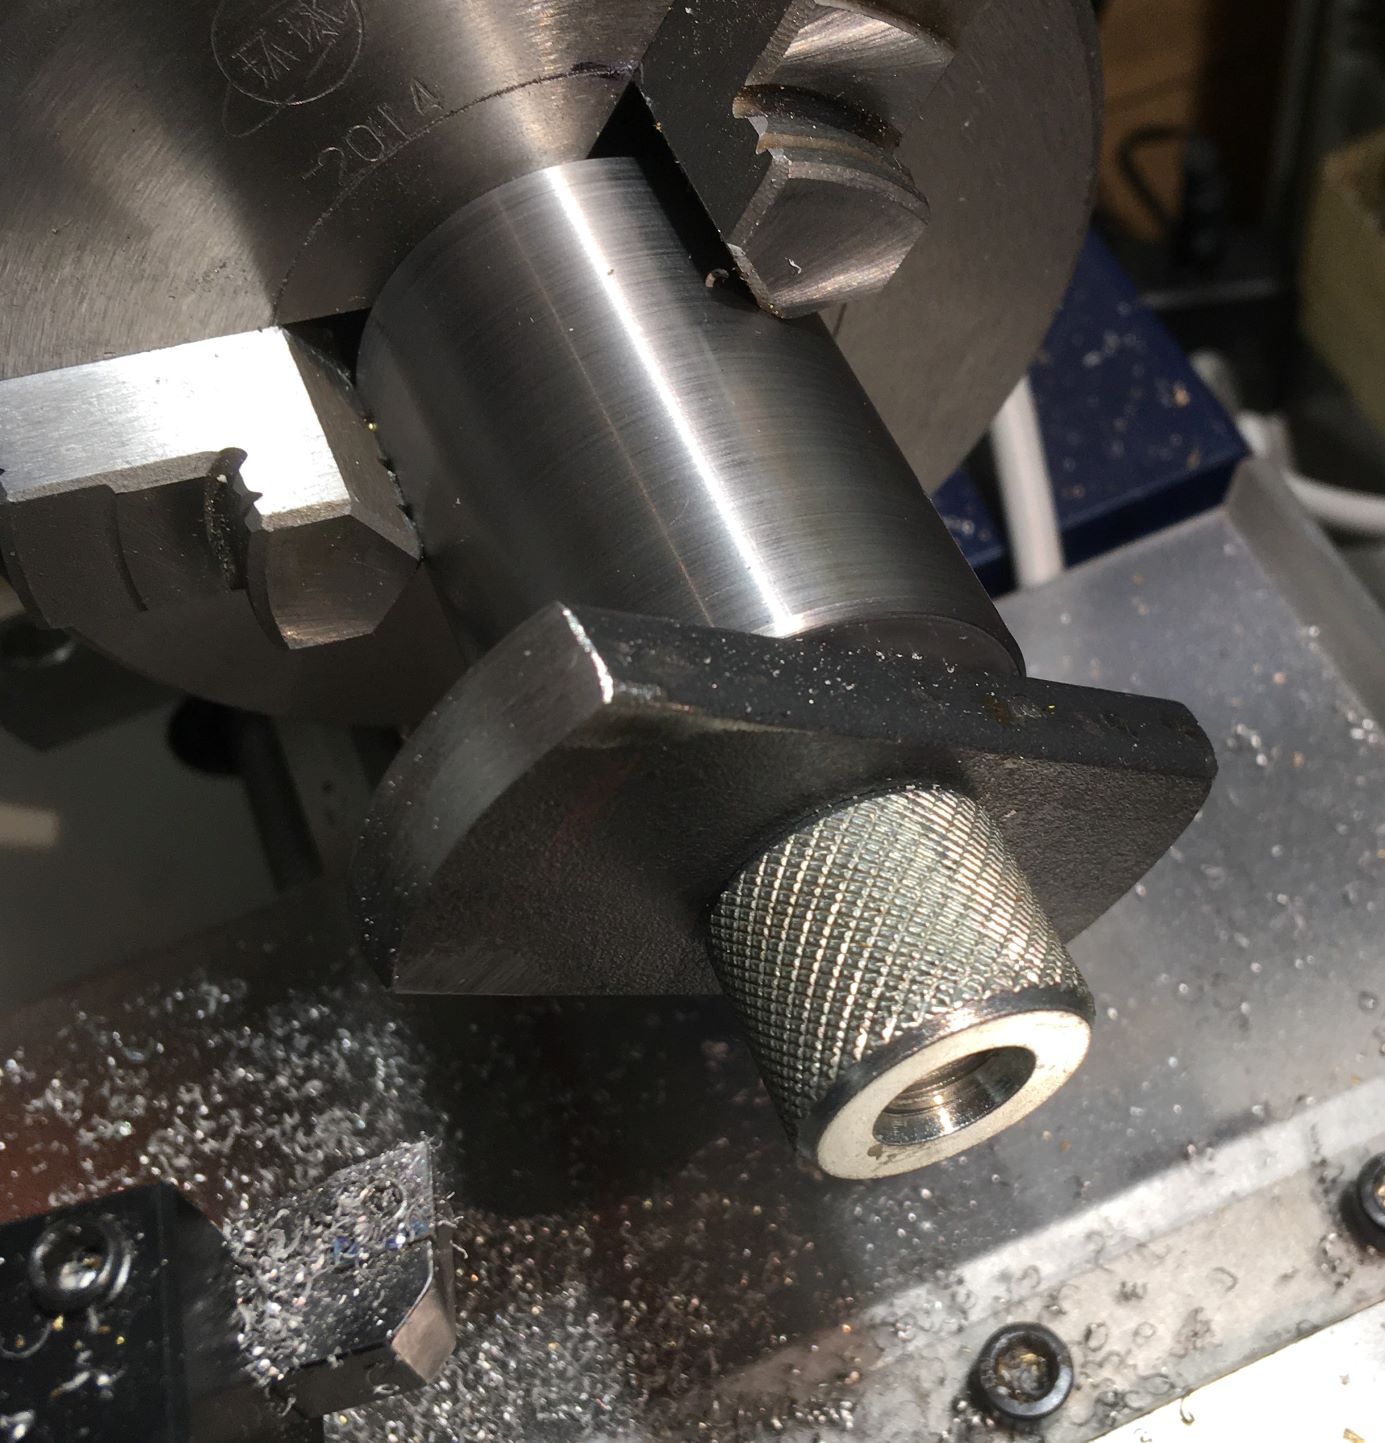
The first casting I ever made a few years ago was dirty and porous, so I might as well use it for some temporary job.
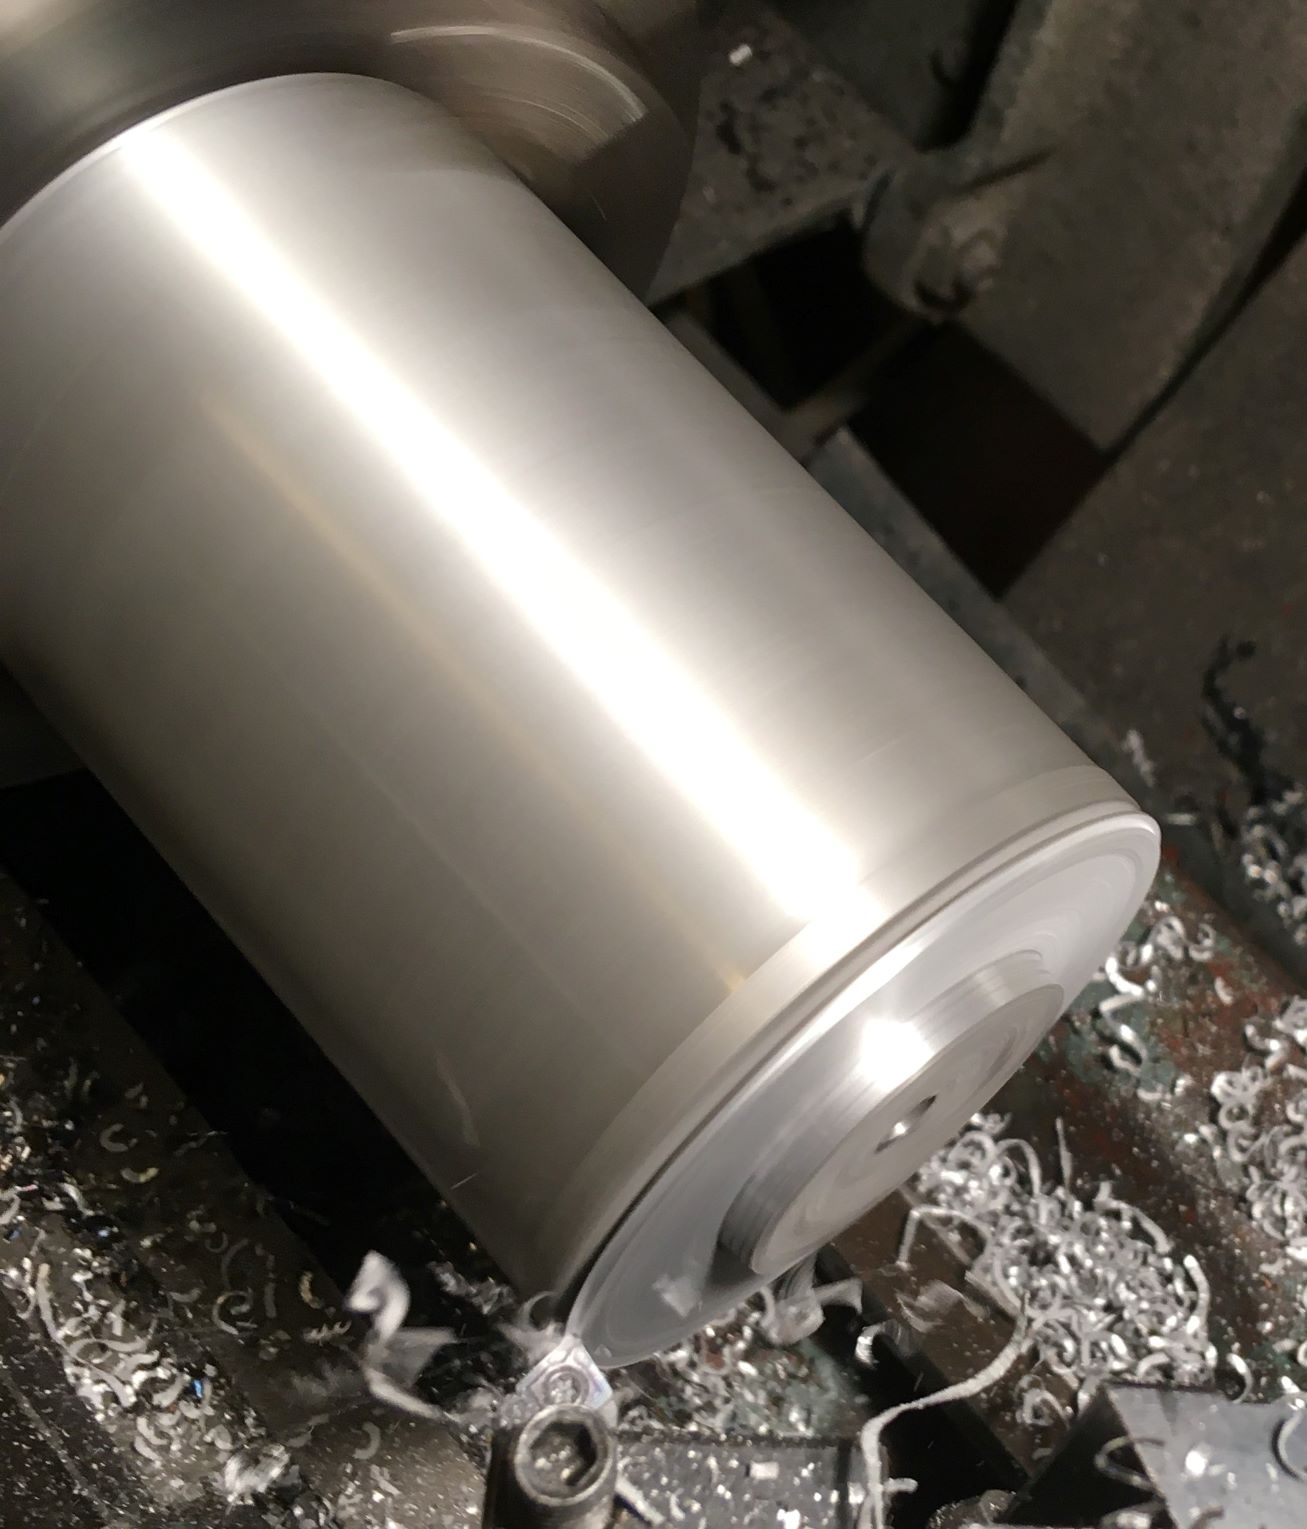
All DIY: pouring the melt into Cocoa Milk cans, hence the small groove (from the can's mouth) near the cutting tool.
AlSiZn (of unknown proportions) billet in the chuck, making a pair of bearing mandrels:
Attachment 35136 Attachment 35137
Machines excellently, as the high Si content makes for short, curly chips.
Carbide insert at high revs still makes a decent satin finish outta this POS,
though inner porosity is really bad at the center. AlSi dulls HSS tools pretty quick
(I've since learned to only stick to remelting with previously diecast stuff containing AlSi9Cu3Fe)
These mandrels will only bear on the outer race - the rest is relieved. Right pic: Entire "2nd line of defense" unit.
Attachment 35138 Attachment 35139
This will only be used as an eventuality, if the following won't suffice - as my "1st line" method for fitting the bearings will be:
1) Heat the bearing aluminum housing up to ca 80 deg C (175 F, well below the glass temp of the surrounding plastic)
2) Freeze the bearing and its aluminium mandrel in the (upside down turned) nozzle of an (upside down turned)
CO2 extinguisher, releasing the liquid CO2 (inside at 20 deg C & 850 psi) to -78 deg C (-108 F).
3) Drop the now smaller bearing & mandrel/ cold sink into the now biggie bearing seat.
4) Clobber in place if needed.
5) Rinse and repeat for the other side's bearing.
If the above won't be sufficient to properly seat them - enter "2nd line of defense" M10 all-thread, bushings, nuts and tiiiighten.
Whack/ tighten 'em and repeat 'til done.
As of now, I don't feel any urge to make some adaptors to the Alfra 75 kN Hand Hydraulic punch press as a last resort.
Anyone's suggestions, cautions on the above methods (i.e. freezing a bearing and then whacking it into place),
or perhaps where I'll find any formulas for thermo-shrinking a 62 & 72 mm ball bearing at -78 deg C
into an aluminium housing (@ +80 deg C) with a total temp diff of 160 deg C?
Thanks for bearing with me (NO pun intended - seriously!) this far thru this long-winded, verbose and still unfinished thread.
(My SWMBO secretly pities all you guys still standing after this barrage of words)
Johan
