Free 186 More Best Homemade Tools eBook:  
Get 2,000+ tool plans, full site access, and more.

User Tag List

Results 1 to 8 of 8

Thread: Attachment base for "D" bed lathe

  1. #1
    Supporting Member mars-red's Avatar
    Join Date
    Aug 2015
    Posts
    21
    Thanks
    0
    Thanked 57 Times in 17 Posts

    mars-red's Tools

    Attachment base for "D" bed lathe

    The Vector and Sincere watchmaker lathes have beds very similar to the "geneva style" machines, where the bed itself consists of a round bar with a flat surface formed along it, for headstock/tailstock/toolpost alignment. It differs in diameter, and relative location of the flat. So existing attachments for the geneva style machines will not fit.

    I needed to make a T-rest for mine (will post a separate thread about that, later), and knew there would be other attachments to make as well (for example, a filing rest (which I have already started) and a steady rest). Since making something to fit the bed was going to be a little bit of a hassle, I decided to make a base with a T-slot that would host any other attachments I needed to make.

    Here we go.

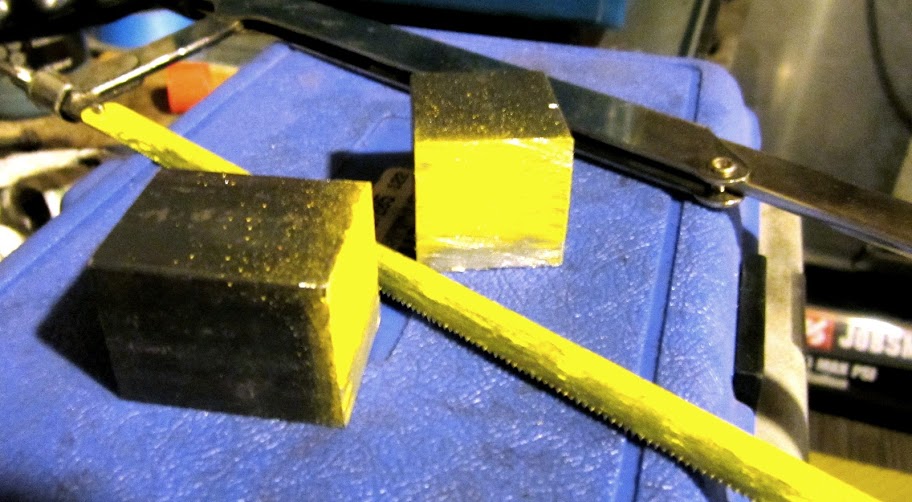
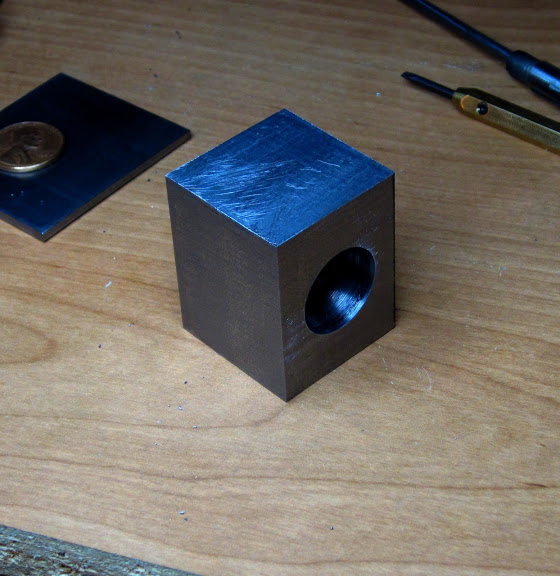
    I started with an offcut of A36 square bar stock (I would have preferred cast iron, but the A36 was on hand). This was long before I had a band saw:
    Attachment base for "D" bed lathe-block%25u0025252520hacksawed.jpg

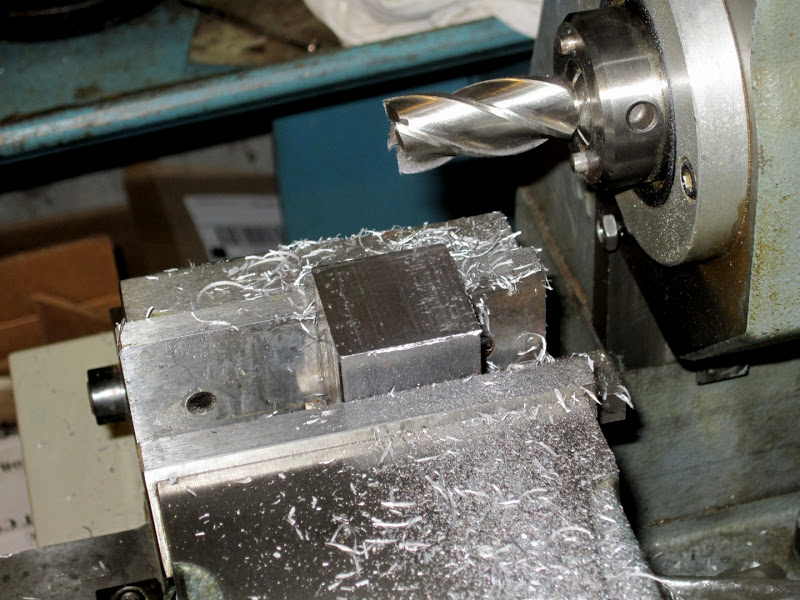
    The sides were then milled flat (using my old Barker horizontal mill, which I still miss sometimes):
    Attachment base for "D" bed lathe-milling%25u0025252520surfaces.jpg

    Attachment base for "D" bed lathe-milling%25u0025252520done.jpg

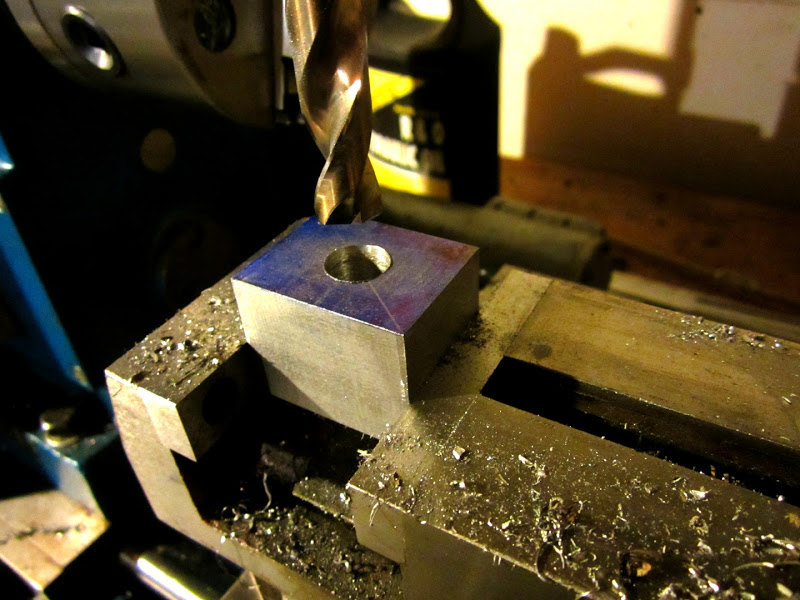
    The approximate center of one of the "tall" sides was found, and it was drilled with a 1/2" pilot:
    Attachment base for "D" bed lathe-pilot%25u0025252520drilled.jpg

    I really wish I had taken pic of my arrangement for boring out the hole to final diameter, but I'll do my best to describe. I made a special fly cutting bar for the horizontal mill, utilizing the overarm support of the machine. It was basically a 1/2" diameter (iirc) bar held in the spindle, and then supported at the other end in the needle bearings of the overarm support. Through the bar was drilled a hole that would accept a small cutting tool, and then another threaded hole to lock the cutting bit in place. I used it for cutting keyways into shafts, and even for small surfacing operations... but here, I used it with a different cutting bit shaped for boring. The work was held in the vise, with the pilot hole on center with the spindle axis, and the fly cutting bar was mounted passing through the pilot hole. With everything set up, the work was fed across the fly cutter. I suppose it was effectively what could be called a line boring operation.

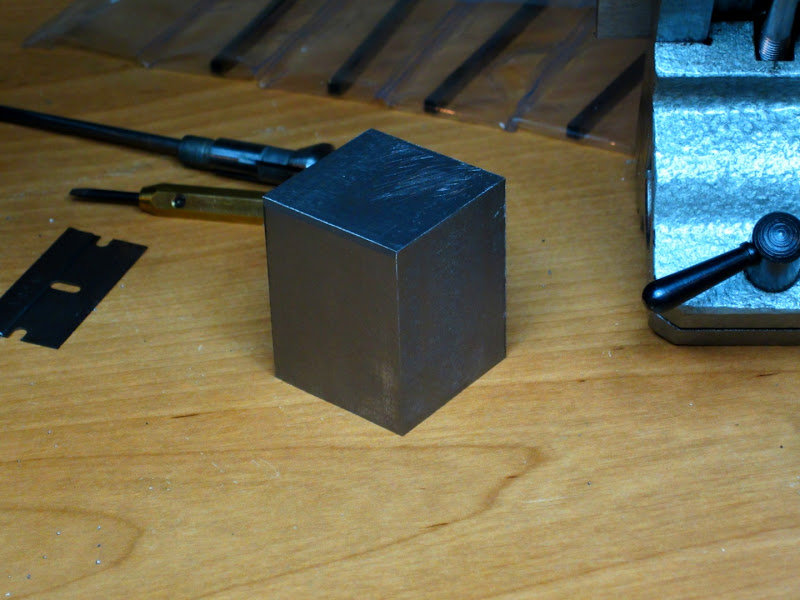
    Here is the part after boring the hole:
    Attachment base for "D" bed lathe-hole%25u0025252520milled.jpg

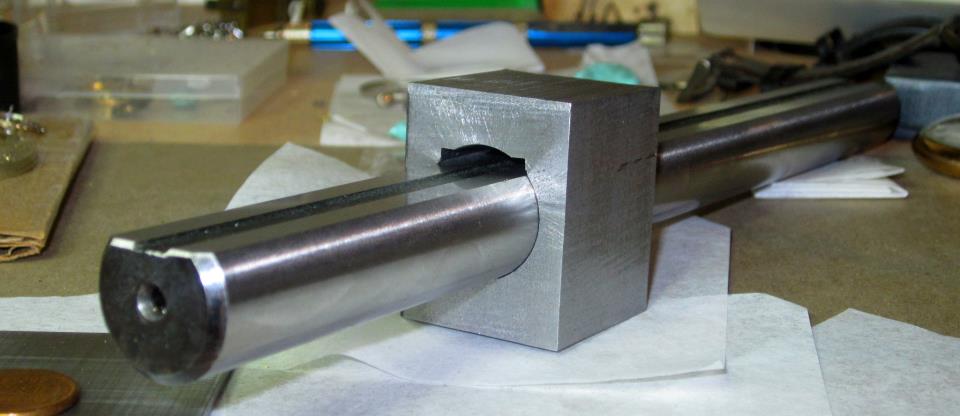
    With a hole the matching diameter of the lathe bed, I just needed some extra clearance to fit a flat shim to engage against the flat of the bed. One of my favorite tricks is mounting specially shaped tool bits in the lathe toolpost and then using the lathe saddle sort of like a shaper, to remove material from the work. This requires the spindle to be locked, of course. This is another one that, in hindsight, I wish I had taken a picture of... but the procedure has been well documented elsewhere, for using your lathe to form internal keyways. Here is the part with some shim clearance broached, with the lathe bed passed through it:
    Attachment base for "D" bed lathe-broached%25u0025252520bed%25u0025252520attachment.jpg

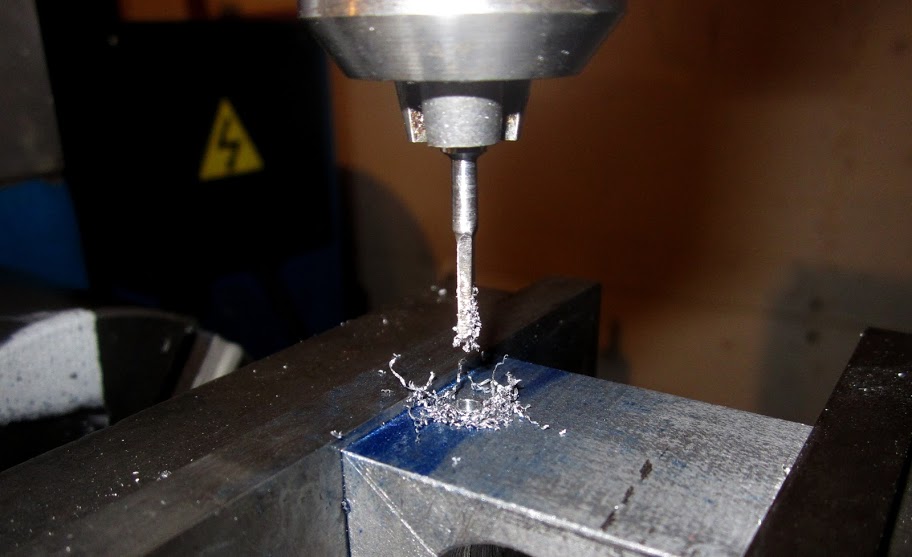
    Next I needed a hole drilled through what would be the bottom of the part. The part would then be slit through the bottom, and that hole used for a clamping screw. I needed a 3.3mm drill bit, and at the time I had a very poor selection of drill bits and was also on a real drill making kick. I could have accepted a couple thousandths oversize and gone with a 1/8" bit... but I made a 3.3mm spade bit instead. I will probably post a separate thread about that too, making your own spade bits isn't hard and can really get you out of a bind sometimes. Here is the hole being drilled with my home made drill bit:
    Attachment base for "D" bed lathe-drilling%25u0025252520started.jpg

    Attachment base for "D" bed lathe-drilling%25u0025252520completed.jpg

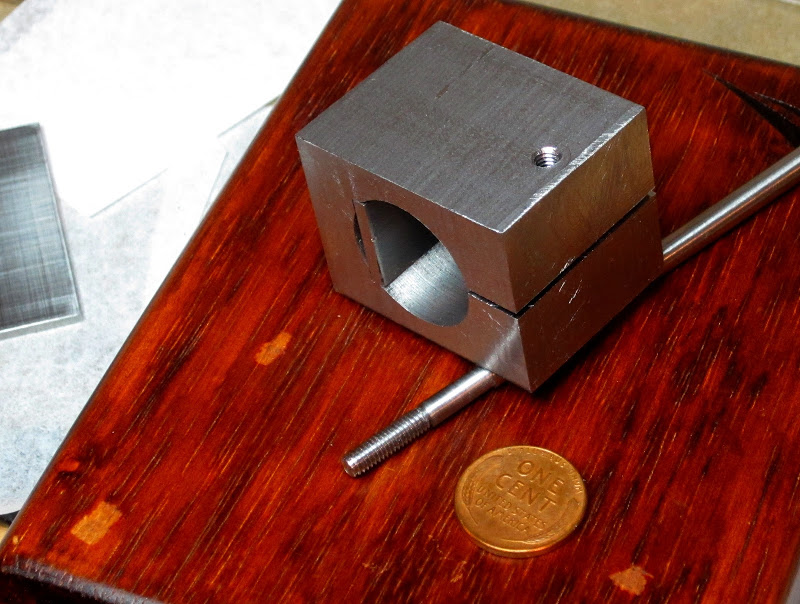
    In that last pic, you can see the flat shim pressed into place, to register against the flat of the lathe bed.

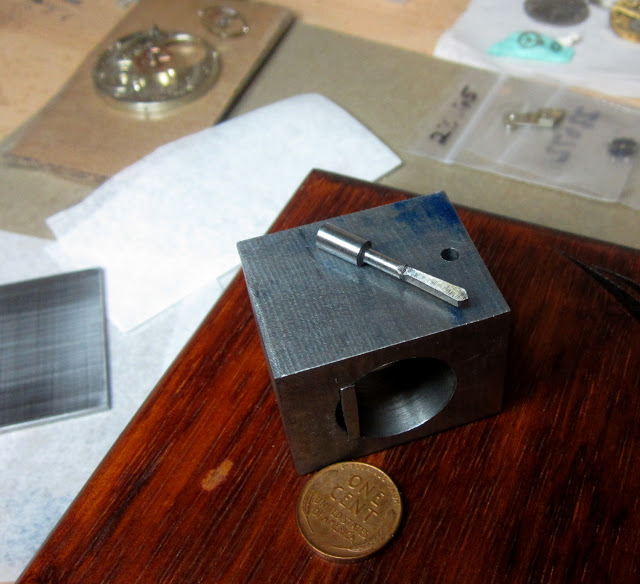
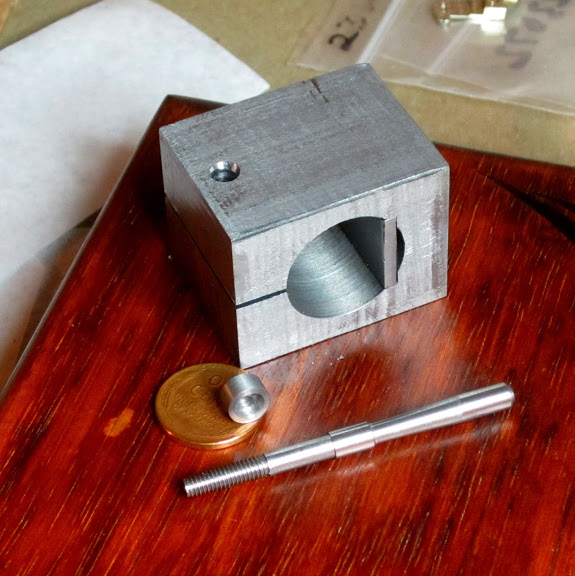
    The bottom of the part was then slit. On one side of the slit, the hole was opened up to pass M4 threads, and on the other side was tapped with M4 threads. In this photo you can also see the start of the locking lever: a length of O1 rod with M4 threads on the end:
    Attachment base for "D" bed lathe-slit%25u0025252520threaded%25u0025252520and%25u0025252520screw%25u0025252520started.jpg

    And here you can see the locking lever completely turned to shape, before being bent. Also shown is a small washer to go between the base piece and the locking lever, made from some mild steel:
    Attachment base for "D" bed lathe-handle%25u0025252520and%25u0025252520washer%25u0025252520turned.jpg

    Will continue in another post, due to attachment limit...

    186 More Best Homemade Tools eBook
    Last edited by mars-red; Sep 9, 2015 at 12:59 PM.

  2. The Following 4 Users Say Thank You to mars-red For This Useful Post:

    Jon (Sep 9, 2015), kbalch (Sep 9, 2015), Paul Jones (Sep 10, 2015), PJs (Sep 10, 2015)

  3. #2
    Supporting Member mars-red's Avatar
    Join Date
    Aug 2015
    Posts
    21
    Thanks
    0
    Thanked 57 Times in 17 Posts

    mars-red's Tools
    And here the locking lever has been bent, hardened, and tempered... and then installed:
    Attachment base for "D" bed lathe-handle%25u0025252520completed.jpg

    Now for the tedious work, making the surface flat and parallel with the lathe bed. I started by filing, and checking with an indicator:
    Attachment base for "D" bed lathe-indicating%25u0025252520top%25u0025252520surface.jpg

    Attachment base for "D" bed lathe-high%25u0025252520spots.jpg

    Attachment base for "D" bed lathe-indicating%25u0025252520top%25u0025252520surface%25u0025252520again.jpg

    Once I had it under 0.005", I started scraping it in. This was long before I ever had a chance to scrape cast iron so I didn't know enough to realize how much of a pain it is to scrape steel. Also being my first scraping attempt, I started off bluing the part rather than the surface plate, which I immediately realized was not the way to do it (high spots showed as barely perceptible shiny dots. In the first pic, you can see the part blued up, and there were some barely visible shiny high spots that I scraped down... and from there on, I switched to bluing the plate, like you're supposed to. I ground the scraper from an old needle file.
    Attachment base for "D" bed lathe-scraping%25u0025252520started%25u0025252520blued.jpg

    Attachment base for "D" bed lathe-scraping%25u0025252520chips.jpg

    Attachment base for "D" bed lathe-spotting.jpg

    During scraping I switched to my most sensitive indicator, reading in 1/500mm (yep, 0.002mm):
    Attachment base for "D" bed lathe-fine%25u0025252520indication.jpg

    The completed surface ended up being within 0.0001". I'm certainly glad it was a very small surface:
    Attachment base for "D" bed lathe-scraped%25u0025252520surface%25u00252525201.jpg

    Attachment base for "D" bed lathe-scraped%25u0025252520surface%25u00252525202.jpg

    Continued in next post...

    2000 Tool Plans
    Last edited by mars-red; Sep 9, 2015 at 01:03 PM.

  4. The Following 2 Users Say Thank You to mars-red For This Useful Post:

    Paul Jones (Sep 9, 2015), PJs (Sep 10, 2015)

  5. #3
    Supporting Member mars-red's Avatar
    Join Date
    Aug 2015
    Posts
    21
    Thanks
    0
    Thanked 57 Times in 17 Posts

    mars-red's Tools
    Then I milled a T slot into the top, at the same time placing a stray scuff across my pretty surface, lol:
    Attachment base for "D" bed lathe-t%25u0025252520slot%25u0025252520milled.jpg

    That was also my first ever T slot, which I was really happy with. It was so small that I couldn't find a reasonably priced commercial cutter... I ended up using a key seat cutter that I already had.

    So at this point I had a functional t slot base. Later on, when I made the T rest attachment itself, I did a bit of cosmetic milling to it. As I mentioned, I'll do a separate post about that, but here's how the base ended up looking (obviously, with the t-rest mounted to it):
    Attachment base for "D" bed lathe-completed%25u00252525201.jpg

  6. The Following 2 Users Say Thank You to mars-red For This Useful Post:

    Paul Jones (Sep 9, 2015), PJs (Sep 10, 2015)

  7. #4
    kbalch's Avatar
    Join Date
    Jun 2012
    Location
    Clermont, FL
    Posts
    5,034
    Thanks
    2,275
    Thanked 531 Times in 383 Posts
    Thanks mars-red! I've added your Watchmaker's Lathe Attachment Base to our Lathe Accessories category, as well as to your builder page: mars-red's Homemade Tools. Your receipt:


  8. #5
    PJs
    PJs is offline
    Supporting Member PJs's Avatar
    Join Date
    Sep 2014
    Location
    Northern CA
    Posts
    1,841
    Thanks
    8,333
    Thanked 1,118 Times in 718 Posts

    PJs's Tools
    Again a great post with excellent details...Great post! Curious how straight/flat the bed bar is in the run compared to your fine scraping? ~PJ
    ‘‘Always do right. This will gratify some people and astonish the rest.’’
    Mark Twain

  9. #6
    Supporting Member Paul Jones's Avatar
    Join Date
    May 2014
    Location
    Del Mar, California
    Posts
    1,231
    Thanks
    5,810
    Thanked 1,440 Times in 655 Posts

    Paul Jones's Tools
    mars-red, I find all your details fascinating and the excellent photos really help with following the steps. I am hoping you also have a blog or website URL where we can see your work (e.g., something like Adventures in WatchmakingÂ*Â* - Home or MOWRER WW LATHE TOOLS ). Thank you very much for posting this work. Regards, Paul Jones

  10. #7
    Supporting Member mars-red's Avatar
    Join Date
    Aug 2015
    Posts
    21
    Thanks
    0
    Thanked 57 Times in 17 Posts

    mars-red's Tools
    Quote Originally Posted by PJs View Post
    Again a great post with excellent details...Great post! Curious how straight/flat the bed bar is in the run compared to your fine scraping? ~PJ
    Thanks very much! For now, I'll have to answer your question with "I don't know". But now that you've piqued my curiosity, I'll do some measuring and checking on the surface plate.

    Quote Originally Posted by Paul Jones View Post
    mars-red, I find all your details fascinating and the excellent photos really help with following the steps. I am hoping you also have a blog or website URL where we can see your work (e.g., something like Adventures in WatchmakingÂ*Â* - Home or MOWRER WW LATHE TOOLS ). Thank you very much for posting this work. Regards, Paul Jones
    Thanks Paul! Yes, I keep a blog of my watch and machining activities here: The Joy of Precision - Page 1 of 9

  11. The Following 2 Users Say Thank You to mars-red For This Useful Post:

    Paul Jones (Sep 11, 2015), PJs (Sep 12, 2015)

  12. #8
    Supporting Member Paul Jones's Avatar
    Join Date
    May 2014
    Location
    Del Mar, California
    Posts
    1,231
    Thanks
    5,810
    Thanked 1,440 Times in 655 Posts

    Paul Jones's Tools
    mars-red, thank you for your blog link and seeing all the great projects. Very cool. Thanks, Paul Jones


    186 More Best Homemade Tools eBook

Thread Information

Users Browsing this Thread

There are currently 1 users browsing this thread. (0 members and 1 guests)

Bookmarks

Posting Permissions

  • You may not post new threads
  • You may not post replies
  • You may not post attachments
  • You may not edit your posts
  •