Free 186 More Best Homemade Tools eBook:  
New: 300+ fresh build posts/day from 275 forums → BuildThreads.com

User Tag List

Results 1 to 2 of 2

Thread: Crowsfoot Wrench

Threaded View

  1. #1
    Supporting Member hemmjo's Avatar
    Join Date
    Feb 2017
    Posts
    3,298
    Thanks
    410
    Thanked 2,127 Times in 1,228 Posts

    hemmjo's Tools

    Crowsfoot Wrench

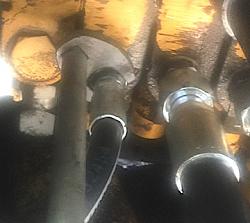
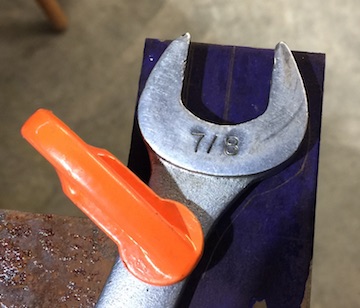
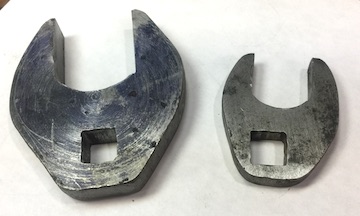
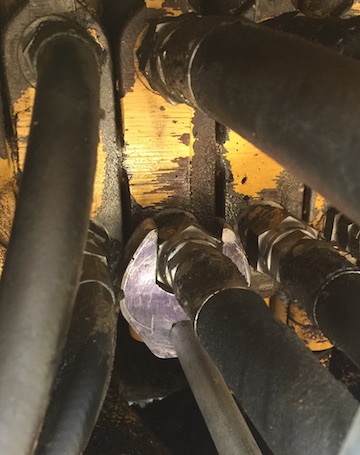
    Needed a 7/8 and 1 1/4 crows foot wrench to get into a tight space.
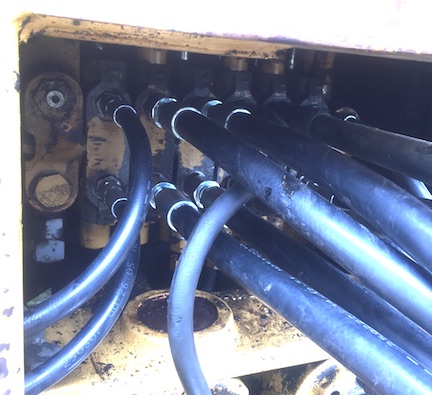
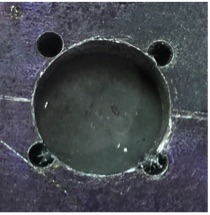
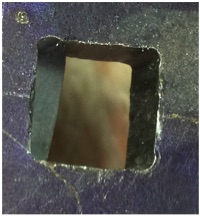
    Hydraulic manifold

    Click image for larger version. 

Name:	01 manifold.jpg 
Views:	68 
Size:	59.8 KB 
ID:	49032

    Failing to locate them locally, with broken equipment to get back into service, I headed to the shop.

    After accurately laying out the proper size opening, traced the outline of a wrench on an appropriate steel plate. 3/8’ for the small one, 1/2” for the large.

    Click image for larger version. 

Name:	02 clamp.jpg 
Views:	61 
Size:	37.5 KB 
ID:	49033

    Click image for larger version. 

Name:	03 Layout.jpg 
Views:	61 
Size:	45.2 KB 
ID:	49034


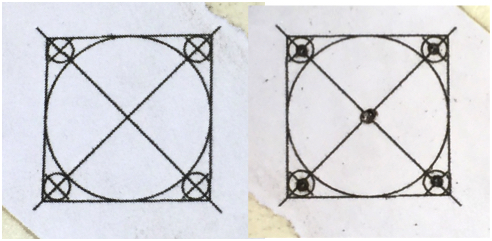
    I often use a paper pattern for repeated layouts. Tape the 1/2 square drive pattern to the plate . Center punch through the paper .

    Click image for larger version. 

Name:	04 Layout square.jpg 
Views:	57 
Size:	133.2 KB 
ID:	49035


    Drill the corner holes through and start the center hole with a small bit, about 0.070”(5/64 is close enough). Then enlarge the center hole to 3/16 then 3/8 then 1/2”.
    (Note to self: make one of those optical center punches as seen on Homemade Tools)

    Name:  05 Drill.jpg
Views: 291
Size:  19.3 KB


    It is then pretty easy to file the excess material from the corners. The edges of the drilled holes serve as file guides for size.

    Name:  06 File.jpg
Views: 293
Size:  19.0 KB

    “Sneak up” on the finished size for a snug fit. It is better to have to tap to remove from your extension than to have it fall off into someplace difficult to retrieve.

    Name:  07 snug fit.jpg
Views: 286
Size:  17.8 KB


    Finally, bandsaw, grind and file the finished shape. The offset hole allows you to turn the tool over for different offset if necessary. I made the large one first. Learn from experience.

    Click image for larger version. 

Name:	08 Finished.jpg 
Views:	63 
Size:	25.8 KB 
ID:	49039


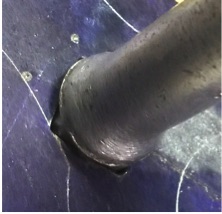
    You can reach as deep as you have extensions.

    Click image for larger version. 

Name:	09 inch one quarter.jpg 
Views:	59 
Size:	51.1 KB 
ID:	49040

    Click image for larger version. 

Name:	10Small one.jpg 
Views:	60 
Size:	36.6 KB 
ID:	49041

  2. The Following 5 Users Say Thank You to hemmjo For This Useful Post:

    clydeman (Apr 19, 2025), Jon (May 1, 2025), nova_robotics (Apr 19, 2025), Philip Davies (May 4, 2025), sdunt (Apr 20, 2025)

Thread Information

Users Browsing this Thread

There are currently 1 users browsing this thread. (0 members and 1 guests)

Bookmarks

Posting Permissions

  • You may not post new threads
  • You may not post replies
  • You may not post attachments
  • You may not edit your posts
  •