Free 186 More Best Homemade Tools eBook:  
New: 300+ fresh build posts/day from 275 forums → BuildThreads.com

User Tag List

Results 1 to 10 of 18

Thread: D10 Dozer blade conversion

Threaded View

  1. #1
    Supporting Member Frank S's Avatar
    Join Date
    Aug 2015
    Location
    Peacock TX
    Posts
    12,611
    Thanks
    2,677
    Thanked 11,100 Times in 5,384 Posts

    Frank S's Tools

    D10 Dozer blade conversion

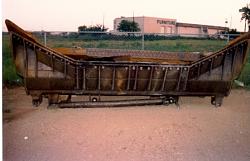
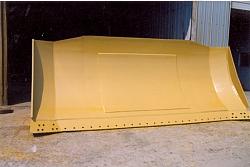
    Digging around in my archives reminiscing over some of the things I have built, seeing the pictures of how I converted a Caterpillar D10 dozer blade from a "U" shaped configuration to a straight blade style
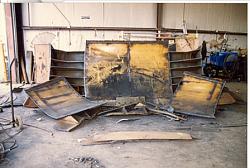
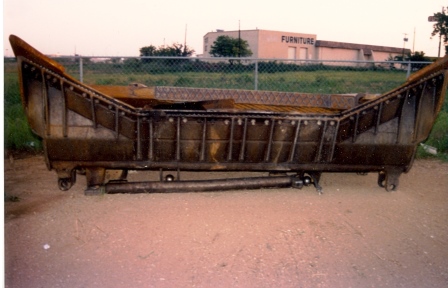
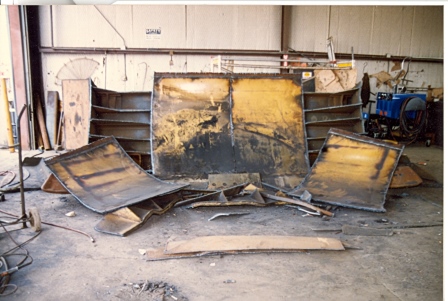
    In order to do this I first had to figure out the right places to cut it apart in order to salvage the parts I would need to make it look like a factory blade.
    I may have been the first person to do this. I know that others have done it since because I taught the method to several welders over the years.
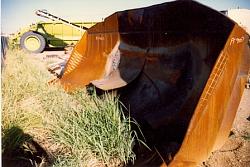
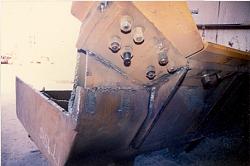
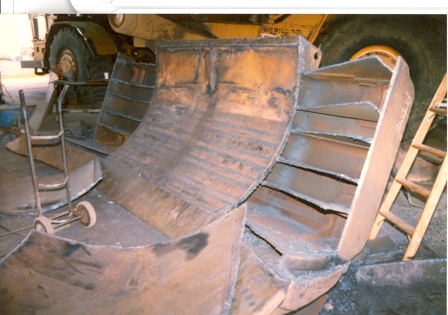
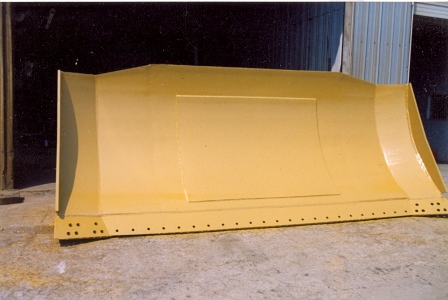
    Here was how the blade started out before I began to transform it.
    I did about 10 of these blades though out the years so not all photos are from the same blade however I did not deviate from my process through out all builds. All of the same cutting edges were reused by exchanging ones from the left to the right
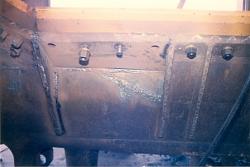
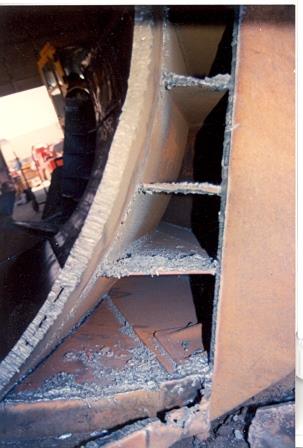
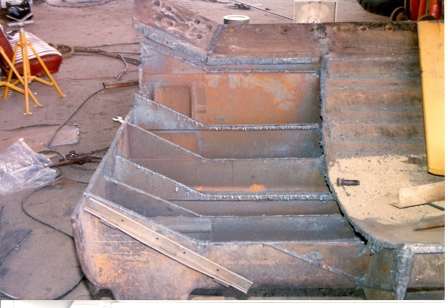
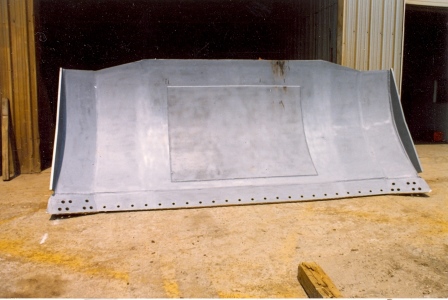
    Cutting the blade open is tricky, you first have to cut off the cheeks from both sides then you need a torch that is at least 4 ft long to reach far enough inside to cut the ribs where they weld to the face. You see a cat blade is made originally laying face down then a series of formed angles and U shaped pieces make up the ribs and the back of the blade After the cutting edge of teh mold board is welded back in place the face of the blade must be returned. This requires a broom handle to be clamped to the mig gun and the switch wired shut so you can reach the full depth to weld the face to the ribs If this is not done the first time the blade is used the face will peal off like removing the skin of an orange after all welding and grinding is done a good sand blast will prepare the blade for painting the final product should look exctly as if it were assembled in the factory For welding wire I used either Hobart Excell 550 or Tri-Mark 771 with CO2
    Click image for larger version. 

Name:	scan0039c.jpg 
Views:	1590 
Size:	70.8 KB 
ID:	9255 Click image for larger version. 

Name:	scan0048c.jpg 
Views:	1292 
Size:	86.7 KB 
ID:	9256 Click image for larger version. 

Name:	scan0055c.jpg 
Views:	1420 
Size:	32.1 KB 
ID:	9257Click image for larger version. 

Name:	scan0056c.jpg 
Views:	2540 
Size:	88.0 KB 
ID:	9258 Click image for larger version. 

Name:	scan0059c.jpg 
Views:	1082 
Size:	90.8 KB 
ID:	9259 Click image for larger version. 

Name:	scan0052c.jpg 
Views:	1156 
Size:	88.1 KB 
ID:	9260Click image for larger version. 

Name:	scan0049c.jpg 
Views:	990 
Size:	64.5 KB 
ID:	9261 Click image for larger version. 

Name:	scan0050c.jpg 
Views:	1042 
Size:	67.6 KB 
ID:	9262 Click image for larger version. 

Name:	scan0046c.jpg 
Views:	1037 
Size:	73.1 KB 
ID:	9263Click image for larger version. 

Name:	scan0062c.jpg 
Views:	1318 
Size:	68.6 KB 
ID:	9264
    Never try to tell me it can't be done
    When I have to paint I use KBS products

  2. The Following 9 Users Say Thank You to Frank S For This Useful Post:

    baja (Aug 20, 2020), clydeman (Mar 19, 2025), Downeast Thunder (Mar 19, 2016), kbalch (Mar 18, 2016), nova_robotics (Aug 19, 2020), Paul Jones (Mar 17, 2016), PJs (May 19, 2016), Radioman (Jul 13, 2018), sossol (Mar 8, 2018)

Thread Information

Users Browsing this Thread

There are currently 1 users browsing this thread. (0 members and 1 guests)

Bookmarks

Posting Permissions

  • You may not post new threads
  • You may not post replies
  • You may not post attachments
  • You may not edit your posts
  •