Free 186 More Best Homemade Tools eBook:  
Get 2,000+ tool plans, full site access, and more.

User Tag List

Results 1 to 7 of 7

Thread: Digital Angle Pipe Marker 3D-Printed Mount

  1. #1
    Supporting Member MetalDesigner's Avatar
    Join Date
    Sep 2013
    Location
    Las Vegas ~ @MetalDesigner Twitter
    Posts
    95
    Thanks
    45
    Thanked 194 Times in 62 Posts

    MetalDesigner's Tools

    Digital Angle Pipe Marker 3D-Printed Mount

    3D-Printed 'DIGITAL' Angle Marker for Pipe

    Website Link:
    https://ctmprojectsblog.wordpress.co...rker-for-pipe/

    Digital Angle Pipe Marker 3D-Printed Mount-magnetic-steel-insert-version.jpg

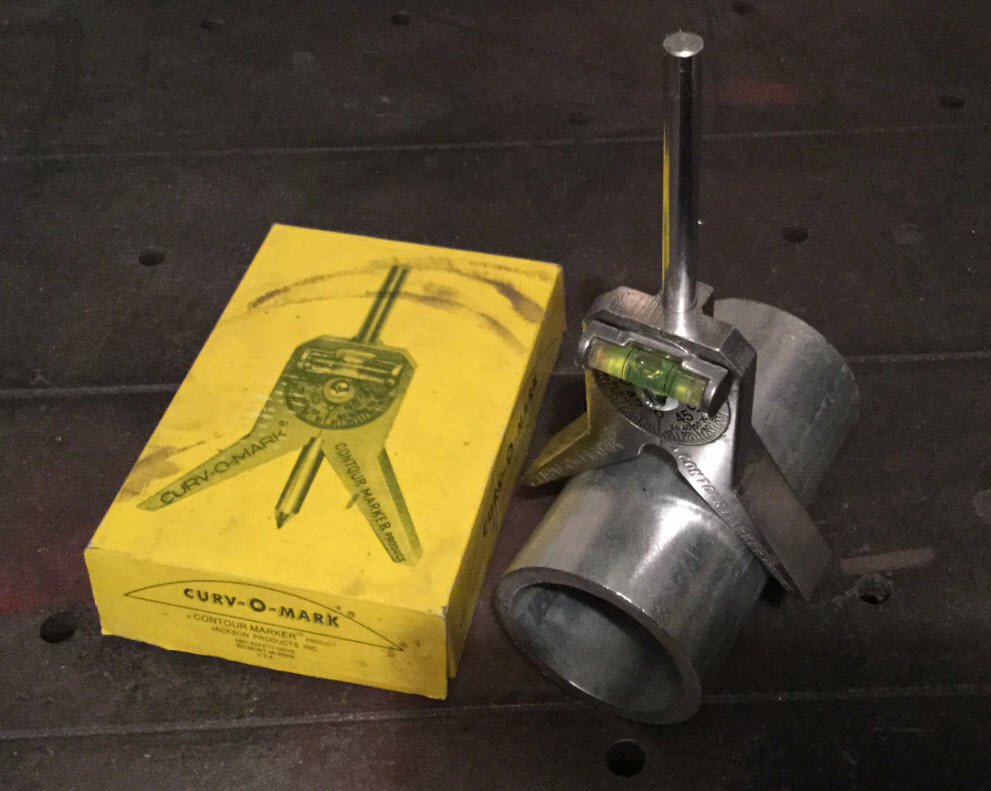
    For over 25 years I have used the CURV-O-MARK ‘Bubble’ Type Angle Pipe Markers … They work great; however, I wanted to be able to use a more accurate 'Digital' Angle Pipe Marker.

    Digital Angle Pipe Marker 3D-Printed Mount-sharpie-marker-point.jpg

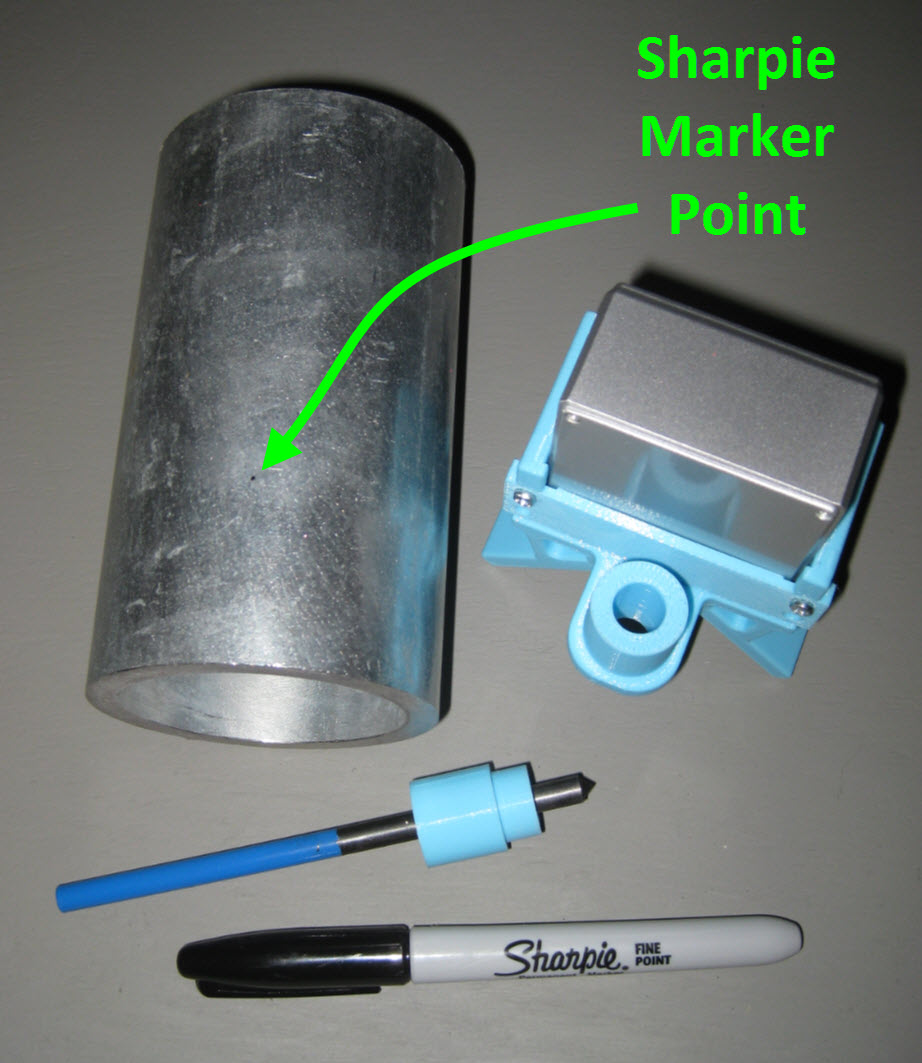
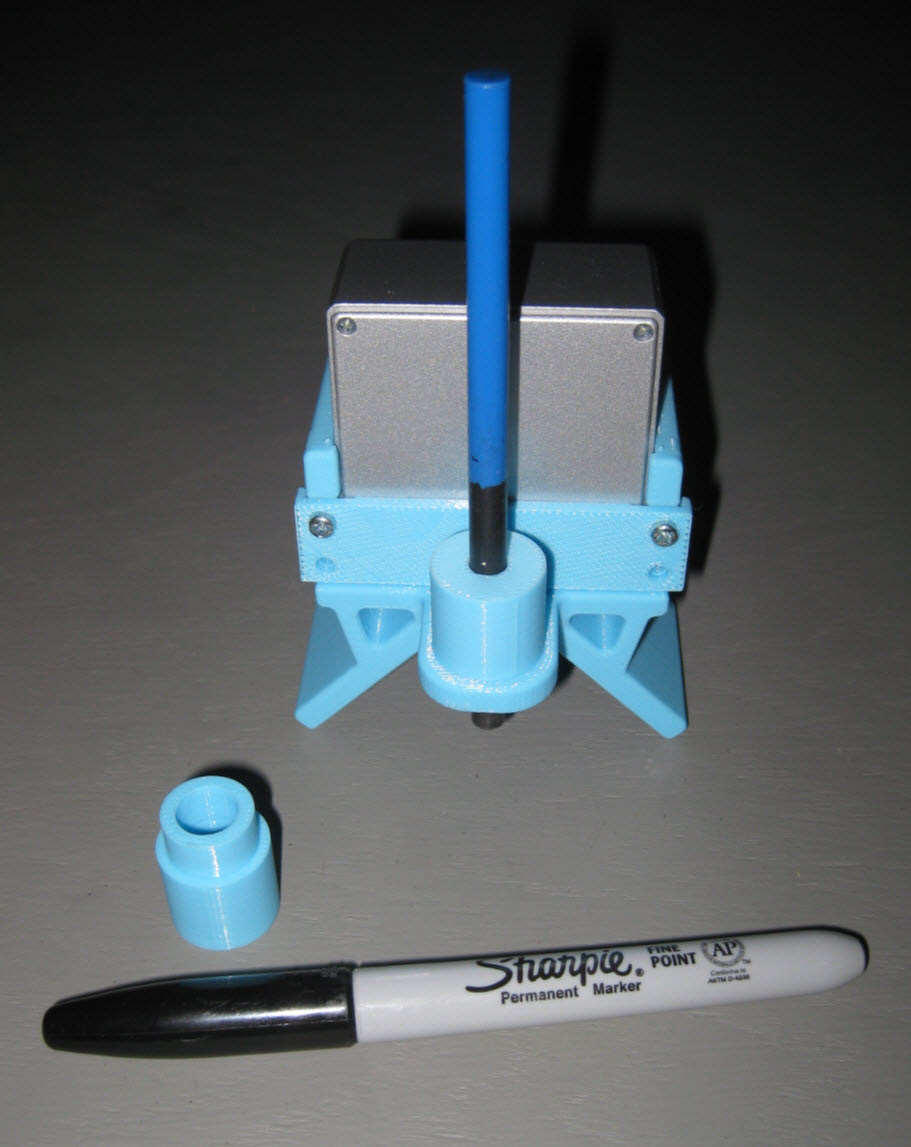
    Sometimes I don't want to punch indentation marks in the pipe; instead, wish to create a group of accurate dots on the pipe with a Sharpie Marker to check my initial set-up ...

    Digital Angle Pipe Marker 3D-Printed Mount-curv-o-mark-pipe.jpg

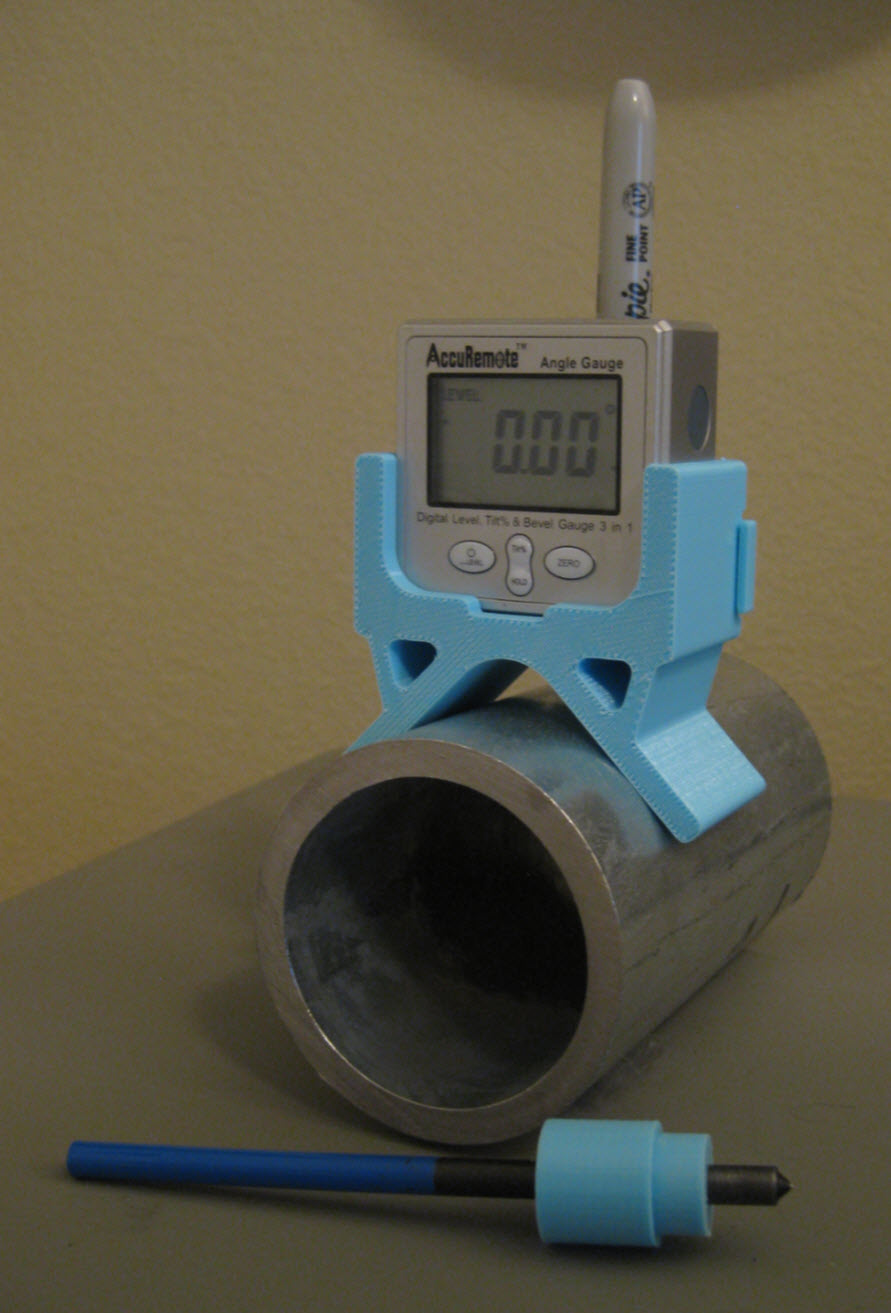
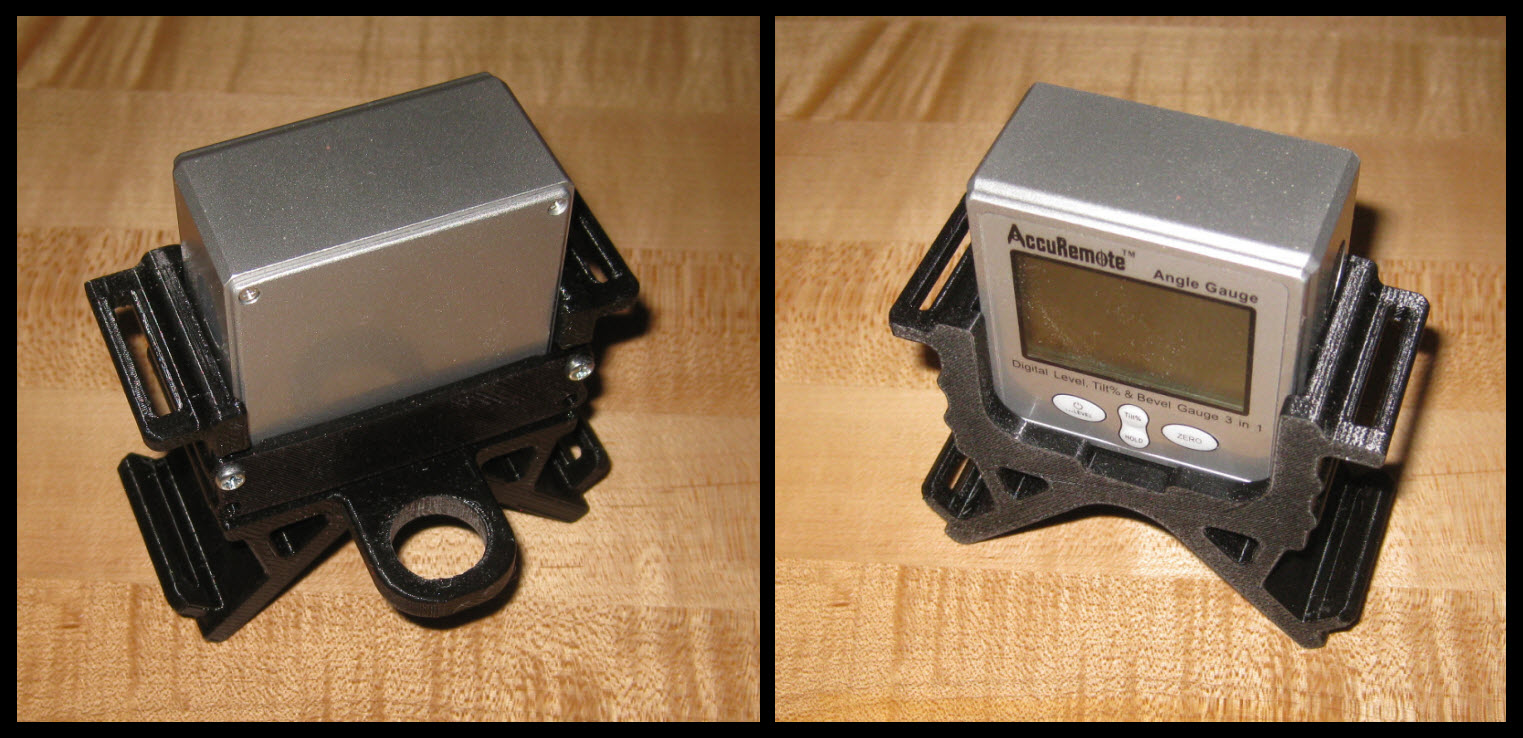
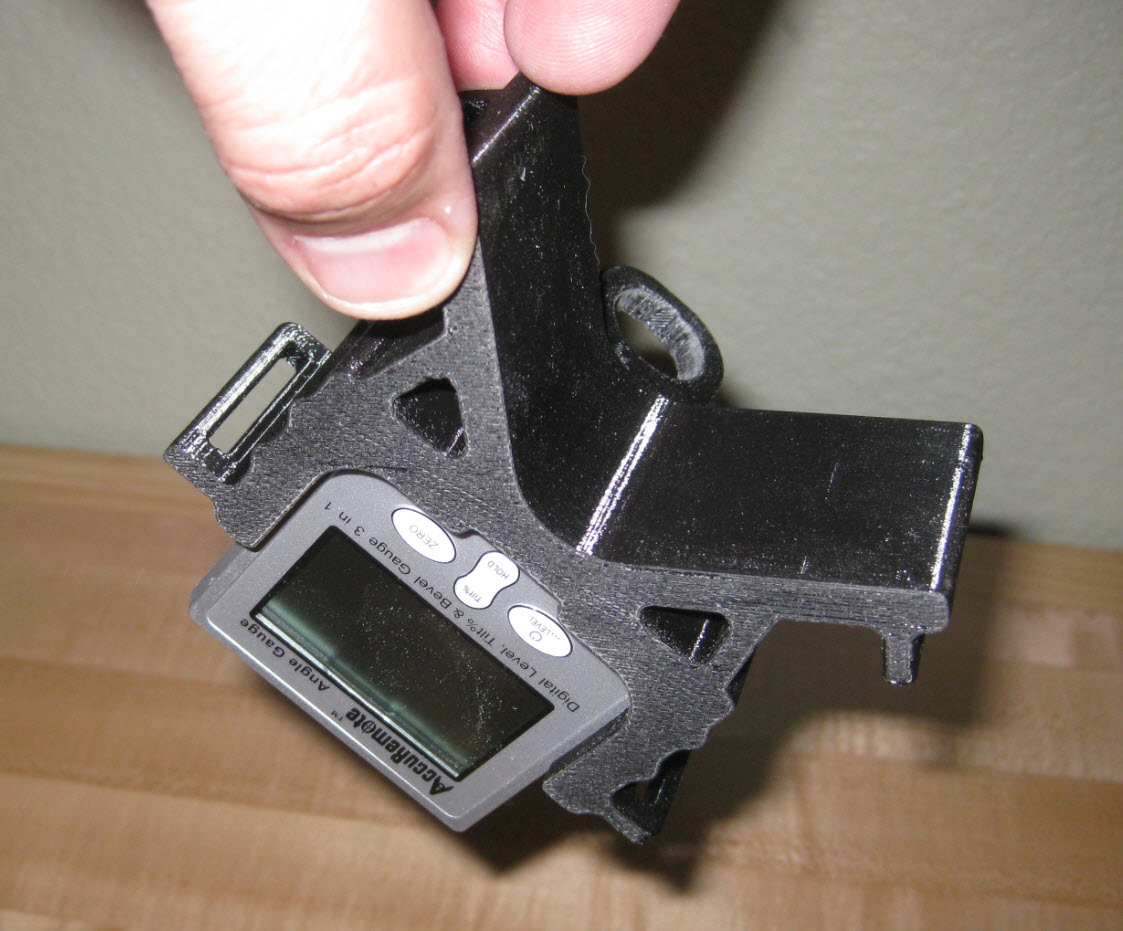
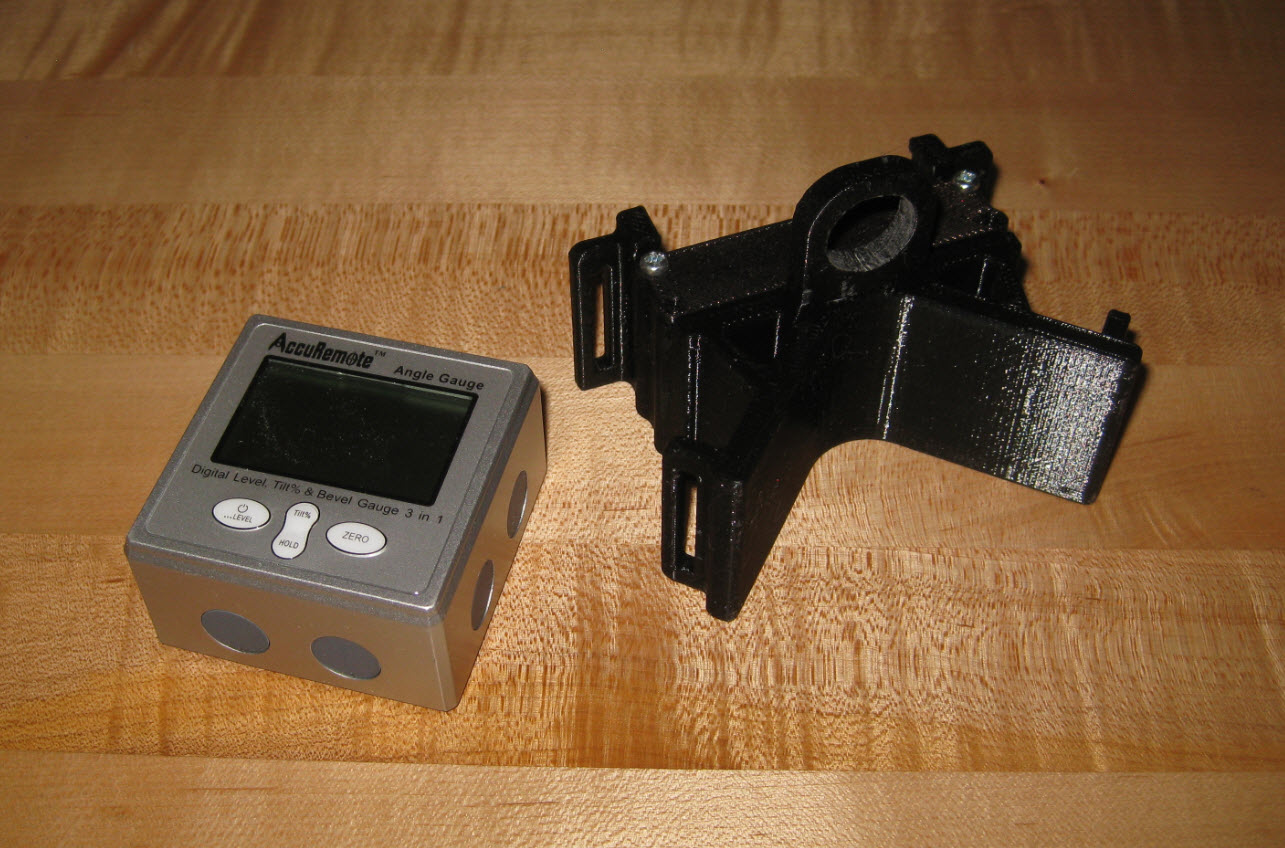
    About a year ago I purchased an AccuRemote Digital Electronic Magnetic Angle Gage Level / Protractor / Bevel Gauge

    Digital Angle Pipe Marker 3D-Printed Mount-sharpie-pipe-front-view.jpg

    Found it to be very accurate and decided to find a way to use it on pipe with a Sharpie & punch …

    Had a project whereby I needed to mark out several areas on a pre-insulated pipe with a Sharpie Marker because didn't want to mess up the insulation with a punch during the set-up process.

    Digital Angle Pipe Marker 3D-Printed Mount-sharpie-pipe-back-view.jpg

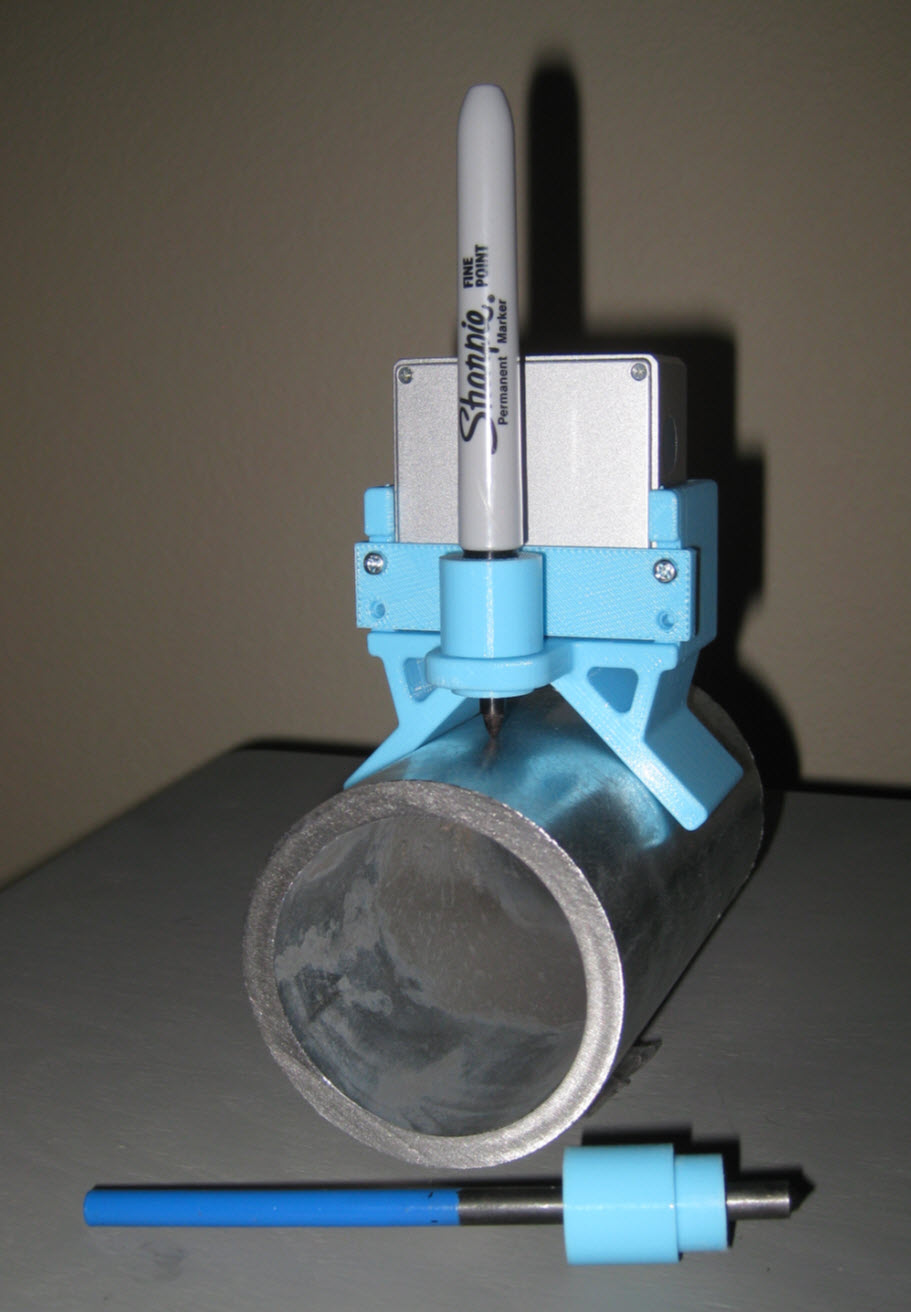
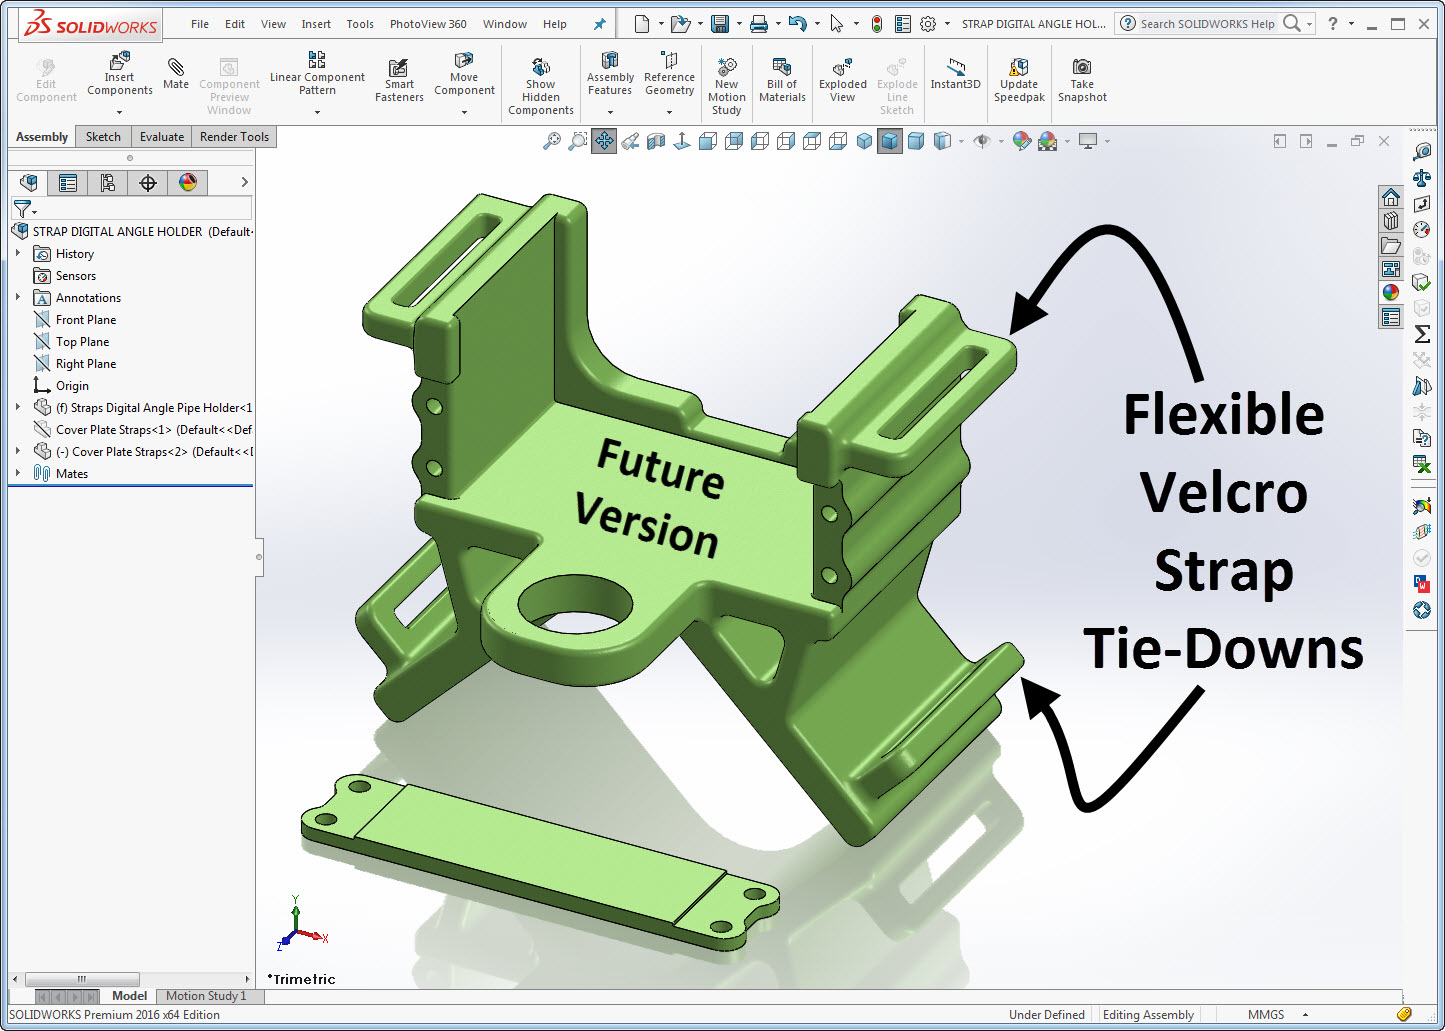
    Designed a metal version out of Flat-bar Steel & Angle Iron but wasn't at home able to get out and weld it together, so designed a 3D-Printed version on my Laptop at the airport using SolidWorks CAD Software.

    Digital Angle Pipe Marker 3D-Printed Mount-testing-punch-fitup.jpg

    When I got home late at night, I pressed a button on the 3D-Printer before going to sleep and had the mount in the morning when woke up ~ Bonus 'Sleep-Working'

    Digital Angle Pipe Marker 3D-Printed Mount-straptie-down-future-version.jpg

    I'm still going to use my CURV-O-MARK ... but this 'Digital' version is an option when need better accuracy for unusual angles.

    Digital Angle Pipe Marker 3D-Printed Mount-updated-version-front-back.jpg

    Updated Version with Flexible Velcro Strap Tie-Downs ... Although not sure I need the top straps because it is a nice tight fit-up.

    Digital Angle Pipe Marker 3D-Printed Mount-holds-tight-upside-down.jpg


    Digital Angle Pipe Marker 3D-Printed Mount-updated-version-velcro-strap-tie-downs.jpg

    ... CHEERS!!!

    For more photos click on this link for the full website post:
    https://ctmprojectsblog.wordpress.co...rker-for-pipe/


    Attached Thumbnails Attached Thumbnails Digital Angle Pipe Marker 3D-Printed Mount-digital-angle-guide-pipe.jpg  

    186 More Best Homemade Tools eBook
    Last edited by MetalDesigner; Apr 25, 2016 at 03:14 AM.

  2. The Following 5 Users Say Thank You to MetalDesigner For This Useful Post:

    C-Bag (Apr 12, 2016), HobieDave (Aug 11, 2021), Jon (Apr 11, 2016), PJs (Apr 23, 2016), Thimet (Apr 12, 2016)

  3. #2
    Content Editor
    Supporting Member
    DIYer's Avatar
    Join Date
    Aug 2013
    Posts
    3,056
    Thanks
    772
    Thanked 1,852 Times in 1,653 Posts


    Thanks MetalDesigner! We've added your 3D Printed Angle Gauge Mount to our Measuring and Marking category,
    as well as to your builder page: MetalDesigner's Homemade Tools. Your receipt:


    2000 Tool Plans

  4. #3
    Supporting Member MetalDesigner's Avatar
    Join Date
    Sep 2013
    Location
    Las Vegas ~ @MetalDesigner Twitter
    Posts
    95
    Thanks
    45
    Thanked 194 Times in 62 Posts

    MetalDesigner's Tools
    Thanks to a note from C-Bag View Profile: C-Bag - Homemade Tools Forum

    ... I am going to see if I can machine a very accurate mounting area directly on the Curv-O-Matic's body to mount a piece of steel for the Digital Angle Gauge to magnetically attach directly to the Curv-O-Matic for when I need to double-check accurate angles prior to using the punch.

    CHEERS!!

    Digital Angle Pipe Marker 3D-Printed Mount-curv-o-mark-box.jpg

  5. The Following 2 Users Say Thank You to MetalDesigner For This Useful Post:

    C-Bag (Apr 25, 2016), PJs (Apr 23, 2016)

  6. #4
    PJs
    PJs is offline
    Supporting Member PJs's Avatar
    Join Date
    Sep 2014
    Location
    Northern CA
    Posts
    1,841
    Thanks
    8,337
    Thanked 1,118 Times in 718 Posts

    PJs's Tools
    MetalDesigner, That print is too cool to rule! I have had the Wixey version and their small digital protractor for several years now and use them all the time...a go to in the shop. Using it on rounds/pipe would be great! Using it with a scribe, transfer punch or a sharpie is icing on the cake in my book. Don't know if the Wixey's are the same dimensions but if you could embed or print a slot for it, a piece of steel would lower the snap in tolerances significantly. What kind of tolerances do you get from your printer? Considering selling them? Another Awesome idea and build, Thanks! ~PJ

    P.S. Your trussing is quite substantial!!
    Last edited by PJs; Apr 23, 2016 at 12:27 PM. Reason: P.S.
    ‘‘Always do right. This will gratify some people and astonish the rest.’’
    Mark Twain

  7. #5
    Supporting Member MetalDesigner's Avatar
    Join Date
    Sep 2013
    Location
    Las Vegas ~ @MetalDesigner Twitter
    Posts
    95
    Thanks
    45
    Thanked 194 Times in 62 Posts

    MetalDesigner's Tools
    Quote Originally Posted by PJs View Post
    MetalDesigner, That print is too cool to rule! I have had the Wixey version and their small digital protractor for several years now and use them all the time...a go to in the shop. Using it on rounds/pipe would be great! Using it with a scribe, transfer punch or a sharpie is icing on the cake in my book. Don't know if the Wixey's are the same dimensions but if you could embed or print a slot for it, a piece of steel would lower the snap in tolerances significantly. What kind of tolerances do you get from your printer? Considering selling them? Another Awesome idea and build, Thanks! ~PJ

    P.S. Your trussing is quite substantial!!

    I waited to respond to this because I had made a 'Magnetic' Wixey Version as a gift and wanted to make sure the person got to see it first before putting it on here.

    Digital Angle Pipe Marker 3D-Printed Mount-wide-magnetic-option.jpg

    It works, but I still prefer the AccuRemote 3D-Printed mount with the sides on it because I know the exact dimensions; therefore was able to create a tight fit.

    ... But did add a slide in piece of metal in the final version so it is also held by magnets.

    Digital Angle Pipe Marker 3D-Printed Mount-steel-mending-plates.jpg

    Added a YouTube Video to the Original Post that shows all the finished items (3D-Printed in Green)

    Digital Angle Pipe Marker 3D-Printed Mount-video-final-version.jpg

    It is nothing fancy, designed it beefy to last, and just made the Mount for my workshop AccuRemote
    ... and maybe a few for gifts to give to other individuals.

    Once I have the exact dimensions from someone for the Wixey Digital Angle Gauge I will make a better mount for the Wixey and send them one.


    The Updated 'Magnetic' Version 3D-Printing Files are on GrabCAD.com
    https://grabcad.com/library/pipe-mou...-angle-gauge-1

    ... CHEERS!!!

    Here is an Additional Video Showing the final 1 minute of 3D-Printing
    You can see all the support material that just pulls off when done.


    Last edited by MetalDesigner; Apr 25, 2016 at 04:14 AM.

  8. The Following 2 Users Say Thank You to MetalDesigner For This Useful Post:

    C-Bag (Apr 25, 2016), PJs (Apr 25, 2016)

  9. #6
    PJs
    PJs is offline
    Supporting Member PJs's Avatar
    Join Date
    Sep 2014
    Location
    Northern CA
    Posts
    1,841
    Thanks
    8,337
    Thanked 1,118 Times in 718 Posts

    PJs's Tools
    Thanks for the info MetalDesigner. Watched the video on YT...nice presentation! WoW on the honeycomb cross section. Makes sense to save material but what it does for structure and weight is fantastic! The LC fit with the magnet plate on your AccuRemote version looks Very stable and no need for additional hold downs along with the LC fit on the plate pocket. Great design and impressive that you can get that kind of fit tolerance.

    What is the resolution tolerance of your machine? The website doesn't give anything but a layer thickness .15mm-.4mm (.006-.015) spec. That wouldn't account for repeatability and X/Y servo/screw resolution.

    I would be happy to measure mine and do a 2D ACAD drawing for all the info you have given me/us here. I've got a busy week but will try to get it to you by next if you want it. Just love the design and versatility of it!! IMHO you could take this all the way to injection molding and production as an add on to AccuRemote or Wixey if you want...or as a cast or extruded (w/mods) AL version. The idea and design is really excellent IMHO! Well Done!!

    Thanks again,
    ~PJ
    Last edited by PJs; Apr 25, 2016 at 01:43 PM.
    ‘‘Always do right. This will gratify some people and astonish the rest.’’
    Mark Twain

  10. #7
    Supporting Member MetalDesigner's Avatar
    Join Date
    Sep 2013
    Location
    Las Vegas ~ @MetalDesigner Twitter
    Posts
    95
    Thanks
    45
    Thanked 194 Times in 62 Posts

    MetalDesigner's Tools
    There is a software Calibration setup whereby you can adjust your Specific AFINIA 3D-Printer on the X/Y so if you wish ya can dial it in pretty darn good.

    Digital Angle Pipe Marker 3D-Printed Mount-calibrate.jpg

    Even as good as this AFINIA 3D-Printer prints it is just a toy. All these inexpensive 3D-Printers are just novelties ... Very FUN... but toys ... and I'm having a lot of fun but understand it could never be used for more than fun items around the house & Workshop.

    However already at Trade-Shows they are showing some mid-level $$ 3D-Printers that will be worthy of a small production shop and already there are very expensive 3D-Printers being used to make outstanding Titanium parts for aircraft and also wax 3D-printers for creating casting patters.

    With that said... I like to experiment ... I'm not an expert on 3D-Printing ... but I like to test out items and this little AFINIA 3D-Printer of mine has FAR EXCEEDED my expectations on 'just-for-fun' items and it sure is a lot of fun just pressing a Start button and coming back later and having a finished item.

    Also have to mention, be careful, it becomes addicting!!
    I'm getting spoiled because I could have made a metal pipe mount for the Digital Angle Gauge but just easier to make the 3D-Printed version and it works GREAT!!

    So easy to draw something up in SolidWorks in 10 minutes, save-as an .STL file and press Start on the 3D-Printer and go out and do other items for a few hours and come back in and it is done.

    It is like starting the dish washer and coming back later and the dishes are washed... it really is that easy to use and start a print. 100% not joking... it is that easy.

    I'll make a video of the 3D-Printing Start process if people want to see how easy it is?

    On your Wixie Digital Angle Gauge ~ If you wish you can just P.M. me the greatest O.D. on all the Wixie sides, etc. No need to draw anything up if you don't wish; however, I enjoy drawing stuff so understand if you wish to draw it up. Better accuracy means a better finished part.

    When I measured the AccuRemote I measured to the 0.001" because anything more accurate than 0.001" the 3D-Printer can not handle.

    On a Side Note ~ I bought an amazing $39 tabletop 6" buffer from Harbor Freight to buff the plastic patterns for metal casting ... I read the reviews and people are saying they are very aligned and quiet and they were not joking ... this thing is wonderful!

    If I have the TV on in the shop I can't hear it is on and it is so perfectly aligned don't have to bolt it down on my Welding table when using it... Yeah???


    Digital Angle Pipe Marker 3D-Printed Mount-buffing-compounds-tabletop-buffer.jpg

    Anyway ~ Tested a bunch of compounds and found that using the plastic buffing compound quickly smooths off these 3D-Printed metal casting patterns ... Then I use Cross-Country Sky wax on the light and fluffy buffing wheel and it makes the patterns smooth like glass.

    Only works in the easy to reach area on the patterns, so have to use a 3M Scratch Pad and/or Flexible backed sand paper for the other areas.

    Just some helpful info for others that wish to 3D-Print metal casting patterns and smooth them off quickly to easily pull out of the green sand.

    It is a feel thing but after a little practice ya know long to hold it on buffing wheel not to melt the PLA too much but just enough to get a good finish prior to then using the Ski Wax on the fluffy buffer to get a slippery finish to pull out of the casting sand very easy.

    .. CHEERS!!


    186 More Best Homemade Tools eBook

  11. The Following User Says Thank You to MetalDesigner For This Useful Post:

    PJs (Apr 25, 2016)

Thread Information

Users Browsing this Thread

There are currently 1 users browsing this thread. (0 members and 1 guests)

Bookmarks

Posting Permissions

  • You may not post new threads
  • You may not post replies
  • You may not post attachments
  • You may not edit your posts
  •