Free 186 More Best Homemade Tools eBook:  
Get 2,000+ tool plans, full site access, and more.

User Tag List

Results 1 to 5 of 5

Thread: DIY Robo Cooker. A precision controller for heating fluids in the shop.

  1. #1
    Supporting Member Mark Presling's Avatar
    Join Date
    May 2019
    Posts
    20
    Thanks
    0
    Thanked 162 Times in 16 Posts

    Mark Presling's Tools

    DIY Robo Cooker. A precision controller for heating fluids in the shop.

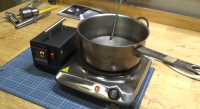
    This stand alone PID controlled interface allows users to plug in just about any heating device that is normally controlled from mains power and set it to a precise temperature. I keep two single burner hotplates in my shop for heating up anodising dyes, glues and copper etching solutions however the thermostats in these hotplates are not very accurate and the hotplates themselves have a lot of thermal mass and consequently, a lot of thermal inertia. I recently purchased the chemicals to do parker phosphating in my shop but it requires three different heated solutions. The first is a boiling water bath. No problem, just heat up a large stainless steel pot of water on the first hotplate. The parkerising solution though has to be heated to 96C. This is difficult to do on one of the standard hotplates without a lot of trial and error. The last stage of the parkerising process is to place the article being treated into a heated pot of a soluble oil at 60C.
    I wanted to be able to control the hotplate with a PID controller kit consisting of the PID controller, a solid state relay and a K type thermocouple.
    The PID controller and the SSR are fitted into a small box with the thermocouple being immersed in the fluid being heated. The video shows how I water proofed the thermocouple and how the box was made. The whole contraption could also be used to control a hot air gun, a sandwich toaster, a domestic toaster oven or whatever. It just depends on how you package the thermocouple.

    Cheers,
    Preso


    186 More Best Homemade Tools eBook

  2. The Following 10 Users Say Thank You to Mark Presling For This Useful Post:

    Altair (Aug 3, 2019), EnginePaul (Aug 3, 2019), Inner (Aug 2, 2019), jimfols (Aug 3, 2019), Jon (Aug 2, 2019), mr mikey (Aug 8, 2023), rgsparber (Aug 4, 2019), Saltfever (Aug 4, 2019), tonyfoale (Sep 13, 2021), tooly (Sep 9, 2021)

  3. #2
    Content Editor
    Supporting Member
    Altair's Avatar
    Join Date
    Aug 2013
    Posts
    11,878
    Thanks
    1,361
    Thanked 29,688 Times in 9,863 Posts


    Thanks Mark Presling! We've added your Parkerizing Heater to our Metalworking category,
    as well as to your builder page: Mark Presling's Homemade Tools. Your receipt:


    2000 Tool Plans

  4. #3
    Supporting Member jdurand's Avatar
    Join Date
    May 2019
    Location
    Krasnodar Krai, Russian Federation
    Posts
    1,458
    Thanks
    127
    Thanked 749 Times in 417 Posts

    jdurand's Tools
    Back when I worked for an independent testing lab (military, commercial, NASA parts) we set up controllers like that. Often it was to heat a beaker of FC-48 that had some electronic part dangling in it for testing at a specific temperature.

    Another trick we used to get exactly -55C for testing parts was to freeze methanol to a slush and then run a different florocarbon (I think F-22) through pipes submerged in the slush. The Freon coming out of the slush was they heated to -55 by a precision bath heater. The overflow from the bath went back down to the slush for another loop.

    The alcohol was frozen by pouring in liquid nitrogen, we used tons of that for temperature chambers so tapping off some now and then was no problem. We had our own liquifier out back.

  5. #4
    Supporting Member
    Join Date
    Oct 2016
    Posts
    1,113
    Thanks
    25
    Thanked 345 Times in 242 Posts

    old kodger's Tools
    A little booklet called ZEUS will give precise calculations for allowances for bending various thicknesses of material through various degrees of bend

  6. #5
    Supporting Member Mark Presling's Avatar
    Join Date
    May 2019
    Posts
    20
    Thanks
    0
    Thanked 162 Times in 16 Posts

    Mark Presling's Tools
    If I need to bend metal to precision tolerances I draw the part first in Autodesk Inventor and then produce the flat part (development). It already has the tangent lines and allowances on the drawing and it is just a matter of printing the drawing full size and sticking it to the metal for cutting. You have to specify the thickness of the metal first and it works best on heavier gauge materials.


    186 More Best Homemade Tools eBook

Thread Information

Users Browsing this Thread

There are currently 1 users browsing this thread. (0 members and 1 guests)

Tags for this Thread

Bookmarks

Posting Permissions

  • You may not post new threads
  • You may not post replies
  • You may not post attachments
  • You may not edit your posts
  •