
 LinkBack URL
 About LinkBacks


Making straight flat cuts on the lathe. Food for thought.
I do not have a mill so I have had to think of ways to make things flat, angular and rectangular on the lathe. It basically just facing using various methods to hold the various shapes. I am sure this is not new, but I have not see it mentioned anyplace.
Just think of the chuck as a vise, then find ways to securely hold parts without damaging them and being able to remove and replace with reasonable repeatability as required.
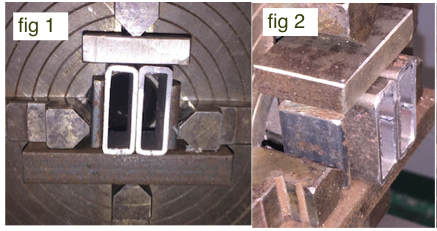
Figs 1 and 2 show short pieces of rectangular tubing that were cut to length with a portable band saw. While the parts are close as cut, the cut ends are not perfectly square and vary a little in length. For this project they need to be square and equal length. Fig 1 shows jaw #1 lightly holds a piece of thick bar stock against jaws #2 and 4 which can still easily slide, the bar just wont easily fall out. The pair of cut pieces sit on the on the bar while jaws 2 and 4 press them together. Small steel plates keep prevent crushing the tubes. A piece of bar stock spreads the force from jaw #3 between the two tubes and presses them against jaw #1. Note the back of the tubes rest against the face of the chuck to assure the ends are even. Face one end, turn around and face the other end.
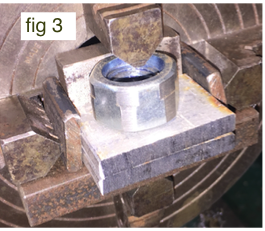
Figures 3-6 show two small parts were rough cut with a band saw but need to be identical sized, not just close. Also matching holes and an angle on one end.
Fig 3 again shows a bar in position under jaws 2 and 4. These parts were small enough they would slide into the hole of the chuck rather than rest on the face. A piece of steel large enough to span the hole was put behind the parts for them to rest against and hold past the front of the chuck jaws. The backing bar can actually move during cutting, but it cannot fly out. A hex nut was used under jaw #3 to clamp the parts rather than the backing bar. The backing bar can actually move during cutting, but is cannot escape. It could have been anything, but the nut was the correct size. Small bars between the parts and jaws 3 and 4 spread the clamping force to both parts. Notice the bars are tilted due to uneven length of the parts.
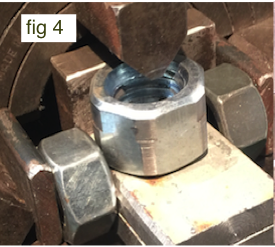
Fig 4 shows the parts turned 90˚ to cut the ends. Here hex nuts worked well to clamp the parts since at this point they are the exact same width.
While the parts were still rectangular and easy to clamp, they moved to the drill press for the required holes were drilled with the parts clamped together in the drill press vise.
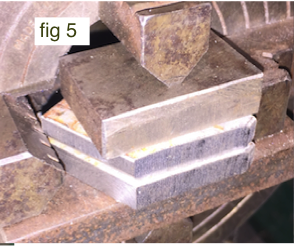
Fig 5 shows the parts clamped to cut the angle on one end. Note that jaws 2 and 4 are not really clamping anything in this set-up. However they do provide stability to the bar stock that is holding the parts.
Fig 6 Shows a the pin that was placed in the hole to assure the parts to not move in relation to each other while being chucked and cutting the angle in fig 5
This next set of pics show the process of turning a heat warped, rusted piece into a usable part. This part was cut from a piece of steel had been flame cut along one edge and appears to have been in a fire. I picked it up during a walk along a railroad track. Perhaps scrap fallen off a car.
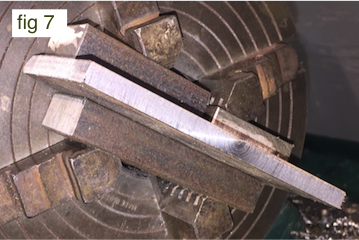
Fig 7 shows the 1/4 x 2 x 4 piece using some bar stock to spread the clamping load and for the jaws have a much wider clamping foot print. This allowed the band saw cut edge to be cut straight and smooth.
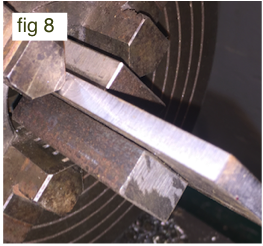
Fig 8 shows the part chucked to trim the ends. The part fits into the chuck hole so it does not extend so far. Notice the bar stock extends the reach to the jaws to stiffen the part.
These last cuts were a little concerning as the part is held with so little contact with the chuck. SLOW the spindle. REDUCE the feed rate. LOWER the depth of cut.
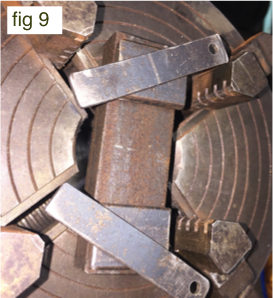
Fig 9 shows the chuck laying on the bench to make it easier to position the part . Spacers were used to position the part flat for the jaws to grip about 1/2 of the edge while laying on the bench so the shims stay in place while the part is clamped. Spacers were removed after clamping the part.
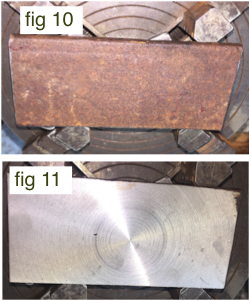
Fig 10 The part is clamped and ready for facing. Fig 11, The finished piece ended up about 0.205 thick, down from about 0.290. Good enough for my needs.
There are many more ways to hold parts, these are the ones did while I was thinking about taking photos.
I have no images for procedure, but I have also clamped a tool bit off center, making the chuck into a fly cutter. Then clamped larger parts to the cross slide using various clamping methods.
Perhaps some of you have other examples of creative clamping techniques.
John


 Reply With Quote

Bookmarks