Thanks for the pics Tony, this a fascinating project and I will be following everything you find the time to post.
Regards
Alan
Printable View
Thanks for the pics Tony, this a fascinating project and I will be following everything you find the time to post.
Regards
Alan
i started this topic with just a single modification to a measuring device, namely a vernier height gauge to help with reverse engineering a set of motorcycle crankcases. I had to make or modify a number of other tools as well. Here are some of them. Cheap calipers came in for some surgery to adapt them to specific tasks.
Attachment 26362 Attachment 26363 Click thumbnails for full size images
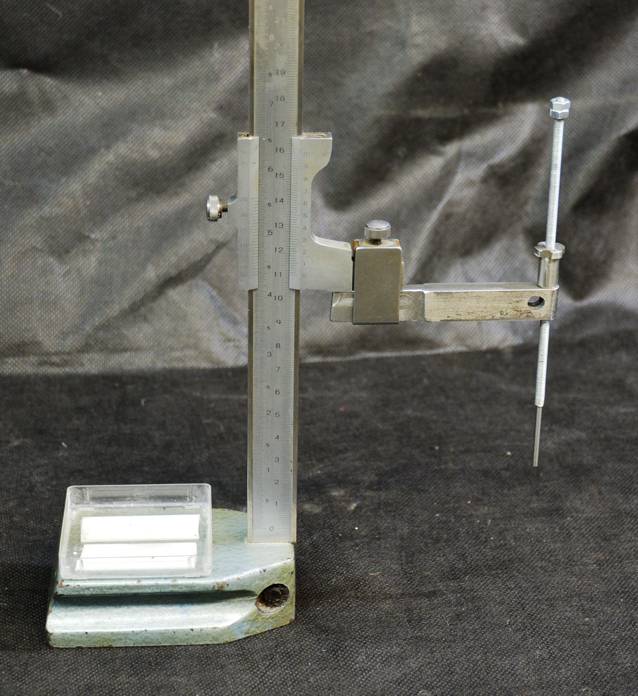
This my version of commercially available depth gauge addition. I used a 4 mm threaded rod with a lock nut above the holding beam which is threaded. At the bottom I fixed a carbide "probe". Firstly I set the vernier to a convenient nearest 10 mm setting and then I adjust the probe and lock it to a reference which may be zero at the base surface or it could be a reference surface on the part to be measured.
Attachment 26364 Attachment 26365
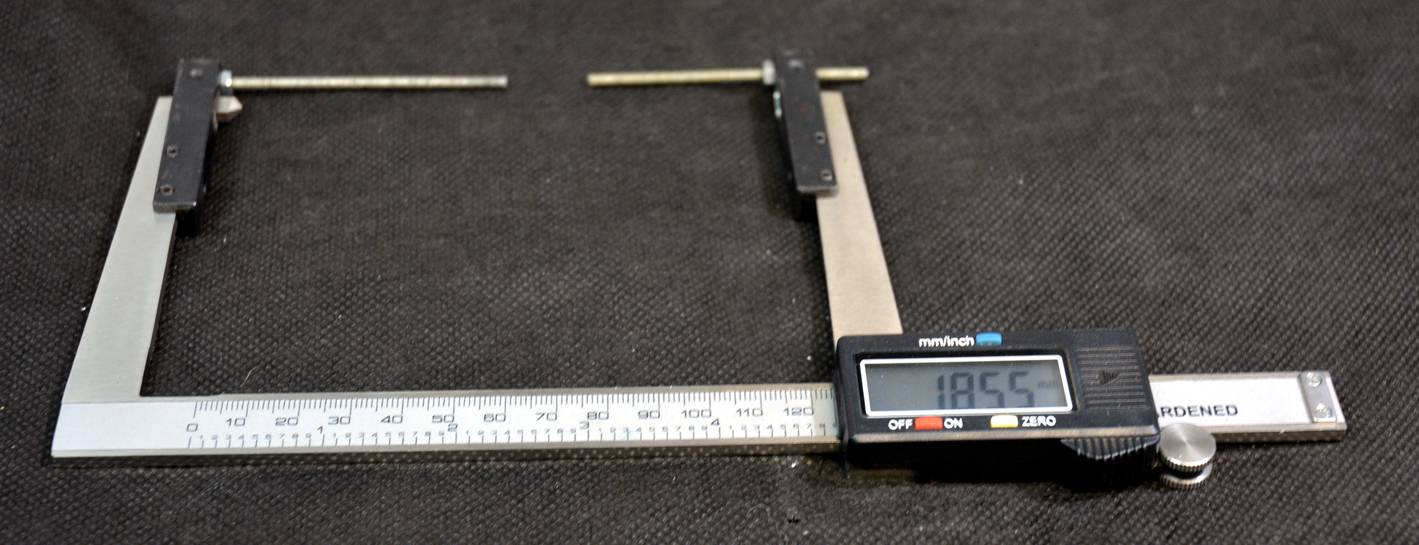
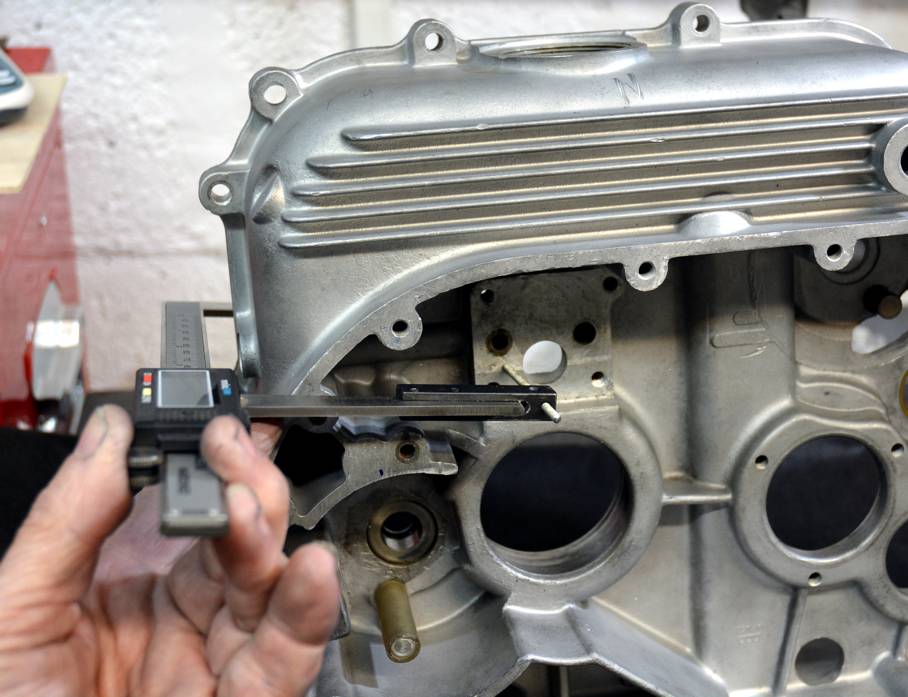
A while back a local Lidl store had brake disc calipers on offer. Due to its long jaws it has been very useful for various purposes. here you can see how I added to its utility by adding clamps to hold some threaded rod. This allows me to get very quick thickness measurements in awkward places. I could get the same results in most, but not all, areas by using the depth gauge modification above from both sides, but using the caliper is much faster. the RH pic. shows how it is used.
Attachment 26366
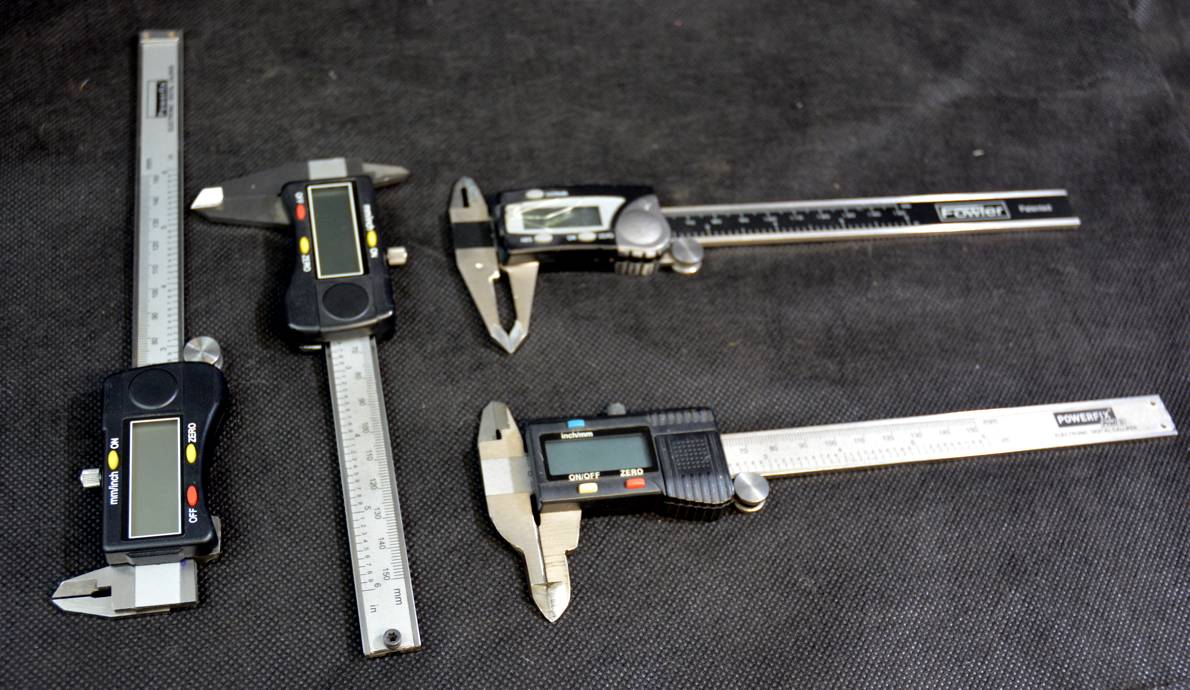
Here are some modified calipers. On the left I have cut off the OD measuring jaws, which allows it to fit some bores to measure grooves or spacing directly. The second one has been shortened to allow it to fit into smaller spaces, the usual depth gauge rod has been cut off also. A small bolt has been added at the end to act as a stop. The stub of the cutoff depth rod will bear against the bolt so the plastic case is protected.
The other two have just had the jaws modified to allow them to be used where there would otherwise be some interference.
All of the modifications here have been done to satisfy a practical requirement, none have been done on a basis of "it might be useful one rainy day".
I still like the height gauge and brake caliper hacks best. I shudder thinking about hacking on any of my calipers. Since they're all [save one 6''] verniers from 4'' to 48'', they feel safe!
The height gauge hacks would be nicer on a digital height gauge with its ability for zeroing at the touch of a button. I might have a word with Santa to see if he can bring me a dual beam digital instrument for Xmas.Quote:
Originally Posted by Toolmaker51
It is only cheap calipers that I modify. i have some nice Mitutoyo (so is the height gauge) vernier and digital calipers which are safe from hacking.
This is where cheap tools can come in to their own, lots of ideas you have given us for those awkward measuring jobs.
Thanks
Alan
I like all your caliper mods. The shortened calipers are very handy for slipping into a pocket when off to do some shopping; especially since metric and inferial are just a button touch away. HF used to sell 3" cheapies. I have a pair and they are my shopping calipers as well as being very useful for in situ measurements when the mill spindle is down close to the workpiece.Quote:
Originally Posted by tonyfoale
Another handy caliper modification is to center drill two spots, one on each jaw, separated by a convenient distance, e.g. 0.2". Now, to set your dividers to a desired radius, stick the points into the spots and open the calipers until they read the radius minus the separation distance.
Also, novices should be aware that calipers are a good substitute for fine tweezers when needing to remove one of those annoying steel splinters from a finger.
Marv, that is a useful tip.Quote:
Originally Posted by mklotz
Another great idea, I have been getting too many aluminium splinters lately which I have been removing with tweezers from a Swiss Army knife but some are very hard to get a hold on. I'll try the caliper method on the next one.Quote:
Originally Posted by mklotz
There will be those who suggest wearing gloves but I hate working like that and it can be dangerous also.
Back in the dim and distant past.......Divider/ compass marks were a common feature on decent vernier calipers. I've only seen them on verniers with an adjustable [calibration] plate. Very small, to accurately position sharp points, and encircled by a little ring so the mark was easily seen. Neat feature being read direct; on back side, one on body other on slide. I haven't used them in awhile for scribing diameters, just equally interspersed lines of holes. It would have been convenient whether a little 2" divider or a long trammel compared to picking up marks on a scale.Quote:
Originally Posted by mklotz
And tweezers. I'll probably stick a copy of this elsewhere too. Buy a good set of tweezers; pointed, is a little better than flat bladed manicure style. They'll probably be Swiss or Pakistan made, stainless and look forged not stamped sheet metal.
Hone sides of pointed variety by drawing [not pushing] over successively finer abrasives. Hold them closed lightly to not deflect jaws open, that's important. Then pointed or flat, hone inside to get jaws truly parallel. Fine wet-or-dry silicone paper works well. This puts very fine engagement on jaws and edges, no splinters will escape grasp. Honing the edges 'sharpens' them, so when needed, embedded splinters can be exposed nipping out a little skin. Works every time.
<!-- BEGIN /var/www/html/homemadetools/protected/modules/zeus/views/tool/postUpdate.php -->
Thanks tonyfoale! We've added your Depth Gauge Modification to our Height and Depth Gauges category,
as well as to your builder page: tonyfoale's Homemade Tools. Your receipt:
<div id="blocks"> <div class="block b1 pngfix"> <div class="bimg"> <div> <a href="http://www.homemadetools.net/homemade-depth-gauge-modification"> <img src="/uploads/218803/homemade-depth-gauge-modification.jpeg"/> </a> </div> </div> <div class="head pngfix"></div> <div class="left pngfix"></div> <div class="right pngfix"></div> <div class="blockover b1 pngfix"> <div class="title"> <a href="http://www.homemadetools.net/homemade-depth-gauge-modification">Depth Gauge Modification</a> <span> by <a href="http://www.homemadetools.net/builder/tonyfoale">tonyfoale</a></span> </div> <div class="tags">tags: <a href='http://www.homemadetools.net/tag/depth-gauge'>depth gauge</a> </div> </div> </div> </div>
<!-- END /var/www/html/homemadetools/protected/modules/zeus/views/tool/postUpdate.php -->
<!-- BEGIN /var/www/html/homemadetools/protected/modules/zeus/views/tool/postUpdate.php -->
Thanks tonyfoale! We've added your Thickness Gauge to our Measuring and Marking category,
as well as to your builder page: tonyfoale's Homemade Tools. Your receipt:
<div id="blocks"> <div class="block b1 pngfix"> <div class="bimg"> <div> <a href="http://www.homemadetools.net/homemade-thickness-gauge-10"> <img src="/uploads/218808/homemade-thickness-gauge-10.jpeg"/> </a> </div> </div> <div class="head pngfix"></div> <div class="left pngfix"></div> <div class="right pngfix"></div> <div class="blockover b1 pngfix"> <div class="title"> <a href="http://www.homemadetools.net/homemade-thickness-gauge-10">Thickness Gauge</a> <span> by <a href="http://www.homemadetools.net/builder/tonyfoale">tonyfoale</a></span> </div> <div class="tags">tags: <a href='http://www.homemadetools.net/tag/thickness-gauge'>thickness gauge</a> </div> </div> </div> </div>
<!-- END /var/www/html/homemadetools/protected/modules/zeus/views/tool/postUpdate.php -->