Free 186 More Best Homemade Tools eBook:  
Get 2,000+ tool plans, full site access, and more.

User Tag List

Results 1 to 9 of 9

Thread: Hole centering aid

  1. #1
    Supporting Member mklotz's Avatar
    Join Date
    Aug 2015
    Location
    LA, CA, USA
    Posts
    3,438
    Thanks
    357
    Thanked 6,393 Times in 2,119 Posts

    mklotz's Tools

    Hole centering aid

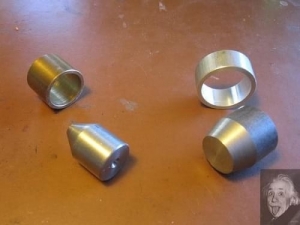
    Like many HSMs I don't have the headroom on my mill to use a coax indicator to center holes under the quill.

    If the job doesn't require the accuracy of the Zero-It indicator, I'll often just use the pointy end of the edge finder (shown at top of picture) to center the hole. Unfortunately, the larger end of the conical tip is only 0.3" diameter so one is out of luck for holes larger than that.

    If the holes happen to be aliquot sizes, a set of nesting drill bushings (shown at bottom) can help but, if the hole is slightly over/under size, the fit can be sloppy.


    I made these two devices to deal with the problem. Each consists of a slug of steel, accurately center-drilled at one end and having a conical taper at the other. Each has a companion close-fitting ring.


    In use, the cone is inserted into the hole and the ring is pressed down on the stock to ensure that the conical plunger is held vertically. Then the cone on the edge finder is inserted into the center-drilled hole.


    No, it's not as accurate as using a DTI in the Zero-It but it's more than accurate enough for 90% of the jobs I do.

    They're simple to make. Try one.

    186 More Best Homemade Tools eBook
    Last edited by mklotz; Jul 5, 2017 at 03:32 PM.
    ---
    Regards, Marv

    Home Shop Freeware
    https://www.myvirtualnetwork.com/mklotz

  2. The Following 12 Users Say Thank You to mklotz For This Useful Post:

    baja (Nov 8, 2023), Captainleeward (Jan 31, 2018), Jon (Aug 29, 2015), kbalch (Aug 31, 2015), kngtek (Oct 31, 2017), lazarus (Jun 13, 2016), Moby Duck (Jan 23, 2018), Paul Jones (Aug 29, 2015), PJs (Sep 2, 2015), Scotsman Hosie (Jul 13, 2019), Sleykin (Mar 13, 2020), Toolmaker51 (Aug 21, 2022)

  3. #2
    kbalch's Avatar
    Join Date
    Jun 2012
    Location
    Clermont, FL
    Posts
    5,034
    Thanks
    2,275
    Thanked 531 Times in 383 Posts
    Thanks mklotz! I've added your Hole Centering Aid to our Measuring and Marking category, as well as to your builder page: mklotz's Homemade Tools. Your receipt:


    2000 Tool Plans

  4. #3
    Supporting Member Toolmaker51's Avatar
    Join Date
    Feb 2016
    Location
    Midwest USA
    Posts
    5,331
    Thanks
    7,042
    Thanked 2,981 Times in 1,893 Posts

    Toolmaker51's Tools
    Centering Aids, never thought of using those for clocking, but it works with transfer punches just as well.
    Sincerely,
    Toolmaker51
    ...we'll learn more by wandering than searching...

  5. #4
    Supporting Member
    Join Date
    Sep 2015
    Location
    Kansas
    Posts
    62
    Thanks
    0
    Thanked 37 Times in 25 Posts
    You could just use the edge finder to get x and y center of the hole within part of a thousandth.

  6. The Following User Says Thank You to Toolguy For This Useful Post:

    uv8452 (Sep 6, 2022)

  7. #5
    Supporting Member mklotz's Avatar
    Join Date
    Aug 2015
    Location
    LA, CA, USA
    Posts
    3,438
    Thanks
    357
    Thanked 6,393 Times in 2,119 Posts

    mklotz's Tools
    Quote Originally Posted by Toolguy View Post
    You could just use the edge finder to get x and y center of the hole within part of a thousandth.
    I've heard of using an edge finder to center a cylinder. Since, in general, you start off diameter, an iterative process is required. The Osborne maneuver, which I described here...

    Osborne maneuver

    is typical. However, I've never heard of using an edge finder inside a hole and would want a proof of the technique.

    Can you describe the method you would use in more detail, please ?
    ---
    Regards, Marv

    Home Shop Freeware
    https://www.myvirtualnetwork.com/mklotz

  8. #6
    Supporting Member
    Join Date
    Sep 2015
    Location
    Kansas
    Posts
    62
    Thanks
    0
    Thanked 37 Times in 25 Posts
    Hi Marv. Just stick the straight end of the edge finder in the hole, center in X axis by eyeball. Move in Y axis to touch off the back of the hole (when the touch probe kicks off) and zero in Y. Move to the front side of the hole in Y axis and take a reading. Divide this number by 2. That will be the center of Y axis. Move to center of Y and rezero. Touch off the left side of the hole in X axis and zero X. Touch off the right side of the hole and see what that number is. Divide by 2. That is the center of X. Move to the center of X and rezero. You now are in the center of the hole. You don't have to know the hole diameter or do any math besides dividing by 2.

    You can find the center of a pin the same way, just on the outside instead of the inside. Carefully approach the edge that the edge finder will touch to get an accurate result. The cylindrical part of the edge finder is .200. If the hole is too small for that to work, you can use the pointed end the same way. In actual use, this takes (me) about 30 seconds to do. My edge finders will repeat to a 1 or 2 tenths. You can check the position with a DTI in the zero-it.

  9. #7
    Supporting Member mklotz's Avatar
    Join Date
    Aug 2015
    Location
    LA, CA, USA
    Posts
    3,438
    Thanks
    357
    Thanked 6,393 Times in 2,119 Posts

    mklotz's Tools
    Yes, I opined that that was the technique you had in mind.

    The problem I have is that initially you're not on a diameter of the hole so when you touch off, it's against a slanted surface. Same when you go to the other side. I'd want some assurance that you had actually measured the length of the chord before halving it to establish the middle.

    The Osborne iteration solves this problem by iterating, each iteration bringing you closer to a diameter where you're touching off on a non-slanted surface.

    There's also the problem of handling backlash. Many home shops lack DROs.

    Before using your method, I would still want to see an accuracy check using a Zero-It or coaxial. I'm very pessimistic about achieving "part of a thousandth" centering error.
    ---
    Regards, Marv

    Home Shop Freeware
    https://www.myvirtualnetwork.com/mklotz

  10. The Following User Says Thank You to mklotz For This Useful Post:

    Toolmaker51 (Sep 8, 2022)

  11. #8
    Supporting Member
    Join Date
    Sep 2015
    Location
    Kansas
    Posts
    62
    Thanks
    0
    Thanked 37 Times in 25 Posts
    The great thing about it is that you don't have to measure the chord, or worry about it. If you're close to center in X, each end of the chord will be centered in Y. The slightly angled part isn't an issue. I've been doing it this way for a lot of years and checked it out with a dial indicator several times. It's always close enough for my jobs. Maybe it will work for you, too.

  12. The Following User Says Thank You to Toolguy For This Useful Post:

    Toolmaker51 (Sep 8, 2022)

  13. #9
    Supporting Member Toolmaker51's Avatar
    Join Date
    Feb 2016
    Location
    Midwest USA
    Posts
    5,331
    Thanks
    7,042
    Thanked 2,981 Times in 1,893 Posts

    Toolmaker51's Tools
    There is merit in both versions; Marv's drills into a decreasing error, I've used it and it works.
    Toolguy is correct as well, though I don't use a wiggler or edge finder. This is especially good on rough or not very symmetrical material. I use an endmill shank, dowel pin, any diameter works, being a decent round and straight is sufficient, long as part fits within boundaries of material. A DRO makes it easy.
    As described, touch one side and note position or zero axis. Retract and traverse to opposite side without disturbing cross axis, draw up to contact and divide result by 2. Do other axis the same way.
    This often avoids surface plate & height gauge work, where locating a scribe line remains subject to interpretation.

    Marv mentioned 'aliquot' (which wasn't in microsoft spell check, lol), I recognized term but took wrong definition being a certain portion instead of any portion of a whole. So, went to look, satisfied at not being too far off.
    But there was a totally foreign usage too; of interest to musicians in the house, "Aliquot stringing, in stringed instruments, the use of strings which are not struck to make a note, but which resonate sympathetically with struck notes ..." from wikipedia.


    186 More Best Homemade Tools eBook
    Last edited by Toolmaker51; Sep 8, 2022 at 08:51 PM.
    Sincerely,
    Toolmaker51
    ...we'll learn more by wandering than searching...

Thread Information

Users Browsing this Thread

There are currently 1 users browsing this thread. (0 members and 1 guests)

Bookmarks

Posting Permissions

  • You may not post new threads
  • You may not post replies
  • You may not post attachments
  • You may not edit your posts
  •