Free 186 More Best Homemade Tools eBook:  
New: 300+ fresh build posts/day from 275 forums → BuildThreads.com

User Tag List

Results 1 to 9 of 9

Thread: How to make a dividing plate

  1. #1
    Supporting Member mklotz's Avatar
    Join Date
    Aug 2015
    Location
    LA, CA, USA
    Posts
    3,720
    Thanks
    376
    Thanked 7,192 Times in 2,348 Posts

    mklotz's Tools

    How to make a dividing plate

    I want an accurate division plate with, for example, 14 divisions. Not a problem - just whip out the dividing head and .... But wait! The dividing head doesn't have a 14 hole plate (we'll pretend). What to do? I need a 14 hole plate to make a 14 hole plate. The proverbial chicken-egg problem.

    Well, they didn't have a dividing head when they made the first plate. There must be some way to do it that doesn't require a dividing head. It's either that or I have to admit to myself that the dividing head plate sitting in front of me doesn't really exist.

    The technique described here requires only a lathe and a bit of mathematics. I can't provide an historical reference that proves this was how the first accurate plate was made but, nevertheless, it's a fascinating technique and may serve you in good stead some day.

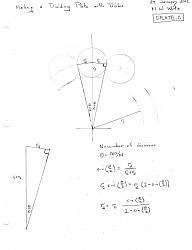
    Imagine you've turned yourself a top-hat shaped piece of steel. Now imagine you've turned 14 circular disks. When you paste these disks on the brim of the hat, touching (what I'll call) the 'crown' of the hat, they all just fit, simultaneously touching the adjacent disks and the crown. Voila, a '14 hole' dividing plate. All that's required is to make a suitable detent to locate between adjacent disks and you've got a dividing plate. With such a contrivance it would be easy to use it as a locator to drill a more conventional dividing head plate.

    If the diameter of the crown of the hat is known, it's only a bit of elementary trigonometry to compute the required disk diameter for any number of divisions. After turning a piece of stock to that diameter on the lathe it's simple to slice off 14 disks. The attached .jpg file illustrates the arrangement and the math that must be done. While straightforward, a small program makes things easier. After all, the program will never transpose a digit, forget a term, take a cosine instead of a sine or make any of those other idiotic mistakes we're all so prone to make. Moreover, you'll probably want to experiment a bit to get a combination of crown diameter and disk diameter that fits your available stock. That means solving the same equation several times. So much easier with a program than a calculator. The program is available on my page; see sig for URL.

    How to make a dividing plate-dplate.jpg
    ---
    Regards, Marv

    Smart phones are to people what laser pointers are to cats
    Homo sapiens is a goal, not a definition

  2. The Following 10 Users Say Thank You to mklotz For This Useful Post:

    12L14 (Jul 3, 2022), Baddog (Apr 9, 2021), bruce.desertrat (Apr 16, 2021), DIYSwede (Apr 8, 2021), emu roo (Apr 9, 2021), Home-PC (Apr 12, 2021), Jon (Apr 16, 2021), mwmkravchenko (Apr 9, 2021), Tonyg (Apr 9, 2021), Toolmaker51 (Apr 8, 2021)

  3. #2
    Supporting Member DIYSwede's Avatar
    Join Date
    May 2019
    Location
    Stockholm, Sweden...
    Posts
    637
    Thanks
    424
    Thanked 880 Times in 340 Posts

    DIYSwede's Tools
    Excellent deduction, Marv!
    Tip: Turn a fairly long piece of stock to intended dia, centre drill and ream to desired indexer hole size,
    cut off desired number of cylinders to desired height.
    Glue cylinders to brim, drill index holes as the cylinder bores will keep drill centered as well as perpendicular to plate.

    2 cents

    Johan

  4. The Following User Says Thank You to DIYSwede For This Useful Post:

    mwmkravchenko (Apr 9, 2021)

  5. #3
    Supporting Member mklotz's Avatar
    Join Date
    Aug 2015
    Location
    LA, CA, USA
    Posts
    3,720
    Thanks
    376
    Thanked 7,192 Times in 2,348 Posts

    mklotz's Tools
    Quote Originally Posted by DIYSwede View Post
    Excellent deduction, Marv!
    Tip: Turn a fairly long piece of stock to intended dia, centre drill and ream to desired indexer hole size,
    cut off desired number of cylinders to desired height.
    Glue cylinders to brim, drill index holes as the cylinder bores will keep drill centered as well as perpendicular to plate.

    2 cents

    Johan
    Not fair, Johan; you read my mind. I was just pondering about how to turn this into a more conventional dividing plate with holes for a detent pin and the idea of washers, as per your suggestion, rather than the disks mentioned in the OP occurred to me.

    Regardless, thanks for the suggestion; it's a good one.
    ---
    Regards, Marv

    Smart phones are to people what laser pointers are to cats
    Homo sapiens is a goal, not a definition

  6. #4
    Supporting Member DIYSwede's Avatar
    Join Date
    May 2019
    Location
    Stockholm, Sweden...
    Posts
    637
    Thanks
    424
    Thanked 880 Times in 340 Posts

    DIYSwede's Tools
    -Your brilliant idea finally solved my problem of making a biggie 127/ 50 tooth bike chain wheel combo,
    to convert my mini lathe's metric leadscrew to inferial!

    ATB

  7. #5
    Content Editor
    Supporting Member
    DIYer's Avatar
    Join Date
    Aug 2013
    Posts
    3,049
    Thanks
    848
    Thanked 2,978 Times in 2,532 Posts


    Thanks mklotz! We've added your Dividing Plate to our Measuring and Marking category,
    as well as to your builder page: mklotz's Homemade Tools. Your receipt:


    New: BuildThreads.com - 300+ build posts/day (with photos)

  8. #6
    Supporting Member Frank S's Avatar
    Join Date
    Aug 2015
    Location
    Peacock TX
    Posts
    12,615
    Thanks
    2,677
    Thanked 11,105 Times in 5,388 Posts

    Frank S's Tools
    get a bunch of small round magnets with a center hole and a length of steel banding material roll the banding into a cylinder use a rubber band to secure it place the magnets around the perimeter until you you have the desired number adjust the banding until the magnets touch all the way around if the banding makes 2 or 3 complete laps it will remain reasonably cylindrical in shape with all of this placed on a steel plate you just need a transfer punch to locate the centers of each magnet
    Never try to tell me it can't be done
    When I have to paint I use KBS products

  9. #7
    WmRMeyers's Avatar
    Join Date
    Dec 2014
    Posts
    885
    Thanks
    405
    Thanked 426 Times in 288 Posts

    WmRMeyers's Tools
    Quote Originally Posted by DIYSwede View Post
    -Your brilliant idea finally solved my problem of making a biggie 127/ 50 tooth bike chain wheel combo,
    to convert my mini lathe's metric leadscrew to inferial!

    ATB
    Try a 127/100, and you can get 3D printer files from thingiverse.com for that. You can use a gear for dividing, too.

  10. #8
    Supporting Member mklotz's Avatar
    Join Date
    Aug 2015
    Location
    LA, CA, USA
    Posts
    3,720
    Thanks
    376
    Thanked 7,192 Times in 2,348 Posts

    mklotz's Tools
    It may happen that one has a collection of disks (with radius rd) at hand and wishes to know the radius of the circle, rc, around which to place them to make the division plate.

    N = number of divisions desired
    S = sin (180/N)

    Then the equation for the disk radius when rc is given, as derived in the diagram is:

    rd = rc * S / (1 - S)

    so, to find rc when the disk radius, rd, is given, we simply invert this equation:

    rc = rd * (1 - S) / S
    ---
    Regards, Marv

    Smart phones are to people what laser pointers are to cats
    Homo sapiens is a goal, not a definition

  11. #9
    Supporting Member carl blum's Avatar
    Join Date
    Nov 2021
    Location
    Charleston, South Carolina
    Posts
    299
    Thanks
    6
    Thanked 171 Times in 108 Posts

    carl blum's Tools
    Hi Folks: I think they used dividers to make new dividing plates. You first layout the plate: X&Y center lines, angle line for first division ie: 35 divisions = 10.28°, and the pin hole circle. Put a solid center punch mark at "zero". Set your divider to the distance from zero to 10.28°. Now comes the improvement of accuracy: Step the divider around the circle and see if the 35 steps return to zero. If not, slightly adjust the divider and try until it matches. Once perfect, set out the holes and drill. ( I need a 35 plate and plan to make one on a rotary table using a list of the angles to 0.01°. I could also use the X-Y chart of the locations to 0.001".
    Carl.


    Download plans for dividing.


Thread Information

Users Browsing this Thread

There are currently 1 users browsing this thread. (0 members and 1 guests)

Bookmarks

Posting Permissions

  • You may not post new threads
  • You may not post replies
  • You may not post attachments
  • You may not edit your posts
  •