Free 186 More Best Homemade Tools eBook:  
Get 2,000+ tool plans, full site access, and more.

User Tag List

Results 1 to 8 of 8

Thread: Mill & drill press tramming tool

  1. #1
    Supporting Member bobs409's Avatar
    Join Date
    Dec 2016
    Posts
    201
    Thanks
    449
    Thanked 591 Times in 111 Posts

    bobs409's Tools

    Smile Mill & drill press tramming tool

    After seeing a few video's on these, I had to make one. This is so easy to make and works so good! Setting your equipment is no longer a hated task.

    I can't take any credit for this as similar ones are sold commercially and plenty of vids on you tube but here's how mine was made.

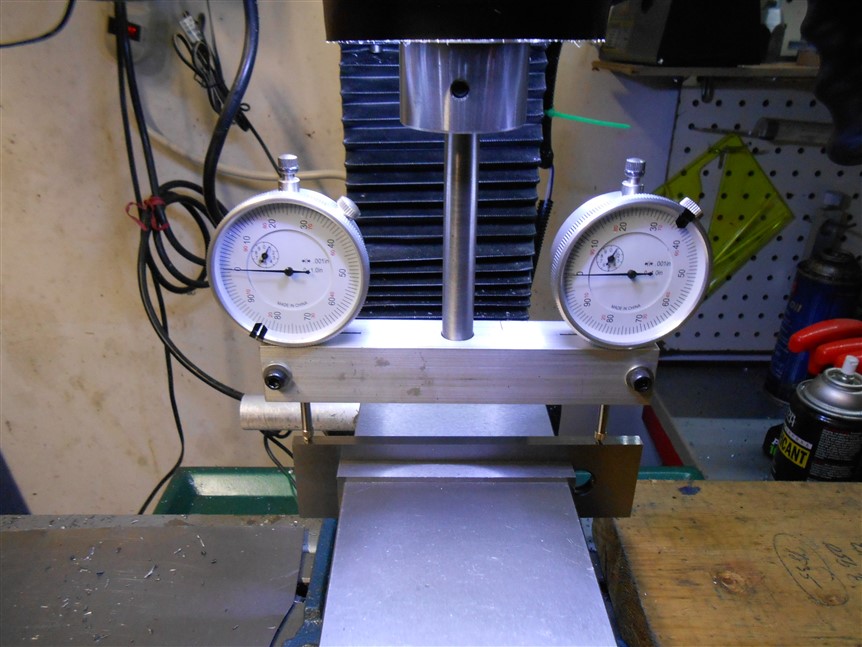
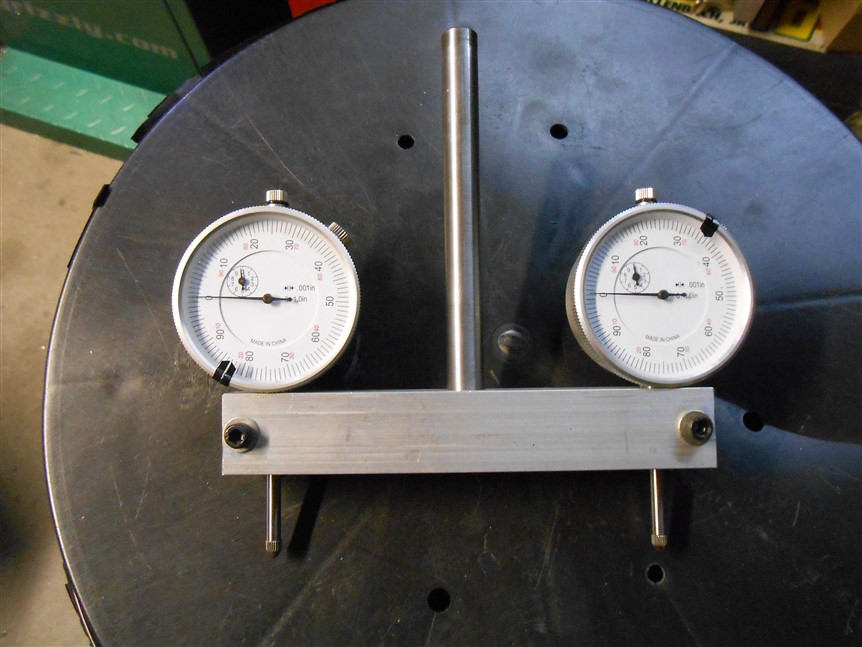
    (1) 6 inch piece of 1x1 aluminum bar
    (1) 1/2 inch steel rod, about 6 inches long (A Chevy V8 fuel pump push rod in my case!)
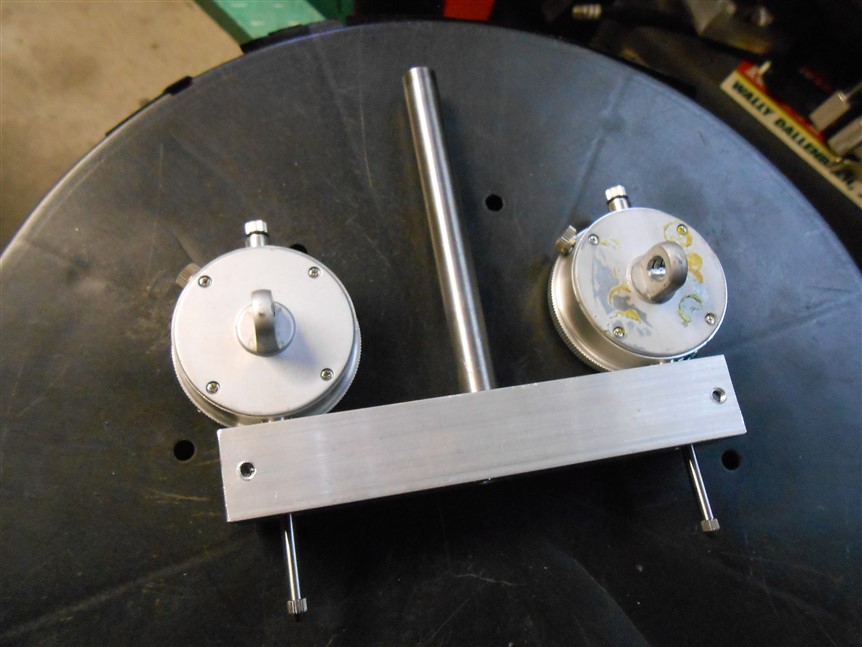
    (2) Harbor Freight dial indicators
    (2) 10-24 cap screws


    As noted, I opted to use a Chevy V8 fuel pump push rod that I had lying around since it's perfectly straight and hardened it was a good choice. I drilled the hole slightly undersized and used my shop press to push the rod into the square bar. The dial indicators I simply robbed from some other tools I made so I bounce those back and forth as needed. They set in a 3/8 inch hole that is then slotted with a 10-24 cap screw that cinches down to tighten them in.

    I guess I'm lucky in that both my gauges are pointing to the same spot but it's not important anyway. Just 0 out both your dials and lower your quill down to your table or in my case, I trammed from my vise using 2 parallels. My mill was out a bit so with the mills head bolts loose (but lightly gripping yet) I just bumped it back until both gauges read the same value. (actual number doesn't matter, just so they both read the same)

    It's quite fool proof and makes quick work of tramming your mill or even drill press tables.

    Mill & drill press tramming tool-dscn7470.jpg
    Mill & drill press tramming tool-dscn7471.jpg
    Mill & drill press tramming tool-dscn7472.jpg

    186 More Best Homemade Tools eBook
    Last edited by bobs409; Jan 27, 2017 at 06:05 PM.

  2. The Following 10 Users Say Thank You to bobs409 For This Useful Post:

    albertq (Dec 29, 2023), markcawston (Sep 17, 2019), Moby Duck (Jan 31, 2017), Paul Jones (Jan 28, 2017), PJs (Jan 31, 2017), Reelhooked (Feb 12, 2017), tonyfoale (Jan 28, 2017), Toolmaker51 (Feb 6, 2017), ttmrj (May 20, 2022), Woodgeezr (Feb 1, 2017)

  3. #2
    Supporting Member Ed ke6bnl's Avatar
    Join Date
    Mar 2012
    Location
    So. California high desert
    Posts
    78
    Thanks
    1
    Thanked 14 Times in 11 Posts

    Ed ke6bnl's Tools
    A lot of old timers do not like this set up they like the old way of using a single gage. BUT I made one exactly like you did and love it especially to tram head on my round column along the X axis. Works great. enjoy

    2000 Tool Plans
    1950 F1 street rod
    1949 F1 stock V8 flathead
    1948 F6 350 chevy/rest stock, no dump bed
    1953 chevy 3100 AD for 85 S10 frame going for a 4BT cummins motor, NV4500
    1968 Baha Bug with 2.2 ecotec motor, king coil-overs,P/S
    2000 National Sea Breeze 5th wheel trailer
    1998.5 Dodge 2500 4x4 Cummins,

  4. The Following 2 Users Say Thank You to Ed ke6bnl For This Useful Post:

    bobs409 (Jan 28, 2017), Moby Duck (Jan 31, 2017)

  5. #3
    Content Editor
    Supporting Member
    DIYer's Avatar
    Join Date
    Aug 2013
    Posts
    3,056
    Thanks
    772
    Thanked 1,850 Times in 1,652 Posts

    Thanks bobs409! We've added your Tramming Tool to our Measuring and Marking category,
    as well as to your builder page: bobs409's Homemade Tools. Your receipt:


    Last edited by Jon; Oct 27, 2021 at 09:13 PM.

  6. The Following User Says Thank You to DIYer For This Useful Post:

    bobs409 (Jan 31, 2017)

  7. #4

    Join Date
    Jun 2016
    Posts
    3
    Thanks
    0
    Thanked 0 Times in 0 Posts
    I made one also and was not sure if my 1/2" drill rod was perfectly 90* as it was made before I trammed my head, so I ran across one on fleebay (an edge brand pro tram) and absolutely love it! I'll have to tram my head on the Bridgeport and switch to the one I made and see if it's good? With the pro tram it comes with a magnet to calibrate both dials at a given location i.e. Bring the quill down so the 1st dial touches the magnet move down .050" then zero the dial, without moving the quill (preferably locked) rotate 2nd dial to magnet location then zero the 2nd dial and then the head square is calibrated! Then tram head accordingly
    Last edited by Trialnterror; Jan 31, 2017 at 02:15 PM.

  8. #5

    Join Date
    Jan 2017
    Posts
    6
    Thanks
    0
    Thanked 0 Times in 0 Posts
    How do you zero it?

  9. #6
    Supporting Member Toolmaker51's Avatar
    Join Date
    Feb 2016
    Location
    Midwest USA
    Posts
    5,330
    Thanks
    7,041
    Thanked 2,977 Times in 1,892 Posts

    Toolmaker51's Tools
    Who's he calling 'old-timer'? The reason for a single indicator is finer measurement; by increments and repeatability. Legitimately, and per inspection standards, instruments used commercially are acceptable to 4x finest graduations.
    So we use an .0005, good parallels to 'skip' over the Tee-slots, occasionally after sweeping a fine stone over the table for nicks.
    1] Wipe clean table & parallels with solvent/ nonabrasive hand cleaner/ or water based cleaner. White paper shouldn't expose any remaining smudge.
    2] Lower the table and extend the quill just short of full travel [not against the stops]. The added extension will magnify error.
    3] Set parallels near front and back edge of table for nod, shift same distance apart for swivel.
    3] As suggested, loosen the clamps for both trunnions [swivel & nod] just snug and sweep them simultaneously.
    4] Approaching Zero in either direction, increase torque on clamp bolts as you would lug nuts across centers. This will displace the indicator, especially if clamps were too loose to attain movement and stable setting.
    5] I usually finish with backing off worm screws to not bear on rack teeth fully, just touching. That way, a reasonable check in the future is when there is still minimal pressure on the worm.
    This is how we used a very special genuine Bridgeport way back when. Equipped with optical scale readers in .0001's, it was our jigbore. Never used a more accurate type of reader before or since. They measure actual position, much like a vernier, instead of interpreting electronic signals. The limitation of electronics is in resolution, both have nearly same repeatability, optics have an edge in physical accuracy.
    Another nice feature was a stainless rule attached at front of table. Below, a sliding tab and pointer, with about 1.5" travel, positioned toward 1/10 inch graduations. Once zero was set [scales or dials] you sailed between coordinates as fast need be by hand or rapids. Instead of counting .200, .400, .600, .800, 1.000, to 3.348 whatever, watch the rule and pointer, reading dial for final thousandths. No one can read a flashing readout faster, even counting rotations. It does require holding backlash on the same side [x+ or -] during use.

    Like that?
    Masking tape and fine point ink-pen will do the same thing. One on the table, one for the bed. Just count up to first setup.
    Sincerely,
    Toolmaker51
    ...we'll learn more by wandering than searching...

  10. #7
    Supporting Member
    Join Date
    Jun 2016
    Location
    New Lenox, IL
    Posts
    25
    Thanks
    6
    Thanked 72 Times in 10 Posts

    garycullen's Tools
    I love to hear from Old Timers! I'm 64 so I guess I am one. Thanks for input on how things got done. I dont have or want a DRO on my mill and have made some very hard hole layouts using ruler and dials while accounting for backlash. I dont suppose your near New Lenox, IL 60451? I would love for you to come to my shop. My # is 815-485-7010 Gary

  11. The Following User Says Thank You to garycullen For This Useful Post:

    Toolmaker51 (May 15, 2022)

  12. #8
    Supporting Member Karl_H's Avatar
    Join Date
    Sep 2013
    Posts
    790
    Thanks
    603
    Thanked 434 Times in 235 Posts

    Karl_H's Tools
    Quote Originally Posted by pigpen60 View Post
    How do you zero it?
    If you only had one dial, you would zero it to your table, then rotate the entire thing 180º. You then measure the difference and adjust your tram to half the difference. Rinse and repeat.

    With this set up, you zero out one dial to your table, rotate the entire thing 180º as before. However, this time, you zero out the second dial - using only the rotation on the dial and NOT the Z adjustment on your mill - at the same spot on your table that you adjusted the first dial. You now have 2 dials zeroed out the the same spot on one side of your table, but one is resting 180º away from the other.

    If your mill is out of tram, one of the dials will be precisely on zero and the other will be off. If you adjust the tram to half the difference, as you did with only one dial, one of the dials will increase by that amount and the other will decrease by that same amount. When both dials are reading the same, you mill will be in tram (along that axis.)

    It doesn't really matter if the center shaft is precisely perpendicular to the bar of if the dials are precisely the same distance from the center spindle. It is handy if both dials have the zero at the 12 o'clock position, but not essential. As you adjust the tram, the needle are going to become either toe in or toe out (pigeon toed or duck toed) so having the dials exactly symmetrical is not necessary.

    One mistake I made was to make the bar too long thinking a longer bar would give more precise results. However, I made it too long so I could not rotate it the required 180º. Another caveat is to make the center spindle long enough that the dials don't collide into the mill.

    Hope this helps.


    186 More Best Homemade Tools eBook

Thread Information

Users Browsing this Thread

There are currently 1 users browsing this thread. (0 members and 1 guests)

Bookmarks

Posting Permissions

  • You may not post new threads
  • You may not post replies
  • You may not post attachments
  • You may not edit your posts
  •