-
I'd pursue softjaw suggestions, in a 3 jaw, sized for nearly full 360° grip. MDF - HDF will work in lieu of 11 layer plywood, all before advancing to aluminum.
To bore, I'd run a small flycutter-like setup with 2 bits; 1 roughing, other larger but undersized for reamer.
With a large enough vise my attempts would use same tooling but in a mill. With a table stop repeating should be correct.
-
2 Attachment(s)
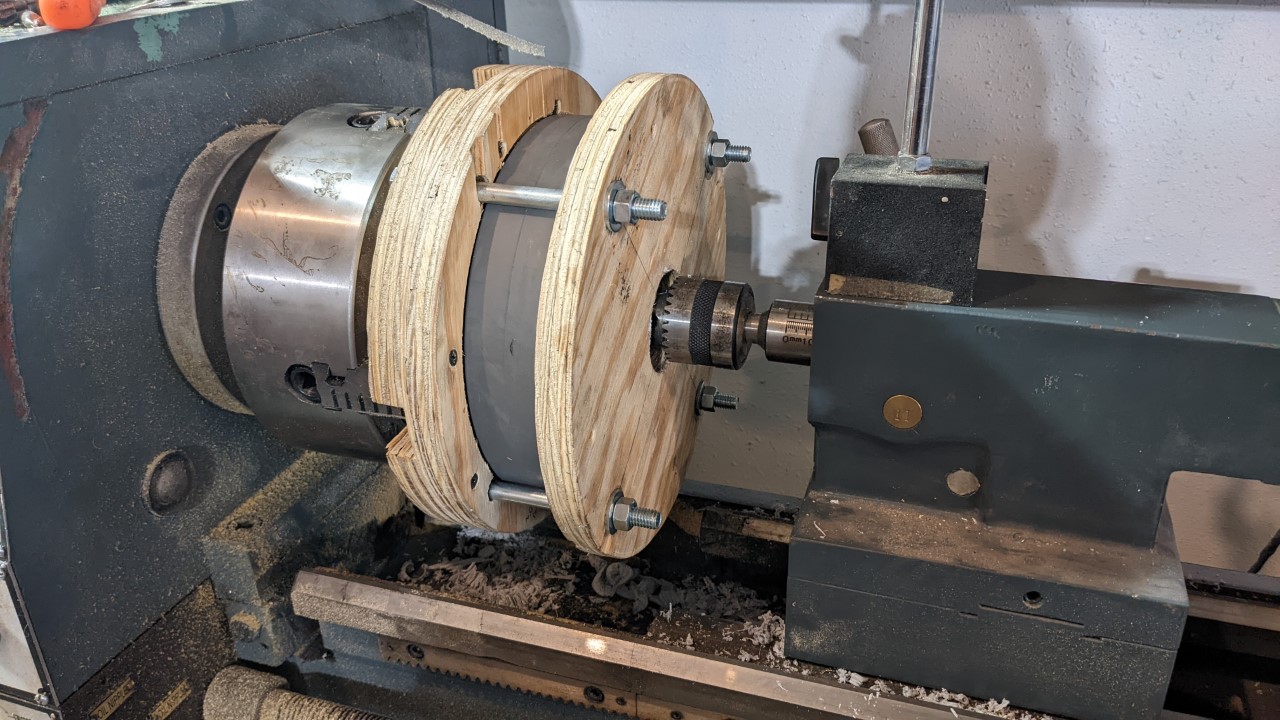
Based on feedback and further thinking, I came up with this plywood fixture that clamps in the 4-jaw chuck of my lathe. The drill chuck is just the right size to center the wheel. Then tighten up the 4 bolts that clamp the wheel in the fixture and then it's ready to ream out.
Attachment 44089
I use a smaller reamer to initially bore it out, and then a larger adjustable reamer to get to the final size of 1.368 to 1.372, just under the nominal of 1.375". That way the bearings are a light press in fit.
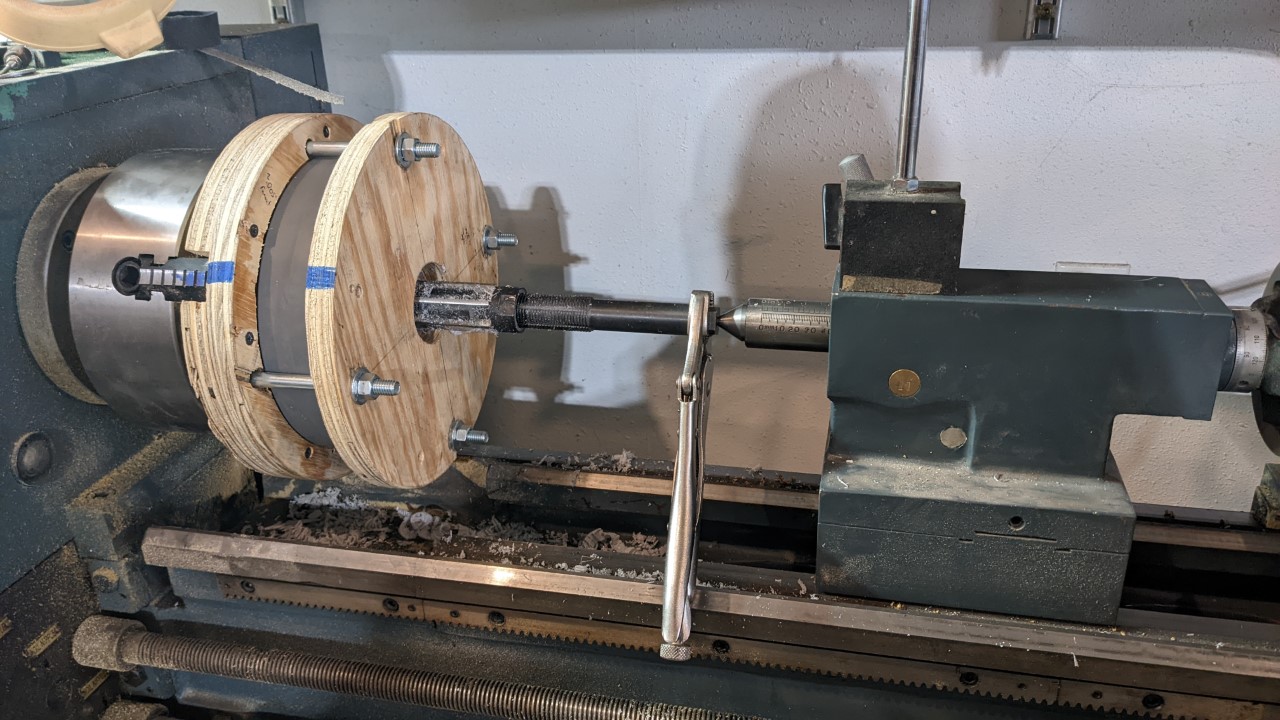
Attachment 44090
This method works, but it is still too slow, and not easy to do. It takes some care to align the wheel. It's roughly 15 mins per wheel.... I've done 24 wheels with this method back in April 2022.
I recently needed to do more wheels, so I figured out another method that is more repeatable and easier to do, and most importantly, I was able to delegate doing another 24 wheels to a friend of mine (I paid him to help). It went much faster and was repeatable. More on that soon, along with more pictures.
-
1 Attachment(s)
re post *12, Kustoms by Kent. It's hard to beat centering with a plug. Successful enough, to be made in various milling spindle models, male version of the hole in a rotary table.
Every fixture is a balance of production rate and quantity. As one increases, a fixture will be modified until it exhausts possible alterations.
Right off, I can offer several minutes saved concerning the hardware or clamping plate.
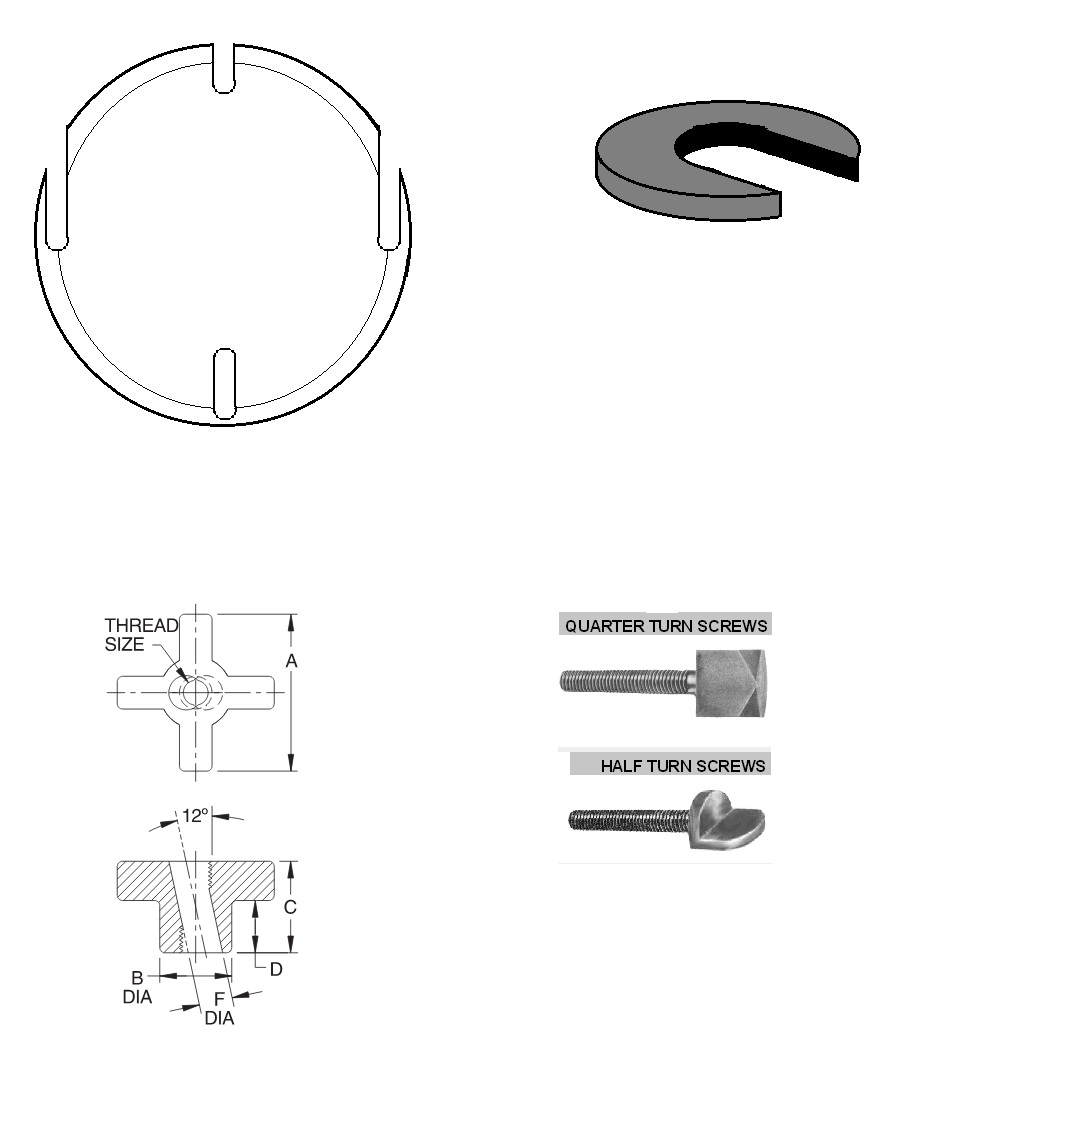
A] the plate looks substantial enough to be slotted, across the axis. In other words, it would be set on the wheel, initially off center and slide into position perpendicular to the studs. Sometimes keyholes are used, but they are fiddly with washers.
B] another simple solution is C-washers. Alter plate with holes large enough for nuts (no washers) to pass through, C-washers are slotted to slide in around studs covering the hole and provide clamping.
C] Slip knobs. They are common in 1/2-13, a star shaped knob with 4 wings, in about 2x length of thread diameter. The inside is milled at an angle to axis of threads, removing half of the engagement at the top, and half at the bottom but opposite side. Consequently, they operate in about half a turn.
D] another is 1/4 turn & 1/2 turn screws. Harder to describe. Basically a threaded bolt with a flag-shape head, with about a third of the surface area cut off. They cover a hole, but pass through a slot. I would not rely on them in this case due to the wood or slight differences in the molded wheel, as dimensional differences change where they tighten. They need a dependable stop height.
Attachment 44095
An examination of most any tooling catalog will hold identical parts. I recommend UDB United Drill Bushing, Carr-Lane & Jergens. McMaster Carr and other distributors carry them. There are upstart companies also building good fixture components
-
Lots of ways to make this in wood. Even collet style with a band clamp or two around the perimeter.
Wood is a lot stronger than many people think if it is used in it's best fashion. It's a composite material. If I had to do a lot of these I would make up a Baltic Birch collet, slit the collet around the exterior in 6 or so places. A chop saw is more than adequate to this. And use two large diameter hose clamps. If you don't have large diameter clamps chain together a few smaller ones.
Been a Custom Cabinetmaker for 35 years. 9 Kitchens in 35 years mind you. I made mostly weird one off stuff and difficult reproductions and millwork.
Nice to see a reasonable jig that gets it done with the least cost, and reasonable precision. If you need higher precision the collet idea is the way to go. I get under a thou when I need it.
If you wanted the ultimate strength you would wind like a roll of toilet paper a veneer banding that was glued with a non water bearing glue like polyurethane on the bottom side of the veneer as it was wound up. Once that setup you would have something that per weight was stronger than aluminum. And pretty near as tough to. Bent laminations are very strong. They used to make airplanes out of wood don't forget. You know small planes like Lancaster Bombers and the Howard Hughes little plane.
Mark
-
<!-- BEGIN /var/www/html/homemadetools/protected/modules/zeus/views/tool/postUpdate.php -->
Thanks KustomsbyKent! We've added your Lathe Wheel Boring Clamp to our Lathe Accessories category,
as well as to your builder page: KustomsbyKent's Homemade Tools. Your receipt:
<div id="blocks">
<div class="block b1 pngfix">
<div class="bimg">
<div>
<a href="https://www.homemadetools.net/homemade-lathe-wheel-boring-clamp">
<img src="/uploads/257011/homemade-lathe-wheel-boring-clamp.jpeg"/>
</a>
</div>
</div>
<div class="head pngfix"></div>
<div class="left pngfix"></div>
<div class="right pngfix"></div>
<div class="blockover b1 pngfix">
<div class="title">
<a href="https://www.homemadetools.net/homemade-lathe-wheel-boring-clamp">Lathe Wheel Boring Clamp</a>
<span> by <a href="https://www.homemadetools.net/builder/KustomsbyKent">KustomsbyKent</a></span>
</div>
<div class="tags">tags:
<a href='https://www.homemadetools.net/tag/lathe'>lathe</a>, <a href='https://www.homemadetools.net/tag/wheel'>wheel</a>, <a href='https://www.homemadetools.net/tag/boring'>boring</a>, <a href='https://www.homemadetools.net/tag/reamer'>reamer</a> </div>
</div>
</div>
</div>
<!-- END /var/www/html/homemadetools/protected/modules/zeus/views/tool/postUpdate.php -->