Free 186 More Best Homemade Tools eBook:  
New: 300+ fresh build posts/day from 275 forums → BuildThreads.com

User Tag List

Page 1 of 3 1 2 3 LastLast
Results 1 to 10 of 27

Thread: Quick Change Tool Post for Lathe

Hybrid View

  1. #1
    Supporting Member Paul Alciatore's Avatar
    Join Date
    Mar 2014
    Location
    Beaumont, TX
    Posts
    304
    Thanks
    9
    Thanked 201 Times in 111 Posts

    Paul Alciatore's Tools

    Quick Change Tool Post for Lathe


    Quick Change Tool Post Plans for Sale - $10.00


    $10.00 - Click here to buy now via PayPal and download instantly

    30-day money-back guarantee.
    If you purchase these plans and are not 100% satisfied, we'll refund your purchase price.


    Tool Post Features:

    • Designed for the utmost rigidity: Unlike dovetail designs, the post and tool holder lock together like a single, solid piece of steel
    • Tools can be removed and remounted with better than 0.001" accuracy
    • Independent tool position adjustments
    • Tool height is easily adjusted and held constant without use of a lock nut
    • Tools can be removed and remounted with a single hand, no tools required: This provides the fastest tool change of any known design
    • Tool holders feature two tool mounting positions at 90 degree orientations: This facilitates turning and facing cuts without rotating the post
    • Simple design with a minimum number of parts
    • Parts are easy to make: No dovetails
    • Sized for a 9" lathe and 1/4" to 3/8" tool bits
    • Can be easily scaled for other lathe/tool sizes


    These plans include:

    • A 25-page PDF instruction manual including:
    • Full, detailed, step-by-step construction procedure
    • 11 technical drawings.
    • 7 photos.
    • BOM (Bill Of Materials) for the post and for the tool holders


    Feel free to post any questions you may have in this discussion, either before you purchase or during construction. I DO monitor this thread. Or, post pictures of your finished QCTP.


    My other plans ..............................


    Name:  ViseWJaws200x150.jpg
Views: 4798
Size:  26.4 KB
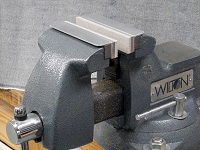
    Magnetic Soft Vise Jaws
    Quickly install the perfect jaws for the task at hand.

    Name:  PartsFinder200x174.jpg
Views: 4759
Size:  28.1 KB
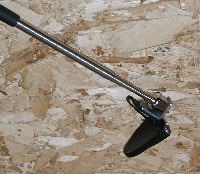
    Illuminated Dropped Parts Finder
    Unique use of light allows small parts to be easily found on dirty floors.

    Name:  TapeDispenserWGuide200x150.jpg
Views: 4668
Size:  21.2 KB
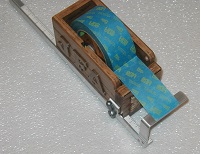
    Measuring Tape Dispenser
    Handsome appearance. Dispenses accurate lengths of tape.

    Name:  FinishedStand200x150.jpg
Views: 4718
Size:  25.3 KB
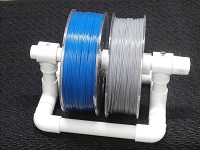
    Adjustable 3D Printer Reel Stand
    Inexpensive, easy to make, adaptable for any reel size.

    Name:  AssembledPCB200x.jpg
Views: 4853
Size:  31.6 KB
    Universal IR Remote Receiver
    Provides control of your devices with any IR remote (TV/DVD/BluRay/etc.)

    Name:  OnePlusTwoMakesThree200x95.jpg
Views: 4693
Size:  7.3 KB
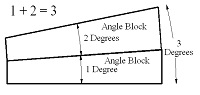
    Using Angle Gauges for Any Angle
    How to set up any fractional angle using inexpensive angle blocks

    Last edited by Paul Alciatore; Nov 14, 2018 at 03:47 PM.

  2. The Following User Says Thank You to Paul Alciatore For This Useful Post:

    Seedtick (Sep 8, 2017)

  3. #2
    Jon
    Jon is online now Jon has agreed the Seller's Terms of Service
    Administrator
    Supporting Member
    Jon's Avatar
    Join Date
    Jan 2012
    Location
    Colorado, USA
    Posts
    28,440
    Thanks
    8,490
    Thanked 44,304 Times in 13,049 Posts
    I just sent out the email notice that these plans had been added, and we already had several orders placed immediately.

    Got any questions about these plans? Post them here. This is a seriously detailed set of plans for a very well thought-out QCTP, and a steal at only $10.
    New: BuildThreads.com - 300+ build posts/day (with photos)

  4. #3

    Join Date
    Sep 2016
    Posts
    4
    Thanks
    0
    Thanked 1 Time in 1 Post
    Jon, Is this a set of paper plans in a binder for the QCTP or is it sent at pdf files to be printed from my computer?

  5. #4
    Supporting Member old_toolmaker's Avatar
    Join Date
    Dec 2017
    Location
    Cape Coral, FL
    Posts
    579
    Thanks
    647
    Thanked 534 Times in 232 Posts

    old_toolmaker's Tools

    Radial repeat-ability?

    Quote Originally Posted by Jon View Post
    I just sent out the email notice that these plans had been added, and we already had several orders placed immediately.

    Got any questions about these plans? Post them here. This is a seriously detailed set of plans for a very well thought-out QCTP, and a steal at only $10.
    Paul,

    How is radial position controlled? Is radial position repeatable?

    Dick

  6. #5
    Supporting Member Paul Alciatore's Avatar
    Join Date
    Mar 2014
    Location
    Beaumont, TX
    Posts
    304
    Thanks
    9
    Thanked 201 Times in 111 Posts

    Paul Alciatore's Tools
    By radial position I must assume you mean the horizontal angle of holder around the tool post. I assume this because "radial position", strictly speaking, would be the distance from a center point and that is trivial to hold constant.

    Anyway, the horizontal angle of the holder is very well controlled by a generous flat on the tool post and a matching, "D" shaped hole in the tool holder. I have found this to be far superior to the common use of a key on other QC tool posts that are based on a round post. In use I have found the repeat-ability of the position of the tool to be well better than 0.001" in all three dimensions, no matter what set of coordinates that you use to measure it (Cartesian or Polar). Unlike a key which will become less accurate as it wears, this "D" design of the post provides a self compensation for any long term wear so it should be equally repeat-able after years of use. When the holder is tightened on the post, it comes into intimate, 360 degree contact with it every time it is mounted: there are no gaps. This is also why it is extremely sturdy: there is just no where the holder can move to. It is locked solidly on the post as if the two were one piece of metal. I believe it is THE sturdiest QC tool holder system of them all. Far better than any of the dovetail designs or any others.


    Quote Originally Posted by old_toolmaker View Post
    Paul,

    How is radial position controlled? Is radial position repeatable?

    Dick
    Last edited by Paul Alciatore; Dec 3, 2017 at 11:54 PM.
    Paul A.

  7. #6
    Jon
    Jon is online now Jon has agreed the Seller's Terms of Service
    Administrator
    Supporting Member
    Jon's Avatar
    Join Date
    Jan 2012
    Location
    Colorado, USA
    Posts
    28,440
    Thanks
    8,490
    Thanked 44,304 Times in 13,049 Posts
    It's a PDF file that you can view, save, or print. I've actually printed this one out myself, and it prints out nicely.
    New: BuildThreads.com - 300+ build posts/day (with photos)

  8. #7
    Supporting Member Paul Alciatore's Avatar
    Join Date
    Mar 2014
    Location
    Beaumont, TX
    Posts
    304
    Thanks
    9
    Thanked 201 Times in 111 Posts

    Paul Alciatore's Tools
    I am Paul, the author of these plans. I have tried to make them as complete and clear as possible but I like to fully support what I sell. I have included my e-mail address at the end of the plans and any purchaser can contact me with any questions they may have.

    I also like to see photos of the post as built by others. So, when you build one, please post some pictures here.

  9. #8

    Join Date
    Apr 2016
    Posts
    3
    Thanks
    0
    Thanked 0 Times in 0 Posts
    Hi Jon,

    Your QCTP sounds nice, but it looks like most of the work is in the holder...which would mean quite a lot of work to make multiple tool holders, or removing the three cap screws and replacing the tool every time you want to change tools.

    Do I have that wrong?

    I'd also like to see a list of materials that would be needed (including what would be needed to make additional holders), their dimensions, a list of machining operations required (like you mentioned...no dovetails necessary...but what operations ARE necessary), and the approximate time that might be expected to make the parts.

    Sounds nice, price is great, but my limiting factor is the time it might take and cost of materials.
    - J

  10. #9
    Supporting Member Paul Alciatore's Avatar
    Join Date
    Mar 2014
    Location
    Beaumont, TX
    Posts
    304
    Thanks
    9
    Thanked 201 Times in 111 Posts

    Paul Alciatore's Tools
    Here is the BOM from the plans:

    Bill of Materials:

    Post:

    1 Post 1018 Carbon Steel Round, 2” OD x 2.75” long
    1 Tee Nut 1018 Steel Rectangle, ½” x 1.25” x 1.5”+ (cut from 1.25” x 2.5” below)
    1 Stud Setup Stud, ½-13 x 3”
    1 Nut ½-13 Coupling Nut
    1 Washer ½” Washer, grade 5

    The following materials are for a single tool holder. Multiply the amounts shown by the number of holders you wish to construct.

    1 Holder 1018 Carbon Steel Rectangle, 1.25” x 2.5”, about 2.562” long
    1 Clamp 1018 Carbon Steel Rectangle, 1.25” x 2.5”, about 0.562” long
    2 Screws Button Head Cap Screws, grade 5 or 8, 5/16-18 x 1”
    3 Screws Socket Head Cap Screws, grade 8, ¼-20 x 1”
    1 Screw Socket Head Cap Screw, grade 5 or 8, 10-32 x 1”
    1 Screw Adjustable Clamp Screw, 3/8-16 x 1”, KBC Tools #1-905-MH306 or equiv.
    1 Washer 3/8” Washer, grade 5

    Of course this is for the size in the plans (8-13 inch lathe). If you scale it for a different size lathe, then the materials must also be scaled.

    The holders for my post do use more material than the common, dovetail holders. That is one of the trade offs for a more rigid QCTP. I have made about 6 holders so far and without changing any tools in them, I am able to do 99% of the work that I want to do. Of course I do plan to make more holders when time is available.

    As for difficulty, I think my holders are actually easier. They require a central hole that must be bored: only the diameter must be precise and you can use the post as a gauge. In my opinion, that is an easier operation than cutting a dovetail. And yes, I have done both. Both styles, in fact all styles of tool holders, require milling a slot for the tool. My holders have two slots on adjacent sides so I guess that is a bit more work, but the setup is the same, just rotate the holder in the vise. And there is no reason why you could not just cut one of them on a given holder. The diagonal flat is not hard to cut and mill. That operation is completely explained in the plans, including how measurements are made. And that, diagonal face, is the only external face that needs to be machined: the others can be left with the mill or saw finish if you wish. The rest is just drilling and taping. I didn't keep track of my time so don't hold me to it, but I think I did about the same amount of work on the post as on the first four holders. And the holders are easier to make in batches: I plan to do at least six in my next batch, perhaps a dozen or more. That should hold me for at least a day or two.

    A list of machining operations? OK, I will try to remember:

    Lathe Operations:
    Turning
    Facing
    Boring
    Center Drilling
    Turn Chamfers

    Mill Operations:
    Flat Faces
    Grooves

    Miscellaneous:
    Sawing
    Drilling
    Filing
    Taping

    I hope I didn't leave anything out. I tried to keep the design simple so that it would be easy to make. Back to time, just briefly; the real time savings with this post is in using it. If you are making many copies of a part, this post will allow time savings every time you need to change tools. The tool change is literally a single hand operation with what is essentially a single motion. Grab the handle and twist upward. Keep going up and the tool is off. Two seconds? Less? And just down and down to solidly mount the next tool. No wrenches are needed so you never have to search for where you put that wrench. And you don't have to use a second motion to tighten the holder in place, just the one, fluid motion and you are back to making chips. I feel I am justified in claiming it allows the fastest tool change of any Quick Change Tool Holder.

    I hope this answers your questions.


    Quote Originally Posted by WindJunkie View Post
    Hi Jon,

    Your QCTP sounds nice, but it looks like most of the work is in the holder...which would mean quite a lot of work to make multiple tool holders, or removing the three cap screws and replacing the tool every time you want to change tools.

    Do I have that wrong?

    I'd also like to see a list of materials that would be needed (including what would be needed to make additional holders), their dimensions, a list of machining operations required (like you mentioned...no dovetails necessary...but what operations ARE necessary), and the approximate time that might be expected to make the parts.

    Sounds nice, price is great, but my limiting factor is the time it might take and cost of materials.
    - J

  11. #10

    Join Date
    Apr 2016
    Posts
    3
    Thanks
    0
    Thanked 0 Times in 0 Posts
    Hi Paul (sorry...I realized I should be addressing you, not Jon just after I sent my last message),

    Thanks for the reply, excellent and thorough answers to my questions. I have an Aloris BXA QCTP for my South Bend 13, but I have no QTCP for my Habeggar Swiss JH102 at all...and I'm seriously considering making yours instead of buying an AXA size set for it. It's not for cost savings (a whole AXA set can be had for around $100), but I'm intrigued by the design...

    I'm just trying to figure out which type is more versatile. With the dovetail type you have two mounting positions that are 90 deg apart, so you can grind a HSS tool on both ends, and have it stick out of the holder on each end. Then you just mount it on one face for one operation and switch to the other face for another operation.

    I presume your design makes the rotational alignment of the tool holder vs the post repeatable? I'm trying to see how that's accomplished. Perhaps the coupling nut at the top sets and locks the rotational angle somehow??? But it seems that it would block removal of the holder.

    Also, with your one-motion removal and mounting...that sounds like a handle has to be made for each tool holder, is that so?

    Thanks, J

Thread Information

Users Browsing this Thread

There are currently 1 users browsing this thread. (0 members and 1 guests)

Bookmarks

Posting Permissions

  • You may not post new threads
  • You may not post replies
  • You may not post attachments
  • You may not edit your posts
  •