Free 186 More Best Homemade Tools eBook:  
Get 2,000+ tool plans, full site access, and more.

User Tag List

Results 1 to 3 of 3

Thread: Rounding-over jig for small parts

  1. #1
    Supporting Member mklotz's Avatar
    Join Date
    Aug 2015
    Location
    LA, CA, USA
    Posts
    3,434
    Thanks
    357
    Thanked 6,380 Times in 2,117 Posts

    mklotz's Tools

    Rounding-over jig for small parts

    Making model engines requires frequent rounding over of the ends of linkages, clevises, etc..
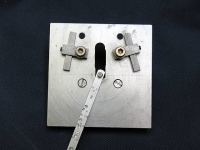
    I made this jig to simplify this operation.

    Top view. The part to be rounded pivots on a central pin which can be changed to suit the size of the hole in the part. The two stops are absolute essentials since the cutter (For safety, I use a rotary file rather than an endmill.) has a tendency to grab the work and pull it out of one's hands. The main bar of the stop is repositionable and can be swung into rough location. Setscrews in the end of the main bar then allow the secondary bars to be slid in and out for fine adjustment.


    A view of the underside. The big block is grasped in the milling machine vise. Through the big block is a threaded rod with a hole into which the various pivot pins fit. Tightening the nut on the threaded rod locks the pivot pin into a V-groove in the main block to keep the pivot pin vertical.


    Another view of the bottom showing the pivot pin holding arrangement.


    In use, the fixture is clamped in the mill vise. A rotary file, held in a collet, is lowered into the slot seen in the other pictures. The y-axis is used to advance the work into the spinning file a few thou at a time. After each advance the work is swung back and forth between the stops to remove material.

    [


    If you make one of these, exercise care in its use. Your hands will be close to the spinning collet and rotary file. For extremely small pieces, I solder the part to a larger piece of metal to use as a handle or else use a small hand vise to grip the workpiece.

    186 More Best Homemade Tools eBook
    Last edited by mklotz; Jul 6, 2017 at 10:32 AM.
    ---
    Regards, Marv

    Home Shop Freeware
    https://www.myvirtualnetwork.com/mklotz

  2. The Following 4 Users Say Thank You to mklotz For This Useful Post:

    jere (Sep 2, 2015), kbalch (Sep 2, 2015), Paul Jones (Apr 23, 2016), PJs (Aug 31, 2016)

  3. #2
    kbalch's Avatar
    Join Date
    Jun 2012
    Location
    Clermont, FL
    Posts
    5,034
    Thanks
    2,275
    Thanked 531 Times in 383 Posts
    Thanks mklotz! I've added your Rounding Over Jig to our Milling category, as well as to your builder page: mklotz's Homemade Tools. Your receipt:


    2000 Tool Plans

  4. #3
    Supporting Member Toolmaker51's Avatar
    Join Date
    Feb 2016
    Location
    Midwest USA
    Posts
    5,330
    Thanks
    7,041
    Thanked 2,977 Times in 1,892 Posts

    Toolmaker51's Tools
    Adding a few details.
    This method is quite prevalent, because it works. It works well with endmill that has multiple flutes, generally 3 or more. The rotary file is a milling cutter with differences in the cut geometry for hand use.
    1. Use a radius about 1.05x that of half part width, so the 'apex' diverts from side of part without creating dwell (divot) mark in side. There is little mechanical or cosmetic call for a full obround (radius = 1/2 part width). That demands accurately locating centerline lengthwise.
    The fixture leading this post uses a positive adjustment system, even when the end is wider than the arm, like a connecting rod. Not always centered, lots of linkages have offset ends.
    2. Cut conventional (against) rotation, not climb cut. Retract the spindle, rotate part back to start point. Save some effort, file or grind the corners off away from scribed layout.
    3. Get the RPM up, using applicable chip control lube or air to keep flutes clear.
    4. Rounding over looks very good when it is 2,3, even 4x part width. Calculate that with cutter radius, radius desired and swing point 'centerline' of part. Same thing works with circle jig in a bandsaw or sander. A large radius is easier when the part rides on a holder and allows any swing point.


    186 More Best Homemade Tools eBook
    Sincerely,
    Toolmaker51
    ...we'll learn more by wandering than searching...

  5. The Following 2 Users Say Thank You to Toolmaker51 For This Useful Post:

    Paul Jones (Apr 23, 2016), PJs (Aug 31, 2016)

Thread Information

Users Browsing this Thread

There are currently 1 users browsing this thread. (0 members and 1 guests)

Bookmarks

Posting Permissions

  • You may not post new threads
  • You may not post replies
  • You may not post attachments
  • You may not edit your posts
  •