Free 186 More Best Homemade Tools eBook:  
Get 2,000+ tool plans, full site access, and more.

User Tag List

Results 1 to 10 of 10

Thread: 5 inch steady rest for Leblond 19 lathe

  1. #1
    Supporting Member Frank S's Avatar
    Join Date
    Aug 2015
    Location
    Peacock TX
    Posts
    11,178
    Thanks
    1,974
    Thanked 8,766 Times in 4,195 Posts

    Frank S's Tools

    5 inch steady rest for Leblond 19 lathe

    When you buy older or used machines more often than not not much of the tooling comes with them.
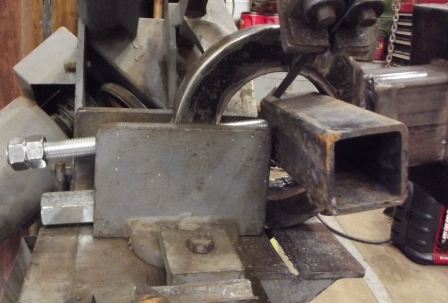
    I needed a small steady rest for an up coming project I am wanting to build so the first step was to make one.
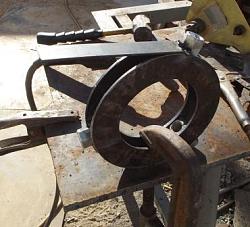
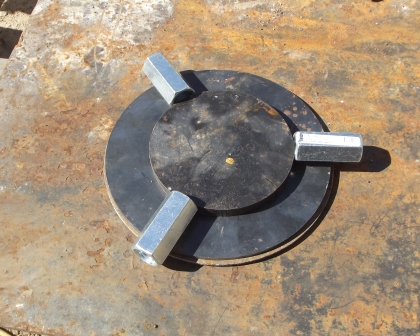
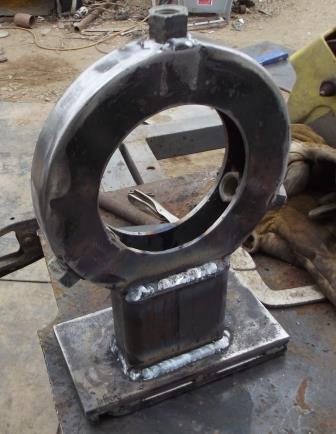
    I started out with a couple of 8" dia. 3/16" thick disc that were picked up at the local scrap metal yard. then bought 3 3/4" coupling nuts and a piece of all thread. All thread is not ideal for making the adjustable guides but suitable for a light duty rest.
    5 inch steady rest for Leblond 19 lathe-dscf6890c.jpg
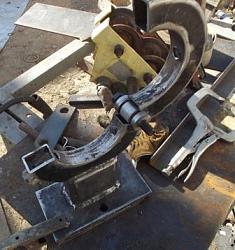
    After welding the coupling nuts and discs together I bored out the center
    5 inch steady rest for Leblond 19 lathe-dscf6892c.jpg
    next I welded a 1/8" thick strap around the perimeter
    5 inch steady rest for Leblond 19 lathe-dscf6893c.jpg 5 inch steady rest for Leblond 19 lathe-dscf6896c.jpg
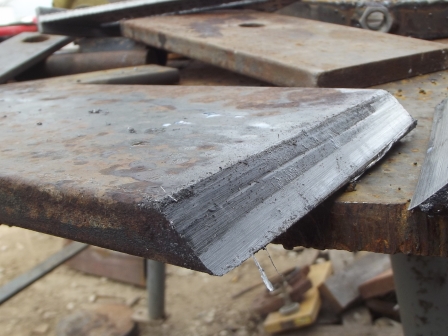
    not wanting to try and make a hodge podge set up to mill a "V" grove in the base I elected to simply saw off the end of the sub base with my band saw
    5 inch steady rest for Leblond 19 lathe-dscf6911c.jpg 5 inch steady rest for Leblond 19 lathe-dscf6912c.jpg
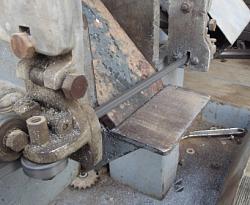
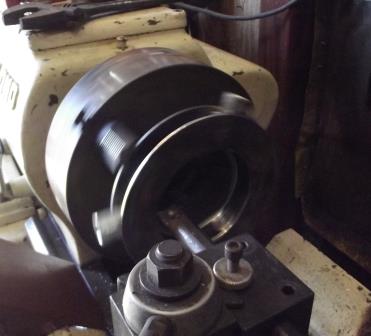
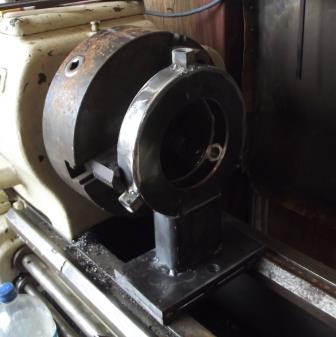
    Next I chucked the rest in the lathe and tacked the base and stand to it
    5 inch steady rest for Leblond 19 lathe-dscf6913c.jpg
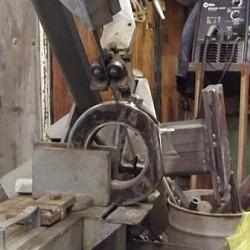
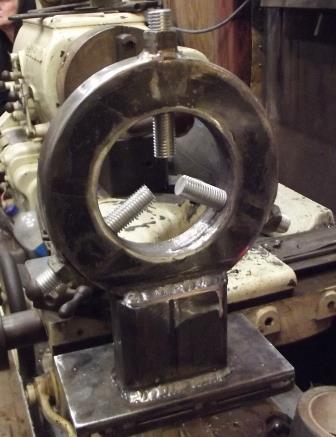
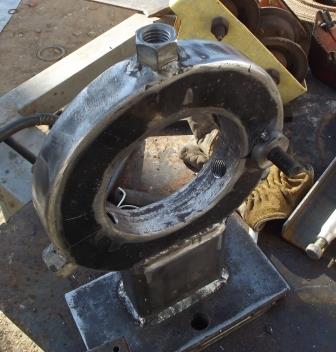
    After welding I did a trial fit of the guides
    5 inch steady rest for Leblond 19 lathe-dscf6914c.jpg 5 inch steady rest for Leblond 19 lathe-dscf6917c.jpg
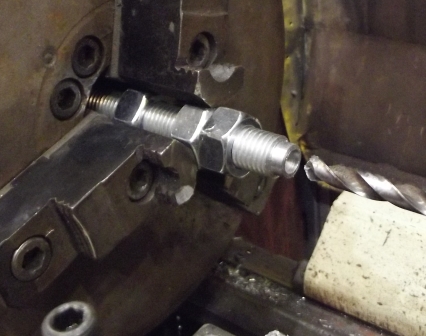
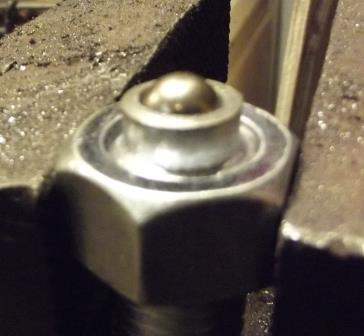
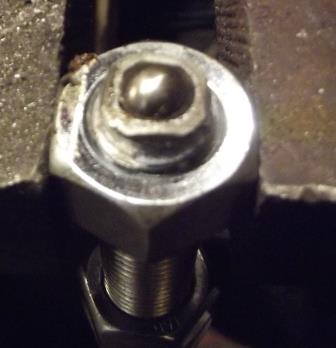
    Then I machined one end of the guides and drilled a hole deep enough to accommodate a 10 mm bearing ball
    5 inch steady rest for Leblond 19 lathe-dscf6918c.jpg
    then I slightly struck the guides in 4 places around the ball to secure it in place, the ball still rolls freely in its socket.
    5 inch steady rest for Leblond 19 lathe-dscf6920c.jpg 5 inch steady rest for Leblond 19 lathe-dscf6921c.jpg
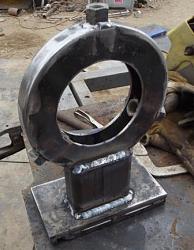
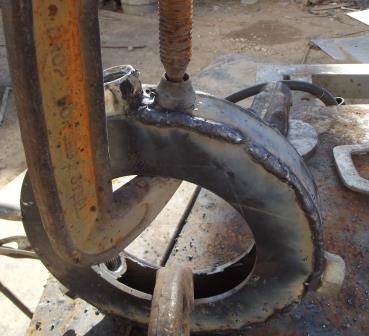
    Next I cut the rest in two once the blade had cut nearly all the way through the first side the saw cut closed up binding the blade to free it I simply used a long piece of all thread and a piece of tubing to spread the rest open enough to free the blade
    5 inch steady rest for Leblond 19 lathe-dscf6922c.jpg 5 inch steady rest for Leblond 19 lathe-dscf6923c.jpg
    After separating the 2 parts and trimming one for the hinge I tacked the hinge in place then welded it and the hold down lock tabs to the opposite side
    5 inch steady rest for Leblond 19 lathe-dscf6926c.jpg 5 inch steady rest for Leblond 19 lathe-dscf6927c.jpg
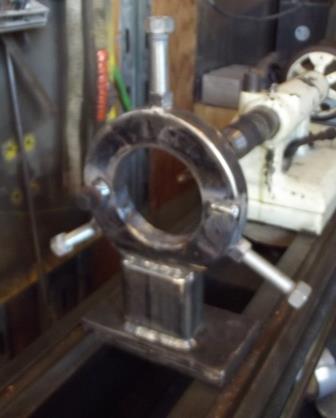
    ready to use as soon as I drill 1 hole and clamp it down to the lathe
    5 inch steady rest for Leblond 19 lathe-dscf6928c.jpg
    Some day when I have the time I may paint it

    186 More Best Homemade Tools eBook
    Never try to tell me it can't be done
    When I have to paint I use KBS products

  2. The Following 10 Users Say Thank You to Frank S For This Useful Post:

    baja (Jan 8, 2020), bobs409 (Jan 23, 2017), Carnel (Jan 8, 2020), Hopefuldave (May 27, 2019), kbalch (Mar 20, 2016), lavern s (Apr 23, 2018), mr mikey (Oct 14, 2023), mwmkravchenko (Apr 22, 2018), Paul Jones (Mar 20, 2016), Scotty12 (Jan 7, 2020)

  3. #2
    Content Editor
    Supporting Member
    DIYer's Avatar
    Join Date
    Aug 2013
    Posts
    3,056
    Thanks
    772
    Thanked 1,850 Times in 1,652 Posts
    Thanks Frank S! We've added your Steady Rest to our Machining category, as well as to your builder page: Frank S' Homemade Tools. Your receipt:


    2000 Tool Plans

  4. #3
    Supporting Member Toolmaker51's Avatar
    Join Date
    Feb 2016
    Location
    Midwest USA
    Posts
    5,330
    Thanks
    7,041
    Thanked 2,977 Times in 1,892 Posts

    Toolmaker51's Tools
    A-1+ Frank. Twice I've had people show up with steady rests to compensate their lathe which hadn't one. Naturally, the 'find' is wrong in both axis, but one had a compatible flat and vee for their bed for their machine, but still wrong centerline and center height. Built them spacers that mated their ways with seat contour of steady rest. No small task, or I was not into it enough, probably the latter.
    Fabricating from scratch would have resulted in better results and size capacity. Cast Iron is good; not superior of a good steel weldment, especially when neither material supports rotating stock. Wish I had a dime for every abused steady that someone tried to braze back together.
    Sincerely,
    Toolmaker51
    ...we'll learn more by wandering than searching...

  5. The Following User Says Thank You to Toolmaker51 For This Useful Post:

    Frank S (Nov 28, 2017)

  6. #4
    Supporting Member Frank S's Avatar
    Join Date
    Aug 2015
    Location
    Peacock TX
    Posts
    11,178
    Thanks
    1,974
    Thanked 8,766 Times in 4,195 Posts

    Frank S's Tools
    Thanks TM51 I wound up an painted the steady as you have probably noticed in the thread where I used it in conjunction with the long boring bar and the wood blocks to line bore locations on a part I was repairing http://www.homemadetools.net/forum/q...1971#post95223
    I have used the steady many times its light weight being made from mostly 10ga & 3/16" steel is actually another plus I can easily store it in a cabinet high up on the wall without having to strain a gut reaching for it
    I am not as satisfied with the single bearing balls making contact with a rotating shaft as I would like but they do roll freely enough and so far have not caused a problem I keep a lot of lube on them just as if I were using brass buttons so that helps.I have a pair of rings to make a 10" steady just haven't had time to make it yet. only this one since the turning parts will be much larger diameters I will use full bearings for the rollers.
    Never try to tell me it can't be done
    When I have to paint I use KBS products

  7. #5
    Supporting Member Toolmaker51's Avatar
    Join Date
    Feb 2016
    Location
    Midwest USA
    Posts
    5,330
    Thanks
    7,041
    Thanked 2,977 Times in 1,892 Posts

    Toolmaker51's Tools
    Bearing balls made me think, a lot of + & - factors.
    + Near zero play; - tiny surface contact. + Easily replaceable, - unsure new ones be same grade. + Many common sizes, - do ball endmills cut real spheres? I'd probably ball cut where a pilot drill removes 20 something percent area of center contact. 'Floating' in high pressure lube and well sized pocket, running good material like shafting might be.
    Full bearings are common sure enough, wonder if anyone's run bare rollers from bearings compared to bearing balls?
    Sincerely,
    Toolmaker51
    ...we'll learn more by wandering than searching...

  8. #6
    Supporting Member Frank S's Avatar
    Join Date
    Aug 2015
    Location
    Peacock TX
    Posts
    11,178
    Thanks
    1,974
    Thanked 8,766 Times in 4,195 Posts

    Frank S's Tools
    Well one thing I found as part of the (-) is the small contact area a way I have compensated for that on a few occasions was to machine a sleeve to slip fit the stock being turned with an OD that pressed fit into the 65 mm ID of the inner race of the bearing the balls came out of. I am thinking about one day replacing the balls with a needle or roller bearing assembly or a cam follower held in place with slotted arms keeping the same adjuster screws. but before I do that I need to make a follow steady
    Never try to tell me it can't be done
    When I have to paint I use KBS products

  9. The Following User Says Thank You to Frank S For This Useful Post:

    Toolmaker51 (Nov 29, 2017)

  10. #7
    Supporting Member Toolmaker51's Avatar
    Join Date
    Feb 2016
    Location
    Midwest USA
    Posts
    5,330
    Thanks
    7,041
    Thanked 2,977 Times in 1,892 Posts

    Toolmaker51's Tools
    Quote Originally Posted by Frank S View Post
    .........found a few occasions was to machine a sleeve to slip fit the stock being turned with an OD that pressed fit into the 65 mm ID of the inner race of the bearing the balls came out of.
    My same attempts weren't satisfactory. Used a bearing on OD of rough roller, 8" OD about 50" long, spud shafts at each end [either turned from solid or pressed and welded -no joint or cracks] that one end turned for light press-fit, driven by a 4 jaw. Surface not metallized, sleeved or plated. And yes, clamp plate was on right.
    OK-ish lathe, not one that I'd buy, but ran alright before and after.
    Incident plastered my concept best machines have a loo...ong space between spindle bearings, curves like a girl - not corners llike a box, grey paint over thick glazing compound, and either cast brass or stamped charts; NOT SCREENPRINTED!
    Finally, brand name or place of origin shouldn't have more vowels consonants IYKWIM?

    Set up to rebore center-drill first. Nothing said bearing was even questionable. Nothing would arrest chatter; tool height, clearance, corner radius, carbide, HSS, steady rest contact, center grease.... Only thing I conjured up was not being in a housing didn't put that slight bind on outer race most need to run at design load, even though inner race 'thought' it was on a shaft.
    Last edited by Toolmaker51; Nov 29, 2017 at 07:20 PM. Reason: More visual-iz-ation! And More again!
    Sincerely,
    Toolmaker51
    ...we'll learn more by wandering than searching...

  11. #8
    Supporting Member Frank S's Avatar
    Join Date
    Aug 2015
    Location
    Peacock TX
    Posts
    11,178
    Thanks
    1,974
    Thanked 8,766 Times in 4,195 Posts

    Frank S's Tools
    That was why I only used the inner race the steady served as the outer race the adjustment screws as the ball cage Had to make light cuts especially since I was making counter bores for a bearing and seal in the end of the material on one particular piece on another the part was just too long to have the tailstock in place
    Agreed about the vowels in brand name also name should be at least a word or combination of words which can be found in a dictionary
    Never try to tell me it can't be done
    When I have to paint I use KBS products

  12. The Following User Says Thank You to Frank S For This Useful Post:

    Toolmaker51 (Nov 30, 2017)

  13. #9
    Supporting Member Toolmaker51's Avatar
    Join Date
    Feb 2016
    Location
    Midwest USA
    Posts
    5,330
    Thanks
    7,041
    Thanked 2,977 Times in 1,892 Posts

    Toolmaker51's Tools
    True, letters and words are important; but quip on curves and flat shapes funnier.
    Sincerely,
    Toolmaker51
    ...we'll learn more by wandering than searching...

  14. #10
    Supporting Member Frank S's Avatar
    Join Date
    Aug 2015
    Location
    Peacock TX
    Posts
    11,178
    Thanks
    1,974
    Thanked 8,766 Times in 4,195 Posts

    Frank S's Tools
    got to give you that one


    186 More Best Homemade Tools eBook
    Never try to tell me it can't be done
    When I have to paint I use KBS products

Thread Information

Users Browsing this Thread

There are currently 1 users browsing this thread. (0 members and 1 guests)

Bookmarks

Posting Permissions

  • You may not post new threads
  • You may not post replies
  • You may not post attachments
  • You may not edit your posts
  •