
 LinkBack URL
 About LinkBacks

I needed to pull the wheels off my boat trailer to inspect the bearings. Itd been far too long since Id last done that.
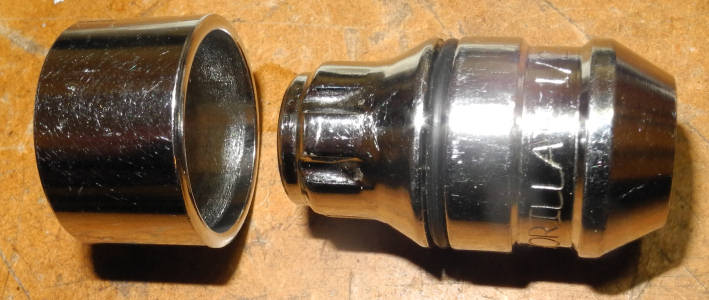
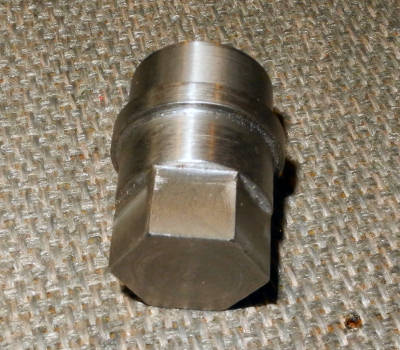
I have a puzzle nut on each wheel of my boat trailer because theyre nice alloy wheels that Id rather not have stolen.
However, the key to the puzzle nuts was not in my toolbox nor in my truck. Its probably in the toolbox at my lake cabin which is 120 miles from here. Id have to make a key. Fortunately, I had an extra puzzlenut from that set in my toolbox. They come in sets of four but my boat trailer only has three wheels two road wheels and the spare so I had an extra in my goodie box and I was able to find it.
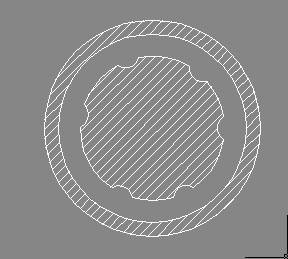
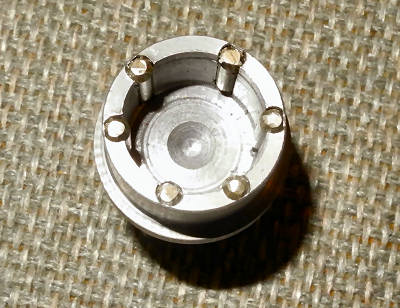
The puzzle nut looks schematically like this:
Outer diameter is 1.000
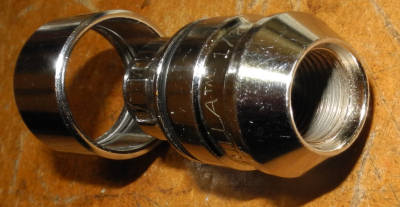
Ya cant get hold of these things on the trailer with any common tools because the whole thing is in a close-fitting hole in the alloy wheel. I suppose one could stick-weld something on the end of the nut in-situ like some older mechanics and millwrights knew how to do, but thatd risk heat damage to the pricey magnesium alloy wheels.
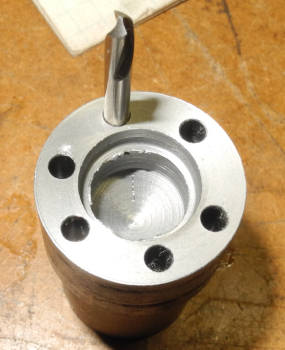
Step one: in a scrap piece of steel, make a hole just large enough to clear the center post of the puzzle nut. Press off the outer ring using a 12-ton press. Probably only took about six tons, it didnt put up much of a fight, make any loud noises or break any windows with ballistically busted bits. Then I mounted a small rotary table on my mill, put the puzzle nut in the little Palmgren drillpress vise thats mounted on the rotary table with freedom to slide in two axes until locked down. A little 4-jaw chuck would be nice and I recently acquired one that would fit nicely, but Id not gotten around to mounting it on the rotary table. I seldom use that little rotary table, but it sure is handy when its needed. The shop-made sliding drill press vise kludge works OK for now.
I got the puzzle nut centered on the tables rotational axis and got that axis aligned with the mills spindle axis. That took about an hour of screwing around with dial indicators, Allen wrenches, a small hammer and a modicum of patience. Theres some satisfaction and pleasure in doing something like that, just having the tools and skills. I've earned both and I purely do enjoy using them now and then.
I got to use my good old Enco Chinese copy of a Blake co-ax indicator. Coulda gotten by just fine with an ordinary Last Word dial indicator, but the Brake (Chinese for Blake) is sooo sweet for a task like that. I got it so everything was centered to within a thou or two, maybe better, certainly close enough.
I guessed that the grooves in the puzzle nut were about 0.062 radius so I put a bit of 0.125 dia rod in the mill chuck and rotated the table until the rod just slid into a groove with very gentle pull on the quill. I later verified this with a 45X spindle-mounted optical center finder that Id bought decades ago from Enco for a really good sale price. Matter of fact, once I thought to use the spindle scope I quit doing it by feel with the bit of rod in the mill chuck and proceeded to do it by eyeball rather than feel. The spindle scope has a crosshair reticule like a rifle scope. With my aging vision, I figure its good for getting things lined up to within a couple of thou and maybe better on a good day, not necessarily more accurate than the "feel" technique, and possibly less accurate.
I went round and measured the angular positions of each of the grooves. Theyre not evenly spaced its meant to be a lock, after all, not intended to be easy. I wrote down the readings. I did it three times to see if my readings would repeat. The second two times they agreed nicely enough, once Id relearned how to read the dials on the rotary table. The rotary table has vernier resolution of 20 arc seconds and the measurements I got came in at very close to integer degree increments which I would think whomever designed the puzzle nuts would have used, so I think my measurements will be accurate enough for my purposes. 20 arc seconds at a radius of .362 is about 35 microinches. Half a degree of accuracy will be plenty close enough. The dials on the old Chinese rotary table are quite nicely made and engraved while the gross degree scale on the table and index mark on the frame look like they were made by a disgruntled Chinaman with a dull axe on a bad Monday. I learned that it pays to count turns of the crank out loud. I'm too deaf to hear myself count but it still helps. The table turns 4 degrees per rotation of the crank so it isnt intuitive where the table might be if Im not paying attention.
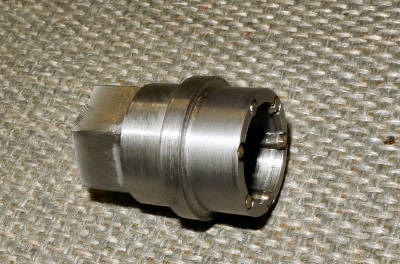
Next step was to make a blank at the lathe, put that in the little vise on the rotary table, check for alignment with table axis and mill spindle axis, and drill and ream a series of .1245 dia holes. The idea was that after the holes were made Id bore out the center hole to clear the post in the nut and press in bits of 0.125 dia rod to grab the grooves in the nut. Less than half of each .1245" hole would be cut away by the center-hole boring operation, so the rods inserted after boring would be captive. Then Id turn down the OD to fit in the hole in the wheel, weld on a bit of hex stock for a wrench to grab. All went well until I compared my blank with the six holes to the puzzle nuts six grooves. They didnt all quite line up. WTF, over???
Ohhh Id made a mirror image of what I need. Id measured the angles with the puzzle nut facing up, drilled the holes with the blank facing up but the finished tool would have to face the puzzle nut so I got the angular sequence mirrored. Well, that was pretty easy and the rotary table was still set up on the mill, so it was easy enough to make a new blank and this time Id get the radius of the hole circle right as well. I was off about 13 thou, probably would have worked but may as well get it right. It didnt occur to me until later how to measure that using a micrometer and a .124 dia center drill. I used Excel to figure out the mirrored angles.
After making a new blank, correctly this time, I found that the holes did indeed seem to align nicely with the grooves in the puzzle nut, so I made some little rods out of .125 welding rod and pressed them in. Instead of welding on a nut I just milled a hex on the other end.
I tried it on the puzzle nut. It fit perfectly, better than factory. Phew!


 Reply With Quote

Bookmarks