Free 186 More Best Homemade Tools eBook:  
New: 300+ fresh build posts/day from 275 forums → BuildThreads.com

User Tag List

Page 1 of 2 1 2 LastLast
Results 1 to 10 of 19

Thread: Bandsaw silver soldering fixture

Hybrid View

  1. #1
    Supporting Member thehomeengineer's Avatar
    Join Date
    Nov 2017
    Location
    Berkshire UK
    Posts
    762
    Thanks
    764
    Thanked 2,388 Times in 483 Posts

    thehomeengineer's Tools

    Bandsaw silver soldering fixture

    Hi All

    I was able to purchase two coils of bandsaw blade from a local scrapyard for my Startrite bandsaw at a great price (£10 each coil). My bandsaw is fitted with a blade welder but for some reason I have never been able to get it to work well. So, I have always silver solder the blades together which works really well.

    As a treat to myself.

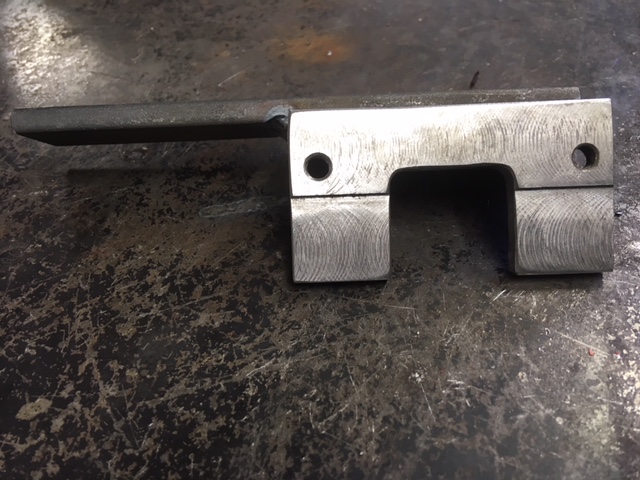
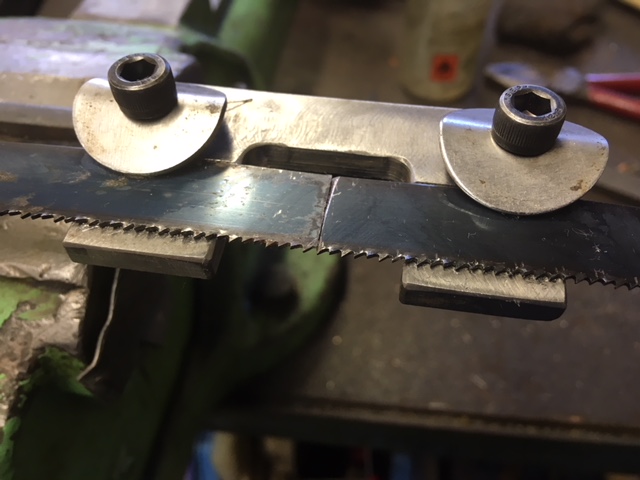
    I knocked up a new soldering fixture to aid the alignment of the two ends. Once the blade is cut to length I grind the two ends at approximately 45 degrees to increase the surface area of the joint rather than just butt the ends together. I have used this technique for years and have never had one break yet. The photos below show the fixture. Two M6 penny washers are bent to clamp/hold blade in place

    Bandsaw silver soldering fixture-img_1590.jpg
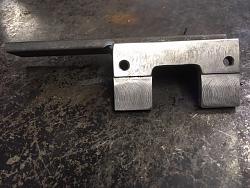
    Fixture with welded bar to enable it to be held in the vice so the heat source can be placed beneath the blade.

    Bandsaw silver soldering fixture-img_1591.jpg
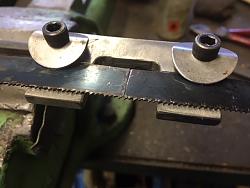
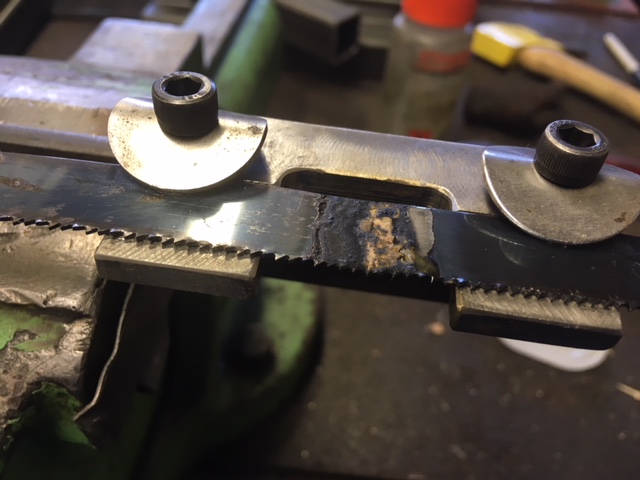
    Ready for silver solder NOTE the splice to increase the mating face surface area and bent M6 clamp washers.

    Bandsaw silver soldering fixture-img_1592.jpg
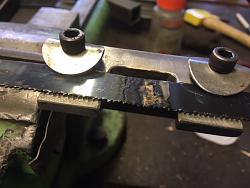
    Silver soldered together. Another advantage for silver soldering the blade doesn’t require annealing

    Thank you for viewing
    The Home Engineer

  2. The Following 31 Users Say Thank You to thehomeengineer For This Useful Post:

    allenz (Feb 27, 2020), Andyt (Apr 6, 2018), bgerens (Apr 5, 2018), Big-Pete (Aug 3, 2020), Canyonman44 (Oct 5, 2023), Carnel (Jun 25, 2020), cognitdiss (Dec 8, 2024), elk-a-holic (Dec 8, 2024), emu roo (Sep 26, 2025), high-side (Jun 26, 2020), JDrouin (Sep 8, 2022), jeanalvitre (Apr 23, 2018), Jon (Apr 5, 2018), Made Home (Apr 5, 2018), Moby Duck (Apr 5, 2018), mr herb (Jun 25, 2020), n9dug (Jun 25, 2020), Paul Jones (Apr 6, 2018), Philip Davies (Dec 27, 2023), philippacificnw (Dec 9, 2024), PJs (Apr 6, 2018), Ralphxyz (Dec 26, 2023), rlm98253 (Apr 5, 2018), Scotsman Hosie (Apr 8, 2018), Seedtick (Apr 5, 2018), sergulbka (Dec 27, 2023), Sleykin (Apr 6, 2018), swedishchopper (Aug 9, 2018), tuchie (Jun 14, 2024), uv8452 (Sep 9, 2022), wimton (Jun 25, 2020)

  3. #2
    mrehmus's Avatar
    Join Date
    Feb 2016
    Posts
    15
    Thanks
    0
    Thanked 16 Times in 6 Posts
    Nice job,

    I was taught to flip one of the blade ends over and then grind the ends at the same time. That way the resulting joint will be straight. Of course we were using a blade welder, not a brazed joint. The annealing process was to first hold the lever on the welder down until the weld was made and then pulse it in decreasing amounts to anneal the weld. Never had one break.
    Too bad the stand-alone welders are in the $600 and up prices here in the U.S.

    Fortunately, a good braze job is stronger than the metal being joined.

  4. The Following 9 Users Say Thank You to mrehmus For This Useful Post:

    cognitdiss (Dec 8, 2024), dbeierl (Apr 8, 2018), emu roo (Sep 26, 2025), Made Home (Apr 5, 2018), Moby Duck (Dec 8, 2024), PJs (Apr 6, 2018), Scotsman Hosie (Apr 8, 2018), thehomeengineer (Apr 5, 2018), uv8452 (Dec 8, 2024)

  5. #3
    Supporting Member thehomeengineer's Avatar
    Join Date
    Nov 2017
    Location
    Berkshire UK
    Posts
    762
    Thanks
    764
    Thanked 2,388 Times in 483 Posts

    thehomeengineer's Tools
    Quote Originally Posted by mrehmus View Post
    Nice job,

    I was taught to flip one of the blade ends over and then grind the ends at the same time.
    Hi mrehmus
    Every day is a school day. That is a great tip which I was unaware of thank you for the reply and I will be trying this tip next time I make a blade.
    The Home Engineer

  6. The Following 2 Users Say Thank You to thehomeengineer For This Useful Post:

    emu roo (Sep 26, 2025), Scotsman Hosie (Apr 8, 2018)

  7. #4

    Join Date
    Oct 2019
    Location
    Germany
    Posts
    139
    Thanks
    565
    Thanked 129 Times in 56 Posts

    uv8452's Tools
    "I was taught to flip one of the blade ends over and then grind the ends at the same time." Let me add: one end <1mm offset; and grinding both 45° angles at the same time. Then the exact angle doesn't matter.
    The clamping spots should be at a greater distance, say, 2"; to give room for a generous flame >> brazing time just a few seconds
    What saves a lot of adjusting: precisely aligned shoulders for both backs of the blade. Like one sees it on
    pfredX1's photograph.

  8. The Following User Says Thank You to uv8452 For This Useful Post:

    philippacificnw (Dec 9, 2024)

  9. #5
    Supporting Member pfredX1's Avatar
    Join Date
    Sep 2016
    Location
    Delaware
    Posts
    162
    Thanks
    6
    Thanked 136 Times in 66 Posts

    pfredX1's Tools
    When I brazed bandsaw blades I double scarfed the joint. Someplace I have a picture of the jig I made. It is similar to what's here. http://i.imgur.com/7SrdP.jpg

    Yeah I was certainly in the mood to mill that day.

  10. The Following 6 Users Say Thank You to pfredX1 For This Useful Post:

    cognitdiss (Dec 8, 2024), emu roo (Sep 26, 2025), Jon (Apr 13, 2018), kbars121321 (Dec 8, 2024), thehomeengineer (Apr 6, 2018), Toffe (Sep 8, 2022)

  11. #6
    Supporting Member thehomeengineer's Avatar
    Join Date
    Nov 2017
    Location
    Berkshire UK
    Posts
    762
    Thanks
    764
    Thanked 2,388 Times in 483 Posts

    thehomeengineer's Tools
    Quote Originally Posted by pfredX1 View Post
    When I brazed bandsaw blades I double scarfed the joint. Someplace I have a picture of the jig I made. It is similar to what's here. http://i.imgur.com/7SrdP.jpg

    Yeah I was certainly in the mood to mill that day.
    Hi pfredX1
    I would be very interested to see the joint if you are able to find the photo. Anything to make improvements to what I do is very welcome. Thank you for taking the time to view and reply to my post.

  12. The Following User Says Thank You to thehomeengineer For This Useful Post:

    emu roo (Sep 26, 2025)

  13. #7
    Supporting Member Ralphxyz's Avatar
    Join Date
    Dec 2016
    Posts
    1,828
    Thanks
    4,103
    Thanked 470 Times in 385 Posts

    Ralphxyz's Tools
    I thought the jig should be made from wood so that the heat is not dissipated quickly.

    I like to see the actual brazing.

    Ralph

  14. The Following 2 Users Say Thank You to Ralphxyz For This Useful Post:

    emu roo (Sep 26, 2025), uv8452 (Sep 9, 2022)

  15. #8
    Supporting Member thehomeengineer's Avatar
    Join Date
    Nov 2017
    Location
    Berkshire UK
    Posts
    762
    Thanks
    764
    Thanked 2,388 Times in 483 Posts

    thehomeengineer's Tools
    Quote Originally Posted by Ralphxyz View Post
    I thought the jig should be made from wood so that the heat is not dissipated quickly.

    I like to see the actual brazing.

    Ralph
    Hi Ralph
    I will do a video on silver soldering very soon and post. The temperature of the silver solder I use melts at 720-degree C so very hot and the wood could cause a fire. I hope this has answered your question and thank you for taking the time to view the post.
    The Home Engineer

  16. The Following 2 Users Say Thank You to thehomeengineer For This Useful Post:

    emu roo (Sep 26, 2025), fiveslo (Sep 12, 2022)

  17. #9
    Supporting Member
    Join Date
    Aug 2016
    Posts
    635
    Thanks
    1
    Thanked 267 Times in 223 Posts

    wizard69's Tools
    Quote Originally Posted by thehomeengineer View Post
    Hi Ralph
    I will do a video on silver soldering very soon and post. The temperature of the silver solder I use melts at 720-degree C so very hot and the wood could cause a fire. I hope this has answered your question and thank you for taking the time to view the post.
    The Home Engineer
    That would be most welcomed, a picture is worth a 1000 a movie millions.

    This appears to be a simple fixture to make, so all I really need is likely some silver solder. I must ask though do you believe a propane torch could heat the band fast enough to do a silver solder joint properly? Also preferences for solder and flux would be appreciated.

  18. #10
    mrehmus's Avatar
    Join Date
    Feb 2016
    Posts
    15
    Thanks
    0
    Thanked 16 Times in 6 Posts
    Propane is probably not hot enough and you need to be careful that you don't take the temper out of a large section of the blade with a large flame. MAPP gas would probably work using on of those small torches with the small flame.

  19. The Following User Says Thank You to mrehmus For This Useful Post:

    emu roo (Sep 26, 2025)

Thread Information

Users Browsing this Thread

There are currently 1 users browsing this thread. (0 members and 1 guests)

Bookmarks

Posting Permissions

  • You may not post new threads
  • You may not post replies
  • You may not post attachments
  • You may not edit your posts
  •