
 LinkBack URL
 About LinkBacks


I have a 1955 Ford 860 farm tractor. The seals on the steering gear box are worn out. While I have it apart doing some other repairs, I may as well fix this issue. There are 2 castings with a bushing seated close to the bottom of a blind hole. There is a threaded hole in the bottom for an adjusting screw. There is not much of the bushing showing to grab with a puller. My 2 or 3 hook puller cannot get to the bottom of the hole to even try gripping the bushing.
I made a puller by turning some appropriately sized parts to reach down to grip the small edge. Then used a bolt threaded in place of the adjusting bolt to push the bushing out. I can provide dimensions if someone has the exact same need. I just posted this in case someone has a similar need. In the past I have made pullers that expand after you push them into the hole, but this was quicker and did not use as much material.
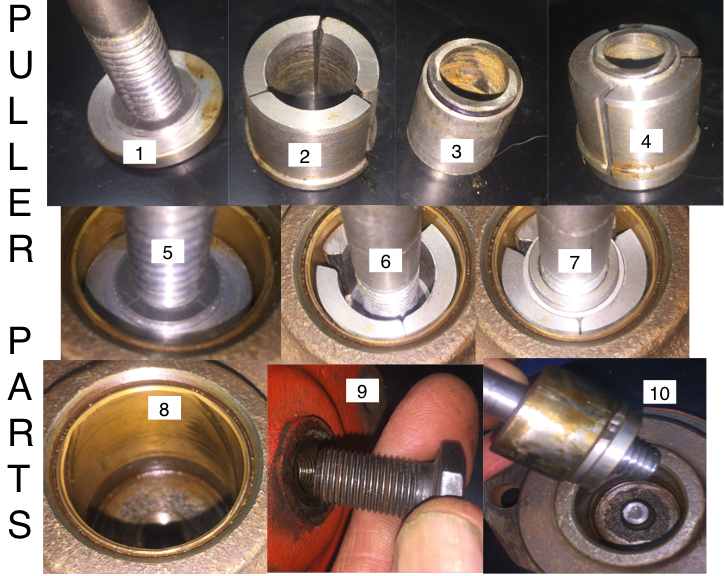
The parts include:
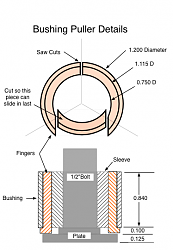
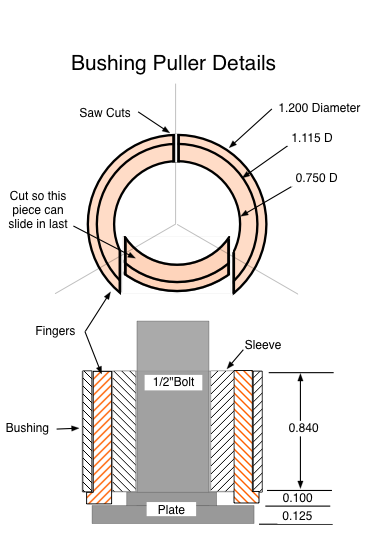
1) A bottom plate that slides down inside the bushing. This plate has a headless bolt for a handle and is sized to he about 1/2 as thick as there is space under the bushing
2) The pulling fingers were turned as one piece to just slide into the bushing with a lip on the bottom to engage the edge of the bushing. The lip is a bit less than 1/2 the height of the space under the bushing. This was then cut into 3rds to create the fingers. One piece has to cut smaller to allow it to slide into place between the first two.
3) Sleeve that drops down over the headless bolt to push the fingers outward under the bushing. The sleeve I made has two parts only because I had a small tube and a small piece of round stock to turn to size and drill. Did not want to waste a larger piece of material turning it down to make the sleeve.
4) The puller with the parts assembled. The handle bolt is not shown here.
5) Inserting the plate with handle into the bushing.
6) The fingers in place in the bushing
7) The sleeve inserted pushing the fingers out under the lip of the bushing.
8) The bushing to be removed is 1.250 x 1.125 x 0.840. The small recess visible at the bottom of the hole only leaves about 0.060 of the bushing exposed for a puller to grip.
9) Bolt threaded into the hole to push the the bushing out.
10) Bushing removed, Notice the bolt handle is now sticking out the bottom of the plate. The push begins with the bolt threads flush with the plate bottom. Begin the push, then as the push bolt runs out of thread, back it off and turn more of the handle through the plate, then finish the push.
Click to enlarge
Here are some details of the fingers. I thought of this improvement after I made my puller


 Reply With Quote

Bookmarks