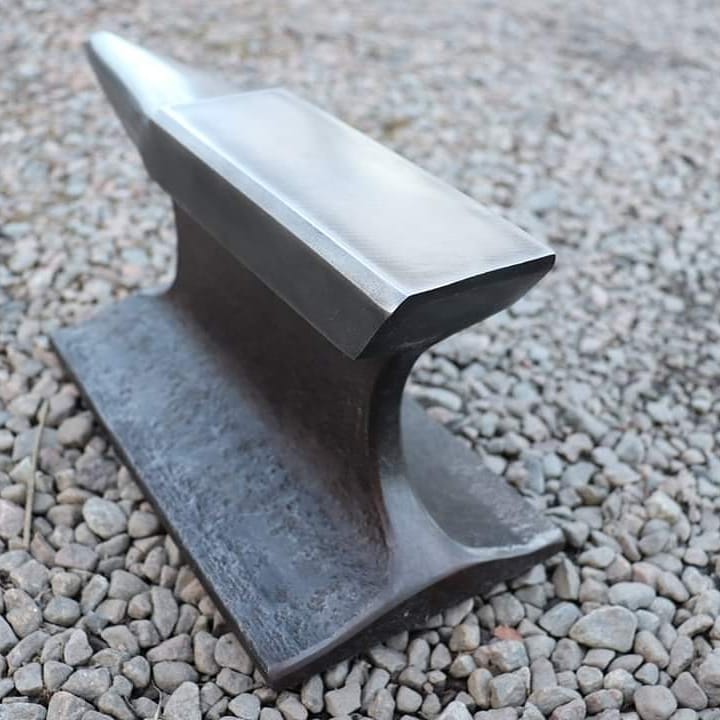
Hi.
I wanted to have small anvil.
Made it from railroadtrack with angle grinder.
Used 2mm cut off wheels, 8mm grinding wheel and 80grit flap wheel for shaping. Removed the rust with steel brush.
https://youtu.be/Ysq9GlRPCMg
Printable View
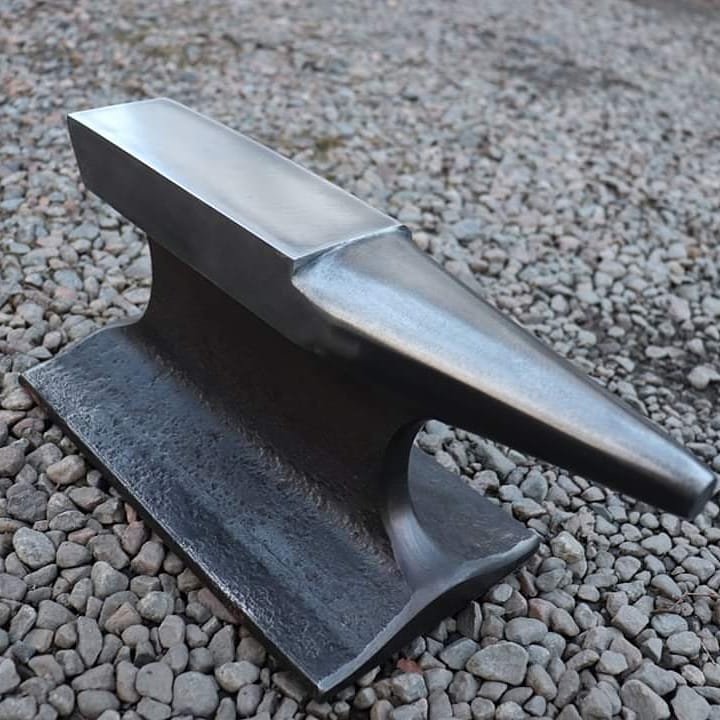
Hi.
I wanted to have small anvil.
Made it from railroadtrack with angle grinder.
Used 2mm cut off wheels, 8mm grinding wheel and 80grit flap wheel for shaping. Removed the rust with steel brush.
https://youtu.be/Ysq9GlRPCMg
Very good, nice work
Thank you very much!Quote:
Originally Posted by rossbotics
Tomas,
I have several short sections of railroad track picked up as remnants and used as-is. Your inspiration adds a whole new dimension to what to do with the short pieces. Thank you for showing us your anvil and the wood base.
Regards,
Paul Jones
Very nice job Tuomas. I have a 6' section of rail in storage waiting for me to cut some projects out of it. For an anvil I am toying with the idea of a 2' long double horn anvil. My question is did you heat treat it and what was the procedure you used? If not how is it holding up? If you addressed this in the video, my apology,my connection is to slow for video.
That's a ton of work. It looks great!
That's fantastic, I roughed out 2 lengths of railway from a long piece of line to make anvils myself [it was holding the joists up in our cottage!!] I removed it & put in new joists, luckily the thieving scrap men left it when they cleaned me out of £2000 s worth of foundry equipment, too heavy to nick, I'm going to make mine now thanks for the video.Quote:
Originally Posted by Tuomas
RR track is tough material, even with penetration of work hardened layers. In this size & proportion, I'd think judicious use of hammer 28-32 ounce max wouldn't tax the shaping or polish.
I have one piece sized much the same, in original contour. Often tempted to make it more anvil-like, commencing by milling new profile. Hesitant what results under a high-speed endmill would attain.
Tuomas, the profile you have created By HAND is really perfection of a full size example. 1000% beyond an import too; mere cast-iron clump, no resonance, or attention paid to a proper horn.
No need to name it. Already known as Pennsylvania Short Line, in honor of Monopoly game; property and token.
First off I want to say nice job you have a well formed horn proportionately shaped not too sharp of a bick the step is pronounced the table could be a bit more pronounced but not all anvils have a table, Hardie holes and pritchels are not always present either the Heel is a littloe un pronounced but that would be a personal preference to its shape by the maker as well Some anvils have no heel at all where the rear of the face goes straight down to the waist, the waist on your anvil just shouts look at me I'm bold and strong. Obviously with RR iron anvils the feet are always perfect more akin to being an elephant's foot on a a small animal it covers the ground it is standing on and no one can knock it over.
There used to be a lot of controversy over main line RR track to make anvils. Many didn't consider them to be anvils due to the size and slenderness of the web proportionately to the face or the base. However those guys probably do not know the definition of the word anvil. In just about any search you can imagine ( Anvil; a heavy block of metal usually iron or steel faced used to shape metal by hand hammering.
I have any number of large and small solid hunks of hard steel that I frequently use as anvils none of which currently are shaped to any traditional anvil like look. Just like TM51 I roo have a piece or 2 of RR track that I use every couple of days to beat a hunk of steel into submission I have no plans to shape it as I frequently need the full 2 ft length of the face and rarely need the horn shape. There are times though when I consider drilling a pritchel near both ends.
I have been hammering on my piece of iron with a 4 lb for 4 years and have not changed its surface shape at all. RR track is made of High manganese steel over many years of millions of tons of rolling freight being transported on them the crown can become work hardened almost through the entire crown even begin to have stress fractures and flake off in huge chunks. If one gets a remnant piece of RR track that was removed from an old main line the surface can be so hard it is nearly impossible to machine whit anything other than a grinder if the track was a short cut off of a new section then it will still be machinable but depending on which mill it came out of and why it was cut out it could have Damascus like qualities with some very hard spots, think of old bed rails some can be drilled anywhere along the rail while others will dull the best colbalt bits you can throw at them.
Thank you Paul.Quote:
Originally Posted by Paul Jones
HiQuote:
Originally Posted by Carlos B
No, i didn't harden or heat treat it. I noticed it to be suitable for my use without heat treatments. I needed it for shaping sheetmetals, too hard anvil is too bouncy, and not so good to use. IMO.
Rather than try and flatten the face by milling to achieve nice squared edges I would probably heat the track to 400°f then build up the edges to near square with hard surfacing rod then surface grind then bring the crown back up to around 500 to 600° and (OIL) quench then polish grind to suit. 400° in high enough to insure a good molecular bond while welding and 500 to 600° wouldn't be so hot as to over harden the face you could possibly go to 1000° but you are only wanting to create a hardened temper still capable of high impact abuse not to make something that is going to spew explosive shrapnel from the thing.Never use water to quench something of this nature there cold be surface fracturing which would result in flaking.Quote:
Originally Posted by Toolmaker51
Does anyone know the real reason why old time Blacksmiths would hammer on white hot steel for a while then purposefully tap his anvil?
No it was not to make his ears ring. Remember I worked for one as a teenager
<!-- BEGIN /var/www/html/homemadetools/protected/modules/zeus/views/tool/postUpdate.php -->
Thanks Tuomas! We've added your Anvil to our Anvils category,
as well as to your builder page: Tuomas's Homemade Tools. Your receipt:
<div id="blocks"> <div class="block b1 pngfix"> <div class="bimg"> <div> <a href="http://www.homemadetools.net/homemade-anvil-37"> <img src="/uploads/169793/homemade-anvil-37.jpeg"/> </a> </div> </div> <div class="head pngfix"></div> <div class="left pngfix"></div> <div class="right pngfix"></div> <div class="blockover b1 pngfix"> <div class="title"> <a href="http://www.homemadetools.net/homemade-anvil-37">Anvil</a> <span> by <a href="http://www.homemadetools.net/builder/Tuomas">Tuomas</a></span> </div> <div class="tags">tags: <a href='http://www.homemadetools.net/tag/anvil'>anvil</a> </div> </div> </div> </div>
<!-- END /var/www/html/homemadetools/protected/modules/zeus/views/tool/postUpdate.php -->
Thanks for the reply Tuomas, I don't plan on heavy work on the RR anvil so work hardening may be sufficient.
Thanks for all the info. in your posts Frank S.Just a guess but could it be to check the heat build up in the anvil face, overly hot anvil rings differently than one at room temp.
Good guess but not the one that 2 old Blacksmiths 1 being my mentor and the other who had worked for him for 50 years both told me.Quote:
Originally Posted by Carlos B
I've seen both men stand at their forges for 12 hours a day many times with 2 guys like me winding the blowers and keeping the fires stoked with fresh coal beating plow shears as fast as one would be come hot enough to work. another would be in the forge being heated. Those old 400 lb+ anvils would really take a beating sometimes water would be splashed on them and steam would fill the air but that was not the real reason for the taps on the anvils according to them.
I won't make this into some reality show guessing game.
Some have heard that it was a rhythm thing like bang bang bang tap tap. Some of today's crafts blacksmiths have adopted a 3 hit 2 tap style some use 4 hits and a tap they must think that you need to do that to be a Blacksmith.
But it is far more mundane in nature. When you are hammering away on a white hot piece of iron the muscles in your hand get tired allowing the hammer to fall to the face of the anvil in a relaxed grip lets your muscles flex this keeps lactic acid from building up and making them cramp.
Often I would watch Clarance hammer away for several minutes then just drop his hand the hammer would do a little tap dance a couple of times HE might even lay it down and switch the tongs from one hand to the other then pick up the hammer with his other hand and hammer away until the piece needed returned to the forge MR Purney a few years older than Clarance who in his 70's at the time . Was left handed like me and had his anvil set in the opposite direction as was his forge the positioning of the blowers were such that one guy could actually turn both of them but it would wear you out doing it all day.
After MR Purney retired I used that forge but even though being left handed I couldn't get used to the set of his anvil so we turned it around and moved the blower to the other side as well
Makes sense Frank, I do it instinctively with aggressive work, now I now why.:)
Thank you! It took little time, but i think that's very relaxing just remove material without need to think too much. :)Quote:
Originally Posted by nshop
Congratulations Tuomas - your Anvil is the Homemade Tool of the Week!
Interesting win. We always consider Thanks votes in deciding the winner each week, but we rarely see such an outpouring of votes in favor of one of the top contenders that it outweighs any of the other deciding factors, especially when so many of those votes are from previous winners.
Further interesting is that railroad track anvils are extremely common, which makes it more difficult to win with such a tool. I believe this is our first winning anvil, and I think we chose a good one. My best guess is that the popularity of this one is based on its small size, its shape, its aesthetically pleasing base, and of course the excellent watch-me-build-it video. You can't help but walk away from this video thinking about building this tool.
Some nice picks this week: a Lathe Cutter Height Gauge by rgsparber, an Extended Point Live Center by rossbotics, a Rotary Mower by Vyacheslav.Nevolya, a High Speed Spindle by Christophe Mineau, a Bench Bull by morsa, a Small Bead Turning Tool by Christophe Mineau, a Sander by webby's rigginations, as well as a Wood Lathe by webby's rigginations.
Tuomas - you'll be receiving a $25 online gift card, in your choice of Amazon, PayPal, or bitcoin. Please PM me your current email address and gift card choice and I'll get it sent over right away.
More importantly, this is your 3rd Homemade Tool of the Week win! I've just added the bronze wrench-on-pedestal graphic to the awards showcase in your postbit, visible underneath your avatar.
:rocker: :clapping: :thumbsup: :bow:https://www.homemadetools.net/forum/...OfTheWeek3.png:bow: :thumbsup: :clapping: :rocker:
Great job, and you're in excellent company joining these other 3-time winners: rossbotics, mr95gst, Paul Jones, Christophe Mineau, immortalx, scorch, Brendon, Frank S, mklotz, Vyacheslav.Nevolya, brianhw, jjr2001, olderdan, tonyfoale.
Here are all of your winning tools:
<div id="blocks"> <div class="block b1 pngfix"> <div class="bimg"> <div> <a href="https://www.homemadetools.net/dremel-belt-sander-attachment"> <img src="/uploads/152068/dremel-belt-sander-attachment.jpeg"/> </a> </div> </div> <div class="head pngfix"></div> <div class="left pngfix"></div> <div class="right pngfix"></div> <div class="blockover b1 pngfix"> <div class="title"> <a href="https://www.homemadetools.net/dremel-belt-sander-attachment">Dremel Belt Sander Attachment</a> <span> by <a href="https://www.homemadetools.net/builder/Tuomas">Tuomas</a></span> </div> <div class="tags">tags: <a href='https://www.homemadetools.net/tag/belt-sander'>belt sander</a>, <a href='https://www.homemadetools.net/tag/dremel'>Dremel</a>, <a href='https://www.homemadetools.net/tag/rotary-tool'>rotary tool</a> </div> </div> </div> <div class="block b1 pngfix"> <div class="bimg"> <div> <a href="https://www.homemadetools.net/homemade-dremel-lathe-conversion"> <img src="/uploads/157425/homemade-dremel-lathe-conversion.png"/> </a> </div> </div> <div class="head pngfix"></div> <div class="left pngfix"></div> <div class="right pngfix"></div> <div class="blockover b1 pngfix"> <div class="title"> <a href="https://www.homemadetools.net/homemade-dremel-lathe-conversion">Dremel Lathe Conversion</a> <span> by <a href="https://www.homemadetools.net/builder/Tuomas">Tuomas</a></span> </div> <div class="tags">tags: <a href='https://www.homemadetools.net/tag/lathe'>lathe</a>, <a href='https://www.homemadetools.net/tag/dremel'>Dremel</a>, <a href='https://www.homemadetools.net/tag/modification'>modification</a> </div> </div> </div> <div class="block b1 pngfix"> <div class="bimg"> <div> <a href="https://www.homemadetools.net/homemade-anvil-37"> <img src="/uploads/169793/homemade-anvil-37.jpeg"/> </a> </div> </div> <div class="head pngfix"></div> <div class="left pngfix"></div> <div class="right pngfix"></div> <div class="blockover b1 pngfix"> <div class="title"> <a href="https://www.homemadetools.net/homemade-anvil-37">Anvil</a> <span> by <a href="https://www.homemadetools.net/builder/Tuomas">Tuomas</a></span> </div> <div class="tags">tags: <a href='https://www.homemadetools.net/tag/anvil'>anvil</a> </div> </div> </div> </div>
Very well deserved
Couldn't be more deserving!
Thank you very much. Didn't expect to win anything, so it feels even better. 😊Quote:
Originally Posted by Jon
Also forgot to mention - great diversity of tools here. You wouldn't expect someone who won two Homemade Tool of the Week awards with Dremel tools to then win a third time with an anvil.
Diversity is another huge draw to HMT There is something here for just about everyone interested in most any tool you can imagine.
Did something with it.. and it works just like i hoped. :)
https://youtu.be/-rt67eR7YJw
Very nice work. I didn't realize you had ground the step into the heal end of the anvil. I think I've only seen this done on jewelers and watchmakers anvils.That feature just raised the little anvil by another bar in my book. For one thing you now have the perfect place to formed clamping cap over the heal, the step will provide a locator stop you can make several of these should you like in them instead of pritchal or hardy holes you could drill and thread holes for attaching forming jigs or dies on one you could make a reverse hardy by adding a square stud you could then make dies and punches which had square sockets instead of the male square hardy's
There is really any in-numerable specialty tools that could be made for this all while remaining level with a anvil face when attached, only your imagination is the limit
Again good job
Thank you very much Frank! I didn't know that shape has a "name", i just shaped it to shape that i tought to need. ��
Actually the correct name for what I called the step is table. many types of anvils have the table or step as I called it on the horn end some only have a half table protruding from one side of the horn.
Clarance the man I worked for as a kid had one of those in the back room.
Oh by the way the most comfortable height of a navil for most folks is to stand beside it and rest the second knuckles of your hand on it while making a loose fist you can whail away with a 3 or 4 lb hammer all day long and still have enough energy left in your arm to knock out Mike Tyson with 1 hit, but then again no self respecting boxer would ever dare to tick off a Blacksmith
Thank you very much for the information Frank. And.. Lol, for the boxer. :)
Tuomas, you inspired me to make my own RR track anvil. I don't need one, and I'll probably never actually use it, but the notion of making it look like an anvil struck my fancy.
Neil
NICE JOB, I HAVE FIVE TEN FOOT RAILROAD TRACKS THAT I BOUGHT 15 YEARS AGO. AS IT TURN OUT THE HAVE THE "CARNEGIE STEEL CO" LOGO FORGED INTO THEM AND I FOUND OUT THAT THEY ARE QUITE VALUABLE. SO I HAD TO RESORT TO EBAY TO BUY FOR COMMON RAILS AS THESE ARE WORTH UP TO $1000.00 A FOOT.
ONLY DUE TO THE HISTORICAL VALUE THAT CARNEGIE MADE THEM IN THE 1800'S.
CRAZY HUH?
JACK
I enjoyed watching that. Great job.
Nice! I have a small bit of rail about that length. Was going to just dress up the top a bit, but you've inspired me to do the same with mine!
How many wheels did this take?
A lot of credit needs to go to the Bosch grinder.
Yep. Grinder does to work, one just holds it on the desired places. That really was a great grinder.. small an light weighted, still with 850w motor.Quote:
Originally Posted by Radioman
Took four 2mm cut off wheels. One 8mm grinding wheel. ( only partly ) Little from 40 & 80 grit flap wheels and 80 and 120 grit fiber discs.
For the stand one and a half 1mm cut off wheel.
Something like that..
Grinding wheels and fiber discs we're 3M Cubitron 2 products, those work specially well with hard materials.
Made a new RR-track anvil.
Lenght 450mm / about 18"
Made with the same way than earlier one.
This is also for shaped for shaping sheet metals.
Attachment 33258
Attachment 33259
Hardening was made in heat treating oven. Started with preheating it to 660 degrees of celsius, temperature was raised 200 degrees / hour. Then it was heated to 1000 degrees and hold in that temperature 30 minutes.
After that it was cooled to water. And finally heated to 300 degrees of celsius and kept 4 hours in that temperature, and cooled to water.
I have about 24" of 120lb rail and contemplated converting it to an anvil. Looks like a lot of grinding. I have one thing going for me I can mill the top flat and begin the tapper for the horn on my knee mill.
Good job Tuomas
<!-- BEGIN /var/www/html/homemadetools/protected/modules/zeus/views/tool/postUpdate.php -->
Thanks Tuomas! We've added your Anvil to our Anvils category,
as well as to your builder page: Tuomas's Homemade Tools. Your receipt:
<div id="blocks"> <div class="block b1 pngfix"> <div class="bimg"> <div> <a href="https://www.homemadetools.net/homemade-anvil-46"> <img src="/uploads/229364/homemade-anvil-46.jpeg"/> </a> </div> </div> <div class="head pngfix"></div> <div class="left pngfix"></div> <div class="right pngfix"></div> <div class="blockover b1 pngfix"> <div class="title"> <a href="https://www.homemadetools.net/homemade-anvil-46">Anvil</a> <span> by <a href="https://www.homemadetools.net/builder/Tuomas">Tuomas</a></span> </div> <div class="tags">tags: <a href='https://www.homemadetools.net/tag/anvil'>anvil</a>, <a href='https://www.homemadetools.net/tag/heat-treatment'>heat treatment</a> </div> </div> </div> </div>
<!-- END /var/www/html/homemadetools/protected/modules/zeus/views/tool/postUpdate.php -->