By cropping the pic I got the up to date pic to loadAttachment 27185Attachment 27185
Printable View
By cropping the pic I got the up to date pic to loadAttachment 27185Attachment 27185
In town we have at least one remaining 2 story work shop. It's a corner lot on a hill. Instead of constructing ramp, access to upper floor is around the corner [uphill]. Been a mechanics shop forever. It's probably always been, but first maybe truck, tractor, or stationary engine clientele - go in to first floor it's clear. I'm guessing 12" or 14" X braced timbers on narrow [not 24"] centers. The uprights, not exactly studs, are big too; every other one is gusseted to the trusses too.
In comparison, my 16 foot ceiling was supported with 15 8" x 8"s, three rows 15 feet apart. The perimeter walls are brick, where eaves terminated 2" x 8" joists and trusses. Finally got rid of entire roof and ignorant 2":12" pitch with fabricated 4":12"s.
I saved part of the original ridge beam. It had lapped & bolted joints with pier washers to make up it's 100' length. It gusseted center posts with mitered timbers, like the secondary beams did.
Many of the old dairy barns in my area are built in to banks for walk in access to the loft, around here we call, them bank barns. One barn I worked on had access to 3 stories this way. 3rd floor was a built up ramp of dry laid up stone with a ramp bridge over the 2nd story access door. Guys from NYC bought it and were determined to save it. Has not had cows in it in a long time.
Eric
Tobacco warehouse. Louisville, Kentucky, circa 1906.
Fullsize image: https://diqn32j8nouaz.cloudfront.net...w_fullsize.jpg
https://diqn32j8nouaz.cloudfront.net..._work_crew.jpg
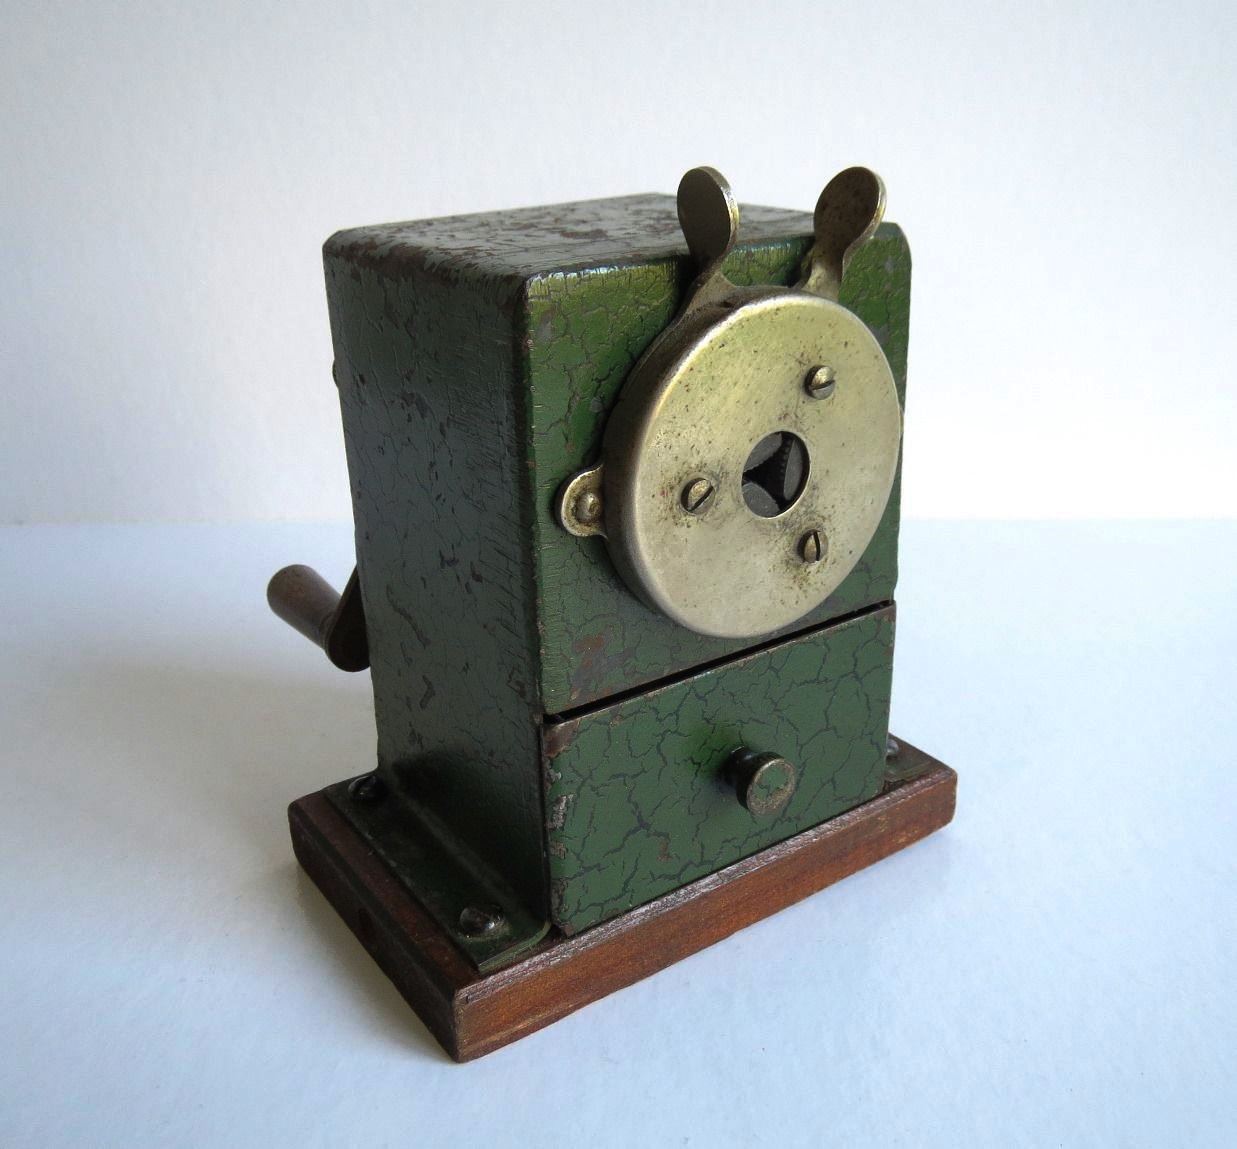
I have to agree with PJ on the metal and the finish, that metal shavings drawer front and the attaching area on the base could well be a heavy gauge sheet steel which was pressed to make the bends as tight as they appear to be. Chances are, the entire "box" or outer casing of the sharpener is heavy gauge steel and the attaching parts are either some other metal or a thinner steel.Quote:
Originally Posted by Beserkleyboy
Regarding the paint, I would guess that it could be either an original dark gray or black enamel finish repainted with a green lacquer finish. That would sometimes cause the lacquer finish to react with the milder enamel finish and cause the green to shrink and make the antique type finish you are seeing. These two finishes are not compatible with each other, [at least in the autobody repair field], The old style Alkyd enamel would sometimes never completely dry, even over years of use. That accounts for the "punky" or soft rubbery style of older enamel finishes if they were not kiln dried or dried under heat lamps. Acrylic lacquer, on the other hand, has a very strong chemistry and, after the quick drying solvents dried out of the finish's surface, the resulting coating is very hard and brittle and will chip easier from rock impacts or other impacts than the softer slower drying solvents in Alkyd enamel.
The other possibility may be that it was restored and painted with an antique appearing "crackle finish" made purposely to appear "crackled" or "split" apart from age.
Well, Toolmaker, I had the same exact problem with my Dell cordless keyboard a few years ago. Crumbs and bits of food and pastries, dust, debris, mixed up and heavily matted with Chocolate Labrador inner fur and outer hair which had "mysteriously" taken haven inside my keyboard.Quote:
Originally Posted by Toolmaker51
Sidenote: Labs shed 24/7/365, as many water dogs do, but this one has a few other quirks. He audibly yawns at 0-dark-30 in the morning, he sneezes no less than a half dozen times after he yawns himself awake, and he grunts [something like an "OOMPH" sound] if I don't pay attention to him when he nudges my elbow or hand for a pat down!
I audibly yawn [don't all you guys do that?], I have allergies to the AIR in Florida, [only explanation I have for ME sneezing 24/7/365], and, if a pretty lady scratches my back ....... well, we won't go there right now with the sound effects ......
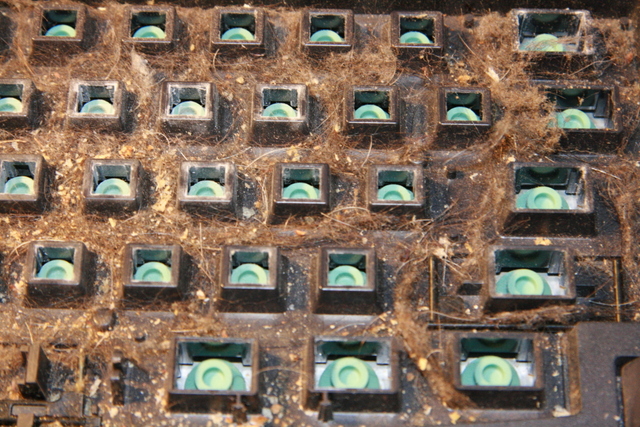
Back to the keyboard overhaul, I decided to remove the top of the keyboard case and check things out. I removed a few phillips screws and popped off all of the keys, carefully lifted the top cover off of the keyboard, and then I gasped ....... which in turn sucked in a few Southern Yellow Pine pollen thingies up my nose and I began to sneeze! After the sneezing fit subsided, I took a close look at what was under my keyboard!
Attachment 27256
I found an almost solid mat of dog hair and remnants of how many meals and snacks I consumed at the computer desk all intertwined together! I wondered why I had so many sticking keys, yeah, now I am thinking that I was lucky there were even a few keys which were NOT still sticking!
Long story short, I carefully lifted the dog hair mat up off my keyboard innards and dropped it into a trash can. Most of the consumables came along with the mat, that's how thick the area below the outside of the keyboard was matted in dog hair in many areas. Like I said I lifted the dog hair mat off ..... from the QWERTY to the NUMBERS block in one piece. From that point it was a matter of lightly blowing compressed air throughout the keyboard area and making sure there was nothing left inside the "control central" to stick or stop or plug up anything else for the near future.
Bottom line, that photo dates back to 04/18/2013 so the cleaning was well worth the time it took to remove the keyboard cover and keys and do a Spring cleaning on the keyboard. One suggestion though, it's a good idea to take a digital of your keyboard prior to the teardown, it makes it substantially easier on the re-assembly when it comes to some of the seldom used keys. [Without looking, do you know where the "standing pipe" key goes? How about the "Pause/Break" key? Just sayin' ...
I like those barrels!! when i was in switzerland this year..or last year dont remember witch time, they had some like that ,but they were campers!!! yes I said campers. for camping in!!!although they were a little longer.
Fullsize image: https://diqn32j8nouaz.cloudfront.net...w_fullsize.jpgQuote:
Workers in the main boiler room of Camp Holabird, MD February 9th, 1919
https://diqn32j8nouaz.cloudfront.net..._work_crew.jpg
it would sure take a lot of crabs to fill those boilers....but oh the party that would ensue.:thumbsup:
I bet I know what that guy in front used to be before going to work shoveling coal. How do you like me now drill Sgt?
yup that could just be him!!!
Those floor boards have quite the belly in them, must be some kind of cavity under them, auto ash removal?
Eric
True Back Braking work, those big boilers consumed a lot of coal all loaded by hand.
Ralph
Fullsize image: https://diqn32j8nouaz.cloudfront.net...w_fullsize.jpgQuote:
Two women operating a shell case forming machine at the New Gun Factory in Woolwich, England, 1916
https://diqn32j8nouaz.cloudfront.net..._work_crew.jpg
You can see stage of drawing the cartridge case is in? It's no little .50 cal. Lady on left has flat blanks to her right, and is holding a first draw. Another is probably in the dieset, punch visible directly to right of her [back to viewer] hand. The white 'paint' is drawing lube - mostly lard and kerosene. I'd estimate that press is 250-300 ton minimum, judging by the flywheel/ clutch; driven from the overhead, no less! Cannon cases aren't too different than shouldered arms, primarily straight taper, not bottle necked like rifle cartridges.
I didn't hit web results for cannon brass, yet this depicts process clearly.
https://www.petersoncartridge.com/ou.../drawing-brass
Fullsize image: https://diqn32j8nouaz.cloudfront.net...w_fullsize.jpgQuote:
Hanna mines of Union Pacific Coal Co., Cheyenne, WY - Miners with a Thew electric shovel c.1918
https://diqn32j8nouaz.cloudfront.net..._work_crew.jpg
That photo reminds me of the St. Joe Lead Mines of Southeast Missouri, the "Old Lead Belt." If you are ever South of St. Louis, take the tour of the Bonne Terre, (MO.) Mine. It is well worth your time.
I like the graffiti on the front of the car.
Newsboys. New Haven, Connecticut. 1909.
This was my very first job. You had to be at least 15 to be a bagger at the local grocery store, but paperboys were allowed to be younger. I don't even know if this is still a job.
Fullsize image: https://diqn32j8nouaz.cloudfront.net...w_fullsize.jpg
https://diqn32j8nouaz.cloudfront.net..._work_crew.jpg
I was going to try the paperboy delivery route thing but I lived 9 miles from town. Which would have meant I would have had to have gotten up at around 4 AM to do my chores around the farm then ride my bike to town load up with papers deliver them before people woke up to eat their breakfast then ride back home and get ready for school in time to catch the school buss since the town I went to school was 8 miles in the other direction of the town where I was going to be delivering papers.. I did actually deliver papers 2 weeks one summer after I had started work at the blacksmith shop. A friend of mine had to go on vacation with his parents so I took care of his route for the 2 weeks he was gone. Since the Blacksmith shop was in the same town it was no big deal to leave home a couple hours earlier than I normally did to get to work by 8 am but I made more working at the blacksmith shop that I did taking care of his route for him.
so...are we going to guess witch one of those paper boys is jon?:rimshot:
I mowed lawns first and then supplemented with paper delivery for about a year for our home town rag (Wednesday' only) and the county rag daily. Almost identical routes just more papers to carry. Not bad work but folding and putting rubber bands on was kind of a Pita as I remember and your hands got black with ink...had to use Lava soap to get it off before school. I did get good at flying them to peoples porch from my bike...nice arching curve about 90% of the time, and got to take my dog Smokey (90-100lb Husky/Shepard) for a run...he loved it...me too, except when he'd take off after a cat. Got good tips for it when I collected. Honorable work but grueling early git up.
I guess this could be considered a vintage photo...early 60's when he was older.
Attachment 27394
:hattip: PJ
I never did the paper route, but Ive wore out my share of mowers.... and remember cutting lawns for $1.25 , wow have tymes changed!!!
My mother is from Butte Mt and we spent a lot of time there as kids visiting Grandpa. The Orphan Girl mining museum is a favorite place and where I once read a miners poem " My sweetheart's a mule in the mine, and I drive's her right on down the line. On the dashboard I sits, and tobbacker I spits, all over my sweethearts behind".
Looking at that, I can see where "land Rover" got its design from. I bet it needed a 5 acre paddock to do a u turn also.Quote:
Originally Posted by Jon
Fullsize image: https://diqn32j8nouaz.cloudfront.net...w_fullsize.jpgQuote:
A team of woodworkers making repairs to the Cazadero Dam. 1909
https://diqn32j8nouaz.cloudfront.net...epair_crew.jpg
and got to take my dog Smokey (90-100lb Husky/Shepard) for a run...he loved it...
Man n dog, best work crew ever
Eric
Great picture Jon...excellent contrast and in focus! They must have been proud working on that by their faces and the tools in hand. Big O' auger bit (long) and what looks to be a curved handle adz.Quote:
Originally Posted by Jon
Thanks,
PJ
what looks to be a curved handle adz.
Yup seem to remember that it is called a ship or ships adz. The spike like small end was for sticking into a timber to hold the tool steady for sharpening much like it is seen in the picture.
Eric
PJs,
More than 60 years ago I would help my dad with repairs around our house and remember using his carpenter brace and a Stanley hand drill for many drilling repairs. I still have both tools and the old augers in one one my tool boxes but haven't used these in a very long time. Finally in the early sixties I filled in enough of the "Blue Stamp" booklets when I could "buy" a Black & Decker model 7004 1/4" corded electric drill. I thought this small drill was so cool and made all the work so much easier. I fitted the drill with a small drill stand used for portable drills and used the electric drill to build my first metal lathe. I still have the electric drill but it burned out years ago but for nostalgic reasons could not throw it away. Too many good memories. You don't have to have the fanciest tools to do good work.
Regards,
Paul Jones
Paul,
I remember the Blue Chip Stamps and S&H too. They were a big thing around our house too and had some real value compared to coupons today. I too still have Dads "Egg-Beater" drill an older Brace n' Bit and his first Craftsman 1/4" electric (mid-late 50's), the polished cast aluminum one. He was pretty proud of that and we used it for years (decades). It started giving a little zort thru the case about 30 years ago and took the chuck off it for use on a hand chuck with a broom handle...but couldn't toss it. Thought one day I'd take it apart and restore it with a grounded plug and change the bushing and brushes if I can find them, but never have. Yet still smile every time I see it and remember some of the many, many things we built or repaired with it.
Absolutely true about not needing fancy or top of the line tools all the time to get things done or even build tools to do the job...Hence HMT and what it represents that way.
:hattip: PJ
The best tools can not make up for poor workmanship. They just make it faster and easier to really mess up.
Fullsize image: https://diqn32j8nouaz.cloudfront.net...w_fullsize.jpgQuote:
Fire Extinguisher Dept., American LaFrance factory, Elmira, NY - 1918.
https://diqn32j8nouaz.cloudfront.net..._work_crew.jpg
I still have MY Dad's old Craftsman polished aluminum 1/4 drill. I need to do the same thing. It howls, growls and shocks. But have the same memories.
Fullsize image: https://diqn32j8nouaz.cloudfront.net...w_fullsize.jpgQuote:
A view inside the Catskill Aqueduct in Yonkers on May 10, 1912, showing the 11-foot-wide steel pipe before a cement mortar lining was placed (foreground), with the lining (middle ground), and before the wooden forms were removed (behind the men)
https://diqn32j8nouaz.cloudfront.net..._work_crew.jpg
HMT??hit and miss technology?..... we too had that old polished drill....worked awesome and lasted long tyme. nowdays if you buy a corded drill it might lasy 7 months before the bushings are dead or the motor burns up. Imho the best to buy is a good batter operated drill like ryobie or ridged, they seem to work pretty good. but the issue is the batterys in most cases. a lot of sellout companys(B&D& many more) change the battery shapes so you will need to buy a new drill when the crap battery dies,ebay has a great selection of different batterys. I have a 2002 ryobie drill,saw,sawzall,flashlight vacume cleaner set ( neibor threw it all away, it looks like new)that had 5 batterys 2 still hold charge,and 2 battery chargers. well I got on flebay and did some research and found that they still use that battery!!! but even better is it is now avalible in lithium!!!! at 3x the power range!!! for about $30 vs $50 for a **** battery that wont last. but the lithum batterys take a different charger... well apparently when the battery started dieing the neibor bought a new charger.... he got the universal charger!!! it charges all the ryobi batterys!!!! ryobi is possiably the best out there now days.Ive never seen a wore out ryobi. B&D & dewalt are the same company and pure ****. I do have a few D&D 18 volt drills I got on 75% off clearance from after christmass 3 years ago. they are possiably the best B&D I have ever had and they have the lithium batterys. other than that get the cheepest harbor fright stuff and throw it away when it dies.it will usulay last as long as the name brand corded stuff does at 1/2 the price.... speaking of dewalt....I have a real nice 12 or 14"compound miter saw that has a bad bushing for the last 10 years it's been in the shed.( it's about 12 years old) I decided to take it appart and make a bush for it( the bush has been obseleite for over 8 years and size shape was changed due to it was ****) I grabed it up and... the plastic main housing just crumbled in my hands....... way to go dewalt!!!!! well atleast I have a real nice degreed rotating thingys to mount somethen else on...hmm I could make a sun dial!!!!! on another note... the may tag repair man just left the house....he did not work on squat... he just told us that the $700 washer has 1 seeting that washes.and about 12 that dont. and 1 that might...... well at least he seems to be honest. as for maytag.... they need to stop makeing tv adds and make something that works...atleast half way works. yall have a great day!!!
I bought a 19.2 volt set of Craftsman drill, impact , 2 Nicad Batteries and charger a few years ago. Of course the battery life was limited. So when the same thing was offered in 19.2 Li-Ion I bought it. One battery internal charging circuit went bad. I got on Flea Bay and ordered 2 batteries for like $64.00 from China. Got them and the darned things would not charge. They were completely dead. Wouldn't read anything at all on the voltmeter. I remember reading that if completely dead, smart Li-Ion chargers will not sharge, so I used a DC variable power supply with clip leads to charge the batteries up by tapping the connection to the battery and holding it 15-20 seconds. (This is the manner that LI-Ion batteries charge so not to overheat and explode) and brought the batteries up to about 12 volts. The charger then charged them fine. What ticks me off is that B&D/Stanley who bought out the Craftsman line is not doing any backwards support whatsoever, only selling their new line with a Craftsman name.
yup I has to put a "serface charge" on the batterys before the "smart charger" would work when I charged the old batterys, the new battery was charged. I usualy opt for the extra $2 priced batterys from the usa selers so I get the fast and a little eazer to deal with if there is a issue.I thin the battery was hear the next day. a week after I found a bigger size had just came out...I do nee to get another one so...that will be the next thing. Ive not been able to run down this one yet,I reckon the next size bigger will alsy me a life time before rechgarging. I love the lithium stuff. Im thinken about getten one for my car.
my brother loves his ridged lithium set, he even took his old what ever brand and cut the things up and made the ridged battery fit them.....
Good Tip on the surface charge for your C3 batteries, Nice save, Vinniel! I did the same thing with some old Ryobi batteries and it works fine...just be careful as you stated. I had great luck with my C3 stuff for 8-9 years now, except for the chuck on the 1/2 Drill was crap and only lasted a few years. Replaced with a Jacobs from Amazon, ($12 higher now than when I bought it but a great chuck). Have had issues with the small capacity Li-ion not lasting long but picked up the 4Ah a year or so ago and it is great. The big thing to me is the PRICES for the buggers...Outrageous from mfg cost perspective...another Printer Ink Tactic! You can get a new drill and battery on sale for what a 4Ah cost.Quote:
Originally Posted by VinnieL
Been tempted to take one of the dead ones and replace the batteries in it with 16850's as I've seen some videos on YT on how to do it. My experience with Li-ion/LiPo's is fairly high from an electronics standpoint from products and projects I've developed, but found some are good, some are bad and would look for a reputable source/mfgr! Doesn't look difficult and as long as the thermal protector isn't shot should be fine...even those are available on Mouser or Digi-Key.
Agreed about the B&D/Stanley sell off but there will be back stock and replacements for a while from sears parts. I tried to pick up some batteries when Lowes shut down OSH but they were the first to go.
About the old 1/4 Aluminum Craftsman; it's nice to hear that others have the had the same experience and the nostalgia with them. The days of products lasting 50-60 years is long gone I'm afraid! I did some looking on EBay and found similar. I think my dads was either a 315.7901 or a 315.7080 but it's in storage in a box some where...but the chuck is still in my tool box on the broom handle, Hand Chuck!
:hattip: PJ