Free 186 More Best Homemade Tools eBook:  
Get 2,000+ tool plans, full site access, and more.

User Tag List

Results 1 to 8 of 8

Thread: Work holding in a lathe.

  1. #1
    Supporting Member tonyfoale's Avatar
    Join Date
    Nov 2016
    Location
    Spain
    Posts
    1,561
    Thanks
    687
    Thanked 2,646 Times in 709 Posts

    tonyfoale's Tools

    Work holding in a lathe.

    This is a very simple but effective tool. I needed to do some machining on the crown of a new piston for my race bike. The engine is a classic Aermacchi 350 (HD Sprint for my US based cousins) which were last made in 1974. As a result, parts are not always readily available and so it is normal to adapt parts made for other models. In this case I got an MTC piston for a Kawasaki which needed the crown modified to give me the CR (compression ratio) that I wanted.

    It is not a good idea to hold a piston by the skirt in a lathe chuck or similar for at least 3 reasons, viz;
    1. The skirts are very thin and can easily be distorted.
    2. The skirts are not machined circular, they are slightly oval to account for different expansion in different directions.
    3. The skirts are not machined parallel but have a taper to allow for different temperatures at positions along the piston.

    One method of holding a piston for "after manufacture" machining is to make some soft jaws to hold the piston by the ring grooves, but there is an easier way applicable to some pistons. These are ones which have an internal register left from the original manufacturing. The MTC piston was in that category.

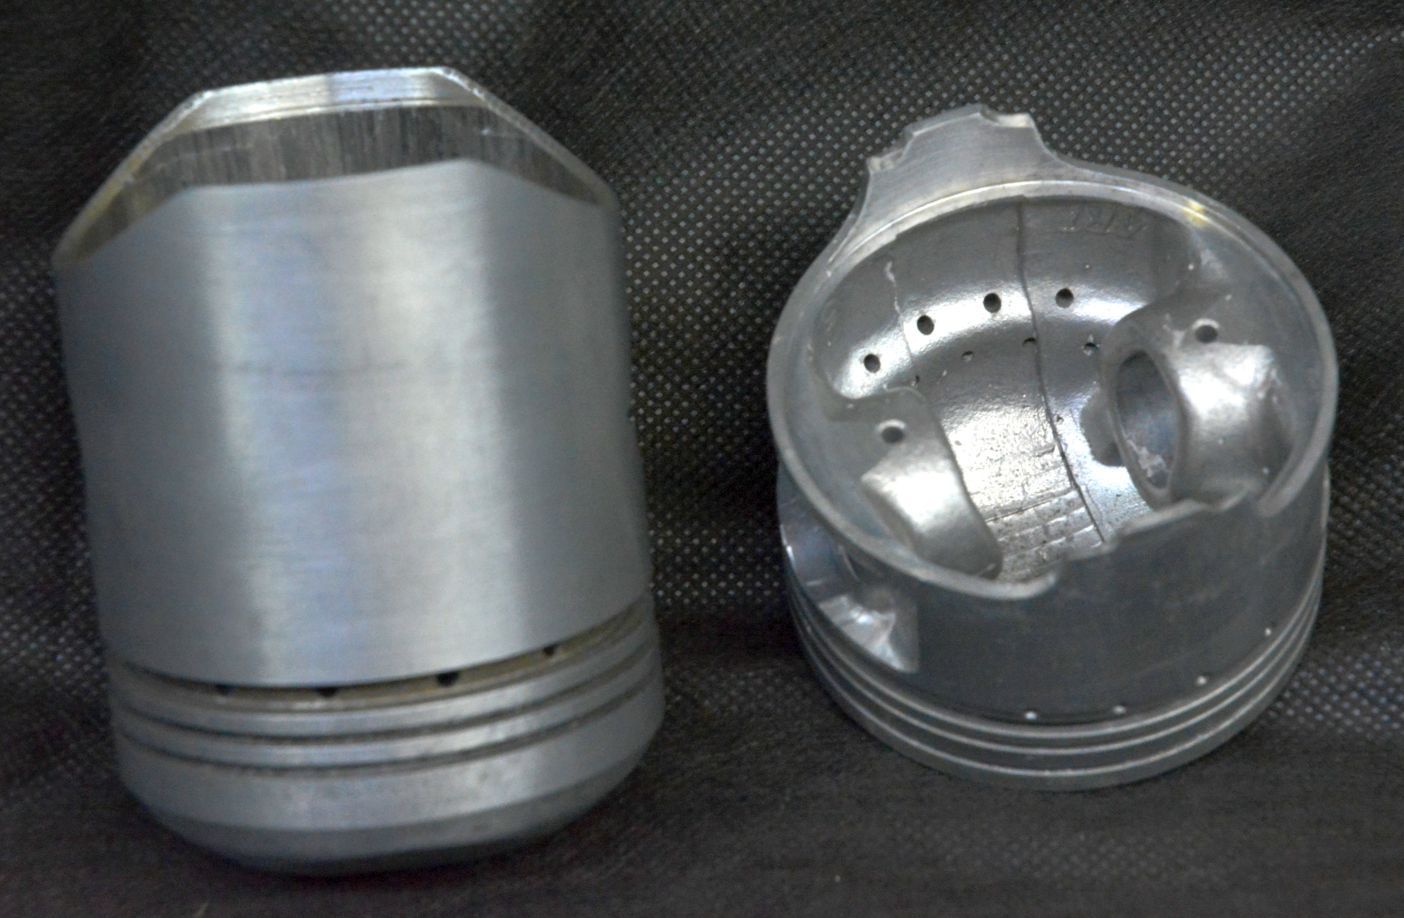
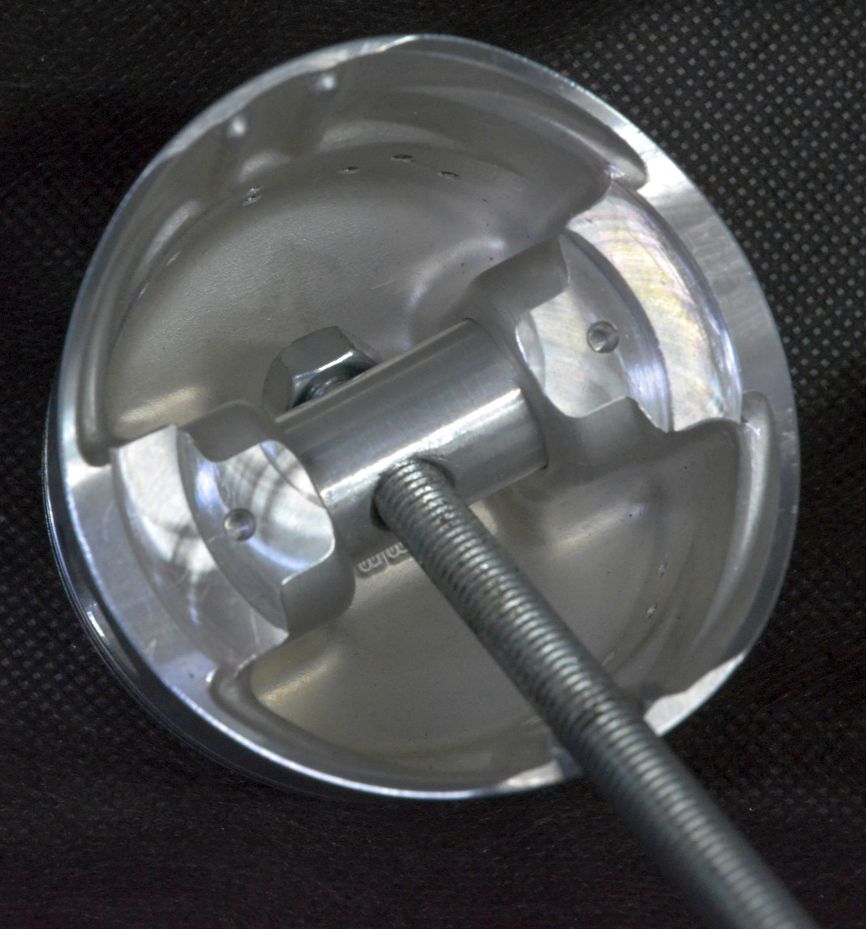
    Here are a couple of examples of the internal register. The Suzuki one on the right has a full circle register. Click thumbnails for full size pix.

    Work holding in a lathe.-mtc-piston-10.jpg

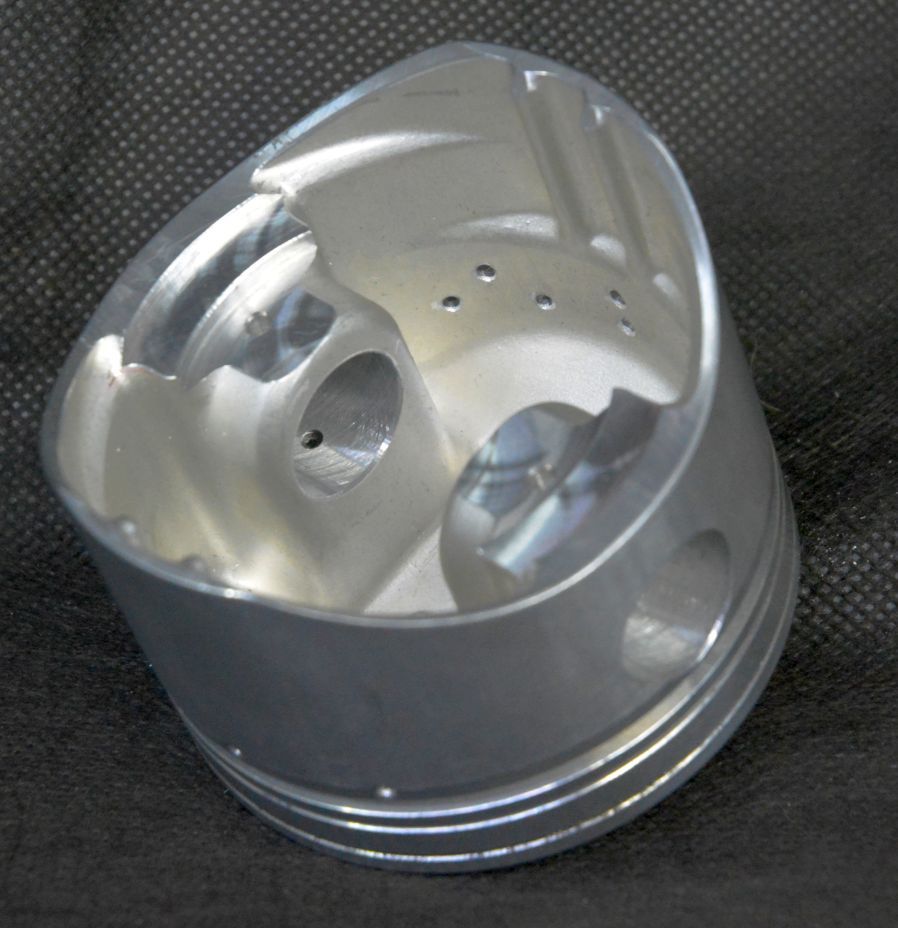
    Here we can see the register in the MTC piston which I needed to attack.

    Work holding in a lathe.-mtc-piston-11.jpg

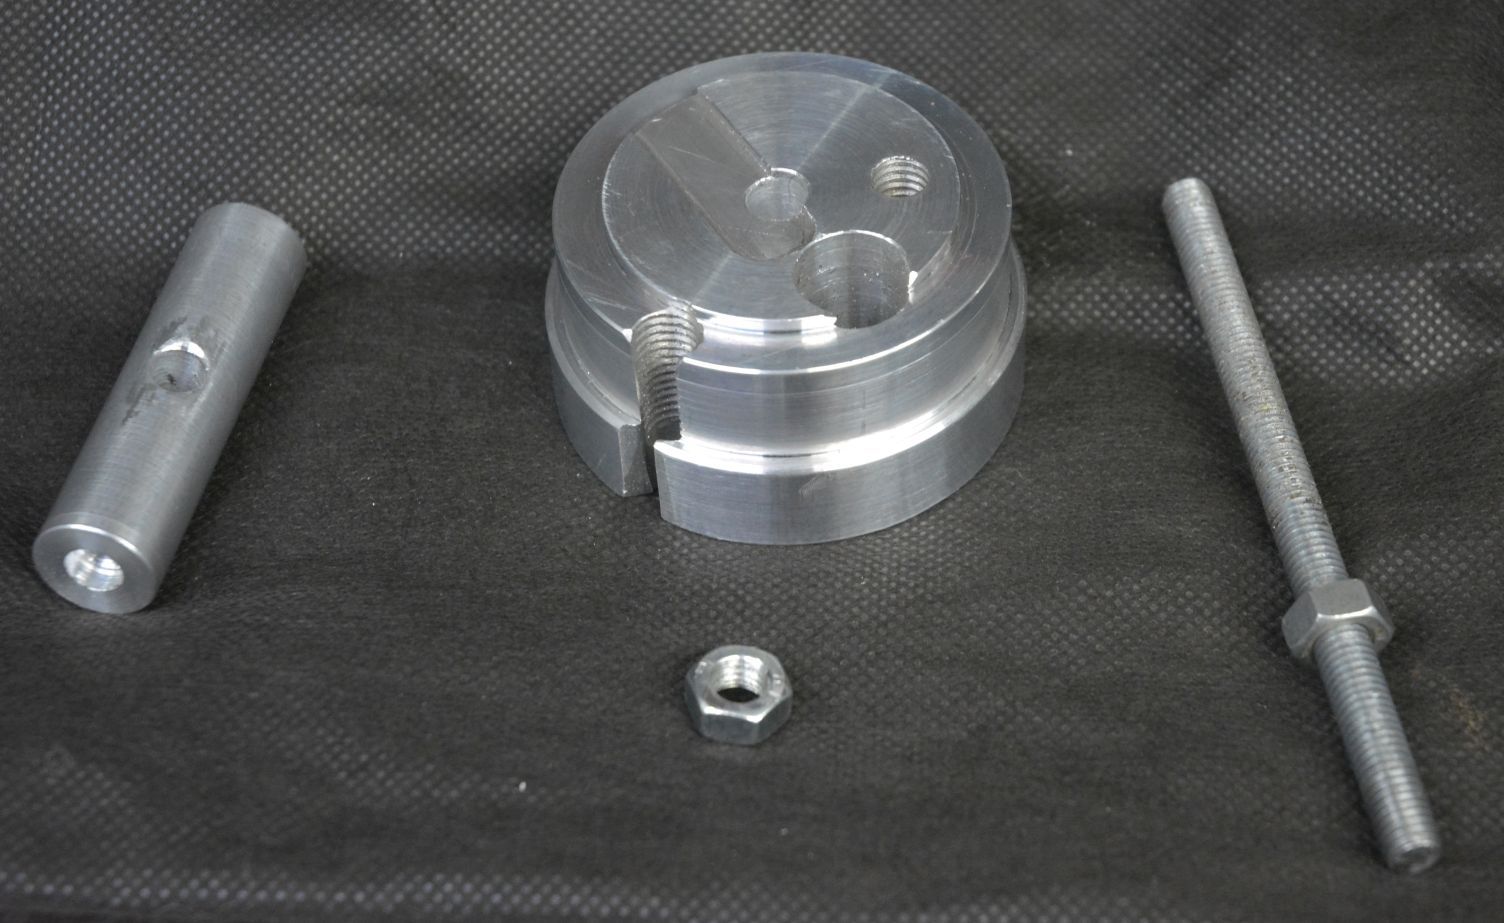
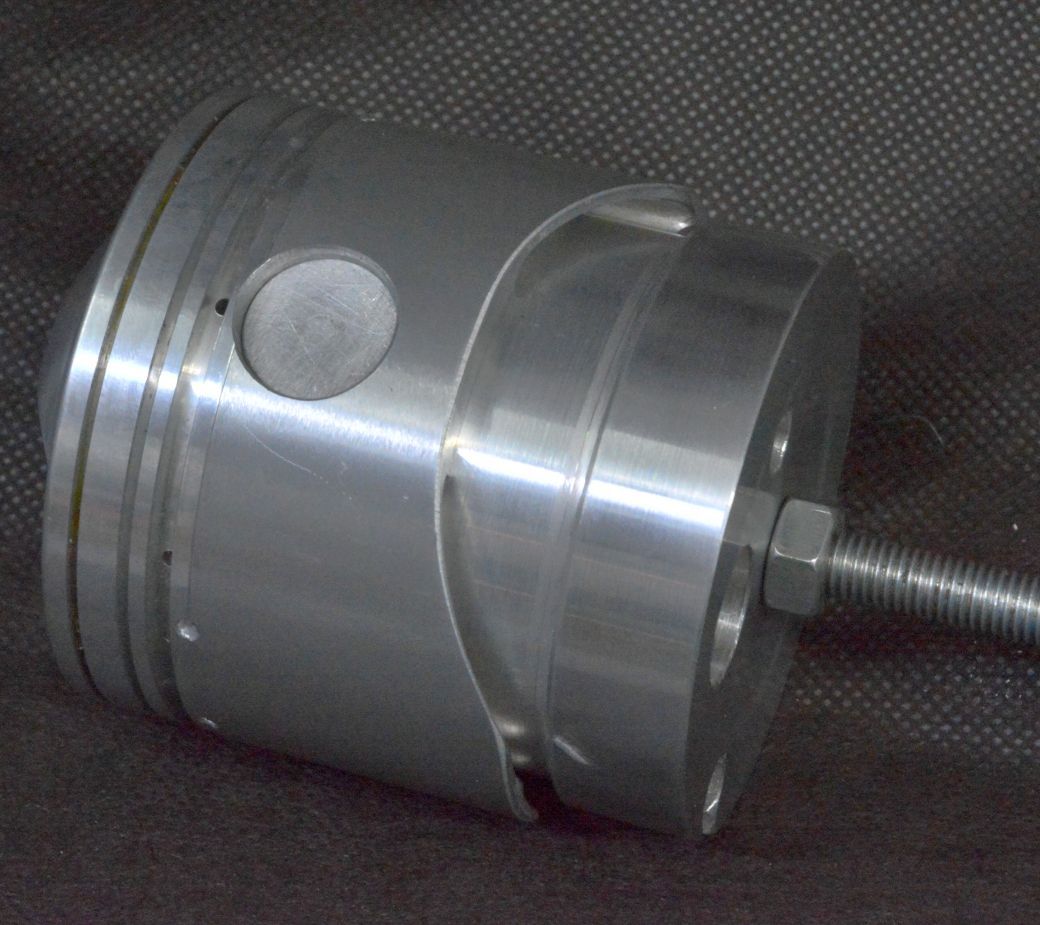
    To hold this piston securely I turned a mating spigot on a piece from the scrap box to fit the piston, which had enough length to hold in a chuck. The extra holes in the piece were there already but have no ill effect. I also turned up a dummy gudgeon pin with a hole in the centre to pull the piston onto the block. Here we can see the parts for this simple tool or fixture.

    Work holding in a lathe.-mtc-piston-09.jpg Work holding in a lathe.-mtc-piston-13.jpg

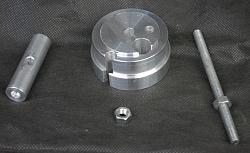
    Shown here is the piston mounted on the block ready to be chucked in a lathe or held by a myriad of ways in a milling machine.

    Work holding in a lathe.-mtc-piston-14.jpg

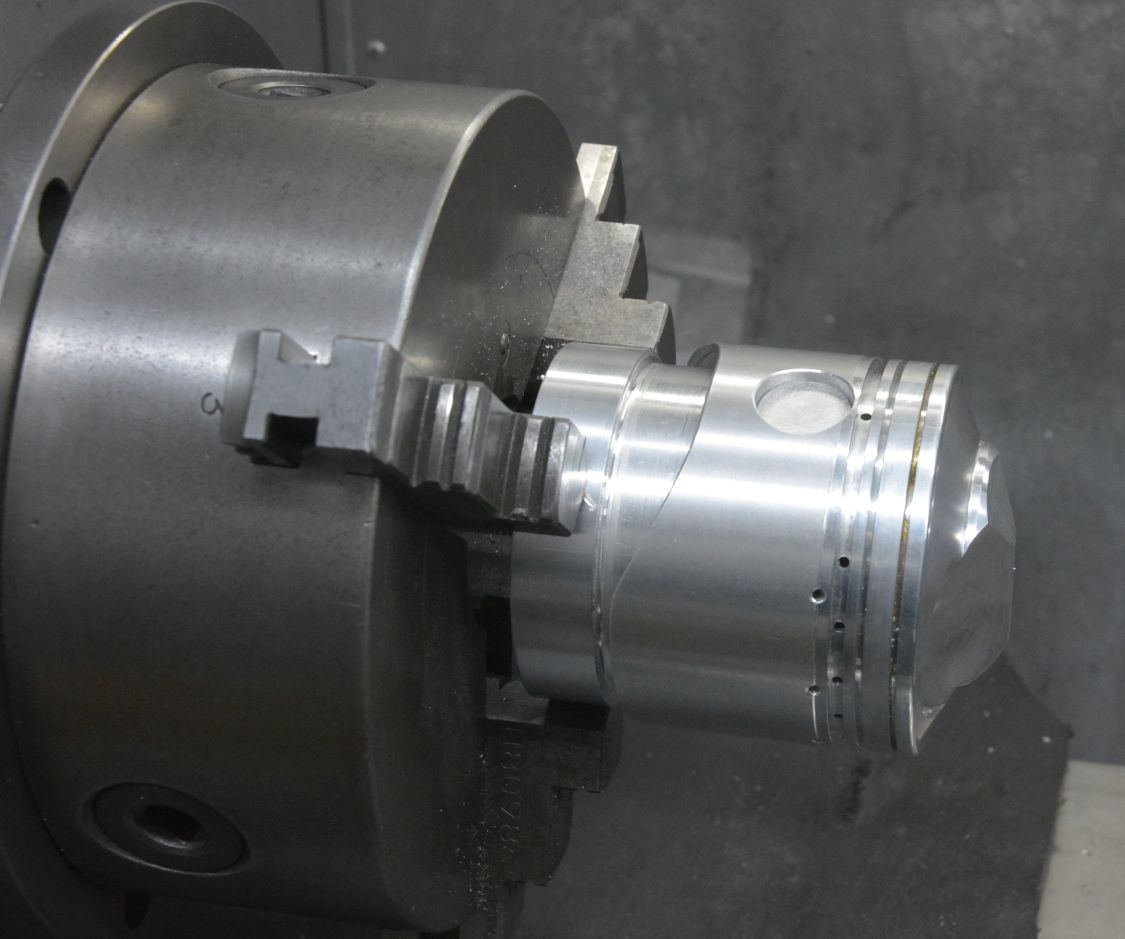
    Although it restricted me to an axi-symmetric shape I went for machining in a lathe because of its simplicity, shown here is the assembly chucked ready to machine.

    Work holding in a lathe.-mtc-piston-16.jpg

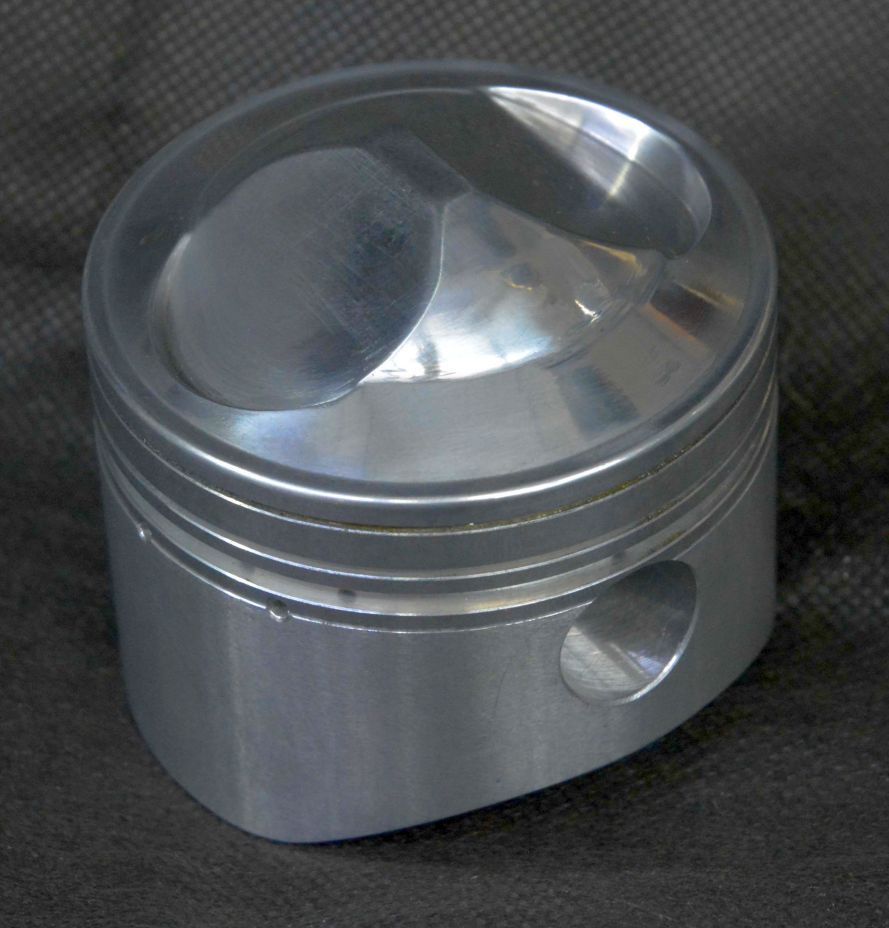
    This is the final result.

    Work holding in a lathe.-mtc-piston-12.jpg

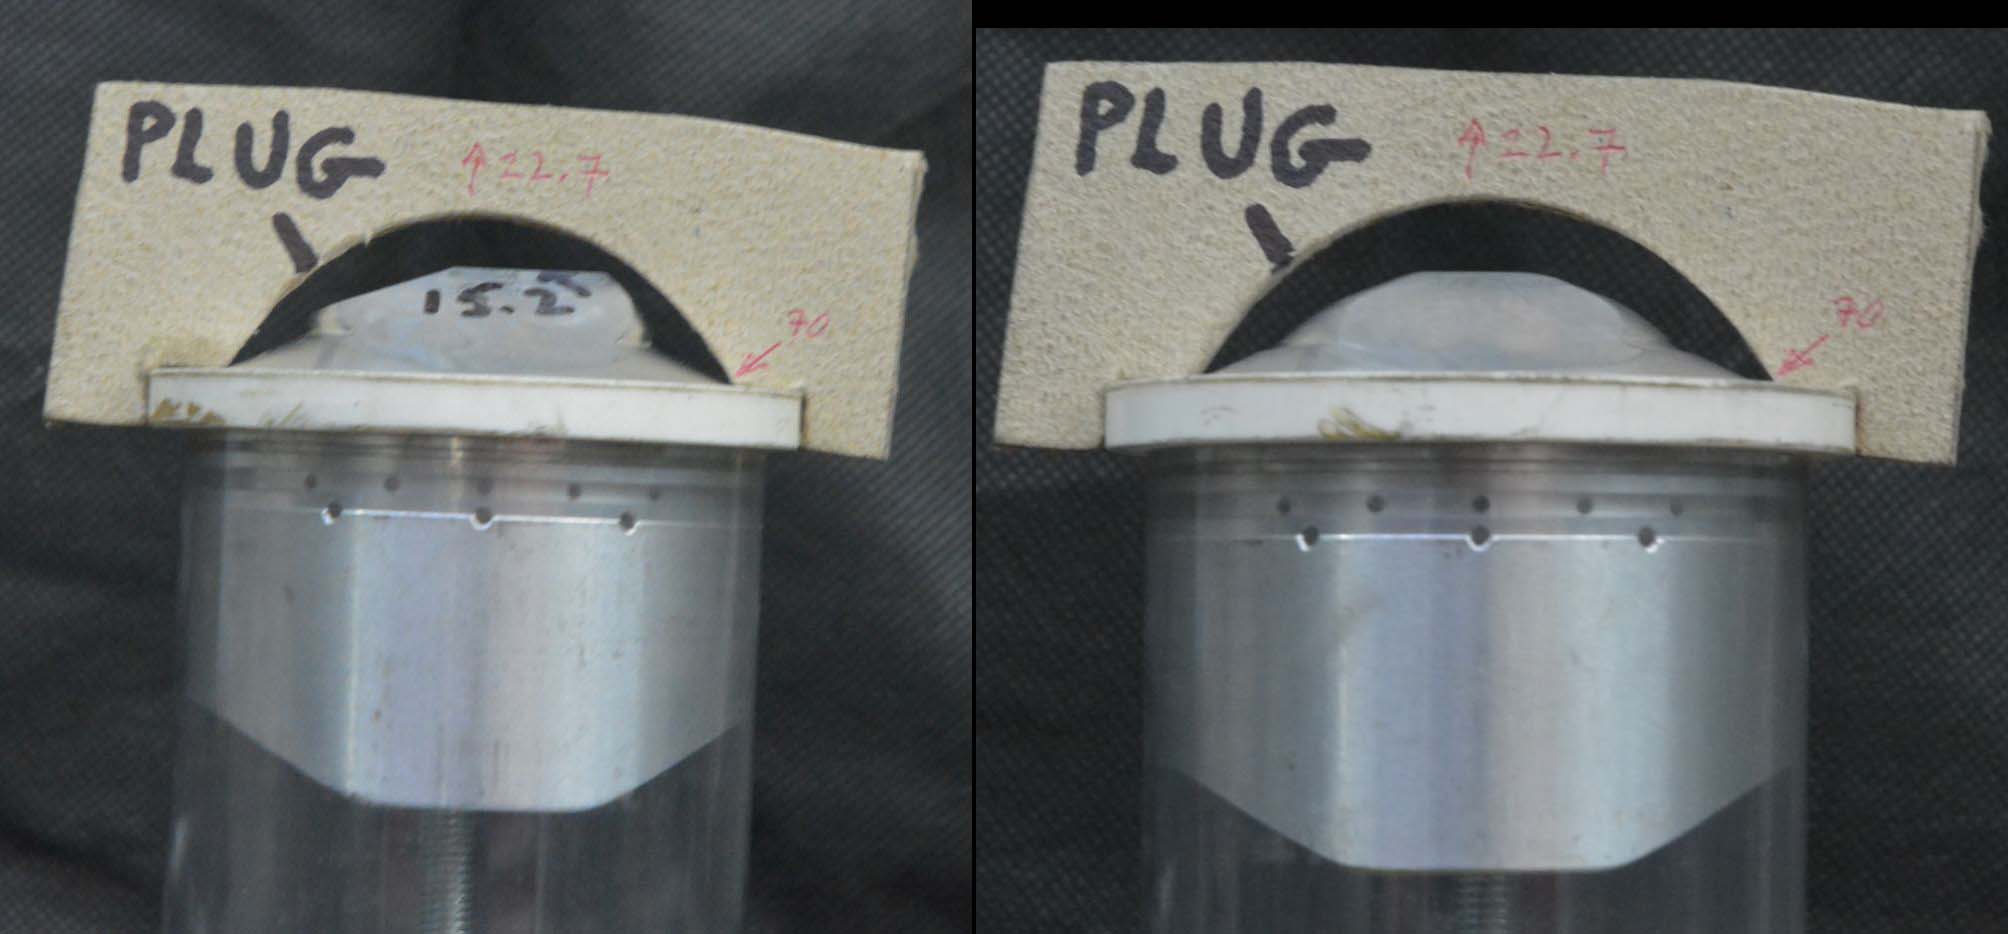
    Here is a before and after profile of the crown relative to the head shape.

    Work holding in a lathe.-mtc-piston-06.jpg

    You can see that there is more space around the plug and less restriction for the flame front to reach the other side, thus reducing the likelihood of detonation.
    Now I need to bore the cylinder to suit the piston but that is another story.

    186 More Best Homemade Tools eBook

  2. The Following 15 Users Say Thank You to tonyfoale For This Useful Post:

    asterix (Apr 19, 2022), baja (Apr 21, 2022), bustre00 (Apr 19, 2022), DIYer (Apr 17, 2022), Frank S (Apr 16, 2022), Jon (Apr 21, 2022), metric_taper (Apr 18, 2022), mr mikey (Nov 27, 2023), mwmkravchenko (Apr 18, 2022), NortonDommi (Apr 22, 2022), olderdan (Apr 16, 2022), Rikk (Apr 19, 2022), Saltfever (Apr 18, 2022), Sleykin (Apr 24, 2022), trevor_60_r (Apr 25, 2022)

  3. #2
    Supporting Member Frank S's Avatar
    Join Date
    Aug 2015
    Location
    Peacock TX
    Posts
    11,212
    Thanks
    1,983
    Thanked 8,787 Times in 4,206 Posts

    Frank S's Tools
    I did something similar many years ago for a guy who was rebuilding his 4 cylinder Ford ranger engine. He had bought new .030 over pistons and connecting rod assemblies without the rings. He had ordered rings from another source but when they arrived the top compression rings were .020" too tall and too thick to fit the groves. Fortunately for me his pistons had machined flats on the bottom of the relieved skirts. All I had to do was cut the bearing end off of 1 of his old connecting rods install it in the new pistons with shims to fill the space between the rod and the piston at the gudgeon pin chuck the connecting rod stub in the 4 jaw with the flats of the piston skirt against 2 of the jaws held the piston against the chuck with a blunt nosed live center then widen and deepen the top ring groves. It wasn't a racing engine so I did no further mods to the pistons

    2000 Tool Plans
    Never try to tell me it can't be done
    When I have to paint I use KBS products

  4. The Following 2 Users Say Thank You to Frank S For This Useful Post:

    freddo4 (Apr 22, 2022), mwmkravchenko (Apr 18, 2022)

  5. #3
    Supporting Member olderdan's Avatar
    Join Date
    Jun 2016
    Posts
    782
    Thanks
    1,457
    Thanked 1,538 Times in 466 Posts

    olderdan's Tools
    A very logical and secure way to do piston machining without stressing or deforming. I have been wondering how your engine build is progressing. Well done.

  6. The Following 2 Users Say Thank You to olderdan For This Useful Post:

    mwmkravchenko (Apr 18, 2022), tonyfoale (Apr 17, 2022)

  7. #4
    Supporting Member tonyfoale's Avatar
    Join Date
    Nov 2016
    Location
    Spain
    Posts
    1,561
    Thanks
    687
    Thanked 2,646 Times in 709 Posts

    tonyfoale's Tools
    Quote Originally Posted by olderdan View Post
    A very logical and secure way to do piston machining without stressing or deforming. I have been wondering how your engine build is progressing. Well done.
    Alan,

    When I get a moment I'll post some details of the cylinder boring and honing, I know that is of interest from your comments on the boring setup that I posted a couple of years back. Cylinder boring without a cylinder borer.
    That turned out very well.

    My real engine build has progressed slowly. I lost momentum when Covid came along and I turned my attention to other things like the electronic lathe control, other tool making and even a bit of garden work. I am glad to report that I am now cured of the gardening attack and have turned my attention to more worthwhile pursuits. I decided to prepare a closer to stock engine to get back to racing ASAP and the motivation has returned, I am aiming to get back to racing in June. The piston in this post is just for this stop gap engine. Once I am back on track I will set up a dynamometer cell to develop the new engine. I have had a watercooled eddy current unit sitting in a box for a few years and it is time to give it some use.

  8. The Following 3 Users Say Thank You to tonyfoale For This Useful Post:

    metric_taper (Apr 18, 2022), olderdan (Apr 17, 2022), Sleykin (Apr 24, 2022)

  9. #5
    Content Editor
    Supporting Member
    DIYer's Avatar
    Join Date
    Aug 2013
    Posts
    3,056
    Thanks
    772
    Thanked 1,852 Times in 1,653 Posts


    Thanks tonyfoale! We've added your Piston Holding Method to our Machining category,
    as well as to your builder page: tonyfoale's Homemade Tools. Your receipt:


  10. #6
    Jon
    Jon is online now Jon has agreed the Seller's Terms of Service
    Administrator
    Supporting Member
    Jon's Avatar
    Join Date
    Jan 2012
    Location
    Colorado, USA
    Posts
    25,546
    Thanks
    7,952
    Thanked 38,796 Times in 11,326 Posts
    Congratulations tonyfoale - your Piston Holding Method is the Homemade Tool of the Week!

    Another clever engine part holding fixture, like your previous winning Valve Holding Collet.

    Some more nice builds from this week:

    Tractor Tire Bead Breaker by Frank S
    Tractor Tire Water Fill Adaptor by Frank S
    Vise by Kwandotechnic
    Filter Wrench by diy creative crafts
    Mill Vise Spacer by Improvised DIY
    Angle Grinder Mount by 5s diy creates
    Rigid Tapping Cycle by GBWM
    Grinder Mount by orioncons36
    Miniature Square Threading Tool by Mr. Factotum's Workshop
    Ring Roller by Mr.DK DIY
    Circular Saw Track Guide by Didpoolhall
    Door Handle by Mr.DK DIY
    Vise Clamping Fixture by Improvised DIY
    Slot Mill Grinding Rest by Mr. Factotum's Workshop


    tonyfoale - we've added your tool entry to our All Homemade Tool of the Week winners post. And, you'll be receiving a $25 online gift card, in your choice of Amazon, PayPal, or bitcoin. Please PM me your current email address and gift card choice and I'll get it sent over right away.


    This is your 15th Homemade Tool of the Week win! Here are all of your winning tools:


  11. #7
    Supporting Member hemmjo's Avatar
    Join Date
    Feb 2017
    Posts
    2,552
    Thanks
    226
    Thanked 1,449 Times in 822 Posts

    hemmjo's Tools
    Very nice Tony. I actually found and joined this list a few years ago while searching for ways to bore my own cylinder for an old jetski I have. It is a side by side twin.

    In the mean time I was able to find another engine, swapped parts between the two to get one running. So that engine is still waiting for me to find the time.

    I have your cylinder boring thread on file when that time comes.

    I am curious, how do you deal with engine balance when you cut pistons?

  12. #8
    Supporting Member tonyfoale's Avatar
    Join Date
    Nov 2016
    Location
    Spain
    Posts
    1,561
    Thanks
    687
    Thanked 2,646 Times in 709 Posts

    tonyfoale's Tools
    Quote Originally Posted by hemmjo View Post

    I am curious, how do you deal with engine balance when you cut pistons?
    Here are a couple of articles that I wrote some years ago.
    Vibro massage Read this first.
    and
    DIYbalance

    Search out on this forum a holding fixture that I made for balancing and alignment, that shows a method that I prefer over the three methods in the DIY article.


    186 More Best Homemade Tools eBook

  13. The Following User Says Thank You to tonyfoale For This Useful Post:

    olderdan (Apr 25, 2022)

Thread Information

Users Browsing this Thread

There are currently 1 users browsing this thread. (0 members and 1 guests)

Tags for this Thread

Bookmarks

Posting Permissions

  • You may not post new threads
  • You may not post replies
  • You may not post attachments
  • You may not edit your posts
  •