Free 186 More Best Homemade Tools eBook:  
New: 300+ fresh build posts/day from 275 forums → BuildThreads.com

User Tag List

Page 1 of 33 1 2 3 4 5 6 7 8 9 10 11 12 13 14 15 16 17 18 19 20 21 22 23 24 25 ... LastLast
Results 1 to 10 of 412

Thread: Took the first step towards building my shop

Hybrid View

  1. #1
    Supporting Member Frank S's Avatar
    Join Date
    Aug 2015
    Location
    Peacock TX
    Posts
    12,613
    Thanks
    2,677
    Thanked 11,103 Times in 5,386 Posts

    Frank S's Tools

    Took the first step towards building my shop

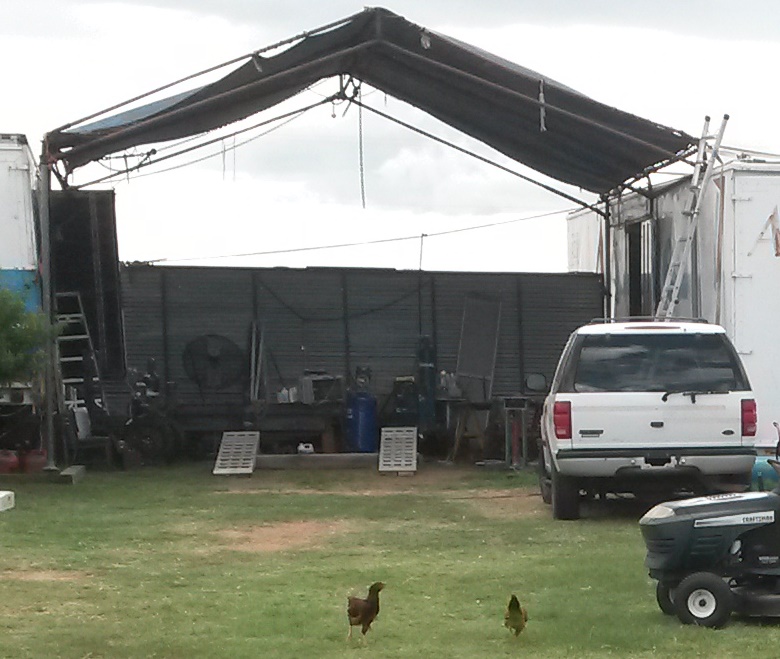
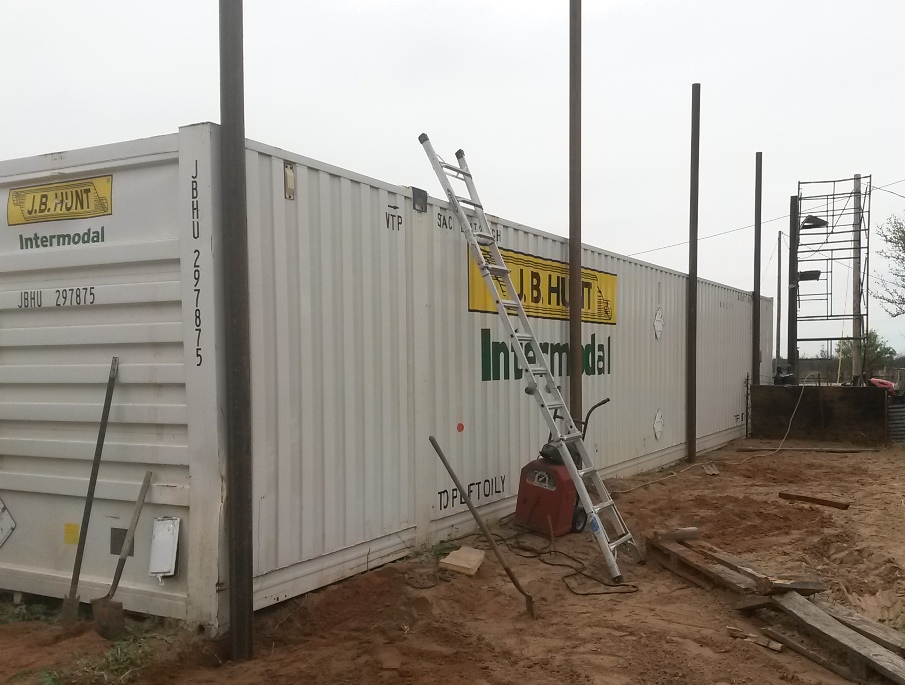
    Everyone who knows me are probably familiar with my work shop or lack there of conditions.
    For many years I have worked under my tent shop I've moved it around several times It is pretty good in the summer , great for providing shade and blocks much of the summer winds But it is horrible in cold wet dreary windy weather especially when the winds are out of the NE or east.
    Took the first step towards building my shop-20180617_164946.jpgmm.jpg
    For the past several years life has always got in the way of my starting my shop so today I decided to at least take the first step.
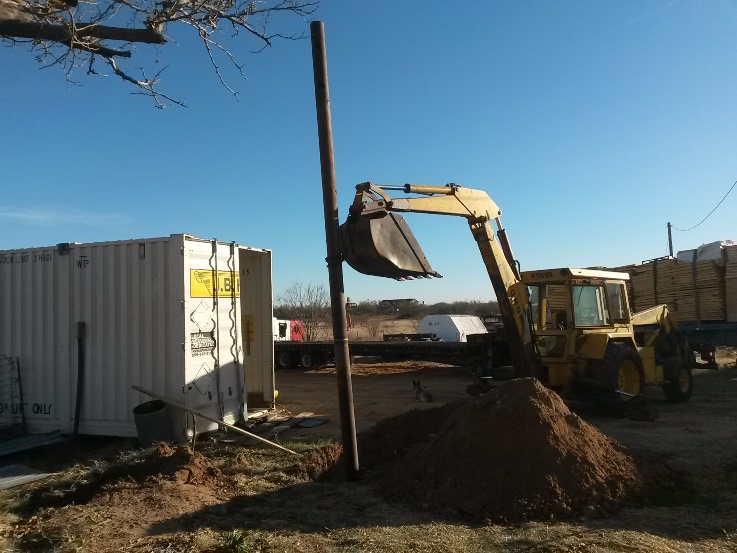
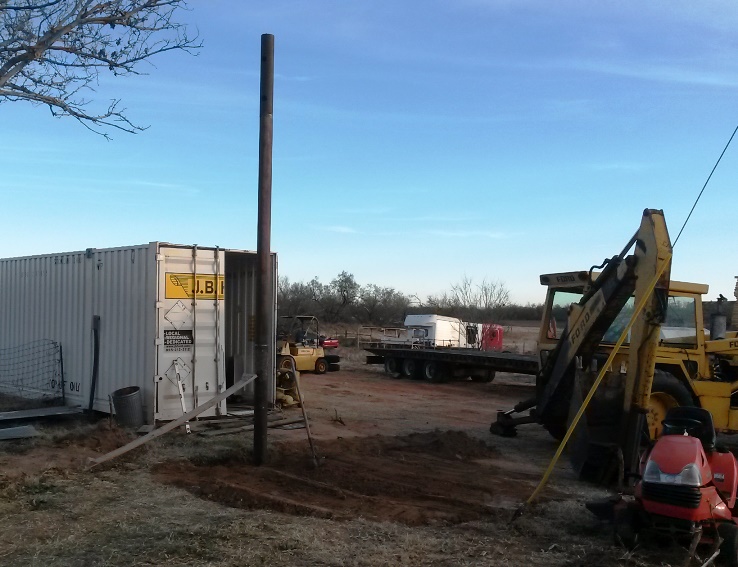
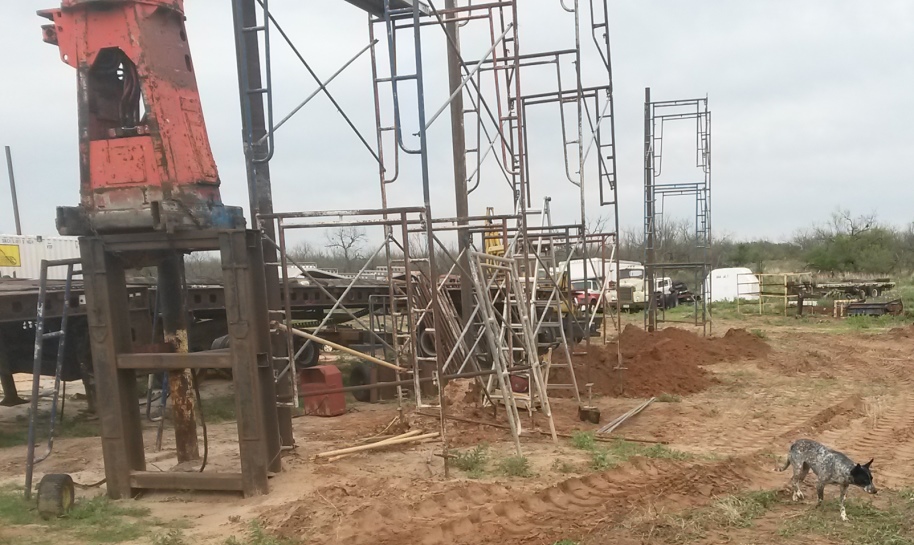
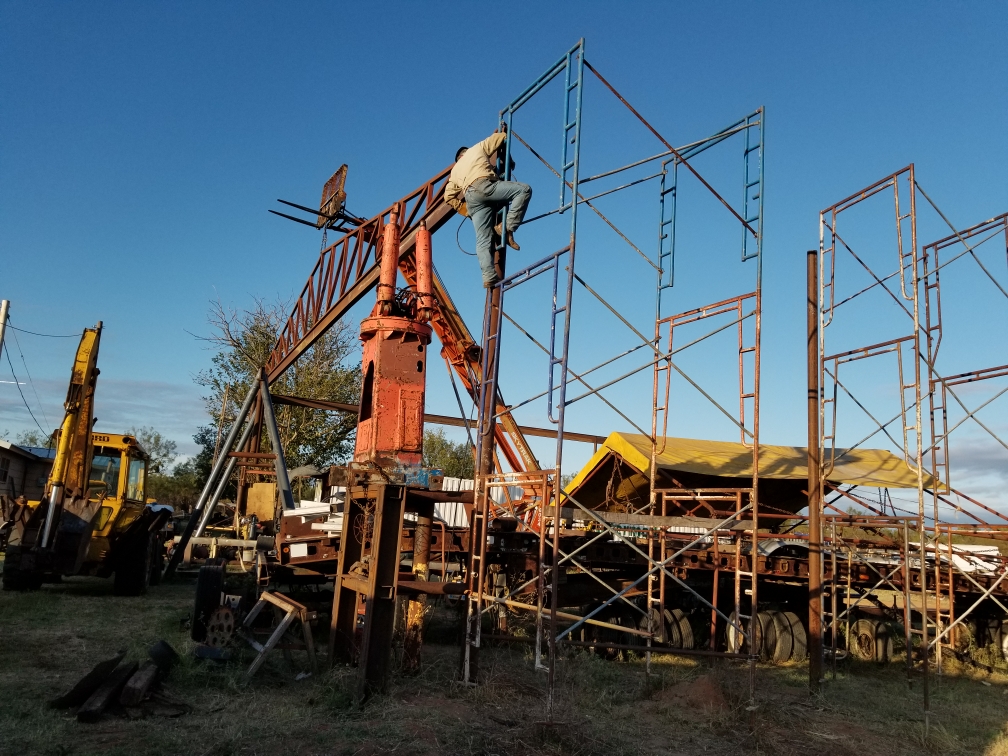
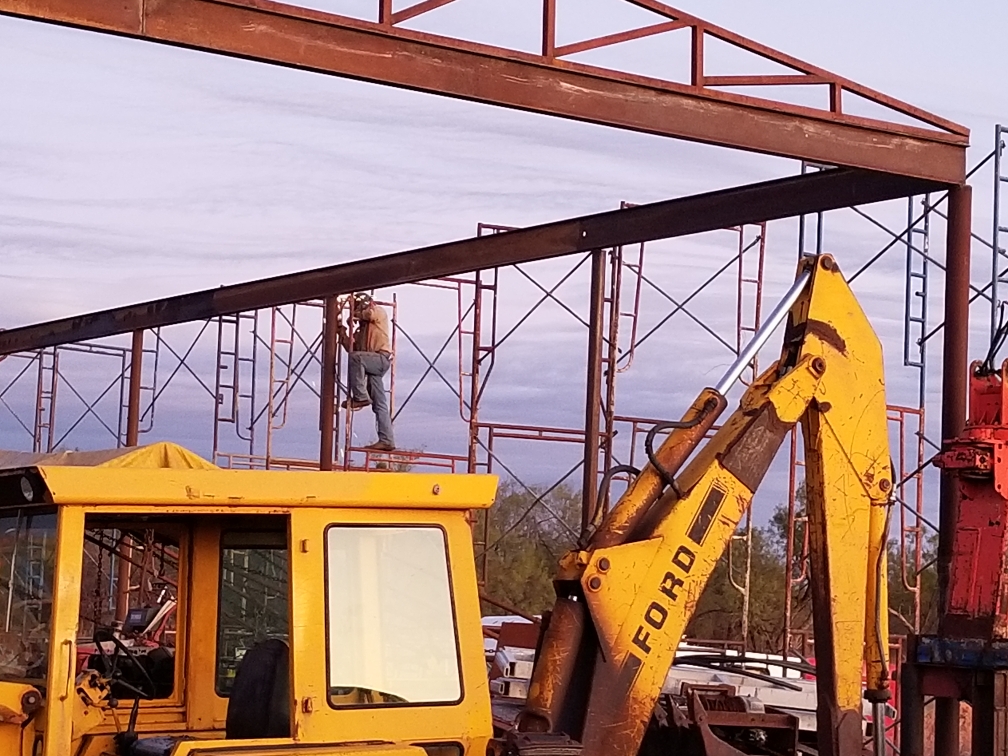
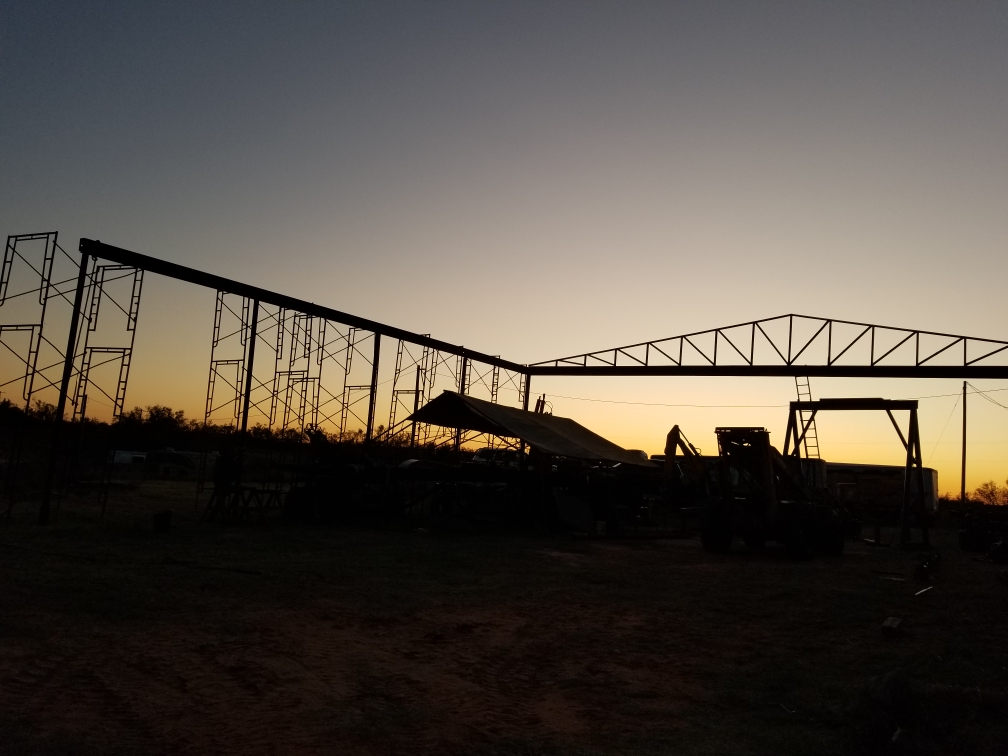
    So since life on a farm always has more things that need doing than can get done I finally decided that if I just get 1 column standing I will be able to say that I am starting on my shop. So today this happened
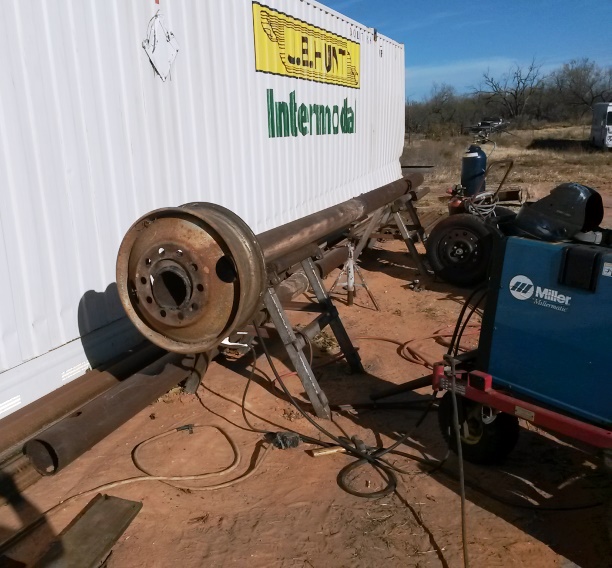
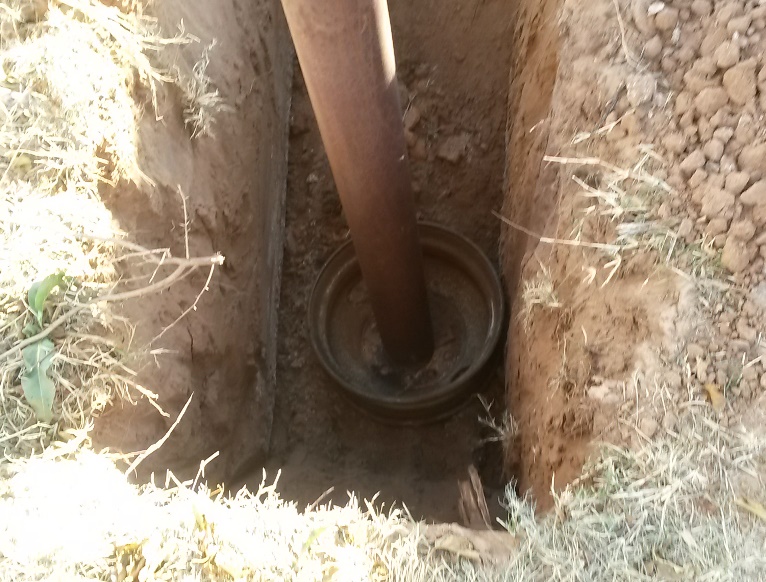
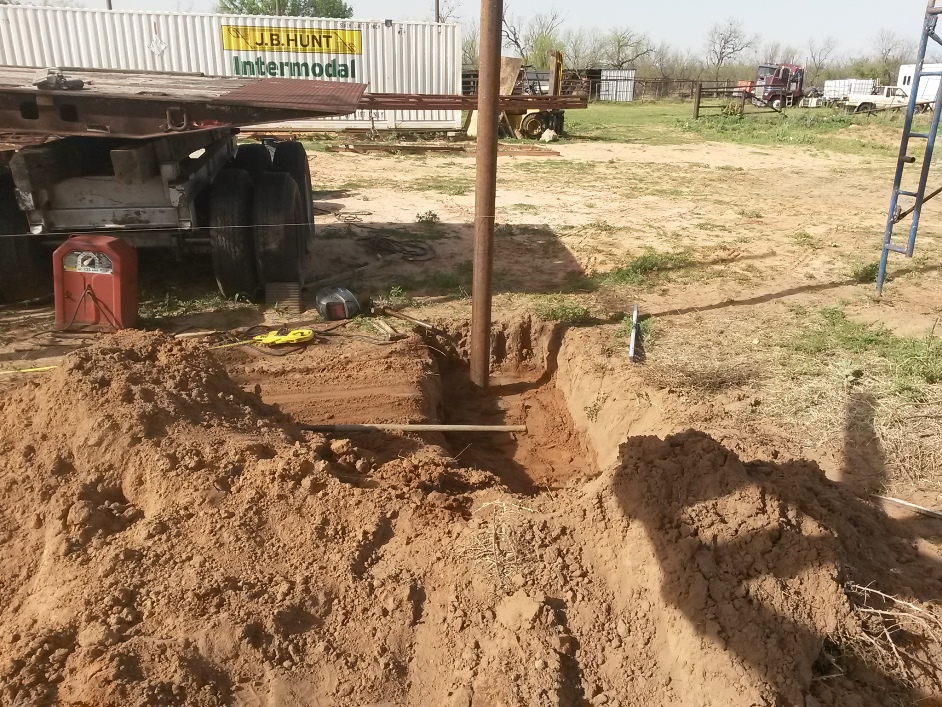
    Of course first I had to pull some stumps that had been nagging me for a long time then remove a tree from a fence and remove the fence but those were not going to stop me from my goal. I removed a tire from an old 24.5" truck rim then welded it to the bottom of a 7" sch 80 pipe. the pipe was not long enough to suit me since it was only 12 ft long I welded a 10 ft section to it then dug the hole with my backhoe . I went down 6 feet deep before I struck hard pan. now my column is not long enough again I wanted 18 ft walls. I added another 4 ft to the pipe. then hefted it into the ground with my backhoe
    Took the first step towards building my shop-20181129_145524.jpgaa.jpg

    Took the first step towards building my shop-20181129_160826.jpgaa.jpg
    I am not cementing these columns in the ground I prefer to have a large base on them then back fill with dirt & clay tossing in a bag of portland every few layers adding water and tamping
    Tomorrow I will try to get my whacker packer running It should run just fine since it only has about 30 minutes of run time since brand new. but I've had it for several years I hope I drained the gas out.
    Took the first step towards building my shop-20181129_160839.jpgaa.jpg

    Took the first step towards building my shop-20181129_165038.jpgaa.jpg
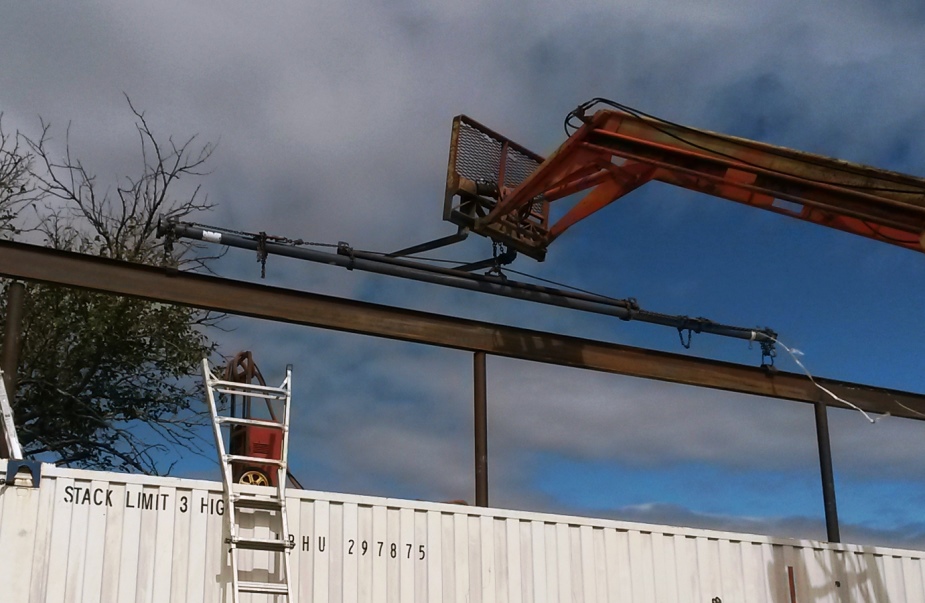
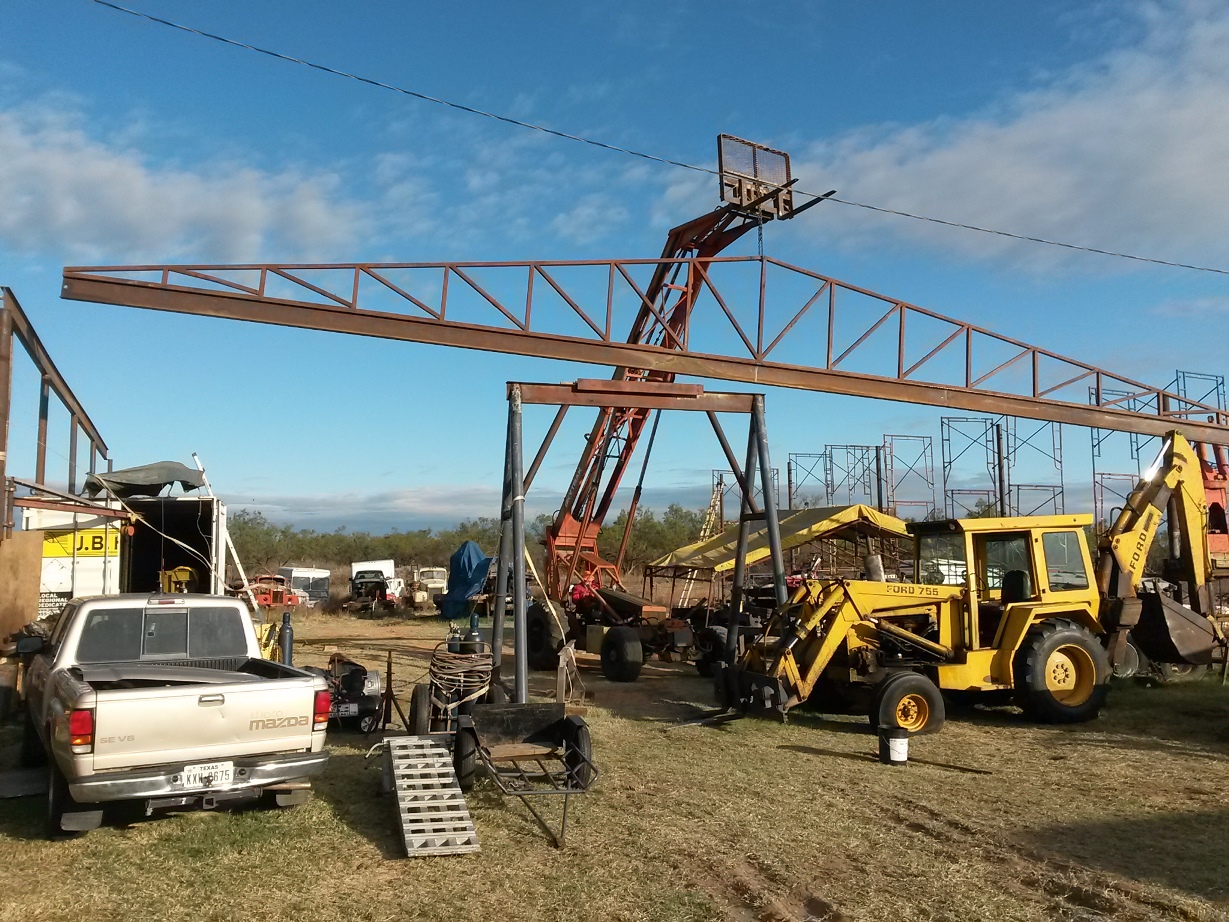
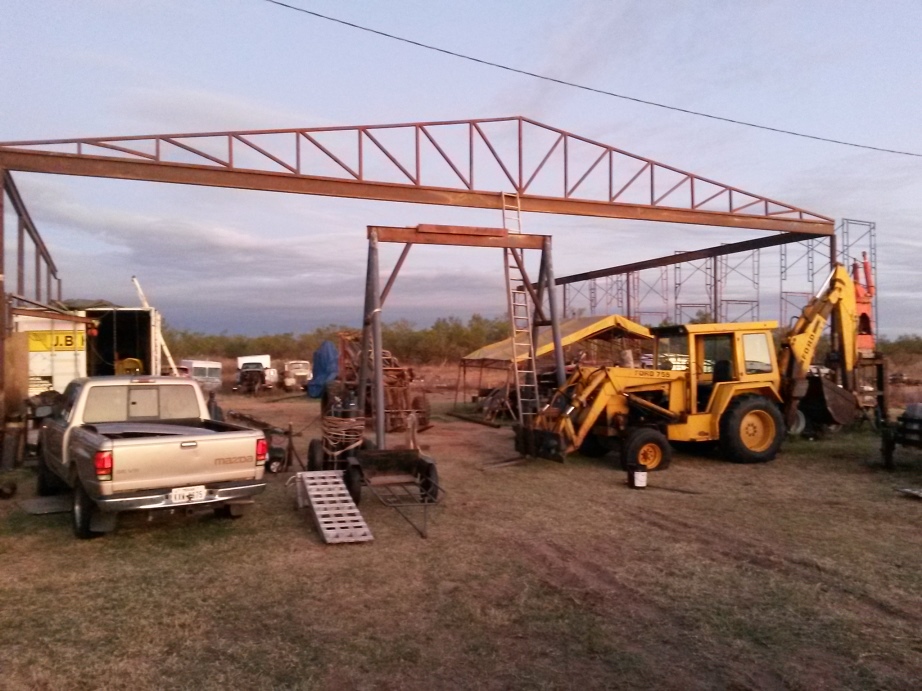
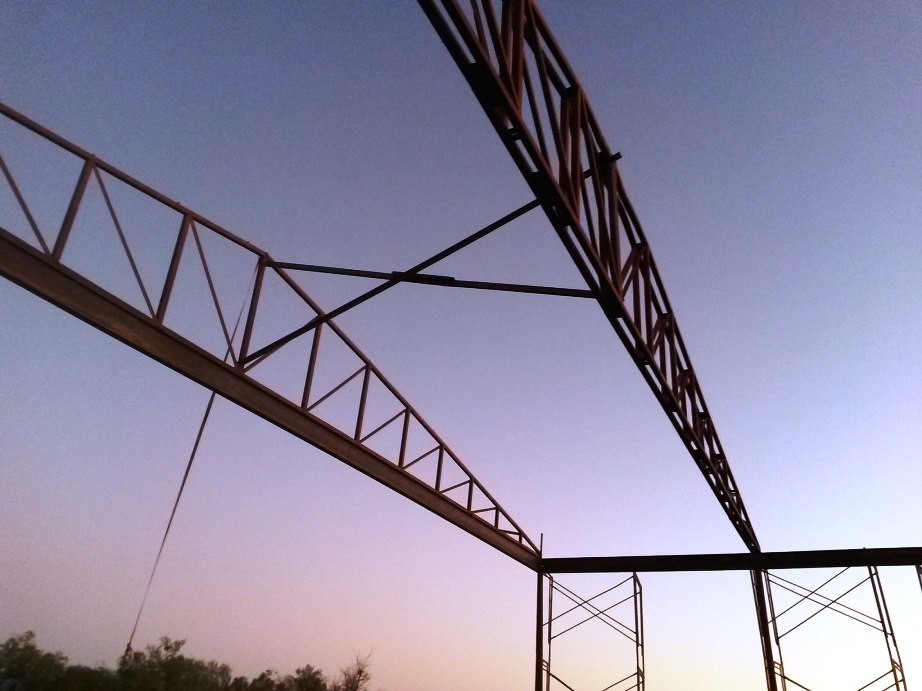
    Once I set up my scaffolding (I have enough to set up an 18 ft high run about 60 feet long so working from a ladder is never in my job description) I will fill each column with sand dirt gravel and used motor oil I have a concrete vibrator that I will strap to the columns to pack the dirt and oil inside of the columns.
    There are a couple reasons for my doing this 1 is it makes them infinitely stiffer 2 it prevents them from ever rusting out from the inside and 3 it deadens any sound transmittal should I decide to add things to them like a thick plate for hammering on or mounting a bench grinder on. also by being stiffer if I weld a pull ring to them they won't have a tendency to bow, they wouldn't anyway since so much else will be welded to them in the form of building materials and bracing.
    Never try to tell me it can't be done
    When I have to paint I use KBS products

  2. The Following 7 Users Say Thank You to Frank S For This Useful Post:

    Jon (Nov 29, 2018), NortonDommi (Jun 18, 2020), PJs (Nov 30, 2018), Scotsman Hosie (Mar 9, 2019), Scotty2 (Mar 8, 2019), Toolmaker51 (Nov 30, 2018), volodar (Nov 3, 2019)

  3. #2
    Jon
    Jon is online now Jon has agreed the Seller's Terms of Service
    Administrator
    Supporting Member
    Jon's Avatar
    Join Date
    Jan 2012
    Location
    Colorado, USA
    Posts
    28,440
    Thanks
    8,490
    Thanked 44,298 Times in 13,047 Posts
    This is gonna be a great build. I had not heard of the scaffolding trick.
    New: BuildThreads.com - 300+ build posts/day (with photos)

  4. #3
    Supporting Member Frank S's Avatar
    Join Date
    Aug 2015
    Location
    Peacock TX
    Posts
    12,613
    Thanks
    2,677
    Thanked 11,103 Times in 5,386 Posts

    Frank S's Tools
    Not really Kent; I cen get my crane hauled to me for nothing I just have to catch my bud coming this way to get some repairs on his truck or trailer or passing by otherwise empty on his way to pick up a load. I have a couple engines that would serve just fine with transmissions mounted just not sure about the pump mounting until I see the crane.
    However the skytrack idea is not a bad one, The guy I got the crane from also has a skytrack that I have used a couple times in the past I can get it to use for a lot less than just the transportation would cost me to rent one. The closest equipment rental to me that would have anything suitable to lift the trusses is over 80 miles away.
    Obviously we have the means to transport but it is not an on demand thing once I got the skytrack it could be 2 3 or 4 week before we could return it ourselves or have the rental company pick it up at $ 4.00 a mile round trip $2.50 a mile if they deliver and pick up that would work out to a 320 mile fee less a 25 mile discount or 100 miles total for the 2 trips, 220 miles at 2.50 or say $550.00 on top of the 1500.00 The only reason I know these figures is I had thought of renting a small dozer last summer
    The other thing about just knocking together something to use on them back hoe is I would not be under any time constraint. Since I have the quick connect on the backhoe I can drop the bucket and bake a short stinger of about 8 ft for it instead of having to build something for the loader end the stinger on the hoe would let it function more like a knuckle boom and I would have it for lifting the bridging girts and purlins then later the sheet metal
    But first I have to sort out my scaffolding to make sure I have all the bits to erect scaffolding along both sides of the building.or at least enough on opposite sides so I can set 2 trusses without having to move it first I think I still have enough to make an 18 ft tall scaffold to cover both sides completely but may have to make some small bits
    Never try to tell me it can't be done
    When I have to paint I use KBS products

  5. #4
    Supporting Member Frank S's Avatar
    Join Date
    Aug 2015
    Location
    Peacock TX
    Posts
    12,613
    Thanks
    2,677
    Thanked 11,103 Times in 5,386 Posts

    Frank S's Tools
    A little better progress today even thought eh wind was 20 to 30MPH most all day
    Took the first step towards building my shop-20191025_134117wer.jpg

    Took the first step towards building my shop-20191025_173501wer.jpg

    Took the first step towards building my shop-20191025_191049wer.jpg
    Never try to tell me it can't be done
    When I have to paint I use KBS products

  6. The Following User Says Thank You to Frank S For This Useful Post:

    KustomsbyKent (Oct 30, 2019)

  7. #5
    Supporting Member Frank S's Avatar
    Join Date
    Aug 2015
    Location
    Peacock TX
    Posts
    12,613
    Thanks
    2,677
    Thanked 11,103 Times in 5,386 Posts

    Frank S's Tools
    I am hoping to be able to devote at least a couple days a week to the project Yesterday I dug out my plate compactor and as usual or I should say normal for me when I used it last I didn't take the little extra effort to completely drain the fuel then pour in a little of the $25.00 a gallon chain saw fuel and run it for a few minutes on that stuff to preserve the carburetor I just fille it with fresh gas and tried to run it.
    Note the redimix 2cyl fuel has stabilizers and does not have the additives that pump gas has it will last a lot longer in storage not 2, 3 or 4 years but much longer than gasoline.
    Anyway the compactor did start and kind of ran as long as I kept it 3/4 choked but it would not rev to full RPM I ran it for a while packing the hole around the column. It settled the fill over a foot and a half. Then I finally managed to get the packer moved out of the way added more fill packed some more added fill and kept packing until the packer decided to quit running. About this time I decided to bite the bullet and drain the tank pull the carb and clean it then life gets in the way once more.
    But right now the column is as solid as a 100 year old OAK tree I just need to add another foot of fill then set up a section of scaffolding next to it and fill the inside. I'm already thinking that I may have wished that I would have made it taller in case I want to add a mezzanine floor later on but I'm never satisfied I probably wouldn't be satisfied if I had a shop with 50 ft tall side walls LOL
    Never try to tell me it can't be done
    When I have to paint I use KBS products

  8. #6
    Supporting Member Frank S's Avatar
    Join Date
    Aug 2015
    Location
    Peacock TX
    Posts
    12,613
    Thanks
    2,677
    Thanked 11,103 Times in 5,386 Posts

    Frank S's Tools
    Well I have finally set column #10 in the ground Time to set up the rest of the scaffolding come up with more scaffold boards Laser line the tops for trimming set some trusses at least 2 so I can add in some wind bracing then set the rest of the trusses and bridge them all together. Plus I need to go to my mine site and excavate another 100 yards of flex base select fill clay to level out the inside floor area then another 4 to 500 yards raise the outside grade on the south side some sloping slightly away from the building so I will be able to have a hard packed area at least 50 feet wide around the side and back of the building Trucks don't do well in the sandy loam unless it is right after a really hard rain.
    What I really need is to come up with a small tracked loader or tracked skid steer for a while. My old 755 backhoe is just too old too slow and too cumbersome at times when just moving material.
    Took the first step towards building my shop-20190407_155146c.jpg
    Took the first step towards building my shop-20190416_175426c.jpg
    Took the first step towards building my shop-20190417_172257ccc.jpg
    I have all 5 trusses completed the 3 center trusses are doubled for the possible later addition of a light weight bridge crane the West end truss will be stiffened by x bracing Tabernacle style to truss #2 and will have a I beams welded to the bottom of it for a tri fold rolling door set to allow access to the whole west end of the building depending on which way the doors are rolled, Haven't decided about the East end yet I may opt to only have a 30ft single rolling door or a pair of 15 foot doors to give a 30 ft opening. I may add an 8ft wide 53 ft long mezzanine attached to the top of the container then build a 12 by 40 ft office on top. Or just place my school bus on top and make my office out of it but still add the mezzanine.
    Never try to tell me it can't be done
    When I have to paint I use KBS products

  9. The Following 6 Users Say Thank You to Frank S For This Useful Post:

    emu roo (Mar 11, 2025), Jon (Apr 18, 2019), KustomsbyKent (Apr 18, 2019), Scotsman Hosie (Apr 19, 2019), Toolmaker51 (Apr 18, 2019), volodar (Nov 3, 2019)

  10. #7
    Supporting Member Frank S's Avatar
    Join Date
    Aug 2015
    Location
    Peacock TX
    Posts
    12,613
    Thanks
    2,677
    Thanked 11,103 Times in 5,386 Posts

    Frank S's Tools
    3 days of climbing scaffolding dozens of times, hanging off the rungs of the scaffolding while welding is just about to get old for this old man. However I can see the light in the tunnel growing nearer with each passing day I think it may the a search light on a UFO or a train but the shop is coming along.
    now have 4 of the 5 trusses in place and some temporary x bracing welded in place just encase things have to go into slow motion for a while I don't want the wind to wreck what I've already done.
    Took the first step towards building my shop-20191026_174427qaz.jpg

    Took the first step towards building my shop-20191026_190810qaz.jpg
    that's me playing monkey while welding
    Took the first step towards building my shop-v.jpg

    Took the first step towards building my shop-e.jpg
    Just after sundown yesterday
    Took the first step towards building my shop-z.jpg
    Never try to tell me it can't be done
    When I have to paint I use KBS products

  11. The Following 10 Users Say Thank You to Frank S For This Useful Post:

    baja (Oct 31, 2019), emu roo (Jul 16, 2025), KustomsbyKent (Oct 30, 2019), mwmkravchenko (Oct 31, 2019), Rikk (Oct 28, 2019), Scotsman Hosie (Nov 4, 2019), Scotty12 (Oct 30, 2019), Seedtick (Oct 30, 2019), Toolmaker51 (Nov 3, 2019), volodar (Nov 3, 2019)

  12. #8
    Supporting Member Toolmaker51's Avatar
    Join Date
    Feb 2016
    Location
    Midwest USA
    Posts
    5,355
    Thanks
    7,074
    Thanked 3,570 Times in 2,209 Posts

    Toolmaker51's Tools
    I have 15'6" walls...will lose 10" to trunk and branches of wireway directly above machines, 277v lighting conduits, and 110v receptacle conduit. Areas without big stuff below, can have small mezzanines for storage, reloading and a ''retreat'. Won't be ideal headroom unless joists are glue-lam, I-beam or stronger materials with less height than 2x10 lumber, and correspondingly thin built up flooring. Under the roof peak, above truss joists I'm saving the 13'odd height x 80' as an air rifle range...with target retrieval lines.
    I cannot reasonably expect acquiring more square feet. In my mind, added square feet are even more expensive than what you
    start out with, unless steps are taken first utilizing cubic space efficiently.
    Last edited by Toolmaker51; Dec 2, 2018 at 01:32 PM. Reason: offering sage considerations
    Sincerely,
    Toolmaker51
    ...we'll learn more by wandering than searching...

  13. #9
    Supporting Member Frank S's Avatar
    Join Date
    Aug 2015
    Location
    Peacock TX
    Posts
    12,613
    Thanks
    2,677
    Thanked 11,103 Times in 5,386 Posts

    Frank S's Tools
    In case anyone is wondering all columns have at a minimum a 24" diameter base welded to them and are from 6 to 8 feet in the ground the holes were dug to penetrate into the blue gray white hard layer below a red clay layer. Since I could not afford to put down concrete footers below each column this became the next best alternative and past experiences show this is often as good if not better than concrete with a few exceptions such as the columns having direct contact with the soil instead of being bolted or welded to a plate secured in the concrete. However these columns are not plain pipe they are oilfield grade tubing designed to be buried 1000's of feet into the earth to last for decades in all types of soil strata I have used the same grades of pipe in construction of both fresh and salt water piers they may eventually rot or rust through but not in my children's and possibly my grand children's life times.AT 64 and half years old if it lasts for 30 years I'll be happy.
    Never try to tell me it can't be done
    When I have to paint I use KBS products

  14. The Following 3 Users Say Thank You to Frank S For This Useful Post:

    baja (Apr 19, 2019), Scotsman Hosie (Apr 19, 2019), Toolmaker51 (Apr 18, 2019)

  15. #10
    Supporting Member Frank S's Avatar
    Join Date
    Aug 2015
    Location
    Peacock TX
    Posts
    12,613
    Thanks
    2,677
    Thanked 11,103 Times in 5,386 Posts

    Frank S's Tools
    To be honest I should start a thread called how not to build a shop building.
    A few things I have been thinking of doing to it as time goes along. First off I have a School buss that is just sitting in the woods collecting weeds around it. It has a good diesel engine I need to pull out to be installed in one of my "B" model macks that I want to turn into a pickup or a flat bed straight truck the buss though body wise is in great shape and would make for some really good mezzanine storage atop of the shipping container So what I will do is remove the body from the frame cut it off right at the windshield cut the skirt off the body so the bottom of the floor of the buss will sit flat on top of the container roof This will make a great storage area up out of the way of everything else.
    There is a good chance that I may do this to the 2 trusses on the West or Entry end of the shop a lot depends on how much excess materials I have laying around
    Took the first step towards building my shop-27652d01bb7f36458564bb73222558e1-oklahoma-bridges.jpg
    If I do then I can construct a 15 by 68 ft. office space between them and still maintain the clear span opening for a 3 top hung sliding door opening allowing me to have a 44 ft wide opening from either side or just open a 22 ft. wide single section
    this will also mean I will have a place to construct an elevator to lift materials to the mezzanine where the school buss will probably be placed and then on up to the office floor.
    But it will also mean that the building will wind up being 28 ft tall in front instead of the 24 ft height at the center of the trusses now
    But it will give me a lot more sq footage. Actually by the time the 45 ft machine shop van is attached to the South side and the 26 ft tool and bolt storage van attached outside of the East or the rear of the building I will have close to 6000 sq ft of useable floor space while still only having to pour a 4000 sq ft slab
    The plans are also to add a 38 by 40 ft lean to canopy on the south side to park my tractors and other equipment under
    Never try to tell me it can't be done
    When I have to paint I use KBS products

  16. The Following User Says Thank You to Frank S For This Useful Post:

    emu roo (Jul 16, 2025)

Thread Information

Users Browsing this Thread

There are currently 3 users browsing this thread. (0 members and 3 guests)

Bookmarks

Posting Permissions

  • You may not post new threads
  • You may not post replies
  • You may not post attachments
  • You may not edit your posts
  •