
 LinkBack URL
 About LinkBacks


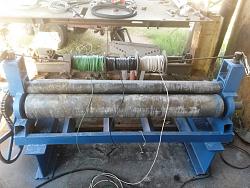
Since I'm waiting on my sheet steel to arrive to make the air tanks out of on my plate roll I discovered another use for it
I'm pulling some circuits in my 53 ft shipping container to run some of the equipment in there
the Plate roll was just sitting there so I grabbed a length of 3/8" rebar slid it through the holes for the top roll adjusting screws and hung 3 rolls of 10 ga wire on it


 Reply With Quote

Bookmarks