Free 186 More Best Homemade Tools eBook:  
Get 2,000+ tool plans, full site access, and more.

User Tag List

Page 30 of 32 FirstFirst ... 6 7 8 9 10 11 12 13 14 15 16 17 18 19 20 21 22 23 24 25 26 27 28 29 30 31 32 LastLast
Results 291 to 300 of 314

Thread: 1974 XS/TX650 rebuild

  1. #291
    Content Editor
    Supporting Member
    Altair's Avatar
    Join Date
    Aug 2013
    Posts
    11,930
    Thanks
    1,362
    Thanked 29,775 Times in 9,896 Posts

    Thanks th62! We've added your Motorcycle Engine TDC Finder to our Motorcycle category,
    as well as to your builder page: th62's Homemade Tools. Your receipt:


    186 More Best Homemade Tools eBook
    Last edited by Jon; Nov 1, 2023 at 01:07 PM.

  2. #292
    Supporting Member th62's Avatar
    Join Date
    Oct 2015
    Posts
    270
    Thanks
    0
    Thanked 503 Times in 168 Posts

    th62's Tools
    Coil bracket.
    When I converted to a single,points system I had to install a dual output coil. I opted for a Honda 750 coil and welded tabs on the frame on which to mount it.

    The coil lasted all of two weeks, so I ordered another the same and installed it. It's still ok, but I have heard this particular coil is known for a short life. With this in mind, I found another type, still for a Honda 750, and ordered one. When It turned up, I discovered it was about 20mm longer than the other, so, the tabs I welded on the frame were too close to allow fitment.

    So, I cut the rearmost tab off the frame, jumped on the mill and machined this bracket. The bracket clamps around the short frame tube under the main top tube and can be slid forward or backward to fit either coil.
    Attached Thumbnails Attached Thumbnails 1974 XS/TX650 rebuild-win_20231107_09_58_35_pro.jpg   1974 XS/TX650 rebuild-win_20231107_09_59_39_pro.jpg   1974 XS/TX650 rebuild-win_20231109_15_48_27_pro.jpg   1974 XS/TX650 rebuild-win_20231107_10_17_58_pro.jpg  

    2000 Tool Plans

  3. The Following 3 Users Say Thank You to th62 For This Useful Post:

    Frank S (Nov 9, 2023), olderdan (Nov 10, 2023), tonyfoale (Nov 9, 2023)

  4. #293
    Supporting Member th62's Avatar
    Join Date
    Oct 2015
    Posts
    270
    Thanks
    0
    Thanked 503 Times in 168 Posts

    th62's Tools
    When I converted to a single,points system I had to install a dual output coil. I opted for a Honda 750 coil and welded tabs on the frame on which to mount it.


    The coil lasted all of two weeks, so I ordered another the same and installed it. It's still ok, but I have heard this particular coil is known for a short life. With this in mind, I found another type, still for a Honda 750, and ordered one. When It turned up, I discovered it was about 20mm longer than the other, so, the tabs I welded on the frame were too close to allow fitment.


    So, I cut the rearmost tab off the frame, jumped on the mill and machined this bracket. The bracket clamps around the short frame tube under the main top tube and can be slid forward or backward to fit either coil.
    Attached Thumbnails Attached Thumbnails 1974 XS/TX650 rebuild-win_20231107_09_58_35_pro.jpg   1974 XS/TX650 rebuild-win_20231107_09_59_39_pro.jpg   1974 XS/TX650 rebuild-win_20231109_15_48_27_pro.jpg   1974 XS/TX650 rebuild-win_20231107_10_17_58_pro.jpg  

  5. The Following User Says Thank You to th62 For This Useful Post:

    olderdan (Nov 10, 2023)

  6. #294
    Supporting Member th62's Avatar
    Join Date
    Oct 2015
    Posts
    270
    Thanks
    0
    Thanked 503 Times in 168 Posts

    th62's Tools
    I've been ruminating on fitting the TX650.with a hydraulic clutch actuator for some time. Originally a plastic screw type actuator was fitted. The clutch action is a little heavy for my arthritic fingers and difficult to operate as my fingers are fused. At first I modified a spare screw actuator by lengthening the lever, it worked ok, but I'm not a fan of screw type actuators, so, I set about making a hydraulic actuator. I worked out I could fit a hydraulic slave to the inside of the side over with a max piston size of 25mm, requiring a master with a piston of around 10mm. That being the sticking point.

    I finally found a master cylinder that 'should' do the job: Its for a KTM and has a 9.5mm piston. Its on order and should be here in a a couple of weeks, along with a couple of banjo fittings. Fitting the slave behind the cover seemed the best idea, as it provided a good solid stop against the clutch spring pressure and would be unobtrusive.

    Unfortunately, I couldn't find a clutch master that matches the brake master of the right size, so I've decided to make a feature of having non matching masters. To that end, when the clutch master arrives, I'll polish the body, and then order a radial brake master and polish that, you can't get much different than these two masters.

    So, the last couple of days I've spent on the lathe and mill building a slave cylinder and modifying the side cover to fit it: Lots and lots of setting up to ensure the holes are in the right place and everything fits. Lots and lots of swearing and cursing as well.

    The piston is phosphor bronze, 25mm diameter and 28mm long, drilled 8mm to a depth of 20mm to take an 8mm ball and the 8mm push rod. Turning and milling the slave was a barrel of fun: I started with a small block of 50 mm 6061, faced it and bored it out to 25mm to a depth of 26mm, then enlarged the first 6mm to 33mm to take a hydraulic ram seal. The seal has a locating lip, so, I had to grind a tool to the ssame shape as the lip to turn a locating groove. And wouldn't you know it, in a moment of senility I turned the groove at the bottom of the 25mm bore, instead of the 33mm seal bore. Oh well, I fitted an O ring to the mistake groove and I'll tell anyone that doesn't know any better the O ring is to soften the rebound.

    After the bore was done, I turned the slave around, chucked it and turned down the other end to 29mm for 18mm, drilled and tapped to 10 x 1.25mm, then faced the end.
    I had to mill 3mm off the 50 mm diameter end so it would fit in the side cover. Once that was done, the side cover was mounted on the mill and the 26.5mm screw actuating hole was bored out to 29 mm to fit the slave cylinder. The slave was fitted and the two mounting holes marked on the slave, then the slave mounting holes drilled and tapped to 6mm x 1.00 to a depth of 10mm, a mm or two short of the ram seal bore . The slave mounting holes on the the front of the side cover were then milled for clearance to take the allen screw heads.

    The slave is mounted where the original screw actuator sat, so space was tight. It's a rather dirty environment behind the cover, so I may have to fit a cover over the seal end to keep it clear of dirt and grease. I'll also have to turn up two half circle Delrin spacers to fill the gap between the slave and the cover to make it look a little neater.

    Here's lots of pics of the build.
    Attached Thumbnails Attached Thumbnails 1974 XS/TX650 rebuild-1.jpg   1974 XS/TX650 rebuild-2.jpg   1974 XS/TX650 rebuild-3.jpg   1974 XS/TX650 rebuild-4.jpg   1974 XS/TX650 rebuild-5.jpg  

    1974 XS/TX650 rebuild-6.jpg   1974 XS/TX650 rebuild-7.jpg   1974 XS/TX650 rebuild-8.jpg   1974 XS/TX650 rebuild-9.jpg   1974 XS/TX650 rebuild-10.jpg  

    1974 XS/TX650 rebuild-11.jpg   1974 XS/TX650 rebuild-12.jpg   1974 XS/TX650 rebuild-13.jpg   1974 XS/TX650 rebuild-14.jpg   1974 XS/TX650 rebuild-15.jpg  

    Last edited by th62; Feb 11, 2024 at 08:46 PM.

  7. The Following User Says Thank You to th62 For This Useful Post:

    tonyfoale (Feb 12, 2024)

  8. #295
    Supporting Member tonyfoale's Avatar
    Join Date
    Nov 2016
    Location
    Spain
    Posts
    1,565
    Thanks
    689
    Thanked 2,646 Times in 709 Posts

    tonyfoale's Tools
    Very neat installation. Those Japanese screw clutch actuators are horrible, especially after a bit of wear from use. Hydraulic actuation wastes much less of your hand effort.
    I get those "moments of senility" quite often.

  9. #296
    Supporting Member
    Join Date
    Sep 2018
    Posts
    2,160
    Thanks
    10,165
    Thanked 1,148 Times in 619 Posts

    nova_robotics's Tools
    Quote Originally Posted by tonyfoale View Post
    Very neat installation. Those Japanese screw clutch actuators are horrible, especially after a bit of wear from use. Hydraulic actuation wastes much less of your hand effort.
    I get those "moments of senility" quite often.
    I had a YZ250 from the early 80s that had to be adjusted about every week. It was brutal. I got really good at removing and reinstalling the clutch cover.

  10. #297
    Supporting Member th62's Avatar
    Join Date
    Oct 2015
    Posts
    270
    Thanks
    0
    Thanked 503 Times in 168 Posts

    th62's Tools
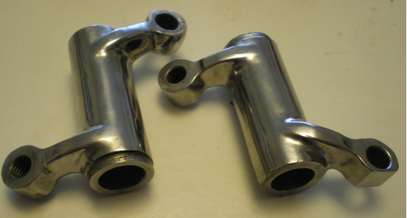
    Yesterday I made another twin lobe points cam. The original I made worked fine, but was slightly out, so I did a little more filing, too much ask it turned out, a few swipes with a file took it past the midway point on the backing plate adjustment.. I've made a few of these points cam, very difficult to get accurate, one swipe of the file can ruin a hole days work. But this one I got spot on for both cylinders. Today, I made a clamp to hold a bit of felt to lube the cam, very small exacting work. After all that I polished the cam and backing plate, just because something isn't seen doesn'mean it shouldn't be shiny. I once polished the rocker arms on a Bonny.
    Attached Thumbnails Attached Thumbnails 1974 XS/TX650 rebuild-win_20240223_16_19_38_pro.jpg   1974 XS/TX650 rebuild-win_20240223_16_30_38_pro.jpg   1974 XS/TX650 rebuild-win_20240223_15_28_28_scan.jpg   1974 XS/TX650 rebuild-win_20240223_15_28_09_scan.jpg  

  11. The Following User Says Thank You to th62 For This Useful Post:

    olderdan (Feb 24, 2024)

  12. #298
    Supporting Member olderdan's Avatar
    Join Date
    Jun 2016
    Posts
    782
    Thanks
    1,457
    Thanked 1,539 Times in 466 Posts

    olderdan's Tools
    I did the same polished rocker arms 1974 XS/TX650 rebuild-rockers.jpgon my T100SS just for the pleasure of knowing its in there looking good.

  13. The Following User Says Thank You to olderdan For This Useful Post:

    nova_robotics (Feb 24, 2024)

  14. #299
    Supporting Member hemmjo's Avatar
    Join Date
    Feb 2017
    Posts
    2,552
    Thanks
    226
    Thanked 1,449 Times in 822 Posts

    hemmjo's Tools
    Polishing internal parts is much more than just visual obsession. It has profound effect on performance. When done properly it also makes parts stronger. This may be counter intuitive, since material is removed during the process. However, by removing surface imperfections, you also remove places where fatigue cracks can begin to form.

    For reference, try to break a piece of glass, then scratch one just like it and notice how much easier it is to break. It also enhances oil flow. There is some research however to indicate that polished intake runners in carbureted engines can cause fuel to condense rather the stay atomized in the intake stream. I do not have enough information to say ya or nay on that..

    Many connecting rods and other parts in modern high performance and race engines are aluminum, or titanium, forged or CNC machined from a forged billet, then polished in Giant Finishing Machines. Back in the day, us poor unfunded hot rodders would polish stock rods and other parts by hand to make them stronger.

    We even polished entire engine blocks, cylinder head, rocker arm surfaces, etc to allow oil to flow more freely back into the oil pan. At high RPM it is possible to pump all of the oil out of the pan because it pumps out faster than it can drain back down.

    Giant Finishing, has a whole series of videos on youtube about vibratory finishing. If you are interested, put Giant Finishing Episodes in the YouTube search bar. Then click VIEW ALL EPISODES. This will show you the whole list.

    Two videos specifically related to this topic are;

    66 Giant Finishing - How To - Finish Connecting Rods - Part 1 and 67 Giant Finishing - How To - Finish Connecting Rods - Part 2

    There are many other videos of cylinder heads, crankshafts, valves, headers, etc.

    After a while they get a bit repetitive, but at least for the 66 and 67, be sure you have the sound turned on and watch at normal speed. I won't tell you why, you can be surprised. Being pleased or not, will depend on your age

  15. The Following User Says Thank You to hemmjo For This Useful Post:

    nova_robotics (Feb 25, 2024)

  16. #300
    Supporting Member Saltfever's Avatar
    Join Date
    Apr 2012
    Location
    NorCal
    Posts
    355
    Thanks
    390
    Thanked 126 Times in 86 Posts

    Saltfever's Tools
    It's not stronger (you are not changing the composition of the material) but you are increasing cyclic fatigue life.

Thread Information

Users Browsing this Thread

There are currently 1 users browsing this thread. (0 members and 1 guests)

Bookmarks

Posting Permissions

  • You may not post new threads
  • You may not post replies
  • You may not post attachments
  • You may not edit your posts
  •