 LinkBack URL
 About LinkBacks
To polish the washers turn an Allen head down then put the washer on with a nut and polish away...


To polish the washers turn an Allen head down then put the washer on with a nut and polish away...
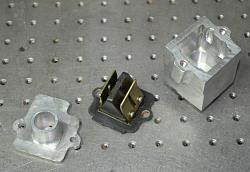
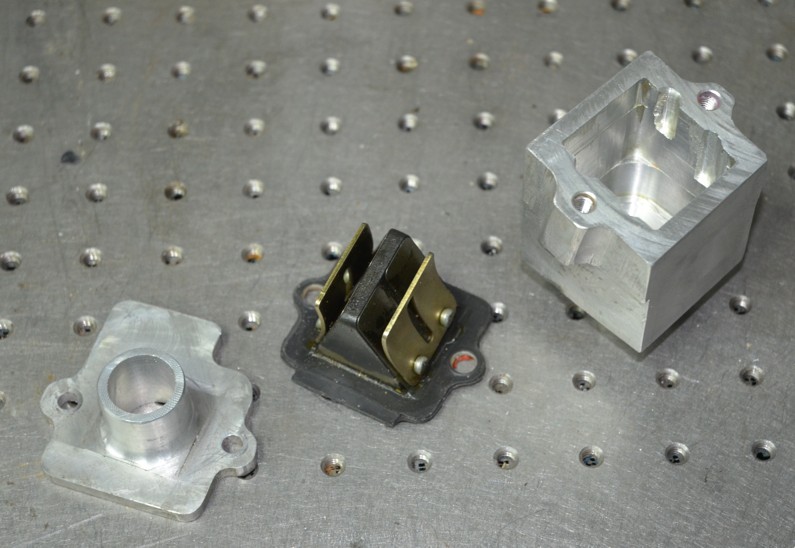
Reed valve engine breather.
I made this little gizmo yesterday, finished it off this morning with the bead blaster. I was going to polish it, but damn this gizmo looks good with a bead blasted finish.
Petal was taken from a pit bike read valve and cut in half, two holes drilled and screwed to the base plate. Base plate was tapped M3 10mm deep to take the petal. Not fun tapping this small, but, this time around the tap survived.
Main body was carved out with an endmill to give the petal room to move and air to flow. Base plate has a channel on the engine side for any oil to run down back into the rockers. Topside was channelled either side to get the Allen heads level with the top surface. Stainless Allen's were turned to make them shiny, I do like shiny baubles.
Outlet spigot is 16mm with a 10mm hole. If it's not big enough I can take it out to 12mm later on.
Air from the engine enters the main body from the reed valve is channelled upward, does a U turn and travels downward to the outlet spigot, losing a little oil on the way. Any oil trapped before the reed valve is channelled back to the rockers.
I'll have to design and build a catch can now, thinking of mounting it behind the downtube between the carbs. But, it's getting a little busy in that area.
Manual machining only, would love a CNC, but not in my budget, would've made things a lot easier
asterix (Oct 11, 2022), NeiljohnUK (Oct 12, 2022), nova_robotics (Oct 12, 2022), tonyfoale (Oct 11, 2022)


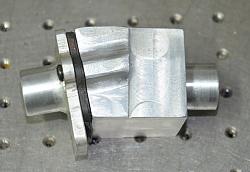
I am a fan of using reed valves in the engine breather line. Here are a couple of pix of the one that I use on my Aermacchi race bike.
asterix (Oct 11, 2022)
A while back I made two wiring harnesses, one for ignition, the other for lights. I wrapped both up in plastic insulation tape, not an easy job keeping the cables straight and in the same order for the harness length. I managed that reasonably well, but after wrapping the harnesses were s tiff as a board and twisted.
This morning some cloth insulation tape arrived, so I cut the old plastic stuff off and wrapped both harnesses in the cloth tape, boy what a difference. The harnesses are now quite straight, pliable and easier to thread through the frame. Big improvement. Good stuff this cloth insulation tape.
Tomorrow I'll solder on some more terminals for the rear end, shorten a couple of leads and hook everything up.
tonyfoale (Oct 25, 2022)

Nice and neatly done, loom work can be very satisfying, I know of a local company to me that makes looms for industrial vehicles, the loose non-glue back PVC tape they use allows movement, with glue backed tape stabilising the exit points. Cloth tape is more 'period' for many vehicles, my long ago sold Series 1 Landy had cloth wrapped looms from new.
I have had similar experiences. Then for a long time I used some plastic tape made for looms. It was a big improvement, although it could be difficult to use because you had to keep tension on it or it would not stay in place. For the last loom that I made I got some cloth tape. As you have found, that is the best.Originally Posted by th62

I've slowed right down now, I can only manage an hour or so in the workshop before the elbow complains. But, I haven't been totally idle: I stripped the clear coat off the forks and gave them another polish. Pulled the front wheel apart, polished the rim and hub and re laced it. I stuck the caliper together, hoping the pistons would seal, no such luck, so I'll have to,order some new pistons. Still haven't re painted the seat and covered it yet or bought tyres.
Most of my interest is making stuff, and mostly machining, but being as the bike is all but finished I didn't have anything more to make. So, I thought real hard about it and decided on some air cleaners, pods just don't do it for me. I turned up an aluminium base and a couple of knurled nuts, then beat up a rear plate and polished them. I was going to use the black, stainless mesh to hold the foam in place, but changed my mind, just don't like the look of it, so I'll look around for some perforated sheet and use that.
I was going to use a catch can for the engine breather, but being as I'll have pancake air filters I'll plumb the breather hose into the filters via a T joining piece.
I finally decided on a shrink fit for the base of the filter, so did a little experimenting with heating and freezing.: The carb bell mouth is tapered slightly by around .05mm,, so I chucked the carb body and trued up the bell so it measures 57.38mm, then stuck it in the freezer for a couple of days to see how much it would shrink - virtually nothing, .01 mm. Next I bored out the centre of the air cleaner base to 57mm and stuck it in the over at 250C, it expanded by .18mm. So, I chucked the base again and turned the hole to 57.20mm. So if I heat the base to 240c it'll expand to 57.38. That of course won't fit over the bell mouth, because it's not a clearance fit, so a little light pushing in the vice will be required. That should give a good tight fit and just to make sure it won't come off, I've tapped the side of the air cleaner base for a 5mm grub screw.
So, you'd probably think freezing the carb body is a waste of time as it doesn't shrink enough to make a difference, but there is a good reason to freeze the carb: Bringing the air cleaner base and carb together to press fit them can't be done quickly, so heat transfer will take place and the carb will heat up slowly, if I'm quick enough it should reach normal temperature sometime during the press fit and hopefully the air cleaner base won't cool down too quickly.
Tomorrow, I'll find out if my plan works, if so, all I have to do then is is make another air cleaner for the left carb.
Well, it's not quite that simple: A while back I made a fuel distributor block that bolts under the front lip of the battery carrier to neaten up the hoses joining carbs and taps, and also to get a level fuel flow in both carbs. Unfortunately, the distributor block hangs too low, so the filters interfere with the fuel lines, I've made the filters as small a diameter as I can, so another 'narower' fuel distributor block will route the fuel hoses around the filter.
There is a method to my madness, I've now got more stuff to machine up, Oh happy days!
asterix (Dec 17, 2022), Jon (Dec 19, 2022), tonyfoale (Dec 17, 2022), yumastepside (Dec 19, 2022)
Lookin good. Keep going...
Well, I finally got around to finishing off the right side filter, and damn it looks good. It gives a nice unobstructed air flows, much better than pods. My plan on heating and cooling didn't work too well, much to hard to handle all the bits and pieces and tooling trying to press them together, so, I ended up pressing together cold.
Same with the sizing, .020mm press fit was much too much, so after a few tries I got a good fit by decreasing it to about .04mm. And of course my day wouldn't be complete without misplacing parts, I lost the idle mixture screw spring, no idea where I'm going to get one of them from.
All I have to do now is make an identical one for the left carb from that great slab of aluminium I spent yesterday tracking down, and beat up a rear plate. But first I'll make another fuel distributor block to keep the hosing neat and simple.
If I can remember, I'll take lots of pics of the machining and fabrication process and bore you all to tears with them.

Nice job, looks much better.
There are currently 1 users browsing this thread. (0 members and 1 guests)
 Posting Permissions


 Reply With Quote

Bookmarks