Free 186 More Best Homemade Tools eBook:  
Get tool plans

User Tag List

Page 9 of 32 FirstFirst 1 2 3 4 5 6 7 8 9 10 11 12 13 14 15 16 17 18 19 20 21 22 23 24 25 26 27 28 29 30 31 32 LastLast
Results 81 to 90 of 316

Thread: 1974 XS/TX650 rebuild

  1. #81
    Supporting Member olderdan's Avatar
    Join Date
    Jun 2016
    Posts
    791
    Thanks
    1,462
    Thanked 1,580 Times in 469 Posts

    olderdan's Tools
    In my experience bullet connectors are unreliable so I use spades instead. Your solution is a good one as cables especially earths can be joined to one point. Your attention to detail has become obvious in your posts, its all looking very neat. I have found a complete modified rewire with only two colours can get confusing so I use temporary In-Sure or Wago connectors until it all checks out and then go round making permanent ones.

    186 More Best Homemade Tools eBook

  2. #82
    Supporting Member th62's Avatar
    Join Date
    Oct 2015
    Posts
    282
    Thanks
    0
    Thanked 511 Times in 171 Posts

    th62's Tools
    A couple of surface finishing ideas. The plastic guard under the seat of the TX650 was in terrible condition: badly scarred, and gouged, much like the rest of the bike. I was going to bin it and either make an ally one or buy a new one, but, being a bit tight with resurrection money, i did a little experimenting. First I hit the plastic guard with a polishing mop, that didn't work at all. Next I tried a nylon fibre wheel, even worse. Next I tried a scotch brite wheel, uh, uh as well. So , as a last resort I tried scrubbing it down with some fine sandpaper, got tired of that real quick, so put some fine paper on the random orbital sander and it didn't come up too bad. Then I had a brain wave, chucked it in the blasting cabinet and blasted it with glass beads. It came out in a matt finish, not shiny as per the original, but pretty darn good. A lot of the scratches and gouges are simply too deep, but once smoothed over with the sander and then blasted with glass beads it comes up pretty good, good enough to reuse as a hidden part anyway..

    Second finish is a random orbital sander on ally, this gives a really, really nice, even finish which can be clear lacquered afterward to retain the finish, Bead blasting and then hitting it with clear lacquer also gives a nice finish, but not as good as the random orbital sander. As well as a nice looking finish it also provides a good base for painting with clear lacquer. Although, it is only workable on flat surfaces, trying to get an even pattern on something like an engine side cover would be impossible. Perhaps bead blasting and paintinng with clear lacquer would look alright, but, I'm addicted to polished side covers so that's out for me. Anyway some pictures: first picture is of the plastic inner guard, don't have any before shots, but trust me, the guard was in disgusting condition. Second pic is of ally finished with a random orbital sander. So, if you'er like me and balk at spending a million bucks on resurrecting a 47 year old motorbike, give these two ideas a shot, you will be surprised.
    Attached Thumbnails Attached Thumbnails 1974 XS/TX650 rebuild-img20210302170841.jpg   1974 XS/TX650 rebuild-img20210227115400.jpg  

    2,000+ Tool Plans

  3. The Following 2 Users Say Thank You to th62 For This Useful Post:

    asterix (Mar 24, 2021), greenie (Mar 2, 2021)

  4. #83
    Supporting Member th62's Avatar
    Join Date
    Oct 2015
    Posts
    282
    Thanks
    0
    Thanked 511 Times in 171 Posts

    th62's Tools
    I rewire everything I build, so I'm very familiar with the circuitry and use as few coloured cables as possible, red for power, green or black for earth and aside from blinkers, one colour for everything else. this keeps it all looking neat and fault finding is simply a matter of using a multimeter. Of course, if you do it right, you should never have to delve into fault finding.

  5. #84
    Supporting Member th62's Avatar
    Join Date
    Oct 2015
    Posts
    282
    Thanks
    0
    Thanked 511 Times in 171 Posts

    th62's Tools
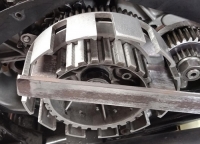
    If you don't have a clutch locking tool, or don't want to waste plates making one, here's an idea: a lump of 25mm x 6mm steel with two lugs welded on at the appropriate intervals to slot into the centre rotor grooves. It has to be off centre a little so the socket can get to the centre nut. It works well and doesn't mark the centre rotor. I also modified the pressure plate spring screws to take an allen head screw. Much better than those damn JIS screw heads which funnily enough are always stripped from someone using a philips head screwdriver on them. Yes, you can buy them, but why, when you can modify the existing ones in about 10 minutes.
    Attached Thumbnails Attached Thumbnails 1974 XS/TX650 rebuild-img20210307143344.jpg   1974 XS/TX650 rebuild-img20210307143401.jpg   1974 XS/TX650 rebuild-img20210307144048.jpg   1974 XS/TX650 rebuild-img20210307144052.jpg   1974 XS/TX650 rebuild-img20210307144704.jpg  


  6. The Following 6 Users Say Thank You to th62 For This Useful Post:

    asterix (Mar 9, 2021), freddo4 (Mar 10, 2021), Jon (Mar 8, 2021), katy (Mar 9, 2021), nova_robotics (Mar 9, 2021), tonyfoale (Mar 7, 2021)

  7. #85
    Supporting Member th62's Avatar
    Join Date
    Oct 2015
    Posts
    282
    Thanks
    0
    Thanked 511 Times in 171 Posts

    th62's Tools
    Here's a couple of sites documenting my work on bikes and other stuff. https://www.facebook.com/groups/1698761733787694 and, https://www.facebook.com/groups/952815685173434
    Last edited by th62; Mar 14, 2021 at 05:16 PM.

  8. The Following 2 Users Say Thank You to th62 For This Useful Post:

    asterix (Mar 24, 2021), greenie (Mar 14, 2021)

  9. #86
    Content Editor
    Supporting Member
    DIYer's Avatar
    Join Date
    Aug 2013
    Posts
    3,055
    Thanks
    785
    Thanked 1,869 Times in 1,667 Posts


    Thanks th62! We've added your Clutch Locking Tool to our Transmission category,
    as well as to your builder page: th62's Homemade Tools. Your receipt:


  10. #87
    Supporting Member th62's Avatar
    Join Date
    Oct 2015
    Posts
    282
    Thanks
    0
    Thanked 511 Times in 171 Posts

    th62's Tools
    You might recall the coil mounting bracket I made a little while ago. I mounted it on it’s side because there wasn’t room between the frame tubes to mount it right way up. This meant the two plug leads were a different length and took different paths from coil to plugs. I said I could live with that at the time, but, I couldn’t, it just hurt my neatness sensibilities too much. The problem was the two, long, mounting bolls either end of the coil, they were simply too long to fit between the frame tubes so I discarded them and made a new bracket that the coil ends bolt straight to, negating the need for the two long bolts. This of course required some fancy bending of the bracket to get the mounting holes in the centre of the backbone tube and at the right height. A certain amount of cutting and removing material was also required so the coil would sit flat and far enough away from the tab for mounting the flasher can. But, success, I managed to get everything right on the second go, so now the coil sits right way up and most importantly the plug leads are identical in length and take the same path to the plugs. You’ll notice the rear coil bolt is a mickey hair away from the backbone tube. I could have mounted the coil further forward, but that would render the tab in front useless for mounting a flasher can. Unfortunately, it doesn’t look quite as Smick as the side mounting bracket, but I can live with that – I think?
    Attached Thumbnails Attached Thumbnails 1974 XS/TX650 rebuild-1.jpg   1974 XS/TX650 rebuild-img20210321152504.jpg   1974 XS/TX650 rebuild-img20210321153843.jpg   1974 XS/TX650 rebuild-img20210321153847.jpg   1974 XS/TX650 rebuild-img20210321153902.jpg  


  11. The Following User Says Thank You to th62 For This Useful Post:

    asterix (Mar 24, 2021)

  12. #88
    Supporting Member th62's Avatar
    Join Date
    Oct 2015
    Posts
    282
    Thanks
    0
    Thanked 511 Times in 171 Posts

    th62's Tools
    Progressing slowly but running low on motivation I thinnk. Might attack the seat pan next I thinnk. When I welded up the seat pan I welded a squarish box on the nose to clear the tank mounting tab, I think this'll make upholstering it difficult, so I'll cut the box off and fabricate a gradual sweeping piece from the edge of the seat, over the tab and down the other side.
    Attached Thumbnails Attached Thumbnails 1974 XS/TX650 rebuild-img20210321160452.jpg   1974 XS/TX650 rebuild-img20210321160541.jpg   1974 XS/TX650 rebuild-img20210321160550.jpg  
    Last edited by th62; Mar 21, 2021 at 02:10 AM.

  13. #89
    Supporting Member tonyfoale's Avatar
    Join Date
    Nov 2016
    Location
    Spain
    Posts
    1,588
    Thanks
    706
    Thanked 2,680 Times in 718 Posts

    tonyfoale's Tools
    Quote Originally Posted by th62 View Post
    Progressing slowly but running low on motivation I thinnk.
    It cannot be easy to maintain motivation when you are not the one who will be riding it.

  14. #90
    Supporting Member th62's Avatar
    Join Date
    Oct 2015
    Posts
    282
    Thanks
    0
    Thanked 511 Times in 171 Posts

    th62's Tools
    Shockies came today, bike is starting to look like a bike now. Huge mistake though, I ordered the shockies in all black, should have bought the ones with chrome springs, damn! Here's a tip though, before you throw away your old shockies, take the rubber grommets out, they also fit the foot pegs. With a lot of fiddling that is.
    Attached Thumbnails Attached Thumbnails 1974 XS/TX650 rebuild-img20210324170425.jpg   1974 XS/TX650 rebuild-img20210324170547.jpg  

  15. The Following User Says Thank You to th62 For This Useful Post:

    Rikk (Mar 24, 2021)

Thread Information

Users Browsing this Thread

There are currently 1 users browsing this thread. (0 members and 1 guests)

Bookmarks

Posting Permissions

  • You may not post new threads
  • You may not post replies
  • You may not post attachments
  • You may not edit your posts
  •