Free 186 More Best Homemade Tools eBook:  
New: 300+ fresh build posts/day from 275 forums → BuildThreads.com

User Tag List

Page 19 of 32 FirstFirst 1 2 3 4 5 6 7 8 9 10 11 12 13 14 15 16 17 18 19 20 21 22 23 24 25 26 27 28 29 30 31 32 LastLast
Results 181 to 190 of 322

Thread: 1974 XS/TX650 rebuild

Hybrid View

  1. #1
    Supporting Member th62's Avatar
    Join Date
    Oct 2015
    Posts
    298
    Thanks
    0
    Thanked 556 Times in 185 Posts

    th62's Tools
    I have chronic RA so the clutch lever on the bike is too heavy to use comfortably, so I put the law of the lever to work.
    The clutch lever's distance from pivot point to nipple centre is 30mm, whereas the clutch actuator lever's distance from screw, or pivot point, to nipple centre is 35mm, so the law of the lever is already at work, but not enough for me.

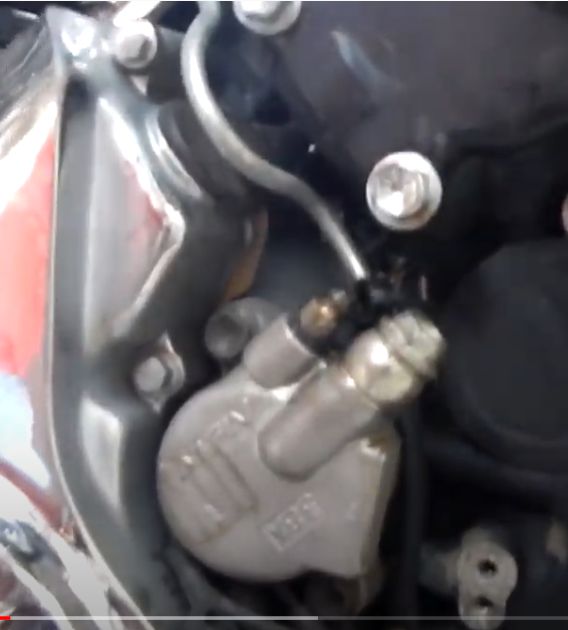
    I had an old clutch actuator lever that came in a box of parts with the bike. I removed the original lever, cleaned up the damaged screw and turned down the head of the screw to 13mm.

    After fashioning a rough lever I attached it to the screw, turned up a dust cover and welded everything together. As I wanted better leverage I drilled the pivot point for the nipple holder 10mm further out from the screw, 45mm.
    Attached everything and pulled the lever, much, much better. The actuator lever, due to the increased distance between screw and nipple holder pivot actually moves the pushrod less than the original, but still separates the plates enough for the clutch to do it's job.
    Attached Thumbnails Attached Thumbnails 1974 XS/TX650 rebuild-win_20220219_11_03_27_pro.jpg   1974 XS/TX650 rebuild-win_20220219_11_03_39_pro.jpg   1974 XS/TX650 rebuild-win_20220220_10_35_07_pro.jpg   1974 XS/TX650 rebuild-win_20220220_10_35_19_pro.jpg   1974 XS/TX650 rebuild-win_20220220_10_38_57_pro.jpg  

    1974 XS/TX650 rebuild-win_20220220_10_39_35_pro.jpg   1974 XS/TX650 rebuild-win_20220220_10_45_42_pro.jpg  
    Last edited by th62; Feb 20, 2022 at 02:54 PM.

  2. #2
    Supporting Member tonyfoale's Avatar
    Join Date
    Nov 2016
    Location
    Spain
    Posts
    1,819
    Thanks
    834
    Thanked 3,235 Times in 909 Posts

    tonyfoale's Tools
    Quote Originally Posted by th62 View Post
    I have chronic RA so the clutch lever on the bike is too heavy to use comfortably, so I put the law of the lever to work................ The actuator lever, due to the increased distance between screw and nipple holder pivot actually moves the pushrod less than the original, but still separates the plates enough for the clutch to do it's job.
    You might find benefit from converting to hydraulic operation. There is no friction in a cable to steal some of your applied force and there is less free-play to steal motion. Those Yamaha scroll actuators are far from the best system around when you want a low force solution.

  3. #3
    Supporting Member th62's Avatar
    Join Date
    Oct 2015
    Posts
    298
    Thanks
    0
    Thanked 556 Times in 185 Posts

    th62's Tools
    Already have parts on order.

  4. #4
    Supporting Member tonyfoale's Avatar
    Join Date
    Nov 2016
    Location
    Spain
    Posts
    1,819
    Thanks
    834
    Thanked 3,235 Times in 909 Posts

    tonyfoale's Tools
    Quote Originally Posted by th62 View Post
    Already have parts on order.
    It will be interesting to see how you fit the slave cylinder. The easy way might be on the outside of the cover, maybe with a bit of welding. The fun way might be if you can fit it inside the cover and hide it.

  5. #5
    Supporting Member th62's Avatar
    Join Date
    Oct 2015
    Posts
    298
    Thanks
    0
    Thanked 556 Times in 185 Posts

    th62's Tools
    There is one that bolts in the cable hole, that's the one I have coming from China. But the bore is probably too small compared to master cylinder bores, so probably will make it heavier.

  6. #6
    Supporting Member th62's Avatar
    Join Date
    Oct 2015
    Posts
    298
    Thanks
    0
    Thanked 556 Times in 185 Posts

    th62's Tools
    The coil on the TX went kaput, so I sent off for another CB 750 coil. It arrived yesterday so I went to install it only to find it didn't fit' the bracket I made a while back, the mounting holes on the new coil are 10mm closer together. Not much choice so I made another mounting bracket. Being as it's under the tank I anodised it instead of polishing it as I'd done with the original. Prior to anodising I rotary sanded it, then hit it with a scotchbrite wheel, then dumped it in the anodising bath. Unfortunately, anodising tends to greatly amplify any imperfections in the finish, whilst it looked great before anodising it came out showing the sanding scratches. Acceptable and not seen under the tank, but I wasn't happy with the finish, so rather than do it all again, I put it in the blasting cabinet and gave it a light blasting with glass beads. What a great finish this gave, still anodised so it won't oxidise, but boy, what a great finish. I still have to route the cables and harness neatly, that's why it looks a little untidy. I might also do the same with the top engine mounts.
    Attached Thumbnails Attached Thumbnails 1974 XS/TX650 rebuild-win_20220304_15_00_09_pro.jpg   1974 XS/TX650 rebuild-win_20220304_16_26_32_pro.jpg  

  7. The Following User Says Thank You to th62 For This Useful Post:

    asterix (Mar 4, 2022)

  8. #7
    Supporting Member th62's Avatar
    Join Date
    Oct 2015
    Posts
    298
    Thanks
    0
    Thanked 556 Times in 185 Posts

    th62's Tools

    Hydraulic clutch slave cylinder.

    I sent off for a hydraulic clutch slave cylinder and some hoses, they arrived today and I was pleasantly surprised. The slave cylinder mounts where the original cable was and pulls on the lever attached to the course thread screw. It was cheap and is pretty darn good quality, just not sure it will work that well as the bore is only around 12_14mm. Tomorrows job.

    Some hydraulic hoses also arrived, these were advertised as 'braided' but certainly there is no external braiding. They are quite small in diameter and appear to be made of some sort of plastic with braiding of some sort under the clearish outer surface. The smaller of the two came with three banjos: straight, 28 degrees and 90 degrees. Again, they appear to be quite good quality.

    The slave cylinder and hoses were only bought to play with, but if everything works ok, I may look at the hoses for brake lines. I'll be on the lathe again shortly to make a slave cylinder that pushes on the clutch actuating rod, not a fan of the course threaded screw actuator.
    Attached Thumbnails Attached Thumbnails 1974 XS/TX650 rebuild-win_20220304_16_25_19_pro.jpg   1974 XS/TX650 rebuild-win_20220304_16_25_42_pro.jpg   1974 XS/TX650 rebuild-win_20220304_16_25_57_pro.jpg  

  9. The Following User Says Thank You to th62 For This Useful Post:

    asterix (Mar 4, 2022)

  10. #8
    Supporting Member tonyfoale's Avatar
    Join Date
    Nov 2016
    Location
    Spain
    Posts
    1,819
    Thanks
    834
    Thanked 3,235 Times in 909 Posts

    tonyfoale's Tools
    What about the master cylinder?
    I have not seen a slave cylinder like the one that you have. 12/14 mm bore does seem small if it was direct acting but it looks like it retains the original Yamaha actuating scroll. I was expecting something like this

    1974 XS/TX650 rebuild-clutchslave.jpg

    That is why in a previous message I expressed an interest in how you would mount it.

  11. #9
    Supporting Member th62's Avatar
    Join Date
    Oct 2015
    Posts
    298
    Thanks
    0
    Thanked 556 Times in 185 Posts

    th62's Tools
    I doubt I'll be using this slave cylinder, it's just something to experiment with.

  12. #10
    Supporting Member th62's Avatar
    Join Date
    Oct 2015
    Posts
    298
    Thanks
    0
    Thanked 556 Times in 185 Posts

    th62's Tools
    I've designed and put together a couple of much simplified harness' one for lights, the other for ignition, minus stuff I don't require, neutral light and so on. But still the spaghetti bucket lived up to it's name. I dislike untidy with a vengeance so made a bracket that sits inside the spaghetti bucket to try and keep things neat and make it easier to find and connect the wires.

    Two grommets sit in the middle for routing earth wires through to earth connections and a couple of linked, Delrin, insulated terminal bridges sit either side of them for power connections. Mostly connected up, but still have to connect the headlight cables and speedo light cables, not sure about adding idiot lights, more procrastination needed there me thinks! The cables emanating from the switchgear are very, very light gauge, not sure if they'll handle the current, even though all lights are LEDs, so I may have to either solder in heavier gauge cables or change the switchgear.
    Attached Thumbnails Attached Thumbnails 1974 XS/TX650 rebuild-win_20220319_14_32_46_pro.jpg   1974 XS/TX650 rebuild-win_20220319_14_40_29_pro.jpg   1974 XS/TX650 rebuild-win_20220319_16_24_00_pro.jpg  

  13. The Following 2 Users Say Thank You to th62 For This Useful Post:

    asterix (Mar 19, 2022), tonyfoale (Mar 19, 2022)

Thread Information

Users Browsing this Thread

There are currently 5 users browsing this thread. (0 members and 5 guests)

Bookmarks

Posting Permissions

  • You may not post new threads
  • You may not post replies
  • You may not post attachments
  • You may not edit your posts
  •